To avoid these ads, REGISTER NOW!

my Florida dream garage project

LutzTD

Well-known member
Joined
Dec 31, 2011
Messages
3,673
Location
Lutz, Florida
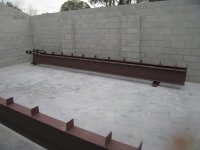
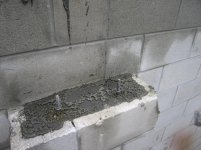
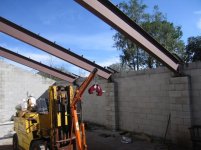
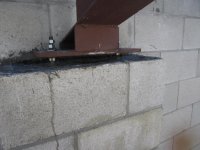
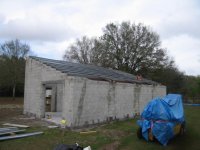
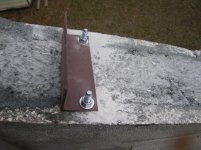
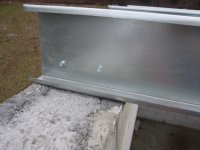
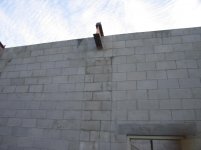
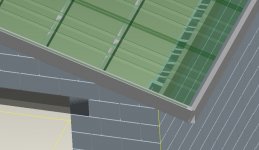
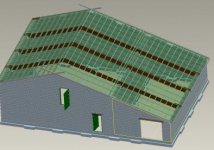
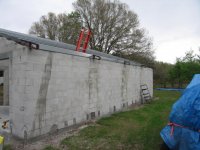
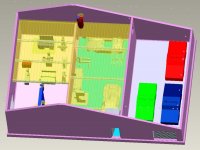
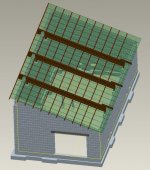
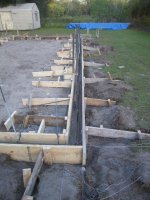
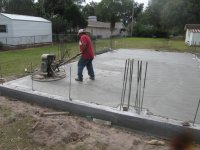
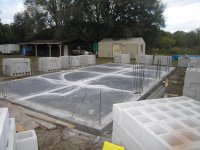
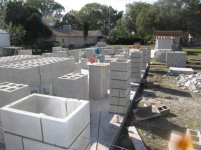
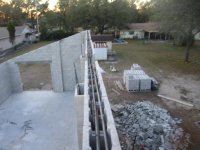
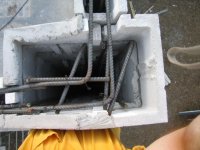
I am embarking on my dream workshop. I did a lot of planning and saving. I wish I would have seen this website before, Im happy with my design, but I am getting a lot of ideas on finishing the garage here and I hope to get a lot of help on these ideas as I move forward. I had several layouts but ended up with a 3 bay 40X60. the plan is to build this in phases so its not a huge hit. I built it with the provision of putting solar cells on the south exposure (40x40). I planned for a dirty bay on the left, a work bay in the middle and a clean storage bay on the right. The right bay is phase 1, then the middle and left will follow. Since I am in Florida the wind load is designed for 130MPH which made a few changes to my initial plan. Here are screen shots of the design plan.
 

Attachments

  • proposed building1.jpg
    proposed building1.jpg
    71.9 KB · Views: 4,744
  • proposed building front.jpg
    proposed building front.jpg
    32.3 KB · Views: 3,455
  • proposed building top.jpg
    proposed building top.jpg
    85.1 KB · Views: 3,766
To avoid these ads, REGISTER NOW!
OP
L

LutzTD

Well-known member
Joined
Dec 31, 2011
Messages
3,673
Location
Lutz, Florida
heres the phase one section with more detail after the wind loads were mitigated
 

Attachments

  • proposed building phase1.jpg
    proposed building phase1.jpg
    78.8 KB · Views: 1,530
Last edited:
OP
L

LutzTD

Well-known member
Joined
Dec 31, 2011
Messages
3,673
Location
Lutz, Florida
heres the beginnings of the phase 1 portion. in this view the block is pretty much done and waiting for the grout, then I need to place the beams and fill in the holes with block. these picture were taken 2 days ago.
 

Attachments

  • IMG_4238.jpg
    IMG_4238.jpg
    144.8 KB · Views: 2,409
  • IMG_4239.jpg
    IMG_4239.jpg
    138.2 KB · Views: 2,330
OP
L

LutzTD

Well-known member
Joined
Dec 31, 2011
Messages
3,673
Location
Lutz, Florida
here are some befores. I documented the whole phase one build and took vacation so I could learn. I hope to do a lot of phase 2 stuff myself.
 

Attachments

  • 2011-11-09_16-51-02_776.jpg
    2011-11-09_16-51-02_776.jpg
    148.7 KB · Views: 1,719
  • 2011-11-15_16-13-20_850.jpg
    2011-11-15_16-13-20_850.jpg
    153 KB · Views: 1,677
  • IMG_3992.jpg
    IMG_3992.jpg
    148.7 KB · Views: 1,684
  • IMG_4007.jpg
    IMG_4007.jpg
    147.3 KB · Views: 1,617
  • IMG_4014.jpg
    IMG_4014.jpg
    146.9 KB · Views: 1,878
Last edited:
OP
L

LutzTD

Well-known member
Joined
Dec 31, 2011
Messages
3,673
Location
Lutz, Florida
some more pics
 

Attachments

  • IMG_4045.jpg
    IMG_4045.jpg
    149 KB · Views: 1,541
  • IMG_4049.jpg
    IMG_4049.jpg
    148.8 KB · Views: 1,494
  • IMG_4108.jpg
    IMG_4108.jpg
    146.4 KB · Views: 1,748
  • IMG_4131.jpg
    IMG_4131.jpg
    143 KB · Views: 1,820
  • IMG_4169.jpg
    IMG_4169.jpg
    147.2 KB · Views: 1,909

jpoe

Well-known member
Joined
Nov 19, 2009
Messages
196
Location
OR
I like it and I think you will like the compartmentalization also. I plan to do the same as I expand my shop. Looking forwards to seeing your progress.
 
OP
L

LutzTD

Well-known member
Joined
Dec 31, 2011
Messages
3,673
Location
Lutz, Florida
and some more pics
 

Attachments

  • IMG_4190.jpg
    IMG_4190.jpg
    147.5 KB · Views: 1,597
  • IMG_4204.jpg
    IMG_4204.jpg
    146.6 KB · Views: 1,458
  • IMG_4223.jpg
    IMG_4223.jpg
    147.3 KB · Views: 1,480
  • IMG_4232.jpg
    IMG_4232.jpg
    144.5 KB · Views: 1,856

theoldwizard1

Well-known member
Joined
Feb 22, 2011
Messages
43,072
Location
SE MI
Since I am in Florida the wind load is designed for 130MPH which made a few changes to my initial plan.
For those of us who don't live in areas where hurricanes or tornadoes are likely, Please take some pics of things that are required in your building to withstand 130MPH wind ! :scared:
 
OP
L

LutzTD

Well-known member
Joined
Dec 31, 2011
Messages
3,673
Location
Lutz, Florida
For those of us who don't live in areas where hurricanes or tornadoes are likely, Please take some pics of things that are required in your building to withstand 130MPH wind ! :scared:

in the pictures above you will see the 10 columns. these are 24x16 with 8 #5 rebar and filled solid with cement.
 

widesheds

Member
Joined
Nov 14, 2011
Messages
22
It seems to be a very good garage in the making and I must complement you for taking care of every aspect and doing the needful. Getting the snaps during the construction just makes it a beautiful experience for you as well as provide a very good insight to the others as well. It will be interesting to see how it shapes up in the end.
 
OP
L

LutzTD

Well-known member
Joined
Dec 31, 2011
Messages
3,673
Location
Lutz, Florida
more pics of the steel install, hopefully they are going to grout today
 

Attachments

  • IMG_4253.jpg
    IMG_4253.jpg
    145.1 KB · Views: 1,477
  • IMG_4271.jpg
    IMG_4271.jpg
    135.3 KB · Views: 1,644
  • IMG_4282.jpg
    IMG_4282.jpg
    132.8 KB · Views: 1,598
  • IMG_4281.jpg
    IMG_4281.jpg
    135.1 KB · Views: 1,740
  • IMG_4283.jpg
    IMG_4283.jpg
    138.1 KB · Views: 1,801

Wingnut65

Well-known member
Joined
Apr 21, 2010
Messages
3,170
Location
Tampa Bay, FL
Welcome to GJ, Neighbor! Glad to know there are other members nearby if/when I need a hand, or that can lend a hand when needed... I'm near TPC.

Nice work. The plans that you have looks like it will be a nice place. Glad phase 1 is big enough to really get you started before you realize you don't have enough space. :lol:.

Subscribed!
 

Wingnut65

Well-known member
Joined
Apr 21, 2010
Messages
3,170
Location
Tampa Bay, FL
I just had a chance to go back over the pictures. You do know that just mentioning the names 'Mustang' and 'Corvette' really need to have a follow-up with years, stats, and pix of each...

Just curious, what are those 8 filled cells to the left of the door? A 64" masonry column is going to be very substantial.
 

Nighttrain

Well-known member
Joined
Aug 6, 2009
Messages
2,682
Location
Dripping Springs, Tx
If you ask Wingnut for help he will just send his wife and daughter over to do the work. Seems like they do most of his garage work for him .:lol_hitti sorry wing nut just had to throw that in there. I wish my wife and daughter would do my floor for me. :beer:


I like how you are building in sections. I see a lot of guys settling for a smaller shop which they can afford at the time, without thinking about future expansion at a later date.
 

bobadame

Well-known member
Joined
Dec 26, 2007
Messages
1,124
Nice shop you're building there in Florida. What is your plan for the English wheel? Whatchagonna make with it?
It looks like you have your compressor up stairs. I did something similar. I put mine up on the mezzanine. Turned out to not be a good idea. It's like mounting a big ******** to a drum head.
 
OP
L

LutzTD

Well-known member
Joined
Dec 31, 2011
Messages
3,673
Location
Lutz, Florida
mustang 1970 428CJ 42K original miles
corvette 1962 with 1999 suspension and drive train on a custom tube chassis (in progress)

eventually I plan to make aluminum bodied cobras

compressor will likely go outside in a small block leanto, its just parked upstairs to store the model.

likely to the left after its all done will be an outside shop where I will have a full height lift. Im thinking the one inside is going to be a maxjax so I can move it from bay to bay as needed

here are some pictures of the beams, I was working all morning getting them into the garage.
 

Attachments

  • IMG_4291.jpg
    IMG_4291.jpg
    132.6 KB · Views: 2,229
  • mustang.jpg
    mustang.jpg
    153 KB · Views: 2,188
  • 62_body_install.jpg
    62_body_install.jpg
    30.6 KB · Views: 3,304

emeraldcoupe

Well-known member
Joined
Jan 4, 2010
Messages
3,425
Location
spring hill, florida
mustang 1970 428CJ 42K original miles
corvette 1962 with 1999 suspension and drive train on a custom tube chassis (in progress)

eventually I plan to make aluminum bodied cobras

compressor will likely go outside in a small block leanto, its just parked upstairs to store the model.

likely to the left after its all done will be an outside shop where I will have a full height lift. Im thinking the one inside is going to be a maxjax so I can move it from bay to bay as needed

here are some pictures of the beams, I was working all morning getting them into the garage.

damn nice cars! i'm building a '66 mustang right now.
 
To avoid these ads, REGISTER NOW!

Carl B

Well-known member
Joined
Feb 3, 2006
Messages
525
Location
Clearwater, Florida USA
Hi LutzTD:
Great looking project and it should give you lots of room to work/play. A friend of mine has a 40x60 foot Steel Framed building behind his house in Lutz.

I'm surprised that the Building Code did not require you to put another exit at the rear of that area. {fire code}.

If you didn't already put the rebar in - to tie the existing foundation into the planed extensions/additions - - you will wind up drilling very long deep holes in the existing foundation, into which you will have to insert and epoxy connecting rebar. Yes/No ??

Do you own a concrete and or concrete block company? Just wondered why you went all block construction today... That would be a VERY expensive space if built here in Clearwater today. I'm seeing a lot of poured concrete walls using the foam form blocks around here....

Good luck with the project...

FWIW,
Carl B.
Clearwater
 
OP
L

LutzTD

Well-known member
Joined
Dec 31, 2011
Messages
3,673
Location
Lutz, Florida
Hi LutzTD:
Great looking project and it should give you lots of room to work/play. A friend of mine has a 40x60 foot Steel Framed building behind his house in Lutz.

I'm surprised that the Building Code did not require you to put another exit at the rear of that area. {fire code}.

If you didn't already put the rebar in - to tie the existing foundation into the planed extensions/additions - - you will wind up drilling very long deep holes in the existing foundation, into which you will have to insert and epoxy connecting rebar. Yes/No ??

Do you own a concrete and or concrete block company? Just wondered why you went all block construction today... That would be a VERY expensive space if built here in Clearwater today. I'm seeing a lot of poured concrete walls using the foam form blocks around here....

Good luck with the project...

FWIW,
Carl B.
Clearwater


we missed the additional rebar, I will be drilling and epoxying :( Did get wall ties in the rear column but forgot them in the front. I marked and took pictures f all the steel in the foundation walls so I will know where to drill later

I looked everywhere local for the styrofoam solid fill blocks, but the price I was seeing with those did not seem to be a big savings and then the secondary finishing seemed to me was less robust and more expensive.

The room has 2 exits, maybe they decided they were far enough apart. when I do the second floor I am going to cut in a 1/2 door in the back to the second floor to serve as an escape from the second floor or from this first bay.You can see it if you look close in the first post picture. The architect missed it and I forgot to ask the contractor until it was too late.
 
Last edited:
OP
L

LutzTD

Well-known member
Joined
Dec 31, 2011
Messages
3,673
Location
Lutz, Florida
we missed the additional rebar, I will be drilling and epoxying :( Did get wall ties in the rear column but forgot them in the front. I marked and took pictures f all the steel in the foundation walls so I will know where to drill later

I looked everywhere local for the styrofoam solid fill blocks, but the price I was seeing with those did not seem to be a big savings and then the secondary finishing seemed to me was less robust and more expensive.

The room has 2 exits, maybe they decided they were far enough apart. when I do the second floor I am going to cut in a 1/2 door in the back to the second floor to serve as an escape from the second floor or from this first bay.You can see it if you look close in the first post picture. The architect missed it and I forgot to ask the contractor until it was too late.

I went back to the builder and asked to have the third exit added per my original design. thanx for reinforcing the fire exit idea, I will be more comfortable also with a rear exit. I will post pics when they get it cut in. this and some anxiety about locating the red iron bolts has held up the grout pour. we decided to hang the beams and mark. here you can see my custom engine hoist and the beam hung in place.
 

Attachments

  • IMG_4299.jpg
    IMG_4299.jpg
    137.9 KB · Views: 1,472
  • IMG_4292.jpg
    IMG_4292.jpg
    137.5 KB · Views: 1,231
OP
L

LutzTD

Well-known member
Joined
Dec 31, 2011
Messages
3,673
Location
Lutz, Florida
heres the latest. the contractor cut in my rear escape door. we also mounted the beams over the weekend. and a little floor cleanup
 

Attachments

  • IMG_4314.jpg
    IMG_4314.jpg
    147.8 KB · Views: 1,288
  • IMG_4336.jpg
    IMG_4336.jpg
    145.4 KB · Views: 1,321
  • IMG_4338.jpg
    IMG_4338.jpg
    145.9 KB · Views: 1,277
  • IMG_4348.jpg
    IMG_4348.jpg
    139.1 KB · Views: 1,388
  • IMG_4349.jpg
    IMG_4349.jpg
    143.6 KB · Views: 1,400
  • IMG_4354.jpg
    IMG_4354.jpg
    128.1 KB · Views: 1,218
  • IMG_4351.jpg
    IMG_4351.jpg
    143.9 KB · Views: 1,429

Wingnut65

Well-known member
Joined
Apr 21, 2010
Messages
3,170
Location
Tampa Bay, FL
Progress looks great! Those beams should last a while. BTW, that is some creative engineering for the lift to fly the beams. It should be a breeze to handle a small block! :thumbup:
 
OP
L

LutzTD

Well-known member
Joined
Dec 31, 2011
Messages
3,673
Location
Lutz, Florida
grouted in the beams last week and set all the purlins this weeked
 

Attachments

  • IMG_4374.jpg
    IMG_4374.jpg
    145.9 KB · Views: 1,199
  • IMG_4373.jpg
    IMG_4373.jpg
    142 KB · Views: 1,344
  • IMG_4370.jpg
    IMG_4370.jpg
    143.9 KB · Views: 1,113
  • IMG_4372.jpg
    IMG_4372.jpg
    143.1 KB · Views: 1,125
  • IMG_4371.jpg
    IMG_4371.jpg
    137 KB · Views: 1,104
OP
L

LutzTD

Well-known member
Joined
Dec 31, 2011
Messages
3,673
Location
Lutz, Florida
call me mister over kill, but I was not happy with the corner support on the roof. the design called for the end channel angled down from peak to support the long end channel on the right side of the building roof over hang. I didnt like this. here are some picures of the before and after in CAD
 

Attachments

  • cadd view roof3.jpg
    cadd view roof3.jpg
    113.5 KB · Views: 967
  • cadd view roof2.jpg
    cadd view roof2.jpg
    97.2 KB · Views: 859
  • cadd view roof1.jpg
    cadd view roof1.jpg
    19.6 KB · Views: 438
OP
L

LutzTD

Well-known member
Joined
Dec 31, 2011
Messages
3,673
Location
Lutz, Florida
I spent today fabbing the new overhang trusses, hopefully the rain will hold off tomorrow and I can get these mounted and buttom up the fascias
 

Attachments

  • IMG_4387.jpg
    IMG_4387.jpg
    152.1 KB · Views: 897
  • IMG_4388.jpg
    IMG_4388.jpg
    152.7 KB · Views: 801
  • IMG_4389.jpg
    IMG_4389.jpg
    155.3 KB · Views: 779

Wingnut65

Well-known member
Joined
Apr 21, 2010
Messages
3,170
Location
Tampa Bay, FL
That ought to do it. I hadn't noticed that in the purllin shot above that there was nothing on the corner. Those will work. And Weather Channel says the rain should be staying north of us today.

So you are a master welder! Those really do look great! :thumbup:
 

shopnut

Well-known member
Joined
Feb 22, 2006
Messages
4,237
Location
Florida
Its hard to beat block construction for buildings in FL. I already had an encounter with termites feasting on the Asylum right after the initial 5 year ground treatment expired. I guess they were just waiting with their knives/forks and bibs tucked in. :)

Looks like a great finished plan. How long do you expect it to be between phases?

Keep up the good work. Maybe some of the FL GJ'ers will stop in to check it out sometime.
 
OP
L

LutzTD

Well-known member
Joined
Dec 31, 2011
Messages
3,673
Location
Lutz, Florida
I managed to get the end overhang trusses mounted and 3 of 4 filler panels in before the rain started. looks like next weekend to finish fascias.
 

Attachments

  • IMG_4390.jpg
    IMG_4390.jpg
    138.3 KB · Views: 927
  • IMG_4391.jpg
    IMG_4391.jpg
    142.5 KB · Views: 1,088

Wingnut65

Well-known member
Joined
Apr 21, 2010
Messages
3,170
Location
Tampa Bay, FL
Progress is progress. You can still get there with little steps.

BTW, after March 11, the second shift can jump in. Daylight Savings Time brings a lot more time to work on projects.
 
OP
L

LutzTD

Well-known member
Joined
Dec 31, 2011
Messages
3,673
Location
Lutz, Florida
Its hard to beat block construction for buildings in FL. I already had an encounter with termites feasting on the Asylum right after the initial 5 year ground treatment expired. I guess they were just waiting with their knives/forks and bibs tucked in. :)

Looks like a great finished plan. How long do you expect it to be between phases?

Keep up the good work. Maybe some of the FL GJ'ers will stop in to check it out sometime.

"plan" and reality diverged about half way into phase I, it always costs more than you think it will...... I hope to sell something to get at least the foudation and slab done on phase II this year, then I can lay block at my own pace. My permit is only good for a year, not sure what happens if Im not done. Ill cross that bridge this fall.
 
To avoid these ads, REGISTER NOW!
Top Bottom