To avoid these ads, REGISTER NOW!

My GAB in the UK thread

OP
R

roger440

Well-known member
Joined
Jul 22, 2011
Messages
343
Location
Mid Wales
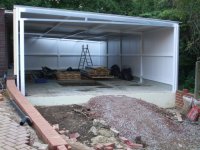
Progress, sadly, has been rather slow, but there is now light at the end of the tunnel.

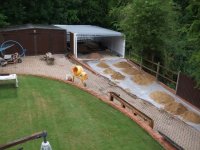
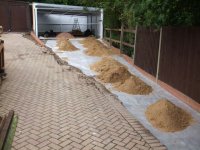
I finally got about 15 tons of soli delivered so i could back fill round the sides. With the help of a diger and the wife with a wheelbarrow, we got this done at last.

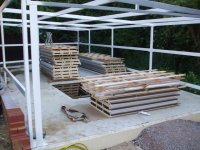
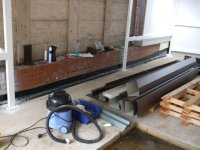
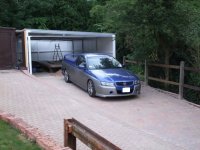
The building guys turned up this week to make a start with putting up the building. Only half completed the frame, but it was all the excuse i needed to take some pictures!

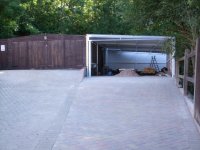
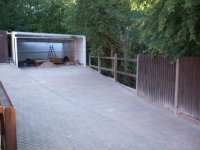
So whilst not much to report, to me its exciting as there is actually a structure!!!
 

Attachments

  • DSCF1139.JPG
    DSCF1139.JPG
    80.1 KB · Views: 173
  • DSCF1140.JPG
    DSCF1140.JPG
    75.8 KB · Views: 161
To avoid these ads, REGISTER NOW!

Bib Overalls

Well-known member
Joined
Dec 4, 2006
Messages
3,318
Location
Jonesboro, Arkansas
I can understand your agitation. Waiting two months to go vertical would frustrate me too. Now that your project is back on track we want to see pictures. Lot and lots of pictures.
 
OP
R

roger440

Well-known member
Joined
Jul 22, 2011
Messages
343
Location
Mid Wales
OK, a couple more pictures :)

The guys finished off the frame. Being in grey primer, it doesnt look that nice.

So i decided it needed painting BEFORE the panels go on. I didn't like all the joints either, so i foamed and seam sealed every joint!!! And then cut off every bit of protruding thread off every bolt and finished with a flap wheel. Am i mad?

That took a full 12 hours of work. Once done, i then sprayed the entire frame in 2K white. Not perfect but way better than grey primer.

Just need to sort out the end of the existing retaining wall and its good for the panels to go.

Cant wait until the panels are on as i can then crack on with fit out, electrics etc. But i still need to find someone to do the drive. Physically im not up to that anymore :(
 

Attachments

  • DSCF1148.jpg
    DSCF1148.jpg
    140.4 KB · Views: 108
  • DSCF1149.jpg
    DSCF1149.jpg
    147.2 KB · Views: 113
Last edited:
OP
R

roger440

Well-known member
Joined
Jul 22, 2011
Messages
343
Location
Mid Wales
I think the end may soon be in sight!

A delivery of panels has taken place :)

This was last week. Today most of the roof went on, but no pics yet as i didn't get home early enough. Will get some during the week.

Also, finally found someone to do some work on the driveway, so the retaining walls have been modified and extended. Crushed stone going in this weekend so will soon be able to drive a car in there.

Its been a long time, but i think i can start to consider some of the internal details,in particular the lighting. Lighting doesn't interest me, but ive got to have some!
 

Attachments

  • DSCF1150.JPG
    DSCF1150.JPG
    76.9 KB · Views: 92
OP
R

roger440

Well-known member
Joined
Jul 22, 2011
Messages
343
Location
Mid Wales
They are cracking on now. Starting to look like a building :)

So a few more pics from me of progress this week.

Stone for the drive is coming Friday and it starts going down Saturday.

Its all looking like progress with only slight negative being an ordering error on the roof panels. We are one short :(

Definitely got to knuckle down and come up with a proper plan of works for the inside, including the lighting. Did i say before, i hate lighting.
 

Attachments

  • DSCF1153.JPG
    DSCF1153.JPG
    76 KB · Views: 120
  • DSCF1151.JPG
    DSCF1151.JPG
    76.6 KB · Views: 127
  • DSCF1152.JPG
    DSCF1152.JPG
    51.6 KB · Views: 108

bazzateer

Well-known member
Joined
Oct 8, 2009
Messages
6,075
Location
Watford, Great Britain
Theres quite a few Holdens over here and I've seen the odd Ford Falcon too, gives you the feel of an American car with the steering wheel on the correct side of the car!

Good friend of mine recently sold a Ford ute he'd had for a year or so. Aussie spec bought new by a Kiwi living in the Channel Islands then imported to the UK. He sold it to a UK based Kiwi.
 
OP
R

roger440

Well-known member
Joined
Jul 22, 2011
Messages
343
Location
Mid Wales
Garage is loking good Roger, I'm probably not too far from you.
Which company did you use for the steel garage?

Iit's being done by dura steel. They normally do industrial stuff, but it's someone I know. Given that it's anything but rectangular finding anyone to do it was a challenge! certainly not an "off the shelf" building.

I was on the verge of doing the thing myself. But I'd take forever to do it.

I'm in north bucks, so not that close, but if you are ever up this way, let me know and swing by for a gander if you wish.
 
OP
R

roger440

Well-known member
Joined
Jul 22, 2011
Messages
343
Location
Mid Wales
Some serious action lined up for the weekend!!!

Digger, dumper and roller. Sand, shingle and block paving. Time for some proper driveway action.

And a lot of stone as we need to build up the ramp to the garage as its significantly above the surrounding ground at the front. And just to complicate things a bit of drainage to go down too at the same time.

So soon, i should be able to christen it by driving a car in there.

On a seperate note, can anyone advise how you get a picture to load full size like this one here rather than as thumbnails?

attachment.php


attachment.php


attachment.php


http://www.garagejournal.com/forum/showthread.php?t=147886&page=51
 

Attachments

  • DSCF1154.JPG
    DSCF1154.JPG
    85 KB · Views: 481
  • DSCF1155.JPG
    DSCF1155.JPG
    85 KB · Views: 478
  • DSCF1156.JPG
    DSCF1156.JPG
    106.8 KB · Views: 485
Last edited:

bazzateer

Well-known member
Joined
Oct 8, 2009
Messages
6,075
Location
Watford, Great Britain
I'm in north bucks, so not that close, but if you are ever up this way, let me know and swing by for a gander if you wish.
Cheers
On a seperate note, can anyone advise how you get a picture to load full size like this one here rather than as thumbnails? http://www.garagejournal.com/forum/showthread.php?t=147886&page=51
I find it easiest to upload all my photos to Photobucket. you then just copy the IMG tag from Photobucket and paste it straight into a post on here, once you submit the post the image will appear full size.
 

Crown

Well-known member
Joined
Jan 21, 2014
Messages
238
Location
FLat land
Or you could just post it as you do now, once posted edit your post and use the 'insert image tool' to select your attachments and post as full size ones:

- Once posted like you do now, select your image and press right click - open in new window (or tab).
- Select the url of the image (in this case: http://www.garagejournal.com/forum/attachment.php?attachmentid=459414&d=1436598030 ).
- Click on
edit.gif
to edit your original post.
- Click on the
insertimage.gif
icon: .
- Add the url you selected in the window that pops up.
- And there you have it:

attachment.php
 
Last edited:

Crown

Well-known member
Joined
Jan 21, 2014
Messages
238
Location
FLat land
You're welcome :thumbup:.
It makes your posts more attractive to read when the images are full size.
 
OP
R

roger440

Well-known member
Joined
Jul 22, 2011
Messages
343
Location
Mid Wales
The good news is that there has been more progress :)

All the stone has been moved into position and compacted down. With abot 4 tons left over!

attachment.php


The only problem encountered was some of my old haunching along the edge of the paving. Some of it proved to be rather more substantial than the digger could pull out, so this will have to be broken out next week with a breaker. Strange as i dont remember putting that much concrete in :headscrat:

The soldier course along the edge will be re-instated along a slightly tidier route, but, we decided to do this because the existing paving is 20 years old and whilst the same stuff has been ordered, its never going to match.

Once the stone was done, they got some sand down ready for next week. A shot from the house where you can see the size of the roof!

attachment.php


attachment.php


While all that was going on, i tidied up the dpc against the old garage retaininf wall and stuck it to the wall. Once the cladding guys are down, this will be extened up and over the wall to tie in with the old garage. The retaining wall is just a straight 9 inch wall with no DPC or similar.

attachment.php


Once the paving is done and the remaining cladding, i can get back to doing everything else myself. Doesn't feel natural having other people do the work:dunno:
 

Attachments

  • DSCF1157.JPG
    DSCF1157.JPG
    71.5 KB · Views: 425
  • DSCF1158.JPG
    DSCF1158.JPG
    73.7 KB · Views: 422
  • DSCF1159.JPG
    DSCF1159.JPG
    77 KB · Views: 420
  • DSCF1160.JPG
    DSCF1160.JPG
    63.7 KB · Views: 418
  • DSCF1161.JPG
    DSCF1161.JPG
    59 KB · Views: 35
Last edited:
To avoid these ads, REGISTER NOW!
OP
R

roger440

Well-known member
Joined
Jul 22, 2011
Messages
343
Location
Mid Wales
At last we have a completed drive way :) :) :)

For the first time in ages the garden looks less like a building site.

In the end i elected to keep, albeit adjusted, the old edging strip and keep the new paving one side and the old paving the other. Although the bricks are from the same company, its 18 yeas since the first bit was done, so it was never going to "blend in".

In a couple of weeks, i will pressure wash the old part and re-sand it too, so it will hopefully reduce the contrast.

Starting to see the end in sight. Im sure a lot of you will have been through it, but there are times you wonder if it will ever get done!

A few pics of the finished job

attachment.php


attachment.php


attachment.php


And looking back towards the house.

Gotta do something with that chassis jig........................

attachment.php
 

Attachments

  • DSCF1165.JPG
    DSCF1165.JPG
    61.9 KB · Views: 681
  • DSCF1164.JPG
    DSCF1164.JPG
    65.5 KB · Views: 678
  • DSCF1163.JPG
    DSCF1163.JPG
    65.9 KB · Views: 680
  • DSCF1162.JPG
    DSCF1162.JPG
    59.4 KB · Views: 682
Last edited:
OP
R

roger440

Well-known member
Joined
Jul 22, 2011
Messages
343
Location
Mid Wales
Time to christen the drive with the ute. Hopefully it wont drop oil all over it!

Cant get it in the garage as there is still to much stuff in the way :(

attachment.php
 

Attachments

  • DSCF1166.JPG
    DSCF1166.JPG
    98.9 KB · Views: 620
Last edited:
OP
R

roger440

Well-known member
Joined
Jul 22, 2011
Messages
343
Location
Mid Wales
Its been a long time since i did an update, but for a long time nothing much happened due to work etc.

The roof was finally completed and made weather tight. Which seemed like a good excuse for a bit of a tidy up and to bring some cars in to try it for size :)

It was also a good time to break out the air tightness tape and start taping joints. This IS going to be draught free when its done.

Here are a couple of pics with the cars in.


Last edited:
OP
R

roger440

Well-known member
Joined
Jul 22, 2011
Messages
343
Location
Mid Wales
The guys came back to trim up the front of the garage. Which meant it was time to fit the door.

I pondered long and hard over what door to go for. It needed to be at least as well insulated as the rest of the building, (so 40mm min). So that rulled out a roller as they are all 20mm. So it needed to be sectional. Problem with a normal sectional door is that it would be in the way of my baby lift. Not least the motor which would be directly over the lifted car. Sooner or later an accident would occur!!

So we decided to go with a side slider. Logically, it would have gone down the left side, but sadly when open it would have fouled the door through to the other garage, as well as get in the way of the cupboards that im going to buld into the void between the 2 buildings.

So to the right it would have to be. Its VERY tight becuase of the overhead track. As a consequence of the possible need to break out the welder, i elected to fit it myself.

Really, really pleased with this door. A nice quality item indeed.

Heres a few pics


OP
R

roger440

Well-known member
Joined
Jul 22, 2011
Messages
343
Location
Mid Wales
Very interesting door. Never seen anything like that !!

It used to be quite a common kind of door many years ago before up and overs were invented. You see quite a few on old garages that front directly onto the road, where outward opening doors wouldn't be possible.

I wanted something that looked traditional, as, when ive completed this, and re-worked the existing garage with a similar door and a taller roof, im going to clad the front of both in hardie plank or similar so it looks more traditional.

As i said, im realy pleased with both the look and quality.

When i was looking, initally i could only find Hormann doors (german) but good as they are, they are crazy money. This was from Ryterna, a lithuanian company and half the price. I was worried it would be "cheap" but it is nicely made. :)
 
OP
R

roger440

Well-known member
Joined
Jul 22, 2011
Messages
343
Location
Mid Wales
Floor, we have floor!

Or, more accurately, tiles :)

After weighing up all the options, in the end, i decided to go with tiles. Initially i was going to do something sensible, but then i decided to go with 600mm x 600mm fully polished tiles. This garage is not where i do any real work. It will be used for storage and a bit of cleaning and detailing. Plus of course my GAB area in the corner.

So fully polished it is.

Given the size of the tiles, and a not particuarly level floor, i got a mate of mine in to do this.

Before he came though, i needed to install some insulated plasterboard around the sides to allow for a tiled upstand as well.

Once that was done, and the aluminium door threshold was down, it was time to let the pros do their stuff :)

Some pics:

Tiles in the ramp well. Moving these off the truck just about done me in!


Plasterboard upstand going in


Had to weld in some addtional steel work for the upstand on the left hand side, and the verticals for the doorway through to the other garage


Garage cleared and ready.


Tiles down!


And done


OP
R

roger440

Well-known member
Joined
Jul 22, 2011
Messages
343
Location
Mid Wales
looks great, and enough for for another 4 cars, maybe more :)

what sort of lift will you be fitting?

Yes, 4 cars, though i can squeeze 5 in if i put the small ones at the back.

I'll be using a lift similar to this one. I will need to make some aluminium lift out panels to fill in the gap between the 2 parts of the lift.

 
OP
R

roger440

Well-known member
Joined
Jul 22, 2011
Messages
343
Location
Mid Wales
After spending all weekend in there making very slow progress with plasterboard and yet more cans of foam, ive concluded that the back left corner (which is being plasterboarded) and where my man area will be, is going to look a little stark all white.

Im pondering some brick effect wall paper (just the left hand wall). This is my inspiration

Credit for photo to owner, its not related to me in any way, just think its great!
 

Attachments

  • F456 in garage_zonder kenteken_2_klein formaat.JPG
    F456 in garage_zonder kenteken_2_klein formaat.JPG
    60.7 KB · Views: 61
To avoid these ads, REGISTER NOW!
Top Bottom