To avoid these ads, REGISTER NOW!

My Garage Adventure Begins

OP
P

PatrickW

Well-known member
Joined
Feb 21, 2005
Messages
86
Location
MN
Color Matching

I went to Home Depot to see if they could mix me up a batch of "color match" paint so I could do my interior garage trim to match the new floor.

When I epoxied the floor, I also epoxied a piece of cardboard, so I could have a sample of the color that I could take with me.

Home Depot could not color match it. They tried a couple of times by placing the sample in front of their color-matching machine, but it never worked out very well.

The Home Depot clerk said that the sample was "too glossy" and the machine couldn't get an accurate reading of it.

Tomorrow I will go to Sherwin-Williams and see if they have a color match for me...

Also - I was working on my cars in the garage this evening. I own a couple of old diesels. I spilled a little used motor oil and some fuel additive on the floor, and also got it dirty when I cleaned some parts off. The floor cleaned up just great, and you can't tell that I was doing anything messy in there just a few hours ago.

- Patrick
 
To avoid these ads, REGISTER NOW!

DaveL.

Well-known member
Joined
May 26, 2005
Messages
337
Location
Pennsylvania,HBG area
Will you be making any road trips to Harrisburg,PA in the near future? I'll put you up for a weekend and you can help me do mine! Looks great.

Dave
 
OP
P

PatrickW

Well-known member
Joined
Feb 21, 2005
Messages
86
Location
MN
Update: Painting the Walls

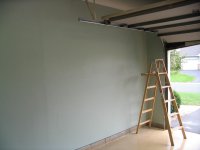
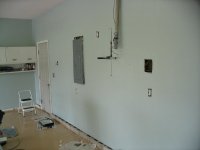
One of my wife's colleagues at work is an Interior Decorator. My wife came home from work armed with some ideas and some color samples, and she convinced me to paint the garage a sort of "Baby Blue/Green" color. That's right, folks, I went and painted my garage baby blue...

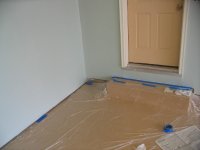
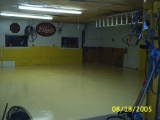
It actually looks very nice. The light blue walls go very well with the tan floor. I don't know how well the pictures below will show up on your computer monitor, but in real-life it does look pretty good.

We had Sherwin-Williams color match a 5 gallon bucket for us, as well as doing a color match of the floor epoxy. I picked up some gloss black as well. Out of that 5 gallon bucket, we used maybe 1/3, so we have enough left over to paint another room in the house, since the wife likes the color so much :pimpflash

So today I put on two coats of the light blue/green on the walls. Tomorrow I’ll paint the trim around the doors the same color as the floor. I’ll also paint the shelves black.

The garage is becoming the talk of the neighborhood. I’ve actually had neighbors come up to me while I’m in there tinkering on something and ask me what I did to the floor. I always tell them that this is the first time I’ve ever done anything like this, and that I learned how to do all this stuff by studying this forum.

Tip for others who have never painted their walls before: Surface Preparation. When you're filling in holes and gouges with drywall compound, only use the minimum amount you need. Remember that any extra that you put on has to get sanded off, and it's a lot harder to get off (when it's dried and has gotten hard as a rock) than it is to put on.

Next step: put up shelves, lawn tool racks, and “organizational aides”.

- Patrick
 

Attachments

  • 1.jpg
    1.jpg
    135 KB · Views: 486
  • 2.jpg
    2.jpg
    115.2 KB · Views: 495
  • 3.jpg
    3.jpg
    129.9 KB · Views: 493

rotus7

Well-known member
Joined
Apr 30, 2005
Messages
180
Location
NW AR
I can' believe you let your wife influence a Garage Decision!...

Just kidding, the color selection does look pretty good.
What's going on with the exposed blocks? I've never seen them exposed like that before. Are you going to cover them up with anything?
 
OP
P

PatrickW

Well-known member
Joined
Feb 21, 2005
Messages
86
Location
MN
rotus7 said:
What's going on with the exposed blocks? I've never seen them exposed like that before. Are you going to cover them up with anything?
I need to do something, but I don't know what...

On one wall the cinder blocks stick out (as seen from the pictures). On another wall they are flush with the drywall. And on a different wall they are "recessed" back from the drywall.

I'd really like to get a more "uniform" finish along the baseboard area, but I'm not sure what to do.

- Patrick
 

muddy

Well-known member
Joined
Jul 12, 2005
Messages
158
Location
Michigan
Patrick,
I'm about to be doing the same thing.......same product. What color exactly is the color you used? Was it tinted by them or a stand alone color.....sandstone? Anyways, I've talked to the Sherwin rep finally and they claim for the warranty on the floor paint to be valid they insist on helping with application and don't charge to do it.........we'll see if I go that route but curious about that color as I am leaning towards that or a dark red............ Keith
 

bmwpower

Super Moderator
Staff member
Joined
Apr 24, 2005
Messages
12,578
Location
NJ
PatrickW said:
I need to do something, but I don't know what...

On one wall the cinder blocks stick out (as seen from the pictures). On another wall they are flush with the drywall. And on a different wall they are "recessed" back from the drywall.

I'd really like to get a more "uniform" finish along the baseboard area, but I'm not sure what to do.

- Patrick

Get some mortar and fill in the holes to start. Then, drywall the blocks (no screws, just construction adhesive), paint, etc. Then again, if you're going to drywall them, you might not need to bother with the mortar.
 
OP
P

PatrickW

Well-known member
Joined
Feb 21, 2005
Messages
86
Location
MN
muddy said:
Patrick,
I'm about to be doing the same thing.......same product. What color exactly is the color you used? Was it tinted by them or a stand alone color.....sandstone? Anyways, I've talked to the Sherwin rep finally and they claim for the warranty on the floor paint to be valid they insist on helping with application and don't charge to do it.........we'll see if I go that route but curious about that color as I am leaning towards that or a dark red............ Keith
It was the "Sandstone" color. Not a custom mix, just what came out of the can.

If they want to help you do the work - great. I did all mine by myself, and it would have been nice to have somebody patching pre-existing pockmarks in the floor. But I don't think that's what your Sherwin Williams guy means. :)

My floor is holding up very well, and my neighbors talk more about my garage than they do about the rest of the house (to my wife's chagrin).

With winter coming, I've been weatherstriping and plan on doing some insulation next.

For much of the year, it doesn't get above freezing in my garage, and it would be nice to have a comfortable place to do stuff. Right now I heat my garage by shutting the door and raising the hood of my car after I get home from work. An engine block gives off a lot of heat. There's a *big* difference between working in 10 degrees and working in 30 degrees!

- Patrick
 

Craig Balzer

Well-known member
Joined
Sep 21, 2005
Messages
867
Location
Colorado Springs
Patrick

A very very impressive picture tutorial. I can't believe anyone would be nervous or apprehensive about trying this in their own gargae after the hand-holding step-by-step instructions you provided :thumbup: :bowdown:
Even I feel prepared and ready to try this process :headscrat

One question and one admonishment:

1. I have AWAYS been leary about applying epoxy to the floor for fear of ultimately having my own in-door skating rink. Could you please comment on how slippery the floor is in its natural state and compare that to when the floor is wet (from rain or snow). I noted someone asked if you had laid down sand or some other sort of "grip" . . . and you didn't . . . so you have the ideal floor for my question.

2. I can NOT believe that when all was said and done that you FAILED to provide an "after" of your ugly drain. After all your preparation and filling and grinding and polishing, I fully expected to see the duckling ugly drain transformed into a beautiful swan solution. :beer:

Patrick -- thanx AGAIN for an absolutely magnificant coverage of the entire process from start to "epoxy finish".
Truly awesome. CONGRATULATIONS :rocker:

I just spent the last 30 minutes copy/pasting your narrative and photos into a 16 slide PowerPoint presentation so i could have it a ready reference.

Craig with a naked garage floor :sad:
 
OP
P

PatrickW

Well-known member
Joined
Feb 21, 2005
Messages
86
Location
MN
Craig Balzer said:
Could you please comment on how slippery the floor is in its natural state and compare that to when the floor is wet (from rain or snow). I noted someone asked if you had laid down sand or some other sort of "grip" . . . and you didn't . . . so you have the ideal floor for my question.
It is not slippery at all. It is very "grippy" (dry or wet) when I am wearing shoes or boots. When I'm wearing just socks I can run and slide (but only when nobody is watching...).

I have not had problems slipping when wet - with water. Oil is another thing, though. But when I spill oil, or when one of my old diesels leaks a little oil, it is now very obvious, and I wipe it up with a paper towel. The way I see it, oil will be slippery wherever it is spilled. With a light colored floor, spilled oil is easy to see, and gets cleaned up.

The floor is rougher in texture in "real life" than it appears in the pictures. I attribute this to a certain roughness of the concrete and to sand and bugs (serious) blowing through my garage and getting on the floor before the epoxy fully cured. Everybody says it looks great, but I know all of the "flaws", and if I ever do this again, it'll be a better job.

Craig Balzer said:
I can NOT believe that when all was said and done that you FAILED to provide an "after" of your ugly drain. After all your preparation and filling and grinding and polishing, I fully expected to see the duckling ugly drain transformed into a beautiful swan solution.
OK - I just ran out and took a picture. It's not pretty, but it's for real. The garage is filthy right now, and a lot of the "crud" that you see in the picture is dried beer from a keg I emptied out before returning it. Had some neighbors over and it started raining, so all of the guys naturally ended up in the garage :thumbup:

- Patrick
 

Attachments

  • Drain.JPG
    Drain.JPG
    38.4 KB · Views: 515
To avoid these ads, REGISTER NOW!

Craig Balzer

Well-known member
Joined
Sep 21, 2005
Messages
867
Location
Colorado Springs
Patrick -- <in my best southern drawl>: What we have heah is failure to communicate.

Thanx for the close up of the drain. I guess I didn't 'splain myself clearly the first time. You posted 2 or perhaps 3 photos depicting the care and effort involved in repairing and sealing the two cracks in the floor radiating out from or leading to the floor drain. I am intersted in seeing how "visible" the crack and/or the repair is after all your hard work.

If it isn't too much of a hassle, could you post another photo that shows the same angle as those previously posted.

Sorry for the confusion and appreacite the quick response.

Craig
-- -- by the way: nice sock.
 

DynoDave

Well-known member
Joined
Mar 25, 2005
Messages
1,685
Location
Michigan
.....and a lot of the "crud" that you see in the picture is dried beer from a keg I emptied out before returning it. Had some neighbors over and it started raining, so all of the guys naturally ended up in the garage...

Dude, what brand of beer are you drinking that has socks in it????? :beer:

Seriously, the floor looks great. Glad you are enjoying it.
 
OP
P

PatrickW

Well-known member
Joined
Feb 21, 2005
Messages
86
Location
MN
Here's a better picture

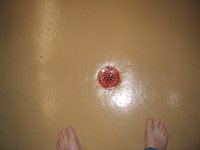
Here's a better picture of the drain area, taken from the same vantage as the earlier ones (without socks this time). :lol:

If you look closely, you can see where the original cracks were. One is at approximately the "8 o'clock" position; the other at about "2 o'clock". More visible are what I call "pock marks" where there were chips and holes in the concrete that I didn't fill in. I filled in the "big" holes, but anything smaller than a quarter (25 cent piece) I just left alone. The floor was rather rough to start out with, with holes and chips everywhere.

Knowing what I know now, I would spend more time filling in the smaller holes after I was finished with the floor grinder. I'd also fill in more around the drain itself. I am happy with how it turned out, but I now know that I could do it even better next time.

I think that a key lesson that people can learn here is that the difference between a "good job" and an "excellent job" is in the amount of work put into Surface Preparation. I spent time doing the grinding, etching, mopping, vacuuming, and even wiping the floor on my hands and knees - and that got me good adhesion of the epoxy to the concrete. What I should ALSO have done - in addition - was fill in more of the small holes. Would have taken a long time, but if you are considering doing the same thing that I did, that advice might help you.

BTW - the beer was "Blue Moon". Belgian wheat beer. My favorite. :thumbup:

- Patrick
 

Attachments

  • Copy of Drain.jpg
    Copy of Drain.jpg
    165.7 KB · Views: 453

DynoDave

Well-known member
Joined
Mar 25, 2005
Messages
1,685
Location
Michigan
You know, on second thought, I think I liked it better WITH socks! LOL

Just kidding man. You did a lot of nice work on that place. You should be proud.
 

Craig Balzer

Well-known member
Joined
Sep 21, 2005
Messages
867
Location
Colorado Springs
Patrick

Thanx for the the follow-on photo of the two cracks near the drain. You are right: they both filled in very well. If you hadn't mentioned the one at 2 o'clock (and I wasn't nearly as familair with your garage floor as I am with mine :lol: ) I wouldn't even know it was there. You have every right to be proud of the final result.

You mention that "The floor was rather rough to start out with, with holes and chips everywhere." How old was the floor when you laid down the epoxy?

Again, patrick -- a super job and even better photo coverage of the effort involoved. Thanx

Craig
 

krooser

Well-known member
Joined
Jun 3, 2005
Messages
2,377
Location
Waupaca, Wisconsin
I'm doing the color matching deal with my walls, too. The local paint store I bought my supplies from took a sample off the paint can lid and saved it in their files in case I ever want to re-do this.

Here's a pic of my shop after the final coat...I did FOUR coats...see my other post as to why....

You're right on the "slippery" part...maybe if you have a floor as perfect as marble it would be slippery...but not a regular finished concrete...mine if fine, wet or dry.
 

Attachments

  • th_finalcoat1.jpg
    th_finalcoat1.jpg
    3.1 KB · Views: 676
  • th_finalcoat3.jpg
    th_finalcoat3.jpg
    3.2 KB · Views: 677
  • th_finalcoat6.jpg
    th_finalcoat6.jpg
    3.2 KB · Views: 674

bmwpower

Super Moderator
Staff member
Joined
Apr 24, 2005
Messages
12,578
Location
NJ
Patrick,
Why did you use 2 different patching compounds? One before the grind, one after.
 
OP
P

PatrickW

Well-known member
Joined
Feb 21, 2005
Messages
86
Location
MN
bmwpower said:
Patrick,
Why did you use 2 different patching compounds? One before the grind, one after.
To be brutally honest, it was because I didn't really know what I was doing. This was all new to me.

If I were to do it again, I'd grind first, and patch second, using a 2 part epoxy patching compount, and taking the time to make the patches smooth before the epoxy patching compound cured. I'd also take more time to patch smaller pits and holes.

Also - it's winter now. The floor IS slippery if you come into the garage from the outside and have snow on the bottom of your shoes.

- Patrick
 
OP
P

PatrickW

Well-known member
Joined
Feb 21, 2005
Messages
86
Location
MN
Been a while since I've checked in. Some of my buddies are asking about how the floor is holding up.

Still very happy with it. The work was all worthwhile, and I'd do it again.

Over the past couple of years I've spilled all kinds of different chemicals on the floor. Acetone, gasoline, diesel, brake fluid, carb cleaner, brake cleaner, beer, you name it. I've run a hydraulic floor jack across it quite a few times, and dragged heavy wood crates over it. The floor has held up quite well.

I did drop a heavy vise, which took out a chunk of concrete. But no peeling around the ding.

One spot has bubbled. It's in a corner where I had a leaky gas can sitting for the whole time. The gas leaked onto the wall, then down into the concrete and got under the epoxy. But it never got through the epoxy.

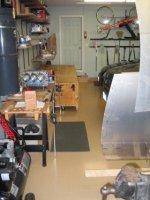
Here's a picture of what it looks like now. Current project in the garage is an airplane that I'm building. You can see the 6 cylinder engine (on the bench off to the left) that I'm also rebuilding that will power my aircraft. The big silver objects to the right are the wings, and the big crate in the background contains parts for the fuselage.

I've also added insulation and a big heater. This garage is a pleasant area, even in the Minnesota winter.

Patrick
 

Attachments

  • garage.jpg
    garage.jpg
    26.8 KB · Views: 159
To avoid these ads, REGISTER NOW!
Top Bottom