To avoid these ads, REGISTER NOW!

My garage odyssey

twk63

Well-known member
Joined
Mar 7, 2018
Messages
48
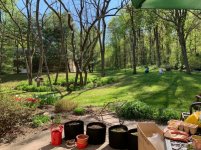
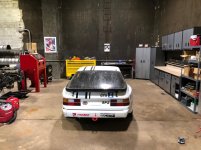
In January 2017, I purchased a neighboring property to my home. The property included two very unusual concrete buildings, one was razed to create open space for my family. I retained the second building to create a new workshop and garage.

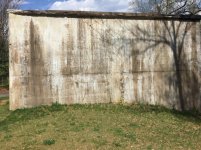
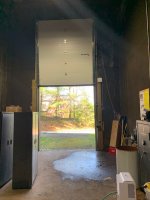
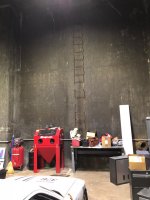
A little history: the two buildings were originally constructed during World War 2 by the Army to serve as a back-up reservoir to the US Army hospital down the hill from the property (now the campus of the University of Valley Forge). These buildings were constructed of 18" thick concrete with two rows of rebar reinforcement. The individual I purchased the property from had originally intended to renovate the two buildings into a residence before running out of funds. He had however cut out two entrances to the building, the first a garage entrance, the second was to be the entrance for the second floor. After I purchased the property, he closed up the second entrance with cinder blocks.

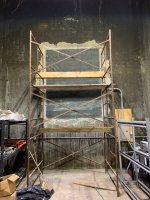
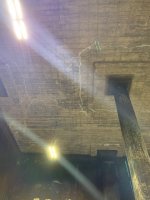
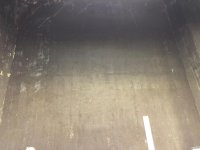
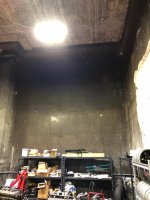
Inside the building are multiple 12" pipes that fed water to an underground pump room. These pipes had to be cut flush to the wall. Additionally the roof had multiple cracks in it, allowing water to drip in after rainstorms. I mitigated the effect of the dripping by running dehumidifiers until I was in a position to repair the roof.
 

Attachments

  • Step 1a.jpg
    Step 1a.jpg
    150.7 KB · Views: 675
  • Step 1b.jpg
    Step 1b.jpg
    155 KB · Views: 621
  • Step 1c.jpg
    Step 1c.jpg
    121.2 KB · Views: 607
  • Step 1d.jpg
    Step 1d.jpg
    116.1 KB · Views: 553
  • Step 1e.jpg
    Step 1e.jpg
    77.9 KB · Views: 532
  • Step 1f.jpg
    Step 1f.jpg
    130.2 KB · Views: 530
Last edited:
To avoid these ads, REGISTER NOW!
OP
T

twk63

Well-known member
Joined
Mar 7, 2018
Messages
48
My first project on purchasing the property was to run power to the building and install overhead lights.

My electrical contractor installed a 200A service, with 110V receptacles every 10 feet around the perimeter building as well as two 220V outlets, for my compressor and in anticipation of installing a lift.

I went with BigAss lights. After describing the size of the building (40' by 40' with 25' high ceilings), they recommended four 20K Lumen units. While I was initially concerned that these would be insufficient, they turned out to be work well, despite the very dark walls absorbing much of the light.
 

Attachments

  • Step 2e.jpg
    Step 2e.jpg
    58.3 KB · Views: 311
  • Step 2d.jpg
    Step 2d.jpg
    59.6 KB · Views: 346
  • Step 2c.jpg
    Step 2c.jpg
    71.8 KB · Views: 435
  • Step 2b.jpg
    Step 2b.jpg
    93.3 KB · Views: 369
  • Step 2a.jpg
    Step 2a.jpg
    92.7 KB · Views: 392
Last edited:
OP
T

twk63

Well-known member
Joined
Mar 7, 2018
Messages
48
The next step of the garage project was to move stuff out of my rented garage and into the new workshop. I tried to organize things as much as I could.
 

Attachments

  • Step 3e.jpg
    Step 3e.jpg
    155.1 KB · Views: 404
  • Step 3d.jpg
    Step 3d.jpg
    154 KB · Views: 395
  • Step 3c.jpg
    Step 3c.jpg
    156.9 KB · Views: 397
  • Step 3b.jpg
    Step 3b.jpg
    160.2 KB · Views: 419
  • Step 3a.jpg
    Step 3a.jpg
    141.3 KB · Views: 444
Last edited:
OP
T

twk63

Well-known member
Joined
Mar 7, 2018
Messages
48
To further create some organization in the workshop, I moved my Gladiator cabinets out of my attached garage to the new workshop.

As a one-person effort, drilling into hardened 18" thick concrete, my attempt to install the upper cabinets level wasn't as successful as I had hoped but it was good enough for government work and I had no interest in re-hanging these by myself.
 

Attachments

  • Step 4a.jpg
    Step 4a.jpg
    152.5 KB · Views: 414
Last edited:
OP
T

twk63

Well-known member
Joined
Mar 7, 2018
Messages
48
Next on the list of things to do was to install a two-post lift and finally start bringing my race cars into the shop.

The lift was installed a year after moving into the shop
 

Attachments

  • Step 5a.jpg
    Step 5a.jpg
    151 KB · Views: 393
  • Step 5b.jpg
    Step 5b.jpg
    151.1 KB · Views: 371
OP
T

twk63

Well-known member
Joined
Mar 7, 2018
Messages
48
All of this brings us to today.

After a couple of years of living with dark and dingy walls, a leaking roof, and a set of rotting wooden barn doors that was allowing all sorts on wildlife to find a home in my garage, I have embarked on a workshop renovation that I would like to share:

Step 1 is the replacement of the wooden barn doors with an electric vertical rising insulated steel door. This installation was completed on May 12th
 

Attachments

  • Step 7c.jpg
    Step 7c.jpg
    99.9 KB · Views: 400
  • Step 7b.jpg
    Step 7b.jpg
    108.5 KB · Views: 375
  • Step 7a.jpg
    Step 7a.jpg
    137.2 KB · Views: 370
OP
T

twk63

Well-known member
Joined
Mar 7, 2018
Messages
48
Step 2 is the rehabilitation of the concrete roof.

Decades of frost heaves led to cracking and buckling of the roof. Grass and other vegetation had begun growing on the roof. Numerous cracks in the 18" thick concrete slab were creating multiple leaks in the roof that were permeating to the garage below.

Originally I had a tarp installed over the roof to contain the leakage somewhat but 3 years of Pennsylvania winters had led to tears and renewed leaking so it was time to cough up the budget for a proper fix.

I consulted with a number of roofers and after considering a wide range of options from EPDM to modified bitumen to single-ply membranes, I elected to go with an SPF spray foam roof. The reasons being that the surface of the roof had been so uneven from the frost heaves that I would have had to grind the surface flat for most of the other options, raising the costs considerably. With the SPF system, we were able to apply a level surface easily and relatively inexpensively.

The job was completed today. I plan on installing a rainwater collection system and cistern once everything else is completed. My wife is a gardener and I have to throw her a bone with what I am spending on my garage!
 

Attachments

  • Step 8a.JPG
    Step 8a.JPG
    63.4 KB · Views: 429
  • Step 8b.jpg
    Step 8b.jpg
    69.2 KB · Views: 438
  • Step 8c.JPG
    Step 8c.JPG
    105.7 KB · Views: 421
Last edited:
OP
T

twk63

Well-known member
Joined
Mar 7, 2018
Messages
48
Next on the list is to power-wash and paint the interior walls and ceilings. They are extremely dark and dingy and absorb a fair amount of the light thrown off by my BigAss light set-up.

The painters are coming in the first week of June so I will post photos of the completed job then. For now, this is the current state of the walls. The large cinder-blocked section of wall is where the previous owner had blasted an entranceway for what would have been the foyer, had he been able to turn the building into a residence as originally planned. Now it will be plastered over and painted, along with the other surfaces.
 

Attachments

  • Step 10e.jpg
    Step 10e.jpg
    103.5 KB · Views: 272
  • Step 10d.jpg
    Step 10d.jpg
    82.1 KB · Views: 298
  • Step 10c.jpg
    Step 10c.jpg
    107.1 KB · Views: 338
  • Step 10b.jpg
    Step 10b.jpg
    88.9 KB · Views: 309
  • Step 10a.jpg
    Step 10a.jpg
    79 KB · Views: 330

thammel

Well-known member
Joined
Oct 3, 2005
Messages
2,243
Location
Maryland
In the first picture of post#8, it looks like a ladder of sorts running up the wall...can you give more info?
 

matt_i

Well-known member
Joined
Mar 14, 2008
Messages
10,727
Location
SE Michigan
Maybe I missed it but was that a holding tank or 25' deep cistern at one point (!?!)

Interesting story and great repurposing! That is quite a "hardened" building :)
 

yetibiker

Member
Joined
Nov 12, 2013
Messages
24
I would be very tempted to add a mezzanine to utilize some of that that headroom. This is a great space!


Sent from my iPad using Tapatalk
 

MWMWMW

Well-known member
Joined
Sep 2, 2019
Messages
89
Location
WV
Wow this is an awesome space! Looks like you’re going to make it awesome!
 

Kevkx125

Well-known member
Joined
Dec 26, 2013
Messages
3,394
Location
DOUGLASSVILLE, PA
twk63

Will be following along, live a little west of you. Grew up in the area graduated from the former tech school down the road. Looking forward to the progress.
 
OP
T

twk63

Well-known member
Joined
Mar 7, 2018
Messages
48
In the first picture of post#8, it looks like a ladder of sorts running up the wall...can you give more info?

The original access to the building was through the roof. Those are the rusted remnants of the access ladder. The painters are going to remove them before power-washing and painting. The roof hatch has since been sealed over to prevent moisture from getting in.
 
OP
T

twk63

Well-known member
Joined
Mar 7, 2018
Messages
48
Maybe I missed it but was that a holding tank or 25' deep cistern at one point (!?!)

Interesting story and great repurposing! That is quite a "hardened" building :)

The building was originally constructed as a reservoir during WW2 for a nearby Army hospital. It was originally completely enclosed with access through a manhole in the roof and the water draining through pipes in the wall and floor into an underground pump room.
 
OP
T

twk63

Well-known member
Joined
Mar 7, 2018
Messages
48
Is the underground pump room still a thing?

The pump room was underground and situated between this building and the adjoining building. We demolished the second building to free up some green area on the property. Part of the rubble was used to fill in the pump room. The machinery had long since been removed and it was simply an underground cavern. I then welded the metal hatches down so that neighborhood kids couldn't find their way in.
 
To avoid these ads, REGISTER NOW!
OP
T

twk63

Well-known member
Joined
Mar 7, 2018
Messages
48
I would be very tempted to add a mezzanine to utilize some of that that headroom. This is a great space!


Sent from my iPad using Tapatalk

That's a project for down the road. I would like to add a loft above part of the workshop for storage and an office.
 
OP
T

twk63

Well-known member
Joined
Mar 7, 2018
Messages
48
Update over the weekend.

The previous owner of the building had knocked out a hole in the wall to create what would have been the entrance to his house, had he be able to develop the property as he had originally planned. When I purchased the building, he closed up the hole with cinder blocks. I decided to patch over the repair work to make a flush surface for the painters.

The opening was anywhere from 1" to 2" deep and rather than fill that entire gap with concrete, we first attached plywood backing to fill in the depth and covered it in mesh for the concrete to hold onto. The first layer went up yesterday and we will finish it off today.

The painters are scheduled to come in the first week of June for an intense power-washing and surface prep before painting.
 

Attachments

  • Wall Repair 4.jpg
    Wall Repair 4.jpg
    124.3 KB · Views: 271
  • Wall Repair 3.jpg
    Wall Repair 3.jpg
    134.7 KB · Views: 264
  • Wall Repair 2.jpg
    Wall Repair 2.jpg
    133.6 KB · Views: 253
  • Wall repair 1.jpg
    Wall repair 1.jpg
    121.7 KB · Views: 263
OP
T

twk63

Well-known member
Joined
Mar 7, 2018
Messages
48
And I spied a vintage Porsche in post two!

This garage will be home to two Porsches, the 1988 944 car I converted to track duty you see in the pictures and a 2011 GT3 Cup factory race car.
 

Attachments

  • Shop 2 (4).jpg
    Shop 2 (4).jpg
    119.4 KB · Views: 160
  • 997 2.jpg
    997 2.jpg
    149.9 KB · Views: 195

bradpac

Well-known member
Joined
Sep 8, 2013
Messages
721
Location
Central TX
A coat of white paint will make a huge difference. That thick of concrete should hold temperature pretty well too. I bet it was a ton of work destroying the other one, have any pictures?
 
OP
T

twk63

Well-known member
Joined
Mar 7, 2018
Messages
48
Finished up patching the wall today.

The painters are delayed until the 2nd week of June. That will provide me with ample time to empty out the workshop and move everything to a storage unit for a couple of weeks.

I have cement coatings contractors coming in this week to bid on epoxy-coating the floor. Between freshly painted walls and ceiling and a fresh epoxy coat on the floor, the garage should look completely transformed!
 

Attachments

  • B9C4F15A-20B8-4563-B9F5-61068C2E6372.jpeg
    B9C4F15A-20B8-4563-B9F5-61068C2E6372.jpeg
    104.5 KB · Views: 130
Last edited:
OP
T

twk63

Well-known member
Joined
Mar 7, 2018
Messages
48
I bet it was a ton of work destroying the other one, have any pictures?

I wish I took pictures, it was a nightmare to demolish. That outbuilding was even larger than this one at 40' x 60'. We spent two months tearing it down. Amusingly we knocked out all four walls but the roof remained completely intact, supported only by the central pillar.

When we finished, a scrap metal company came to haul away the rebar, it was almost 18 tons of metal.

The rubble was used to fill the underground pump room. The rest was graded over and re-sodded to add green space. The workshop is visible in the attached picture through the trees, the second building was in the open field to the right of the existing building.
 

Attachments

  • Yard.jpg
    Yard.jpg
    85.2 KB · Views: 321

Kevkx125

Well-known member
Joined
Dec 26, 2013
Messages
3,394
Location
DOUGLASSVILLE, PA
Finished up patching the wall today.

The painters are delayed until the 2nd week of June. That will provide me with ample time to empty out the workshop and move everything to a storage unit for a couple of weeks.

I have cement coatings contractors coming in this week to bid on epoxy-coating the floor. Between freshly painted walls and ceiling and a fresh epoxy coat on the floor, the garage should look completely transformed!

Sounds like some great progress, can't wait to see some finished pics. Having a bright & clean shop will be a real treat I bet.
 

GirchyGirchy

Well-known member
Joined
Nov 14, 2011
Messages
9,877
Location
Central Indiana
Holy ****, that's cool! After seeing the first few pictures I was thinking, "meh...how big is that thing, about 15' x 15'?" Then seeing the interior ones once you got things in there...the scale was hard to understand. Cool history and one hell of a garage.
 
OP
T

twk63

Well-known member
Joined
Mar 7, 2018
Messages
48
If I were one of your neighbors I know where I'd be heading when the tornado warning siren starts to sound.

LOL!

The building was designed by the Army to be able to withstand a direct hit by a German bomb. It can pretty much withstand anything.

By the way, it would be payback for the two months of jackhammering the neighbors had to live through when we demolished the other building.
 

Brian R

Well-known member
Joined
Dec 1, 2009
Messages
591
Location
Chestertown, MD
This is so cool, thanks for posting.

Can't wait so see the walls redone.

Outstanding work. Where do you run those cars?

You might want to consider asking moderators to switch this to the Garage Gallery (so more people see it).
 
Last edited:
To avoid these ads, REGISTER NOW!
Top Bottom