To avoid these ads, REGISTER NOW!

My Garage Refurb

IONH

Well-known member
Joined
Feb 12, 2010
Messages
2,043
Location
Central Massachusetts
Alright, I've bit the bullet and decided to finally make a thread. Long story short, when purchasing my first home 5 years ago, a requirement was that it had to have a garage as I was very tired of working in a driveway. The wife (then girlfriend) was on board and we went house hunting. Found a nice little 40 year old house which had a detached garage nearly as large as the house and a second garage underneath it. SOLD.. even though they were different colors (and still are)! :lol_hitti

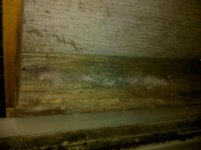
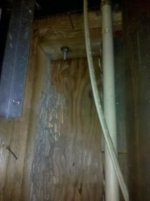
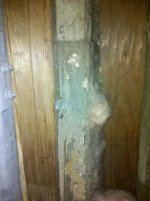
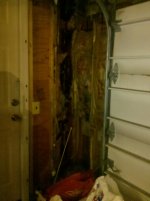
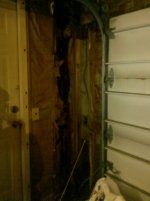
Anyway, the garage turned out to be heavily termite damaged come the next spring when I was removing some old metal shelving off the rear wall to find the bolts holding them on on the lower half had nothing inside the wall. Replaced the rear wall myself (with the help of my Dad). The roof which I knew was in need of replacement required some new sheeting around the edges and that should help take care of the moisture the termites loved so much. Also got a chemical treatment in the ground around the house and garage for the termites too, so I should be good to go with that.

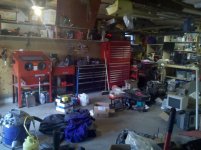
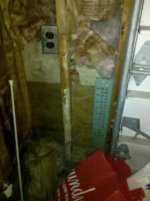
When replacing the rear wall, we ran a 20 amp circuit with numerous outlets on the bench you'll see below. Definitely thought ahead for storage needs on that wall, but as you'll see in the pictures, still not enough.

This thread will be for the rehab of my garage. Overall plans are as follows in no particular order...
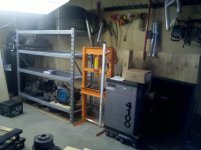
1. More storage - Can never have enough.
2. OSB all the walls - Will help cover up some of the visible drywall paper which was eaten some on all walls by the termites.
3. OSB ceiling - Current 2x8 drywall is in rough shape and sagging in a lot of areas.
4. About 16 twin bulb 4' T8 fixtures on two switches all with pull chains for variability. - I-Beam in the middle keeps me from getting away with just 3 rows so instead I will have 4 rows. I plan to run conduit against the OSB'd ceiling to power the lights.

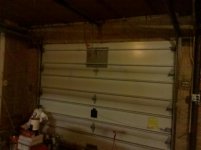
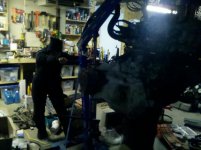
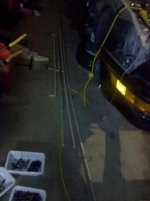
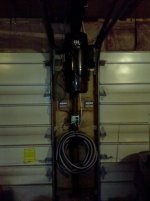
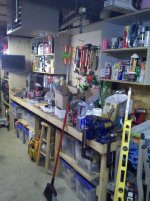
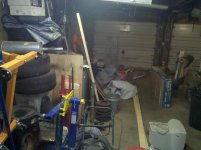
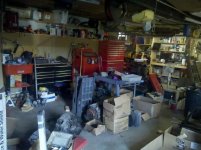
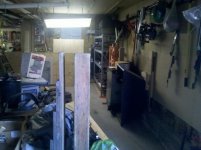
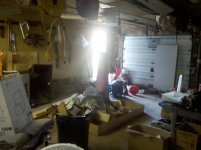
I think that's it for now. Here come my shameful cluttered garage. I tend to work on one piece and everything explodes to other areas. I often end up with a car taking residence that I work on for a month or a year or more and that doesn't help keep the rest of it clean and organized.

:beer: Big thanks to my Wife who comes through once in a while and cleans things up while I work on something! :rocker:
 

Attachments

  • IMG_20121104_134222.jpg
    IMG_20121104_134222.jpg
    140 KB · Views: 1,908
  • IMG_20121104_134229.jpg
    IMG_20121104_134229.jpg
    141.7 KB · Views: 1,787
  • IMG_20121104_134256.jpg
    IMG_20121104_134256.jpg
    143.4 KB · Views: 1,704
  • IMG_20121104_134312.jpg
    IMG_20121104_134312.jpg
    139.5 KB · Views: 1,452
  • IMG_20121104_134321.jpg
    IMG_20121104_134321.jpg
    140 KB · Views: 1,380
  • IMG_20121104_134432.jpg
    IMG_20121104_134432.jpg
    142.3 KB · Views: 1,358
To avoid these ads, REGISTER NOW!
OP
I

IONH

Well-known member
Joined
Feb 12, 2010
Messages
2,043
Location
Central Massachusetts
Though I could build a storage rack which is just as good and holds just as much for probably half, I really liked a storage rack I saw at Sam's Club here so I bought it to put some tires and engines on. Ultimately, the tires won't be in the garage... but for now, they are.

As I said, when I work on a spot, everything "explodes" away. So the wood which was here is now leaning unsafely elsewhere. Also, as I started moving one of the 4 transmissions I have hanging out to the right of the wood (which will end up on this rack) another ended up on its side and put a nice spill on the floor. Included a picture of that as well for the progress. It's all covered with speedy dry though so don't worry. Still smells horrible though!
 

Attachments

  • IMG_20121109_200014.jpg
    IMG_20121109_200014.jpg
    139.7 KB · Views: 769
  • IMG_20121109_193724.jpg
    IMG_20121109_193724.jpg
    151 KB · Views: 602
OP
I

IONH

Well-known member
Joined
Feb 12, 2010
Messages
2,043
Location
Central Massachusetts
Any tips as to how to better store the engine hoist and stands?

I could build a shelf somewhere above them so they don't take up that entire wall section but I'm open to other options.
 
OP
I

IONH

Well-known member
Joined
Feb 12, 2010
Messages
2,043
Location
Central Massachusetts
Though it may not look like it, I have made quite a bit of progress in the garage. The last picture shows the rack a bit fuller plus that wall mostly clear of "stuff".
 

Attachments

  • IMG_20121111_132018.jpg
    IMG_20121111_132018.jpg
    142.8 KB · Views: 551
  • IMG_20121111_132024.jpg
    IMG_20121111_132024.jpg
    141.4 KB · Views: 463
  • IMG_20121111_132044.jpg
    IMG_20121111_132044.jpg
    140 KB · Views: 469
  • IMG_20121111_132050.jpg
    IMG_20121111_132050.jpg
    138.4 KB · Views: 459
  • IMG_20121111_132103.jpg
    IMG_20121111_132103.jpg
    138.3 KB · Views: 592
OP
I

IONH

Well-known member
Joined
Feb 12, 2010
Messages
2,043
Location
Central Massachusetts
Had to push things out of the way to get my VW in there and replace its flex pipe last weekend.

Finally made some more progress today.
 

Attachments

  • IMG_20121123_154105.jpg
    IMG_20121123_154105.jpg
    138.9 KB · Views: 481
  • IMG_20121123_154036.jpg
    IMG_20121123_154036.jpg
    140.3 KB · Views: 412
  • IMG_20121123_154029.jpg
    IMG_20121123_154029.jpg
    141.2 KB · Views: 477
  • IMG_20121123_153943.jpg
    IMG_20121123_153943.jpg
    139.9 KB · Views: 430
  • IMG_20121123_153935.jpg
    IMG_20121123_153935.jpg
    141.7 KB · Views: 510

Daniel Dudley

Well-known member
Joined
Sep 4, 2009
Messages
3,546
That's good space. My trick is that I keep cars parked in mine, so there always has to be room for them. If I want to work on a project, I just roll them out, and there is the space.
 
OP
I

IONH

Well-known member
Joined
Feb 12, 2010
Messages
2,043
Location
Central Massachusetts
Put a handful of boxes and a couple hubs up in the attic space.

Noticed a used can of spray in foam insulation so I decided to fill in the bottom of the studs next to the roll up doors considering I could see light through them. From there my mind traveled and I decided to start filling in a couple of stud cavities which did not have insulation in them.

The garage has/had a lot of termite damage and I have since been chemically treated. There has also been a lot of mouse activity, but I have gotten rid of them using a Rat Zapper and occasionally pick up another as the seasons change due to the rotten/eaten holes still present.

First was between the roll up doors. Because the termites had so heavily eaten one of the jack studs, I decided to remove it and insulate the cavity. Next year (or whenever I get to it), I plan to unsheet the front wall and replace probably the majority of the studs plus the affected sheeting. Then I'll sheet the inside with OSB.
 

Attachments

  • IMG_20121202_175152.jpg
    IMG_20121202_175152.jpg
    143.1 KB · Views: 448
  • IMG_20121202_172841.jpg
    IMG_20121202_172841.jpg
    136.8 KB · Views: 383
  • IMG_20121202_172822.jpg
    IMG_20121202_172822.jpg
    141.5 KB · Views: 454
  • IMG_20121202_172727.jpg
    IMG_20121202_172727.jpg
    134.3 KB · Views: 521
  • IMG_20121202_171822.jpg
    IMG_20121202_171822.jpg
    126.9 KB · Views: 614
  • IMG_20121202_171620.jpg
    IMG_20121202_171620.jpg
    137.9 KB · Views: 635
OP
I

IONH

Well-known member
Joined
Feb 12, 2010
Messages
2,043
Location
Central Massachusetts
Next was the front left corner (from the inside) of the garage. I relocated the 30" rear door to side a few years ago when I rebuilt the back wall (which was nearly non-existent due to the termite/carpenter ant damage) and put a 36" door in instead. I had never put insulation in the cavity to its right which I worked on now.

I also noticed there were a couple places that the PO had literally folded the insulation on itself, probably thinking that would provide MORE insulation quality, but I know it does not.

For tonight's work, I was using some R-13 I had in the attic from when I did the rear wall. While cutting the new insulation, I noticed it had been attacked by mice. That, combined with running out of staples, ended my insulation work for tonight.

Since the mice take insulation, I think I will redo the insulation on the front wall since it never had any sheeting on the interior. As I am now keeping up on the mice with the zapper, I won't sheet the interior until I replace the wood which had been severely degraded by the termites.
 

Attachments

  • IMG_20121202_175630.jpg
    IMG_20121202_175630.jpg
    141.7 KB · Views: 185
  • IMG_20121202_175638.jpg
    IMG_20121202_175638.jpg
    139.5 KB · Views: 177
  • IMG_20121202_180630.jpg
    IMG_20121202_180630.jpg
    134.7 KB · Views: 168
  • IMG_20121202_180815.jpg
    IMG_20121202_180815.jpg
    150 KB · Views: 166
  • IMG_20121202_182024.jpg
    IMG_20121202_182024.jpg
    144.7 KB · Views: 167
OP
I

IONH

Well-known member
Joined
Feb 12, 2010
Messages
2,043
Location
Central Massachusetts
What did you do about the termites? I may be looking for something.

Chemical treatment. My house is right on some wetlands (drainage) so I would never be able to actually kill the colonies anyway. I have termites in the mulch I put around a water feature, so they're still here in force.

I did put up a wood shed foundation a few years ago so we'll see how long that holds up. I made it out of pressure treated so that may deter them for a bit. I also put up a wooden fence to keep some neighborhood kids from cutting through my yard and leaving their stuff in my yard, so time will tell on that as well.
 
OP
I

IONH

Well-known member
Joined
Feb 12, 2010
Messages
2,043
Location
Central Massachusetts
Picked up some more R-13 wall insulation today and put some more up. Finished the corner and halfway across the first door. So much wasted because of those 8" cavities, not sure what to do with 7 feet of just 6" wide insulation.
 

Attachments

  • IMG_20121203_193227.jpg
    IMG_20121203_193227.jpg
    153.7 KB · Views: 154

John in OH

Well-known member
Joined
Jun 2, 2007
Messages
2,444
Location
SE Ohio & Eastern Virginia
For tonight's work, I was using some R-13 I had in the attic from when I did the rear wall. While cutting the new insulation, I noticed it had been attacked by mice. That, combined with running out of staples, ended my insulation work for tonight.

Since the mice take insulation, I think I will redo the insulation on the front wall since it never had any sheeting on the interior. As I am now keeping up on the mice with the zapper, I won't sheet the interior until I replace the wood which had been severely degraded by the termites.

Ya just gotta love the smell of mouse pee !!

When I replaced some insulation in the wall of an old building several years ago I dropped several pieces of the solid mouse bait (looks like rectangular green dog biscuits) down into each wall cavity between the studs before I closed up the wall. Just as a precaution against any future mouse intrusion.
 
OP
I

IONH

Well-known member
Joined
Feb 12, 2010
Messages
2,043
Location
Central Massachusetts
Ya just gotta love the smell of mouse pee !!

When I replaced some insulation in the wall of an old building several years ago I dropped several pieces of the solid mouse bait (looks like rectangular green dog biscuits) down into each wall cavity between the studs before I closed up the wall. Just as a precaution against any future mouse intrusion.

I don't know if it is the disgust in dealing with the stuff, or maybe the fact that it has been like this for so long, but I haven't smelt any mouse pee yet. The cold temps (I only bring the heat up to 50*F in the garage while I'm out there) may help keep the smell down as well.

What's pretty gross is pulling a piece of insulation out from over the doors and having the mouse **** rain down on me. :eyecrazy: Now I stand back a bit further.
 
OP
I

IONH

Well-known member
Joined
Feb 12, 2010
Messages
2,043
Location
Central Massachusetts
Replaced some more insulation on the front wall.

Found some termite damage in the header of the left door. This saddens me as I had hoped they hadn't made it all the way up there. I should have known better though as those things will eat anything.

I wonder if mice eat termites because they'd have had a feast before I got treated! :lol_hitti

Anyway, first two pictures are of the same section of door header. In the second, you can see a small hole, well that header piece of wood is nearly completely hollow. Last picture is current left half progress on the insulation (done).

I redid the far right corner as well (no picture) but I'm going to stop for now as I want to get a car which I am stripping in there this weekend as it's bound to snow eventually!
 

Attachments

  • IMG_20121205_182548.jpg
    IMG_20121205_182548.jpg
    130.1 KB · Views: 201
  • IMG_20121205_182559.jpg
    IMG_20121205_182559.jpg
    127.7 KB · Views: 162
  • IMG_20121205_190141.jpg
    IMG_20121205_190141.jpg
    142.8 KB · Views: 163
OP
I

IONH

Well-known member
Joined
Feb 12, 2010
Messages
2,043
Location
Central Massachusetts
Bummer about the additional termite damage. Not to be a party pooper, but have you checked the roof trusses to see if those are OK?

When I bought the house, I knew the garage needed a roof in the near future. This is because of a couple things... 1) There was apparently a tree removed many years earlier which hung over a corner of the garage causing sap/stuff to land on the roof and accumulate. 2) The roof was not done correctly and went up to the drip edge but not over it (go figure).

I replaced the roof on my own and found a good portion of damage at both gable ends primarily due to #2 above. I ended up cutting out 1 foot around the lower edges and went 1-2 rafters alternating by sheet in on both gable ends to stagger the joints. The rafter on the back of the garage I did replace. The rafter on the front was completely solid.

While doing the roof, I added a ~6" (I forget the exact length) rake to the gable ends in order to match the main house. This forced me to remove the vinyl siding from the front. In doing this, while up near the top working on the rake, I replaced the sheeting on the top half of the garage.

As I did not want to mess with the door structure at the time, I did not touch any of the sheeting.... hindsight, wish I'd already taken care of the stud/sheeting replacement because I'm going to have to pull all that siding down again next year to take care of it.

The bad roof definitely resulted in a very moist area on the gable walls. The back left (looking from the inside) was the worst corner. The garage is now completely water tight with the exception of the front studs which do not touch the floor and I can actually see some light through their bases. THANKFULLY the gable ends aren't fully load bearing. I do have an I-Beam which the attic joists lie across so that may be what is actually keeping the front gable wall from collapsing. The top plate of the front wall did seem to be solid even though the header of the wall has the significant termite damage I showed above.
 
OP
I

IONH

Well-known member
Joined
Feb 12, 2010
Messages
2,043
Location
Central Massachusetts
Wrapped the rest of the insulation I had left with some backward duct tape getting ready for storage in the attic. Also moved a few other things together to also be brought up stairs.

Moved two engines and another transmission over in front of that storage rack I first put up... not sure what I'm going to do with those other than junk them I guess. Out of wall space yet again but the floor is largely available (or will be when I push everything to one side to fit a car in there this weekend).
 
OP
I

IONH

Well-known member
Joined
Feb 12, 2010
Messages
2,043
Location
Central Massachusetts
Okay, the garage refurb will be largely on hold until the new car which has entered the garage today is stripped and gone.

Attached are a few "current state" pictures plus the car in the building.

Oh, and the front right wheel up close.. notice the lack of lugs or even lug holes. I can only imagine the wheel is majorly seized onto the hub, so that should be fun to get off. I drove the car from one driveway of mine to the other plus into the garage and the wheel did not break free.
 

Attachments

  • IMG_20121209_092011.jpg
    IMG_20121209_092011.jpg
    140.3 KB · Views: 356
  • IMG_20121209_092017.jpg
    IMG_20121209_092017.jpg
    140.1 KB · Views: 323
  • IMG_20121209_092032.jpg
    IMG_20121209_092032.jpg
    140.7 KB · Views: 374
  • IMG_20121209_093638.jpg
    IMG_20121209_093638.jpg
    140.3 KB · Views: 374
  • IMG_20121209_095414.jpg
    IMG_20121209_095414.jpg
    141.6 KB · Views: 408
  • IMG_20121209_092554.jpg
    IMG_20121209_092554.jpg
    140.6 KB · Views: 471
OP
I

IONH

Well-known member
Joined
Feb 12, 2010
Messages
2,043
Location
Central Massachusetts
Engine's out, shouldn't be more than a couple weeks before I am back to the garage refurb (after some other car maintenance which is pending getting rid of this chasis).

Put the wife to work too. This isn't her first time helping with an engine removal. Easier to muscle around the motor so it will clear the body better with someone else driving the hoist.
 

Attachments

  • IMG_20121219_202006.jpg
    IMG_20121219_202006.jpg
    141 KB · Views: 357
  • IMG_20121219_202734.jpg
    IMG_20121219_202734.jpg
    136 KB · Views: 384
To avoid these ads, REGISTER NOW!

jagleaso

Well-known member
Joined
Jul 22, 2012
Messages
48
Keep this thread going man. I am enjoying seeing what you have going on.
 
OP
I

IONH

Well-known member
Joined
Feb 12, 2010
Messages
2,043
Location
Central Massachusetts
Keep this thread going man. I am enjoying seeing what you have going on.

I appreciate your comment. :thumbup:

I have lots of plans, but right now some car projects are taking priority. I am so severely lacking lighting though that it was difficult to pull the motor I just removed. I had to actually take down one of the T12's so my engine hoist would clear it! It was hanging by a chain and physically plugged in to an extension cord so wasn't that big of a deal, but things got quite dark in the area until I had the hoist cleared. This said, lighting may step up in line sooner rather than later.

This being a detached structure, should I still use fire rated sheet rock for the house facing side? The house is about 6-8 feet away. I ask because I'd rather put up OSB instead and I am guessing that is obviously not fire retardant enough.
 

NUTTSGT

Super Moderator
Staff member
Joined
Sep 14, 2009
Messages
50,853
Location
Northern Central Ohio
You're making some good progress. Once you have the insulation in the ceiling, ceiling up and new lights, it'll be night and day difference out there.

If the garage isn't attached, honestly, I wouldn't worry about the drywall on the house facing side wall. Unless you are doing every wall and ceiling with drywall, the fire can easily get around that single drywall covered end.
 
Last edited:

Modifieddriver

Well-known member
Joined
May 29, 2009
Messages
820
Location
Moonville, South Carolina
Termites in Massachusetts???

All the time I lived in upstate NY I never heard of a termite problem.

Now if ya' wanta' see termite damage, I have pictures of my house here in South Carolina that will shock you. These little bastards snuck into my house, undetected even to a trained termite exterminator. They had a feast.
 
OP
I

IONH

Well-known member
Joined
Feb 12, 2010
Messages
2,043
Location
Central Massachusetts
You're making some good progress. Once you have the insulation in the ceiling, ceiling up and new lights, it'll be night and day difference out there.

If the garage isn't attached, honestly, I would worry about the drywall on the house facing side wall. Unless you are doing every wall and ceiling with drywall, the fire can easily get around that single drywall covered end.

The ceiling is currently 2x8 foot sheets of drywall somehow held up primarily by strapping (on the inside of the garage side) because it appears the PO missed the joists above with a good portion of the nails. As there is insulation already up between the joists, I do not want to pull the drywall down.

Instead, I was going to replace the strapping (or re-use where possible) and actually hit some studs plus add some more strapping to get the ceiling fully covered. Then sheet over (below) the strapping with some more 3/8" plywood.

That said, my long term goal would end up with all walls covered with wood. Are there any codes which say that the wall facing the garage should be fire retardant sheet rock?

Termites in Massachusetts???

All the time I lived in upstate NY I never heard of a termite problem.

Now if ya' wanta' see termite damage, I have pictures of my house here in South Carolina that will shock you. These little bastards snuck into my house, undetected even to a trained termite exterminator. They had a feast.

These termites must not have got the memo. Did I mention I have wetlands behind my 1/3 acre lot with lots of standing water? Termites may be the least of my concern considering the large amount of mosquitoes.
 

jcirafic

Member
Joined
Oct 4, 2008
Messages
10
Location
Mid Hudson Valley, NY
Ion, great thread. Please keep us updated. Not sure why you want to use OSB, if you do any welding that could be a fire hazard. Fireproof SR seems like a better choice but the taping and painting would be a pain. Why did you yank the engine out of that car? What will you do with the engine and the car? Anyway best of luck with all your projects, you do a hell of a lot more than me.
 
OP
I

IONH

Well-known member
Joined
Feb 12, 2010
Messages
2,043
Location
Central Massachusetts
Ion, great thread. Please keep us updated. Not sure why you want to use OSB, if you do any welding that could be a fire hazard. Fireproof SR seems like a better choice but the taping and painting would be a pain. Why did you yank the engine out of that car? What will you do with the engine and the car? Anyway best of luck with all your projects, you do a hell of a lot more than me.

I do not like mudding and taping, takes way too much finesse and I reserve that patience for inside the house work.

The added bonus of using wood is I can attach anything to any wall anywhere without being concerned of finding a stud. This is especially useful for putting hooks up at various locations around the walls, some closer than 16" on center.

The current car is a donor for a different car, so I am simply stripping it and getting rid of the chassis as soon as possible after that.
 

e-tek

Well-known member
Joined
Dec 19, 2007
Messages
10,690
Location
Saskatoon, SK
Hey - what's been happening in the shop? Got the car stripped and outta there? Are you using those parts to make another car or just for spares?

Nice to have a wife that comes to the garage to help.....mine just comes in to pose!
 
OP
I

IONH

Well-known member
Joined
Feb 12, 2010
Messages
2,043
Location
Central Massachusetts
Thanks for asking for updates guys. Unfortunately, as with most others around here, I haven't been able to work in the garage hardly at all over the last 3 or so weeks. I do hope to get back to it in the middle of this week though now that the holidays are over.

The engine will be going in my little British car as a nice >200 wheel torque upgrade to the original ~60 stock torque ancient motor. THAT will be a fun fabrication project!

Reading my previous post, I meant to type "wouldn't" not would.

I thought it made more sense to not have to worry about it seeing as it is a detached structure. That will help me make the garage more consistent in the long run by having the same material all the way around.
 
OP
I

IONH

Well-known member
Joined
Feb 12, 2010
Messages
2,043
Location
Central Massachusetts
Okay, did a small bit of work in there today. Fired the heater up to bring temps from 39 to 52 which helped.

First two pictures are of a couple signs the wife got me for Christmas.

Next is the clock she got me for a late Christmas gift. Forth is the 80th anniversary Craftsman clock which has been hidden for a while.

Fifth is some PVC air line which I had never used since living in this house (just over 5 years now). Got in the way of the garage vac mounting location so I finally cut it out.

Sixth is the bracket for hanging the garage vacuum. Seventh is the garage vacuum box itself. The plan is to mount the vacuum as high as I can on the pole between the front roll up doors. Because the ON/OFF switch is near the top, I think I'll wire it into a switched outlet a bit lower on the same section of wall.
 

Attachments

  • IMG_20130119_181758.jpg
    IMG_20130119_181758.jpg
    139 KB · Views: 153
  • IMG_20130119_181746.jpg
    IMG_20130119_181746.jpg
    151.7 KB · Views: 78
  • IMG_20130119_181736.jpg
    IMG_20130119_181736.jpg
    145.7 KB · Views: 75
  • IMG_20130119_181655.jpg
    IMG_20130119_181655.jpg
    144.8 KB · Views: 2,373
  • IMG_20130119_181630.jpg
    IMG_20130119_181630.jpg
    79.9 KB · Views: 2,365
  • IMG_20130119_170040.jpg
    IMG_20130119_170040.jpg
    135.8 KB · Views: 68
  • IMG_20130119_170031.jpg
    IMG_20130119_170031.jpg
    147.1 KB · Views: 76

melliott28

Well-known member
Joined
Jul 26, 2010
Messages
181
Location
Plano, TX
Thanks for asking for updates guys. Unfortunately, as with most others around here, I haven't been able to work in the garage hardly at all over the last 3 or so weeks. I do hope to get back to it in the middle of this week though now that the holidays are over.

The engine will be going in my little British car as a nice >200 wheel torque upgrade to the original ~60 stock torque ancient motor. THAT will be a fun fabrication project!

If the car you are putting that engine in is small and light, then it should haul ***! Way back in the 80's, my father had 1988 Mazda MX-6 GT (which has the same engine) and it was a blast to drive. Are you going to do any mods to the engine or just freshen it up/keep it basically stock? Please post pictures of the engine swap once it is complete.
 
OP
I

IONH

Well-known member
Joined
Feb 12, 2010
Messages
2,043
Location
Central Massachusetts
If the car you are putting that engine in is small and light, then it should haul ***! Way back in the 80's, my father had 1988 Mazda MX-6 GT (which has the same engine) and it was a blast to drive. Are you going to do any mods to the engine or just freshen it up/keep it basically stock? Please post pictures of the engine swap once it is complete.

Yes, same engine so you probably remember its torque even back then.

I do not plan on any internal engine mods as of yet. The 12V head does not breath very well, but getting 200-225 wheel hp should be good enough with a minor turbo upgrade and another chip. I plan on putting it in a small ~2300 pound car so yes, it should haul nicely.

I'll definitely put up some pictures when I get to the project. Too many things on the list right now to risk the well running (but slow) car not being ready for the summer. Will all depend on when I get the timing belt done on my VW which is next in line after this shell is gone.
 
OP
I

IONH

Well-known member
Joined
Feb 12, 2010
Messages
2,043
Location
Central Massachusetts
Worked in the cramped garage today and installed the garage vacuum my dad got me for Christmas!

My placement decision was to make it convenient for either side or even potentially in the driveway. However, it sticks out quite far so that may change in a bit. I also added a bungie cord to ensure the hose does not fall off.
 

Attachments

  • IMG_20130119_181758.jpg
    IMG_20130119_181758.jpg
    139 KB · Views: 92
  • IMG_20130123_182717.jpg
    IMG_20130123_182717.jpg
    139.7 KB · Views: 97
  • IMG_20130123_183417.jpg
    IMG_20130123_183417.jpg
    142.9 KB · Views: 127
  • IMG_20130123_185607.jpg
    IMG_20130123_185607.jpg
    140.9 KB · Views: 112
OP
I

IONH

Well-known member
Joined
Feb 12, 2010
Messages
2,043
Location
Central Massachusetts
Put the accessories to the garage vacuum in their nylon bag and hung it from the hose reel holder. (no picture)

Also continued working on the donor car today. Worked on pulling apart the HVAC assembly and found a nice sized mouse nest against the heater core. Wonder how well the heat output was. The picture was from a strange angle. The side of the core in the picture is actually vertical to the ground and not facing down like it may appear. The "bottom" is toward the floor.

Got tired of fighting with the HVAC as there must still be a bolt / nut hidden somewhere so I worked on removing the wiring harness around the column. Generally went well. Got tired of that so I went into the engine bay and started unbolting and loosening up some of the harness there as well.

As I continue unplugging harnesses to try and save the harness it dawned on me that there is likely way more electronics that I am saving harnesses to than I actually need. Does anyone have a good suggestion on how to figure out (more importantly find) the minimal number of wires I will need to run this engine?

I'm thinking I could cut off all the electrical tape on the OE harness and trace all the engine harness wires to the ECU. After that, wire up my own relays for injectors and ignition. The rest is outside the motor so I am okay wiring that up myself (e.g. fuel pump, etc).
 

Attachments

  • IMG_20130127_122145.jpg
    IMG_20130127_122145.jpg
    135.1 KB · Views: 97
OP
I

IONH

Well-known member
Joined
Feb 12, 2010
Messages
2,043
Location
Central Massachusetts
Okay, excuses aside, I had a good battle with food poisoning early last week which put me out of commission till about Friday. Here are some updates.

The parts car is done! It is ready to be picked up. I am going to try and get my wife to call and have it picked up in the next couple of days.

It was my birthday yesterday so I got some nice new toys for the garage.

My wife got me two sets (Metric and SAE) long handle wrenches and a traffic light (picture below).

Some various HF items that my Mom randomly found in the store plus a $200 gift card and a membership to the inside track club (again, random). The gift card will be put to good use of course.

My Dad got me a WIFI thermostat for my garage. I'm excited to put this in so I can turn my garage heat on without having to go outside to do it. Of course, this won't help my freezing regulator issue which happens when the temp is below about 25 and the regulator is not in direct sun, but if it's not frozen then I'm good to go. I can also monitor it from inside to know the heat is rising so I know if I have to go outside and put the heat gut on the regulator (like today) to get it started.
 

Attachments

  • IMG_20130217_180524.jpg
    IMG_20130217_180524.jpg
    138.9 KB · Views: 93
  • TrafficLight1.jpg
    TrafficLight1.jpg
    42.6 KB · Views: 85
OP
I

IONH

Well-known member
Joined
Feb 12, 2010
Messages
2,043
Location
Central Massachusetts
I like the traffic light, how do you plan on hanging it up ?

I think it will go in that front left corner where it is sitting on the floor right now.

How to mount it? Not sure. Just posted in the traffic light thread asking how others do it. It'd be nice if it could swivel, but that is truly a nice to have and I would like it to be stable.

Any suggestions?

btw, cost was $50! The guy wanted $60 but since we drove out there in a snow storm, he knocked $10 off. Also, the guy had horses so the wife got to see them and pat them. He also had chickens which she got to pat. Made her day picking up my birthday gift! :lol:
 

NUTTSGT

Super Moderator
Staff member
Joined
Sep 14, 2009
Messages
50,853
Location
Northern Central Ohio
Without actually seein ghte traffic light, I have no suggestions, you posted in the right thread to get your question answered though.
 
OP
I

IONH

Well-known member
Joined
Feb 12, 2010
Messages
2,043
Location
Central Massachusetts
Installed a Honeywell WIFI thermostat in my garage today. I'm excited to be able to turn on the heat when on my way home or sitting in the house instead of having to go outside and kick it on.

Of course, that still won't help if the regulator is frozen... but it will let me monitor the temperature and if it doesn't go up a degree in at least 20 minutes, I will know to go out and heat up the regulator.
 

Attachments

  • IMG_20130220_173520.jpg
    IMG_20130220_173520.jpg
    126.6 KB · Views: 50
  • IMG_20130220_174509.jpg
    IMG_20130220_174509.jpg
    130.3 KB · Views: 52
  • IMG_20130220_182048.jpg
    IMG_20130220_182048.jpg
    129.6 KB · Views: 63
  • IMG_20130220_181051.jpg
    IMG_20130220_181051.jpg
    139.1 KB · Views: 86
To avoid these ads, REGISTER NOW!
Top Bottom