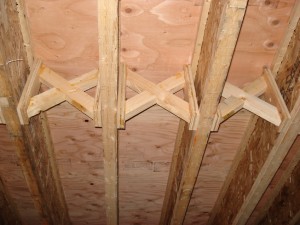
Hey guys. Here are some pics of the progress on my garage so far. First time home buyer and I'm 24 so I have a little bit of a budget, but I'm doing the best I can...
Here is the garage the day we moved in. 22x30 with an 8' insulated door. Bare studs on the walls and an open ceiling.
https://scontent-b-ord.**.fbcdn.net/hphotos-prn1/28159_4870757647633_1941664908_n.jpg
There were 5 rafters that were 2x6x16 and sistered together in the center. sagging terribly. I installed 2x8x24 16" on center.
https://scontent-b-ord.**.fbcdn.net/hphotos-prn2/969782_10200500949427086_1606822151_n.jpg
4500 CFM whole house fan installed
https://scontent-b-ord.**.fbcdn.net/hphotos-prn2/988696_10200539952882148_1644014258_n.jpg
The ceiling is closed off with OSB. Every sheet of OSB is notched to fit around the 2x6's for the roof so it touches the roof plywood. Also, i had to use 2x4s above the garage door, as the roof would have been too low with the 2x8s above the door, and i wanted to maintain a flat floor in the attic.
https://scontent-b-ord.**.fbcdn.net/hphotos-frc3/1240619_10200744232909021_1163879111_n.jpg
The attic is not very tall, but it has lights and good storage space. Accessed by a pull down Werner ladder
https://scontent-a-ord.**.fbcdn.net/hphotos-ash3/1175523_10200620865384910_2071097563_n.jpg
The roof was sprayed because it would have taken me a month to roll/brush it
https://scontent-b-ord.**.fbcdn.net/hphotos-ash4/1185501_10200744693800543_1539441446_n.jpg
15 gallons of paint later...
https://scontent-b-ord.**.fbcdn.net/hphotos-prn2/1185037_10200750206138348_1384796039_n.jpg
Since the garage door opener is above the roof line, you wouldn't have any lights that would come on when the door was opened. The two lights pictured are controlled by the garage door opener
https://scontent-b-ord.**.fbcdn.net/hphotos-ash3/557535_10200759950141942_448571823_n.jpg
All 16 lights installed. 14 on switches and two on the garage opener. The bulbs are Phillips T8 32w 835 5000k
https://scontent-b-ord.**.fbcdn.net/hphotos-prn1/65021_10200785179492660_1335283130_n.jpg
Night shot with just the ceiling complete
https://scontent-b-ord.**.fbcdn.net/hphotos-prn2/1187100_10200794505365801_427376550_n.jpg
Floor coating
https://scontent-b-ord.**.fbcdn.net/hphotos-ash3/553649_10200820353691993_502743998_n.jpg
Outlets
https://scontent-b-ord.**.fbcdn.net/hphotos-prn2/1239569_10200840186947812_861673906_n.jpg
Attic fan cover
https://scontent-b-ord.**.fbcdn.net/hphotos-ash4/1239988_10200859504630742_862690946_n.jpg
Night shot after the floor
https://scontent-a-ord.**.fbcdn.net/hphotos-ash3/1240112_10200860080845147_1511250391_n.jpg
Insulation
https://scontent-b-ord.**.fbcdn.net/hphotos-ash3/11507_10200863660294631_1580055312_n.jpg
OSB
https://scontent-a-ord.**.fbcdn.net/hphotos-prn2/1256530_10200865157332056_1579154163_n.jpg[IMG]
Painted OSB
[IMG]https://scontent-a-ord.**.fbcdn.net/hphotos-prn2/1376467_10200897533501440_339255077_n.jpg
Pegboard on top
https://scontent-b-ord.**.fbcdn.net/hphotos-prn2/1378315_10200924195647977_596455017_n.jpg
Because everyone needs to be able to balance tires at home
https://scontent-a-ord.**.fbcdn.net/hphotos-frc3/988306_10200895967542292_1662305503_n.jpg
Dayton 60k BTU heater
https://scontent-b-ord.**.fbcdn.net/hphotos-ash4/1391633_10200932503855677_1314745480_n.jpg
Gas line
https://scontent-a-ord.**.fbcdn.net/hphotos-prn2/960153_10200937133451414_1409166940_n.jpg
https://scontent-a-ord.**.fbcdn.net/hphotos-frc3/1381193_10200937987032753_615708142_n.jpg
This is as far as I am for now. Tomorrow I will position my air compressor and start running the air line around the garage. There are alot of amazing garages on here so be easy on me! My girlfriend and my dad are the only ones that help me with this project, and the only thing we haven't done ourselves was the floor coating...thanks for looking!
Here is the garage the day we moved in. 22x30 with an 8' insulated door. Bare studs on the walls and an open ceiling.
https://scontent-b-ord.**.fbcdn.net/hphotos-prn1/28159_4870757647633_1941664908_n.jpg
There were 5 rafters that were 2x6x16 and sistered together in the center. sagging terribly. I installed 2x8x24 16" on center.
https://scontent-b-ord.**.fbcdn.net/hphotos-prn2/969782_10200500949427086_1606822151_n.jpg
4500 CFM whole house fan installed
https://scontent-b-ord.**.fbcdn.net/hphotos-prn2/988696_10200539952882148_1644014258_n.jpg
The ceiling is closed off with OSB. Every sheet of OSB is notched to fit around the 2x6's for the roof so it touches the roof plywood. Also, i had to use 2x4s above the garage door, as the roof would have been too low with the 2x8s above the door, and i wanted to maintain a flat floor in the attic.
https://scontent-b-ord.**.fbcdn.net/hphotos-frc3/1240619_10200744232909021_1163879111_n.jpg
The attic is not very tall, but it has lights and good storage space. Accessed by a pull down Werner ladder
https://scontent-a-ord.**.fbcdn.net/hphotos-ash3/1175523_10200620865384910_2071097563_n.jpg
The roof was sprayed because it would have taken me a month to roll/brush it
https://scontent-b-ord.**.fbcdn.net/hphotos-ash4/1185501_10200744693800543_1539441446_n.jpg
15 gallons of paint later...
https://scontent-b-ord.**.fbcdn.net/hphotos-prn2/1185037_10200750206138348_1384796039_n.jpg
Since the garage door opener is above the roof line, you wouldn't have any lights that would come on when the door was opened. The two lights pictured are controlled by the garage door opener
https://scontent-b-ord.**.fbcdn.net/hphotos-ash3/557535_10200759950141942_448571823_n.jpg
All 16 lights installed. 14 on switches and two on the garage opener. The bulbs are Phillips T8 32w 835 5000k
https://scontent-b-ord.**.fbcdn.net/hphotos-prn1/65021_10200785179492660_1335283130_n.jpg
Night shot with just the ceiling complete
https://scontent-b-ord.**.fbcdn.net/hphotos-prn2/1187100_10200794505365801_427376550_n.jpg
Floor coating
https://scontent-b-ord.**.fbcdn.net/hphotos-ash3/553649_10200820353691993_502743998_n.jpg
Outlets
https://scontent-b-ord.**.fbcdn.net/hphotos-prn2/1239569_10200840186947812_861673906_n.jpg
Attic fan cover
https://scontent-b-ord.**.fbcdn.net/hphotos-ash4/1239988_10200859504630742_862690946_n.jpg
Night shot after the floor
https://scontent-a-ord.**.fbcdn.net/hphotos-ash3/1240112_10200860080845147_1511250391_n.jpg
Insulation
https://scontent-b-ord.**.fbcdn.net/hphotos-ash3/11507_10200863660294631_1580055312_n.jpg
OSB
https://scontent-a-ord.**.fbcdn.net/hphotos-prn2/1256530_10200865157332056_1579154163_n.jpg[IMG]
Painted OSB
[IMG]https://scontent-a-ord.**.fbcdn.net/hphotos-prn2/1376467_10200897533501440_339255077_n.jpg
Pegboard on top
https://scontent-b-ord.**.fbcdn.net/hphotos-prn2/1378315_10200924195647977_596455017_n.jpg
Because everyone needs to be able to balance tires at home
https://scontent-a-ord.**.fbcdn.net/hphotos-frc3/988306_10200895967542292_1662305503_n.jpg
Dayton 60k BTU heater
https://scontent-b-ord.**.fbcdn.net/hphotos-ash4/1391633_10200932503855677_1314745480_n.jpg
Gas line
https://scontent-a-ord.**.fbcdn.net/hphotos-prn2/960153_10200937133451414_1409166940_n.jpg
https://scontent-a-ord.**.fbcdn.net/hphotos-frc3/1381193_10200937987032753_615708142_n.jpg
This is as far as I am for now. Tomorrow I will position my air compressor and start running the air line around the garage. There are alot of amazing garages on here so be easy on me! My girlfriend and my dad are the only ones that help me with this project, and the only thing we haven't done ourselves was the floor coating...thanks for looking!

 Your garage really is looking sharp, though.