To avoid these ads, REGISTER NOW!

My Hardware Storage Project

melliott28

Well-known member
Joined
Jul 26, 2010
Messages
181
Location
Plano, TX
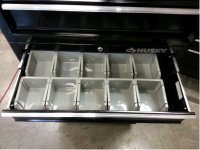
For the past few years, I had been looking for a way to store hardware, but my storage had some specific criteria: it had to have drawers, shallow depth (12-14 inches deep), the drawers had to be able to fit the grey Harbor Freight plastic bins (I have bunch of them), and it had to be relatively cheap. Browsing Craigslist daily produced no results. Then one day, I was in Home Depot and saw a 2 drawer intermediate chest with 4 inch drawers that would fit the HF bins and it was 12 inches deep. I got to thinking that 4 or 5 of these would fit the bill. Fast forward to 2 weeks ago and I was in Home Depot and they had the Husky 2 drawer intermediate chests on clearance for $39. While this unit is pretty flimsy, for $39 I figured I could make it work. So, I asked some supervisor guy in the store if I bought a bunch of these, could he give me an additional discount - he said he would knock off an additional 10%. I ended up buying 4 for around $140.

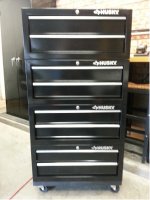
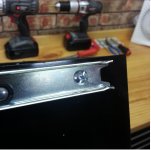
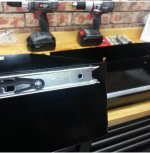
To make my storage unit, I bolted them together with 3/8" bolts, fender washers, and lock nuts. I also added a bolt and nut at the end of each slide because there was a hole for a fastener on the slide, but it wasn't utilized. I also took the casters off of a Harbor Freight moving dolly and mounted them to a 1.5" thick plywood base, then bolted the four cabinets to it. The finished unit, with the shallow depth, needs to be secured to a wall to prevent tipping over, but that isn't an issue because my plan is to secure it to the wall. While this solution is relatively light duty, it is more than adequate for my Homeowner/DIY garage and overall, I'm satisfied with the result. Here are some pics:
 

Attachments

  • What I started with.jpg
    What I started with.jpg
    133.8 KB · Views: 302
  • DrawerSlideafteraddingbolt-2.jpg
    DrawerSlideafteraddingbolt-2.jpg
    125.2 KB · Views: 235
  • DrawerSlideafteraddingbolt-1.jpg
    DrawerSlideafteraddingbolt-1.jpg
    107.7 KB · Views: 250
  • DrawerSlidebeforeaddingbolt-2.jpg
    DrawerSlidebeforeaddingbolt-2.jpg
    108.2 KB · Views: 236
  • DrawerSlidebeforeaddingbolt-1.jpg
    DrawerSlidebeforeaddingbolt-1.jpg
    118.4 KB · Views: 263
  • Bolts on right side.jpg
    Bolts on right side.jpg
    142.6 KB · Views: 245
  • Bolts on left side.jpg
    Bolts on left side.jpg
    143.8 KB · Views: 277
Last edited:
To avoid these ads, REGISTER NOW!
OP
M

melliott28

Well-known member
Joined
Jul 26, 2010
Messages
181
Location
Plano, TX
More Pics:
 

Attachments

  • BinsFittinginDrawer.jpg
    BinsFittinginDrawer.jpg
    131.3 KB · Views: 420
  • FinishedCabinet.jpg
    FinishedCabinet.jpg
    139.2 KB · Views: 423
Last edited:

PelicanPines

ALLIANCE MEMBER
Joined
Apr 30, 2014
Messages
38,104
Location
New Jersey, USA, Earth, My own reality
Awesome job. Looks like something I would love doing. I ended up getting the 25 compartment Stanley boxes... a dozen or so. I really need to make them INTO drawers in a cabinet. I'm constantly stacking restacking. Wish I did what you did from the start.
 

MN4x4

Well-known member
Joined
Sep 5, 2010
Messages
1,443
Location
Minnesnowta
Nice execution.

I'm glad I didn't see this when I could have purchased the intermediate units - with the quantity of hardware I have in the shop it would have cost me a fortune!!!
 

metal1313

Well-known member
Joined
Apr 28, 2009
Messages
3,416
Location
clinton NJ
looks good.

i sorta hate you though, you've reminded me how badly i need to start organizing my hardware drawer. i have cabinets similar to vidmars. 2 full drawers are packed and poorly done so. i want to cut 1/8-1/4 ply to make a grid. pretty easy once i make enough room in the garage to rip the sheets down to height, then cut the slots in the boards to interlock them.

its kind of hard to explain but i want to also cut a notch in the top center of each cube, so i can further divide them, i always have 5lbs of 2.5 deck screws, but normally have less than 50 1/2 nuts so they need less room.

most of my sub 1/8 hardware is in plano organizers, the small clear ones. i keep my electrical connectors in one, and so on. they just go on a shelf
 

Hundojoe

Well-known member
Joined
Mar 5, 2012
Messages
122
Location
Minnesota
I don't think that's going to work very well for you, you should probably give that to me and build a new one! Seriously though, nicely done and I'm probably going to use your idea.
 
To avoid these ads, REGISTER NOW!

sho92

Active member
Joined
Oct 14, 2009
Messages
39
Location
Upper Freehold, NJ
Great idea! But I'm confused on one thing. You have casters on it, but say you need to attach it to a wall so it doesn't tip... Are you mainly just using the casters as feet then?
 
Last edited:
OP
M

melliott28

Well-known member
Joined
Jul 26, 2010
Messages
181
Location
Plano, TX
Thanks for compliments guys!

Great idea! But I'm confused on one thing. You have casters on it, but say you need to attach it to a wall so it doesn't tip... Are you mainly just using the casters as feet then?

There are a few reasons for the casters. The first is that I am still in the process of arranging my garage and I need to be able to move the cabinet easily. With the thin metal of these cabinets, after I put hardware in it, moving this unit without warping or bending the metal would be next to impossible without casters. Second, it raises the height so that the bottom drawers aren't literally sitting on the floor. The third reason is that in the future, should I move, it needs to be able to be moved without lifting.
 

Vegaman_Dan

Well-known member
Joined
Jun 1, 2012
Messages
2,453
Location
Pacific, WA
You built a cabinet to meet your needs out of modular components and stacking them like Lego's. I approve of this.

If you ever wanted to make a matching unit, you could bolt them back to back as a standalone hardware storage solution that wouldn't tip over and bit mobile too.
 

garya505

Member
Joined
Jun 29, 2014
Messages
12
Location
NM
I had actually considered the idea that melliot28 implemented. I picked up a Lowes intermediate chest with two 2" and one 4" drawer to see if this would work, and it would, but they didn't have anymore of that chest. And, I'd have to set them on a shelf or some kind of cart (which I didn't have). I also looked at the kind of parts I have and realized that most of them would fit better in 2" plastic bins, and I'd get better space utilization. For the large parts (lag screws, etc.) I can just use larger bins. Schaller has the 2" bins in sizes up to 6"x12". So ... today I picked up the Seville Classics UHD20204 rolling cabinet for 200 bucks at Sam's. This thing has five 23"W x 16"D x 2.5"H drawers for a total of 1840 square inches of drawer area, plus a big 23"W x 16"D x 9.5"H drawer on the bottom. I plan to use Stanley or Schaller plastic bins. I'll post pics when I get it assembled and loaded up.

https://www.sevilleclassics.com/6_drawer_rolling_cabinet_ultra_hd
 

Attachments

  • UHD20204.jpg
    UHD20204.jpg
    11.9 KB · Views: 40

NUTTSGT

Super Moderator
Staff member
Joined
Sep 14, 2009
Messages
50,852
Location
Northern Central Ohio
Just a word of advice, fill the bottom drawers first.

I attempted something similar with some Cman lowers during my refurb of my garage. The first one that I opened was dented. Once I felt how cheap they were made I decided not to use them. I hope yours holds up to the weight of the fasteners.
 
To avoid these ads, REGISTER NOW!
Top Bottom