
You are using an out of date browser. It may not display this or other websites correctly.
You should upgrade or use an alternative browser.
You should upgrade or use an alternative browser.
My humble contribution
- Thread starter JACDes
- Start date
77thor
Well-known member
What do you have under the wrapper on the trailer?
This was a originally built in 1914, with the home, possibly used as a horse barn, with the hay loft above.
I found lumber yard ticket dated from November 1938, which is when I assume it was remodeled into the garage.
So lucky me the third owner got to fix all the previous mistakes & deferred maintenance LOL, but it did survive 100 years. 2 layers of slabs, that was a pleasant surprise.
The way I repaired it should be good for another 200+
Didn't people shoot grades back then to make sure they were not building in a "low spot"
Last edited:
1/2 Cup
Member Emeritus
Looking fantastic and many thanks for posting.
Didn't people shoot grades back then to make sure they were not building in a "low spot"
From what I've seen working on old buildings, I think they waited till their horse took a leak and watched the general direction it ran in. If they weren't drunk.
MattVette89
Well-known member
a car, that's a silly question.
Hard to tell...my guess is a third gen trans am with 5 stars and a cowl hood.
MattVette89
Well-known member
From what I've seen working on old buildings, I think they waited till their horse took a leak and watched the general direction it ran in. If they weren't drunk.
The builder...or the horse?
The builder...or the horse?
Well I was thinking the builder, but now that the question has been asked..

We admittedly don't always do so hot these days either. Too high is much easier to fix than too low

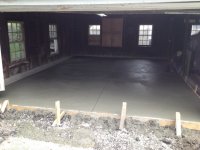
I gave up 4" of headroom at the rear and 2" at the doors in order to have positive drainage to the driveway. The apron makes the transition back to grade acting as a "gutter" at the same time to channel run-off until I can redo the driveway.
I had to compromise and use 6'8 tall overhead doors, not a big deal, the original doors were that height. The family still SUV gets in with room to spare.
There was no stone fill under the original slab, it was just poured on earth, but I had to remove the other slab first (the one poured in 1938?) and that doubled my disposal cost and machine rental time, thankfully I did all this labor myself.
24 yards of 3/4" crushed limestone (12 per 2 car bay) went in before the new slabs were placed. My concrete crew did the final grading and were impressed with my eyeballed rough placing. They compacted all the stone, laid the 2" foam, 12 mil visquene and wire mesh. The slabs and foundation are now frost protected.
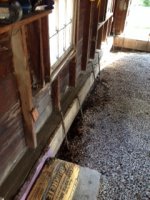
From years of being wet and dry, the original sill plates were rotted out along with the tails of the studs, Thankfully the brick veneer was holding up the structure! I repaired all of that and raised the height of the foundation by pouring a concrete "knee wall" to make sure the wood framing would never get wet or rot out again.
I had to compromise and use 6'8 tall overhead doors, not a big deal, the original doors were that height. The family still SUV gets in with room to spare.
There was no stone fill under the original slab, it was just poured on earth, but I had to remove the other slab first (the one poured in 1938?) and that doubled my disposal cost and machine rental time, thankfully I did all this labor myself.
24 yards of 3/4" crushed limestone (12 per 2 car bay) went in before the new slabs were placed. My concrete crew did the final grading and were impressed with my eyeballed rough placing. They compacted all the stone, laid the 2" foam, 12 mil visquene and wire mesh. The slabs and foundation are now frost protected.
From years of being wet and dry, the original sill plates were rotted out along with the tails of the studs, Thankfully the brick veneer was holding up the structure! I repaired all of that and raised the height of the foundation by pouring a concrete "knee wall" to make sure the wood framing would never get wet or rot out again.
The new concrete knee-walls are tied to the old with rebar, it took a few weekends and hours during the week after work but I got it done.
I am glad a co-worker let me borrow his concrete mixer,that helped speed up the process !
you can see in the slab picture the positive pitch of the floor to the driveway and how much I raised the foundation to keep the wood framing above the floor line. The north wall (left side on the slab photo) had no footing! The brick had support but the studs were framed on the original slab which had a thickened edge.. when they poured the second slab they buried this sill plate and tails of the studs, it probably took 10-20 years for them to rot out.
For this wall I formed a footing first & tied it to the brick footing. Then I poured a curb over that for the wood framing to bear on. all the old & new concrete is frost protected. I don't plan on a redo in my lifetime LOL.
The last picture show the remains of a typical sill plate.. this was the underside.. the top still looked good, until you hit it with a hammer, LOL. All the sills are pressure treated lumber now.
Attachments


Last edited:
One of my favorite pics from this past summer !
The little ones stayed inside the house when I was operating the skid steer.
but I saw no harm letting them pose with me with the machine parked for the day.
After I saw cut the old floor into 3x3 panels I use the forks to pick them up and toss them in the dumpster. I was not planning on repeating this but who knew there was another slab.
2 dumpster disposal turned to 4 ! You can see / appreciate how quickly a contractor could lose money on a rehab job. Another life lesson I can share when someone ask me why construction is so expensive..
Attachments

Last edited:
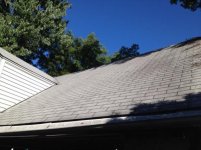
This is how I solved my sagging roof.
Even old growth 2x4s have their design limits.
A 12' rafter span (measured from horizontal) @ 2' o.c. led to a bowed roof. it was probably curved from day 1 !
. They also framed the attic floor perpendicular to the rafters.
I ran some calcs. and designed a beam / purlin system which actually accomplished 3 things..
1) it cut the rafter span in half.
2) my design also let me cut the span of the floor joists which were also under sized for the original span.
3) it allowed me to create rafter ties which frame from the top plate/tail of the rafters into the glulam beams and also nailed to the floor joists below bracing the walls to the roof.
The end result was a "straight" roof, and some very useful cubby holes for storage.
Even old growth 2x4s have their design limits.
A 12' rafter span (measured from horizontal) @ 2' o.c. led to a bowed roof. it was probably curved from day 1 !
. They also framed the attic floor perpendicular to the rafters. I ran some calcs. and designed a beam / purlin system which actually accomplished 3 things..
1) it cut the rafter span in half.
2) my design also let me cut the span of the floor joists which were also under sized for the original span.
3) it allowed me to create rafter ties which frame from the top plate/tail of the rafters into the glulam beams and also nailed to the floor joists below bracing the walls to the roof.
The end result was a "straight" roof, and some very useful cubby holes for storage.
Attachments


Last edited:
I jacked the purlins into place, an 8' section at a time. I took the bow out of the roof with a few pumps of my floor jack checked the beam for level, then trimmed the posts to length.
No creaking, groaning,, popping, or 1/4" per day non-sence. The joists simply wanted to be jacked back into their proper position, and 4 months later they are still there !
To assist me I used simpson purlin brackets, which avoided having to notch the purlins. I did have to cut blocking and plywood to sister the joints since the brackets are made for 4x4 framing but they served the purpose quite well.
Last edited:


once the roof was straightened out this is how I addressed the floor joists
My calcs included framing an LVL beam from glulam beam to glulam beam so the span of the floor joist could be cut in half.
so the glulam beams are massive for a reason.
1) They have to span 18' from outside wall to interior steel beam
2) They are the support system for the purlins bracing the roof and have to transfer those loads to the exterior walls.
3) the are the support system for the LVL beams used to reinforce the floor framing
I also had to design the steel as well.
Over-killed engineering ? hardly, Sound design based on calcs for the anticipated loads.. YES. Can the average Joe without an Arch . Eng. or construction background do it?
Maybe, there is nothing illegal about a home owner doing his own repairs but I would not recommend this for the novice or first timer without doing a lot of research and speaking with the right people in terms of structural design.
There are many ways to solve a problem this it the way which worked for me and for what I wanted to achieve.
Last edited:

77thor
Well-known member
a car, that's a silly question.
What do you have under the wrapper on the trailer?
Sorry... I didn't know that it is a SECRET.

catch2otwo
Well-known member
you posted a picture of a car under covers on a forum full of car guys and you are suspicious of why they want to know whats under your cover...paranoid much?
you posted a picture of a car under covers on a forum full of car guys and you are suspicious of why they want to know whats under your cover...paranoid much?
you must be confused, I don't see any cars.

MattVette89
Well-known member
Just curious... In hindsight would it have been easier to tear it down and rebuild it? Was there a significant cost difference? Just asking because I don't know the answer.
Just curious... In hindsight would it have been easier to tear it down and rebuild it? Was there a significant cost difference? Just asking because I don't know the answer.
It is always more cost effective to rehab, since I did not have to tear down, and dispose of the entire structure and start from scratch I saved a lot of money & time. Total demo would have meant total removal including the old foundations, etc.
The new garage would have to comply with current zoning in our area which limits new detached garages in residential lots (despite lot size) to 720 sf.
( 30 x 24 ) My existing garage does not comply with this, because it existed prior to this zoning ordinance. (Grand-fathered in or Existing Non-conforming)
Given the choice to tear down my 4 car garage to build a new smaller 3 car or repair/maintain my existing garage, to me the answer was simple.
Scott V
Well-known member
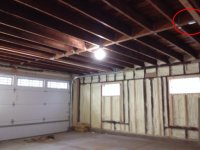
That I should say those (because there are 4 of them) is a Simpson LVL hanger and it is made for beam to beam connections such as this to transfer forces from one beam to the other.
if you look to left side of the LVL beam you will see another one.
Not an off the shelf component at the box store. You have use the Simpson catalog to select the correct part # based on the design loads. Once you have that part you can special order them from Simpson (I went thru a Lumber yard not a box store) and they arrive within 1-2 weeks based on inventory.

the glulam beams which the LVLs frame into with the brackets simple span from the exterior walls to an interior steel beam.
The steel beam is between the 2 garage door bays and also is the interior bearing point for the 2x8 floor joist.
The steel beam is between the 2 garage door bays and also is the interior bearing point for the 2x8 floor joist.
interior steel beam to left on this pic
hopefully this gives you a better understanding of the framing system.
The garage always had an interior steel beam but it had post at mid span making getting in out of cars a PIA ! I re-designed this to be a clear span beam with posts at the ends.
I also changed the sagging wood headers to steel and those are connect to the interior beam and corner posts which also helped to increase the shear capacity of the wall.
this thing is not going anywhere LOL.
Attachments

Scott V
Well-known member
Beefy. From that first angle it was hard to tell. Nice open space now!
