SPaikmos
Active member
I recently did two garages with polyurea. This is my "post-mortem" of the experience, what went well and what did not. I hope this helps others with the process.
Disclaimer: I did not do everything the "right way". I'm sure I made a lot of mistakes. This writeup is to document how this process went for me, to make others aware of what mistakes I made and hopefully avoid them.
Why Polyurea?
I recently built a new 1400sf workshop, and considered a lot of options for garage flooring. I also have an existing 4-car 1000sf garage attached to the house. I originally planned to do epoxy flooring, but quickly realized there are tons of different epoxy kits. Then I learned about polyurea, polyaspartic, and went down a rabbit hole of flooring options. Luckily, I have a bunch of coworkers that have done similar things, and were able to share their experiences with me. Here's a quick rundown of their suggestions:
Rustoleum: A few coworkers used the Home Depot / Lowes Rustoleum kits. In general, they seem to be happy with the results, even after a few years. More knowledgeable folks describe this as being a step above painted floors, but not a true epoxy. However, if you're just parking cars, it seems to be sufficient for that.
Epoxy: A coworker who has done multiple floors (and knows waaaay too much about the chemistry of flooring) dissuaded us from using straight epoxies. His reasons are:
1) They are not great at bonding.
2) They are fairly brittle.
3) They cure slowly.
4) They are unable to take any moisture permeation, which means there are plenty of stories of delamination / peeling after 2-5 years.
They are used a lot because it has a longer pot life, easy to build, and cheap to produce.
Polyurea: The same coworker highly recommended polyurea, for the following reasons:
1) Much better at bonding
2) More flexible than epoxy
3) UV stable
4) Cure a lot faster than epoxy
He gave his seal of approval to Legacy Industrial Nohr-S, which is what I went with.
He states that a 2K polyurea is the ultimate, but a bit harder to work with (shorter pot life) and unless you have extreme requirements for flooring, usually not necessary for the average DIYer. His suggestions was the 1K polyurea with "unlimited" pot life.
Polyaspartic:
I was really tempted to use this. AFAICT, it's the best material you can use, the most protective covering. However, the POT life is short, and knowing what I know now, there is no way I would have succeeded in applying this. It's also more expensive.
FWIW, the Nohr-S is the sweet spot for me, in terms of durability / quality vs ease of application.
Porcelain Tile: 1 coworker found Dakota00's porcelain tile install thread. That was a tempting option for me, but I had already purchased the polyurea and was committed. Dakota00's install is amazing, but I am not a pro like he is and I hate tiling.
My Floor
My garages have moisture issues, so I decided to use Legacy's Aquadike moisture barrier to help mitigate it. Here are the products I used for my floor:
Xtreme Set 100 Crack Joint Filler
Aquadike Vapor Barrier
Standard Epoxy Primer Coating
Nohr-S Polyurea Coating
Nohr-S Pigment Pack
Soft Skid Media
Color Glitter
I went with a white floor and silver glitter. My intent was to try an aircraft hangar look, and I wanted silver metallic flake to break up the pure whiteness. I plan to build cars and planes, and functionality is much more important to me. The reason I chose white is to give me the best illumination / lighting in my garage. I also wanted to make it easy to find dropped bolts and parts on the floor. This color combo has already worked well for both purposes!
Ordering Product
One thing I wish I had thought about when ordering is to understand how the product is packaged and used. For instance, I ordered a 15 gallon batch of Aquadike without realizing that I would need to mix this up in 5x 3 gallon batches. The product came in 3x 5 gallon buckets. 2 buckets of Part A, and 1 bucket of Part B.
If I had known this, I would have paid extra to have it in smaller units so I can mix it without having to measure.
The other advice I would give is to order slightly more than you need. You do NOT want to be short on product. I'd rather throw away an extra gallon rather than being short by a pint. Seriously. Don't try to save a few bucks by ordering EXACTLY what you think you need. I imagine some concrete may absorb more or less material, and everyone's application technique varies so it's hard to know how much to order.
Preparation
As everyone will tell you, preparation is the key. If you don't prep the concrete properly, you are gonna have a bad time. Someone made the analogy that applying flooring is like the icing on the cake; it's the last step, and it takes much less time than baking the cake. I found this to be true.
What does it mean to do proper prep? To me, it means that you need to be willing to resist schedule pressure and DO IT RIGHT. When I took CPR training (twenty years ago - very different from today), I was giving breaths to the mannequin and I didn't observe the chest rising. Instead of going to the next step of compressions, I kept re-adjusting the airway until I was able to get proper breaths in. IOW, you do not apply flooring until the concrete prep is PROPERLY DONE. You can read my lessons from concrete prep to get my thoughts on that.
My original schedule was to spend one afternoon on grinding, and then go straight into polyurea. My ordeal ended up taking 2-3 weeks extra to rent three different machines and get it done right. YMMV.
This also means waiting for the right conditions to apply flooring. I had to delay my garage flooring because of a heatwave that had ambient temps above 90F (I wanted to apply closer to 70F) and rain in the forecast. I waited an extra week until the weather was predicted to be 70's for 3-4 days straight so I had a good, dry window to apply the products.
Tools
The basic tools you will need are:
- tarp for mixing liquids and keeping your tools
- roller frame. Buy a SOLID 18" roller frame
- 18" 3/8" nap rollers
- roller poles
- 1/8" notched squeegee
- lots of buckets
- mixer
- rubber gloves to protect your hands
- 3M organic respirator
- spike sandals
When doing flooring, lay a tarp outside of the garage and mix all your liquids there. If you spill something, you want to spill it on the tarp, and not on your prepped floor.
For the roller frame, I found that the material got sticky and harder to work with over time. You want a solid frame because you may be using a lot more force after 30min - 1 hour of working the material. There were a couple of times when the roller popped free of the frame, and I wish I had used locktite on the screws of the frame to keep it solid.
For the rollers, I wrapped them in packing tape first to de-lint them. This works well, and I had no issue with lint in the finishes.
Wear a proper organic mask whenever working with ANY of these products. They all have nasty fumes and you do not want to inhale any of it!
I used plenty of buckets. I had tried to save a few by cleaning them, but I found it's not worth the time to save them. Resign yourself to throw away a few buckets.
Xtreme Set 100
I used this to fill in cracks on the concrete. You need to use "fine silica sand" to fill in the cracks, and then pour the xtreme set 100 on top of it. I couldn't find the proper sand at Home Depot, but was able to find it at a pottery supply store. I believe it's "70 mesh" sand, and the salesman told me the consistency is roughly that of table salt. I bought a 50lb bag for $10 and used about 30 lbs of sand filling in cracks on 2500sf of flooring. I would describe the sand to be similar to what's in an hour glass.
The xtreme set 100 is tricky to work with. I ended up buying two gallons because I wasted the first 1/2 gallon figuring out how it works. My tips:
1) Only mix a few ounces at a time. Seriously. Start with 3 ounces of part A and 3 ounces of part B for a total of 6 ounces.
2) This stuff has a pot life of 2-3 minutes. You need to work FAST.
3) I recommend using it early in the morning or late at night. If it's cooler out, you'll get a little more time to work with it.
4) As you're using it, if it starts to thicken and turn white, STOP. It's too late and you don't want to apply it in this state since it won't soak in. You want to apply it when it's liquid so it absorbs into the sand.
5) Wear a proper organic mask, because this stuff smells bad.
I would buy the plastic bottles from Legacy. I tried finding appropriate bottles locally, and eventually found them at Safeway. I first tried using a disposable plastic water bottle, and that was a fail. You need a bottle with a small nozzle so you can accurately apply the liquid. Otherwise it just goes everywhere.
When mixing this, do it on a tarp away from the concrete. You will spill some, and it'll make a mess.
I found that after mixing 3-4 batches in the same bottle, the nozzle gets plugged up. Instead of throwing away the bottle, you can remove the hardened material and reuse the bottle. After throwing away 6 bottles, once I learned to remove the hardened material, I used one bottle for the entire garage.
Once this all dries, you use a hand grinder to smooth it out. I found some areas where I didn't get enough penetration with the liquid, and the sand wasn't solidified. You need to fill these in again with sand, and do more crack filler.
Aquadike Application
The Aquadike is basically a clear epoxy. Pot time is about an hour and I found it relatively easy to work with. When mixing the product, make sure you don't mix it too quickly otherwise you'll get bubbles, which is bad.
In my first garage, I used a 3/8" nap roller and found that this left a lot of bubbles when it dried. The instructions recommend using an "air release roller" but I didn't have one. In hindsight, I probably should have sanded down the bubbles after my application, but I was too lazy to do this.
For my second garage, I used a 1/8" notched squeegee to apply the product, and this seems to leave almost no bubbles. The product may have gone on a little thicker than recommended; it's hard to know exactly what the proper thickness should be since I've only done this twice now, and I don't have the benefit of seeing how my work stands up over time.
Spiky shoes are a must; it makes it really easy to spread the material around. I mixed it in 3 gallon batches, poured it onto the floor, and used the squeegee to push it around. My son used a paintbrush to trim the edges, and this worked fine. I thought the aquadike might be able to fill in some cracks, but that was not the case. It could probably do small cracks, but bigger ones showed through.
I found the 100sf/gallon to be reasonable. I mixed up 15 gallons of Aquadike for 1400sf and ended up with about 1 gallon extra. I mixed up 10.5 gallons for 1000sf and ended up with a little extra as well.
Standard Epoxy Primer Application
The Aquadike creates a non-porous surface, so I used the epoxy primer for this. I chose the off-white primer, since I planned to create a white floor. I ordered a 5 gallon batch of primer for each garage, and was told to mix it 2.5 gallons at a time.
You need to use a mixer on Part A (large portion) by itself, because that liquid tends to separate. Once Part A is mixed, you can then measure it out, transfer it to a second bucket, and then add Part B and mix again.
This material goes on thin, and it's easy to apply. I can't wear spike shoes for this, so make sure you plan your application carefully. I found this stuff gets very sticky after 30 min. I was able to do the 1400sf garage with one roller, but it may be a good idea to have a spare roller ready, just in case you decide you want to switch it in the middle of your application.
I used 5 gallons of primer on the 1400sf floor and it was barely enough.
Polyurea color coat
I mixed one pint of color with one gallon of polyurea for the color coat. I then poured about 2 gallons of liquid into a roller tray and applied it to the floor. The pot life is "infinite", but I found that the polyurea on the roller starts to harden after about an hour. I was able to finish 1400sf with one roller, but it would have been wise to switch it in the middle, YMMV. My roller popped off the frame once because the screws on the frame loosened, so beware of that.
Polyurea final coat
For this coat, I mixed in the silver glitter and anti-skid powder. This coat is the trickiest to apply, because it is clear and IMPOSSIBLE to see where you applied it. I ran into trouble stepping in areas that had already been applied. To help with this, I recommend having all the lights in your garage on so you can see where it has been applied. I would also recommend you segment the garage with "landmarks" to keep track of where you have applied the top coat.
My workshop was a vast expanse and I lost track of it and caused a mess. My second garage had some interior walls and features that made it easier to keep track of my progress, so I was able to apply the top coat without too much trouble. In hindsight, I would suggest placing blue tape on the walls to sub-divide the area and make sure you know where you have applied the top coat.
I bought 1 pound of silver glitter. I started by using 1/3 of the bag in a 5 gallon bucket of polyurea for the 1400sf workshop, and that was too light. I then used the remaining 2/3 of the bag in 5 gallons of polyurea for the 1000sf garage, and that turned out much better. In hindsight, I'd suggest using the entire 1 pound bag for 5 gallons. When mixing it, the polyurea became almost black and I thought it was too much glitter, but it turns out that I wanted more.
The glitter also helps with seeing where you applied product, although it still wasn't dark enough to see it easily.
One mistake I made here is walking on the white color coat barefoot with dirty feet. I left a couple of black footprints on the white coat. I tried to blend it in with the glitter, but it's pretty noticeable. D'oh! I'd recommend wearing socks when applying the top coat.
Timing
For my floor, I applied the layers at the following times:
Aquadike: Day 1, 6pm
Epoxy Primer: Day 2, noon
Polyurea color coat: Day 3, 7am
Polyurea top coat: Day 3, 1pm
In my case, I found the polyurea took a little longer to dry so I gave it a few extra hours. That's because I started applying at 7am, but finished at 9am so it had about 4 hours to dry before applying the second coat.
If you wait too long between layers, you will have to lightly sand to prep the surface to accept the next layer. The Aquadike and epoxy primer can go up to a day for recoats.
Conclusions
The first floor I did, I had a major screw up because I couldn't see where the final polyurea coat was done. It resulted in me stepping all over the final coat and causing a mess, but it turned out ok in the end.
The second floor came out much better (see pics below) and I'm super happy with the results!
In my case, I subscribe to the 80/20 rule. I wasn't after total perfection; I wanted to get 80% of the way to perfect, with minimal effort. I think I achieved this.
A few problems I did run into, but haven't solved:
1) I found that dirt / bugs got into my flooring between each layer. Since I did 4 layers, each layer got more junk in it. If I was a perfectionist, I would have sanded in between layers to remove this, but I decided to just proceed and polyurea over the bugs. It's a little messy near the garage door, but c'est la vie.
2) I used blue painters tape to mask off the walls. I found the epoxy primer to be really effective in priming through it, so the tape is now stuck to the walls. I was told to change the tape after each layer, and that would probably solve this issue. Otherwise, you will find that the tape, with four layers of material on it, is near impossible to remove in areas.
3) On the workshop floor, I didn't fill in all the cracks and I regret that. I thought four layers of material may fill in the cracks, but it doesn't. As someone else wrote, if you can fit a putty knife into a crack, you want to fill it in.
I'll see how the floor holds up over time. I'm confident that the materials are top notch, and should be able to compensate for my less-than-perfect application technique. I hope.
I can also see that broadcast flakes would hide a lot of my mistakes. As i said< I wanted the clean aircraft hangar look to make my garage brighter and easier to find dropped bolts. For a 'normal' garage, I'd go with a full flake layer. This would:
1) hide cracks fairly well
2) hide any footprints / bugs / dirt much easier
Unfortunately, I didn't want the flake look. The clean white look is a lot harder to pull off.
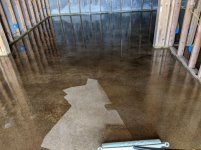
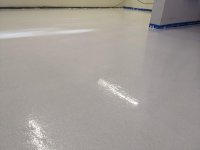
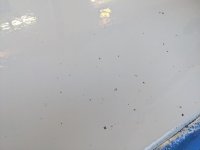
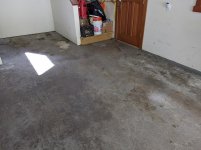
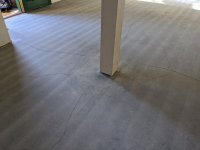
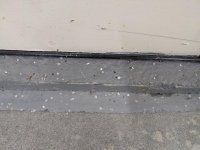
The pics below show:
1) Clear aquadike layer
2) Halfway through the epoxy primer coat application
3) Final floor picture
4) Bugs and **** that fell into the floor near the garage door entrance
Disclaimer: I did not do everything the "right way". I'm sure I made a lot of mistakes. This writeup is to document how this process went for me, to make others aware of what mistakes I made and hopefully avoid them.
Why Polyurea?
I recently built a new 1400sf workshop, and considered a lot of options for garage flooring. I also have an existing 4-car 1000sf garage attached to the house. I originally planned to do epoxy flooring, but quickly realized there are tons of different epoxy kits. Then I learned about polyurea, polyaspartic, and went down a rabbit hole of flooring options. Luckily, I have a bunch of coworkers that have done similar things, and were able to share their experiences with me. Here's a quick rundown of their suggestions:
Rustoleum: A few coworkers used the Home Depot / Lowes Rustoleum kits. In general, they seem to be happy with the results, even after a few years. More knowledgeable folks describe this as being a step above painted floors, but not a true epoxy. However, if you're just parking cars, it seems to be sufficient for that.
Epoxy: A coworker who has done multiple floors (and knows waaaay too much about the chemistry of flooring) dissuaded us from using straight epoxies. His reasons are:
1) They are not great at bonding.
2) They are fairly brittle.
3) They cure slowly.
4) They are unable to take any moisture permeation, which means there are plenty of stories of delamination / peeling after 2-5 years.
They are used a lot because it has a longer pot life, easy to build, and cheap to produce.
Polyurea: The same coworker highly recommended polyurea, for the following reasons:
1) Much better at bonding
2) More flexible than epoxy
3) UV stable
4) Cure a lot faster than epoxy
He gave his seal of approval to Legacy Industrial Nohr-S, which is what I went with.
He states that a 2K polyurea is the ultimate, but a bit harder to work with (shorter pot life) and unless you have extreme requirements for flooring, usually not necessary for the average DIYer. His suggestions was the 1K polyurea with "unlimited" pot life.
Polyaspartic:
I was really tempted to use this. AFAICT, it's the best material you can use, the most protective covering. However, the POT life is short, and knowing what I know now, there is no way I would have succeeded in applying this. It's also more expensive.
FWIW, the Nohr-S is the sweet spot for me, in terms of durability / quality vs ease of application.
Porcelain Tile: 1 coworker found Dakota00's porcelain tile install thread. That was a tempting option for me, but I had already purchased the polyurea and was committed. Dakota00's install is amazing, but I am not a pro like he is and I hate tiling.
My Floor
My garages have moisture issues, so I decided to use Legacy's Aquadike moisture barrier to help mitigate it. Here are the products I used for my floor:
Xtreme Set 100 Crack Joint Filler
Aquadike Vapor Barrier
Standard Epoxy Primer Coating
Nohr-S Polyurea Coating
Nohr-S Pigment Pack
Soft Skid Media
Color Glitter
I went with a white floor and silver glitter. My intent was to try an aircraft hangar look, and I wanted silver metallic flake to break up the pure whiteness. I plan to build cars and planes, and functionality is much more important to me. The reason I chose white is to give me the best illumination / lighting in my garage. I also wanted to make it easy to find dropped bolts and parts on the floor. This color combo has already worked well for both purposes!
Ordering Product
One thing I wish I had thought about when ordering is to understand how the product is packaged and used. For instance, I ordered a 15 gallon batch of Aquadike without realizing that I would need to mix this up in 5x 3 gallon batches. The product came in 3x 5 gallon buckets. 2 buckets of Part A, and 1 bucket of Part B.
If I had known this, I would have paid extra to have it in smaller units so I can mix it without having to measure.
The other advice I would give is to order slightly more than you need. You do NOT want to be short on product. I'd rather throw away an extra gallon rather than being short by a pint. Seriously. Don't try to save a few bucks by ordering EXACTLY what you think you need. I imagine some concrete may absorb more or less material, and everyone's application technique varies so it's hard to know how much to order.
Preparation
As everyone will tell you, preparation is the key. If you don't prep the concrete properly, you are gonna have a bad time. Someone made the analogy that applying flooring is like the icing on the cake; it's the last step, and it takes much less time than baking the cake. I found this to be true.
What does it mean to do proper prep? To me, it means that you need to be willing to resist schedule pressure and DO IT RIGHT. When I took CPR training (twenty years ago - very different from today), I was giving breaths to the mannequin and I didn't observe the chest rising. Instead of going to the next step of compressions, I kept re-adjusting the airway until I was able to get proper breaths in. IOW, you do not apply flooring until the concrete prep is PROPERLY DONE. You can read my lessons from concrete prep to get my thoughts on that.
My original schedule was to spend one afternoon on grinding, and then go straight into polyurea. My ordeal ended up taking 2-3 weeks extra to rent three different machines and get it done right. YMMV.
This also means waiting for the right conditions to apply flooring. I had to delay my garage flooring because of a heatwave that had ambient temps above 90F (I wanted to apply closer to 70F) and rain in the forecast. I waited an extra week until the weather was predicted to be 70's for 3-4 days straight so I had a good, dry window to apply the products.
Tools
The basic tools you will need are:
- tarp for mixing liquids and keeping your tools
- roller frame. Buy a SOLID 18" roller frame
- 18" 3/8" nap rollers
- roller poles
- 1/8" notched squeegee
- lots of buckets
- mixer
- rubber gloves to protect your hands
- 3M organic respirator
- spike sandals
When doing flooring, lay a tarp outside of the garage and mix all your liquids there. If you spill something, you want to spill it on the tarp, and not on your prepped floor.
For the roller frame, I found that the material got sticky and harder to work with over time. You want a solid frame because you may be using a lot more force after 30min - 1 hour of working the material. There were a couple of times when the roller popped free of the frame, and I wish I had used locktite on the screws of the frame to keep it solid.
For the rollers, I wrapped them in packing tape first to de-lint them. This works well, and I had no issue with lint in the finishes.
Wear a proper organic mask whenever working with ANY of these products. They all have nasty fumes and you do not want to inhale any of it!
I used plenty of buckets. I had tried to save a few by cleaning them, but I found it's not worth the time to save them. Resign yourself to throw away a few buckets.
Xtreme Set 100
I used this to fill in cracks on the concrete. You need to use "fine silica sand" to fill in the cracks, and then pour the xtreme set 100 on top of it. I couldn't find the proper sand at Home Depot, but was able to find it at a pottery supply store. I believe it's "70 mesh" sand, and the salesman told me the consistency is roughly that of table salt. I bought a 50lb bag for $10 and used about 30 lbs of sand filling in cracks on 2500sf of flooring. I would describe the sand to be similar to what's in an hour glass.
The xtreme set 100 is tricky to work with. I ended up buying two gallons because I wasted the first 1/2 gallon figuring out how it works. My tips:
1) Only mix a few ounces at a time. Seriously. Start with 3 ounces of part A and 3 ounces of part B for a total of 6 ounces.
2) This stuff has a pot life of 2-3 minutes. You need to work FAST.
3) I recommend using it early in the morning or late at night. If it's cooler out, you'll get a little more time to work with it.
4) As you're using it, if it starts to thicken and turn white, STOP. It's too late and you don't want to apply it in this state since it won't soak in. You want to apply it when it's liquid so it absorbs into the sand.
5) Wear a proper organic mask, because this stuff smells bad.
I would buy the plastic bottles from Legacy. I tried finding appropriate bottles locally, and eventually found them at Safeway. I first tried using a disposable plastic water bottle, and that was a fail. You need a bottle with a small nozzle so you can accurately apply the liquid. Otherwise it just goes everywhere.
When mixing this, do it on a tarp away from the concrete. You will spill some, and it'll make a mess.
I found that after mixing 3-4 batches in the same bottle, the nozzle gets plugged up. Instead of throwing away the bottle, you can remove the hardened material and reuse the bottle. After throwing away 6 bottles, once I learned to remove the hardened material, I used one bottle for the entire garage.
Once this all dries, you use a hand grinder to smooth it out. I found some areas where I didn't get enough penetration with the liquid, and the sand wasn't solidified. You need to fill these in again with sand, and do more crack filler.
Aquadike Application
The Aquadike is basically a clear epoxy. Pot time is about an hour and I found it relatively easy to work with. When mixing the product, make sure you don't mix it too quickly otherwise you'll get bubbles, which is bad.
In my first garage, I used a 3/8" nap roller and found that this left a lot of bubbles when it dried. The instructions recommend using an "air release roller" but I didn't have one. In hindsight, I probably should have sanded down the bubbles after my application, but I was too lazy to do this.
For my second garage, I used a 1/8" notched squeegee to apply the product, and this seems to leave almost no bubbles. The product may have gone on a little thicker than recommended; it's hard to know exactly what the proper thickness should be since I've only done this twice now, and I don't have the benefit of seeing how my work stands up over time.
Spiky shoes are a must; it makes it really easy to spread the material around. I mixed it in 3 gallon batches, poured it onto the floor, and used the squeegee to push it around. My son used a paintbrush to trim the edges, and this worked fine. I thought the aquadike might be able to fill in some cracks, but that was not the case. It could probably do small cracks, but bigger ones showed through.
I found the 100sf/gallon to be reasonable. I mixed up 15 gallons of Aquadike for 1400sf and ended up with about 1 gallon extra. I mixed up 10.5 gallons for 1000sf and ended up with a little extra as well.
Standard Epoxy Primer Application
The Aquadike creates a non-porous surface, so I used the epoxy primer for this. I chose the off-white primer, since I planned to create a white floor. I ordered a 5 gallon batch of primer for each garage, and was told to mix it 2.5 gallons at a time.
You need to use a mixer on Part A (large portion) by itself, because that liquid tends to separate. Once Part A is mixed, you can then measure it out, transfer it to a second bucket, and then add Part B and mix again.
This material goes on thin, and it's easy to apply. I can't wear spike shoes for this, so make sure you plan your application carefully. I found this stuff gets very sticky after 30 min. I was able to do the 1400sf garage with one roller, but it may be a good idea to have a spare roller ready, just in case you decide you want to switch it in the middle of your application.
I used 5 gallons of primer on the 1400sf floor and it was barely enough.
Polyurea color coat
I mixed one pint of color with one gallon of polyurea for the color coat. I then poured about 2 gallons of liquid into a roller tray and applied it to the floor. The pot life is "infinite", but I found that the polyurea on the roller starts to harden after about an hour. I was able to finish 1400sf with one roller, but it would have been wise to switch it in the middle, YMMV. My roller popped off the frame once because the screws on the frame loosened, so beware of that.
Polyurea final coat
For this coat, I mixed in the silver glitter and anti-skid powder. This coat is the trickiest to apply, because it is clear and IMPOSSIBLE to see where you applied it. I ran into trouble stepping in areas that had already been applied. To help with this, I recommend having all the lights in your garage on so you can see where it has been applied. I would also recommend you segment the garage with "landmarks" to keep track of where you have applied the top coat.
My workshop was a vast expanse and I lost track of it and caused a mess. My second garage had some interior walls and features that made it easier to keep track of my progress, so I was able to apply the top coat without too much trouble. In hindsight, I would suggest placing blue tape on the walls to sub-divide the area and make sure you know where you have applied the top coat.
I bought 1 pound of silver glitter. I started by using 1/3 of the bag in a 5 gallon bucket of polyurea for the 1400sf workshop, and that was too light. I then used the remaining 2/3 of the bag in 5 gallons of polyurea for the 1000sf garage, and that turned out much better. In hindsight, I'd suggest using the entire 1 pound bag for 5 gallons. When mixing it, the polyurea became almost black and I thought it was too much glitter, but it turns out that I wanted more.
The glitter also helps with seeing where you applied product, although it still wasn't dark enough to see it easily.
One mistake I made here is walking on the white color coat barefoot with dirty feet. I left a couple of black footprints on the white coat. I tried to blend it in with the glitter, but it's pretty noticeable. D'oh! I'd recommend wearing socks when applying the top coat.
Timing
For my floor, I applied the layers at the following times:
Aquadike: Day 1, 6pm
Epoxy Primer: Day 2, noon
Polyurea color coat: Day 3, 7am
Polyurea top coat: Day 3, 1pm
In my case, I found the polyurea took a little longer to dry so I gave it a few extra hours. That's because I started applying at 7am, but finished at 9am so it had about 4 hours to dry before applying the second coat.
If you wait too long between layers, you will have to lightly sand to prep the surface to accept the next layer. The Aquadike and epoxy primer can go up to a day for recoats.
Conclusions
The first floor I did, I had a major screw up because I couldn't see where the final polyurea coat was done. It resulted in me stepping all over the final coat and causing a mess, but it turned out ok in the end.
The second floor came out much better (see pics below) and I'm super happy with the results!
In my case, I subscribe to the 80/20 rule. I wasn't after total perfection; I wanted to get 80% of the way to perfect, with minimal effort. I think I achieved this.
A few problems I did run into, but haven't solved:
1) I found that dirt / bugs got into my flooring between each layer. Since I did 4 layers, each layer got more junk in it. If I was a perfectionist, I would have sanded in between layers to remove this, but I decided to just proceed and polyurea over the bugs. It's a little messy near the garage door, but c'est la vie.
2) I used blue painters tape to mask off the walls. I found the epoxy primer to be really effective in priming through it, so the tape is now stuck to the walls. I was told to change the tape after each layer, and that would probably solve this issue. Otherwise, you will find that the tape, with four layers of material on it, is near impossible to remove in areas.
3) On the workshop floor, I didn't fill in all the cracks and I regret that. I thought four layers of material may fill in the cracks, but it doesn't. As someone else wrote, if you can fit a putty knife into a crack, you want to fill it in.
I'll see how the floor holds up over time. I'm confident that the materials are top notch, and should be able to compensate for my less-than-perfect application technique. I hope.
I can also see that broadcast flakes would hide a lot of my mistakes. As i said< I wanted the clean aircraft hangar look to make my garage brighter and easier to find dropped bolts. For a 'normal' garage, I'd go with a full flake layer. This would:
1) hide cracks fairly well
2) hide any footprints / bugs / dirt much easier
Unfortunately, I didn't want the flake look. The clean white look is a lot harder to pull off.
The pics below show:
1) Clear aquadike layer
2) Halfway through the epoxy primer coat application
3) Final floor picture
4) Bugs and **** that fell into the floor near the garage door entrance


 You've almost convinced me to do this in the spring