To avoid these ads, REGISTER NOW!

My Little Aussie Welding Table

andsonsvd

Well-known member
Joined
Feb 7, 2012
Messages
169
Location
Mandurah, Western Australia
Hey,

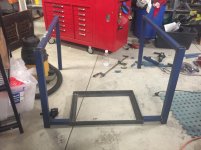
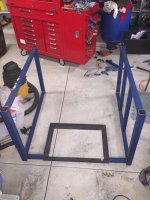
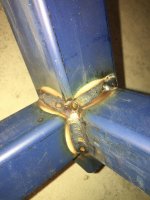
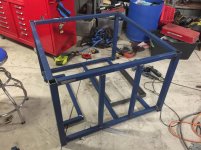
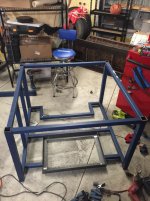
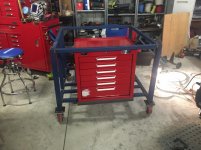
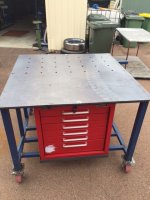
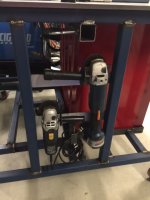
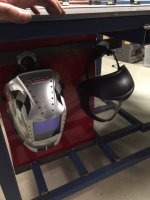
This is my first major Welding Project Started today.

It was over 100 Degrees (38+ C) today and I was at work until 2pm so I didn't get a lot done.

I have copied a lot of different designs from GJ and I am excited to get this finished.

I have a little man that will slow the process down but he is worth it:) I am building this table so I can finish his Radio Flyer Custom and many more projects for him.

Hopefully this will be my Mobile Welding Table in my new Garage and ill build a bigger one when the Garage is finished.

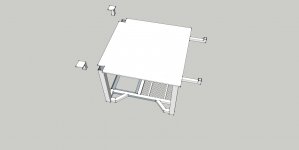
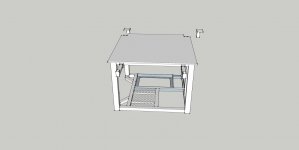
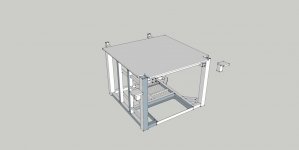
here are some of the sketchup drawing it will be 1200mmx1200mm.

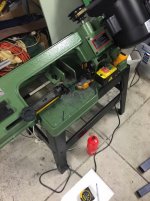
When Cutting 2inchx2inch using a Vertical Bandsaw should I use some type of lubricant?

Shane
 

Attachments

  • IMG_8689.jpg
    IMG_8689.jpg
    129.1 KB · Views: 232
  • IMG_8691.jpg
    IMG_8691.jpg
    95.4 KB · Views: 230
  • IMG_8692.jpg
    IMG_8692.jpg
    51 KB · Views: 283
  • Table 1.jpg
    Table 1.jpg
    121.1 KB · Views: 298
  • Table 2.jpg
    Table 2.jpg
    129.1 KB · Views: 291
  • Table 3.jpg
    Table 3.jpg
    52.2 KB · Views: 310
Last edited:
To avoid these ads, REGISTER NOW!

buildyourown

Well-known member
Joined
Jan 8, 2010
Messages
185
Stick wax is a really good lube for saw blades. Doesnt make a mess but really improves blade life
 
OP
A

andsonsvd

Well-known member
Joined
Feb 7, 2012
Messages
169
Location
Mandurah, Western Australia
Thanks Koditten and buildyourown.

Nursepeter I love sketchup it makes everything work out closer to how I wanted it then pen and paper.

Thanks Halfcup.

I am concerned that it will not quiet look like the design but I will be trying my hardest.

Working 11 hours a Day doesn't give me much time to play after work but I squeeze in any time I can when the little fella is asleep.

Tonight I got a bit done considering I felt like I was fighting the welder all night. I am VERY novice when it comes to welding and I love when I get a decent weld down unfortunately they are few and far between. I seem to have a lot of issue tonight with the tip welding over and on my 3rd tip I think it was a wire feed issue. I guess once I have some hours welding under my belt I will get to know the settings a little more.

I have got the 4 legs welded together in 2 sections. I think I am going to complete each side then weld them together.

You can see in the pictures the Angle section is for the tool box to drop into, I didn't really leave enough room for the welds in the corners and I have to work out the best way to grind them flat now, I can't fit my angle grinder in there and I didn't want to start the compressor up for the die grinder. I should have really only welded it underneath but I didn't think of that.

I haven't taken any close up's of any of the welds for a very good reason.

Here are some pictures please excuse the dirty workshop I am so out of space at the moment it isn't funny can't wait for the new workshop (Plans are with the engineer)

In the third Picture you will see that the excess steel I am storing outside is safely been watched over by this spider. Good to know I can sleep well tonight knowing that the steel is safe and he is outside not inside!

Shane
 

Attachments

  • IMG_8728.jpg
    IMG_8728.jpg
    82.5 KB · Views: 136
  • IMG_8729.jpg
    IMG_8729.jpg
    87.3 KB · Views: 117
  • IMG_8732.jpg
    IMG_8732.jpg
    39.3 KB · Views: 124

1/2 Cup

Member Emeritus
Joined
Apr 28, 2012
Messages
19,283
Location
Shepparton. Victoria. Australia
Great progress Shane, I like to set the MIG up by running a few tacks on a piece of scrap metal before start. Make sure you have a good earth connection at all times and try not to have any bends in your welding lead.:thumbup:

Regards.
 
OP
A

andsonsvd

Well-known member
Joined
Feb 7, 2012
Messages
169
Location
Mandurah, Western Australia
1/2 Cup.

Thanks!! I think the lead not been straight wasn't helping. Isn't it ironic I need a welding table to build my welding table... Working on the floor with not a lot of support is hard work.

Hopefully the welder behaves better tonight. I have a bit of material cutting to do but my new vertical bandsaw isn't cutting straight I think it may be a blunt blade. I hope not as it hasn't done much cutting and they are not cheap.

I like Hare and Forbes tools i have lots of them but the product information and instructions are never real flash.

Shane
 

1/2 Cup

Member Emeritus
Joined
Apr 28, 2012
Messages
19,283
Location
Shepparton. Victoria. Australia
Funny thing I have just brought a Unimig TIG / Arc from Hare and Forbes and the instructions were like a Welding for Dummies ( me to a tee ) and a fantastic guide.

I have to say tacking up RHS to keep it square is an art in it self, fully welding it can also be a test of ones patients as well and there are some do s and don'ts no doubt you are finding out and having a go which is the main thing.:thumbup:

One thing I can say is fully weld along an edge and no across a face as it bends like hell.

Let us know how you get on..
 
Last edited:

RivennHewn

Well-known member
Joined
Jun 4, 2011
Messages
10,370
Location
PNW
Looks like a good start on what going to be a great work table.

Have fun with it.
 
OP
A

andsonsvd

Well-known member
Joined
Feb 7, 2012
Messages
169
Location
Mandurah, Western Australia
Funny thing I have just brought a Unimig TIG / Arc from Hare and Forbes and the instructions were like a Welding for Dummies ( me to a tee ) and a fantastic guide.

I have to say tacking up RHS to keep it square is an art in it self, fully welding it can also be a test of ones patients as well and there are some do s and don'ts no doubt you are finding out and having a go which is the main thing.:thumbup:

One thing I can say is fully weld along an edge and no across a face as it bends like hell.

Let us know how you get on..

1/2 Cup do you mean "One thing I can say is fully weld along an edge and no across a face as it bends like hell. " when welding the top down?
 
OP
A

andsonsvd

Well-known member
Joined
Feb 7, 2012
Messages
169
Location
Mandurah, Western Australia
Well I am heading back into the shed tonight with a new toy!!!

Finally got myself a new welding helmet.

Good helmets are hard to get here cheap, but it seems this Lincoln Electric Helmet is the same price in Australia as it is in the USA.

Just going to have dinner and then give it a run.

Shane
 

Attachments

  • IMG_8745.jpg
    IMG_8745.jpg
    85.7 KB · Views: 43
  • IMG_8746.jpg
    IMG_8746.jpg
    71.9 KB · Views: 41
OP
A

andsonsvd

Well-known member
Joined
Feb 7, 2012
Messages
169
Location
Mandurah, Western Australia
Well the new Helmet worked great!

Got a fair bit done tonight. still not happy with the inconsistent welds.

I have posted a few pictures of a couple of welds I am reasonably happy with.

I only have to cut 3 more long lengths to join the two sides together and then ill have a few bits here and there to finish and then its ready for the final weld of any spots I have missed, and fit the casters which came in today.

We have a long weekend with Monday being Australia Day but I don't think ill be getting the Top before then so I might have to move onto my next little project which is to make a stand on casters for my vertical Bandsaw. It came with a small stand but it is way to short for me as I am 6ft7. I don't like sitting in a normal chair to use machinery I like to be on my stool or standing, at least Im ready to jump up while sitting on the stool.

Has anyone considered adding a light over the welding bench that is removable for the odd time you have low light?

Until next time Thanks again for everybody's help and advice.

Shane
 

Attachments

  • IMG_8751.jpg
    IMG_8751.jpg
    99.2 KB · Views: 183
  • IMG_8754.jpg
    IMG_8754.jpg
    104.9 KB · Views: 110
  • IMG_8753.jpg
    IMG_8753.jpg
    114.1 KB · Views: 135
  • IMG_8752.jpg
    IMG_8752.jpg
    108.9 KB · Views: 171
  • IMG_8755.jpg
    IMG_8755.jpg
    121 KB · Views: 104
  • IMG_8756.jpg
    IMG_8756.jpg
    95.8 KB · Views: 130

1/2 Cup

Member Emeritus
Joined
Apr 28, 2012
Messages
19,283
Location
Shepparton. Victoria. Australia
Looking great Shane, you can't beat a good welding helmet that's for sure.

I find the lighting in my shed is enough, I have seen a few benches on the forum with them though.

Regards
 

RivennHewn

Well-known member
Joined
Jun 4, 2011
Messages
10,370
Location
PNW
Check to see if your helmet has adjustable darkness.

It makes a big difference if you're welding inside at night, or outside in sunlight.
 

mike13u

Well-known member
Joined
Mar 1, 2008
Messages
616
Location
S.Florida
Check to see if your helmet has adjustable darkness.

It makes a big difference if you're welding inside at night, or outside in sunlight.

^^^What he said. Adjust your shade if the light is bad in a particular area. Your hood has that adjustment, I own the same model. Nothing wrong with positioning a light either
 

MarkG

Well-known member
Joined
May 23, 2012
Messages
1,219
Location
Elgin, IL
Looks like some nice welds to me! You ARE grinding/sanding your joint areas back far enough, right?? Kind of hard to tell what I'm seeing in the pics, but it looks like the paint is still pretty close to the welds, like it's only missing because it burned off----I like to flap sand more than I need so contamination is one less thing I have to worry about.
 
To avoid these ads, REGISTER NOW!

racingtadpole

Well-known member
Joined
Dec 3, 2011
Messages
2,029
Location
The far side of crazy.. but sometimes Australia
Sometimes I do, sometimes I dont, depends on what the finished product is going to be and how much time I have on my hands. stripping paint off all four sides of an RHS that has to be welded both ends...tedious.

Did you tack it together first? Sort of looks like you are finish welding as you go along with the construction.
 
OP
A

andsonsvd

Well-known member
Joined
Feb 7, 2012
Messages
169
Location
Mandurah, Western Australia
Racing,

Yes I tack it first on all parts and then go and tidy it up, then I thought I would just finish anything I miss at the end, Its my first time welding this much so I am open to suggestions Im not grinding the welds or anything I don't care much what it looks like, all I care about is that it is strong and that I built it :)

Shane
 
OP
A

andsonsvd

Well-known member
Joined
Feb 7, 2012
Messages
169
Location
Mandurah, Western Australia
Well this weekend was a Long Weekend as Today is Australia Day!!

Although I had a whole extra day off I got very little work done on the Table.

I have come to realise that there is something I could have really benefited from during this project and that is a Welding Table (ironic I know).

As previously stated this is my first real welding project and there is a few area's that I am not happy about but over all I think once I have finished welding it It will do its job, it may not look perfect but at least I can say I built it.

I still have some other structure to put in and I am wondering should I just put another bar in the middle at the top for support of the 16mm or just a little thicker than 5/8. Or should I just put some 45deg supports in all four corners?

Thanks Shane
 

Attachments

  • IMG_8820.jpg
    IMG_8820.jpg
    100.2 KB · Views: 56
  • IMG_8821.jpg
    IMG_8821.jpg
    106.6 KB · Views: 45
  • IMG_8823.jpg
    IMG_8823.jpg
    113.4 KB · Views: 50
OP
A

andsonsvd

Well-known member
Joined
Feb 7, 2012
Messages
169
Location
Mandurah, Western Australia
Should I be grinding down all of the welds? I feel I should because some are very ugly, but to be honest I don't want to affect the strength of the weld. and no one is really going to see them, and if they do tuff :)

Opinions?

Thanks Shane
 
OP
A

andsonsvd

Well-known member
Joined
Feb 7, 2012
Messages
169
Location
Mandurah, Western Australia
Getting there.

Can I ask the question I had asked before with no response.

Should I be grinding down all of the welds? I feel I should because some are very ugly, but to be honest I don't want to affect the strength of the weld. and no one is really going to see them, and if they do tuff

I have seen on another table where they welded on a table and left it unpainted to attach the earth clamp, does this work? should i have one on each corner? will that be enough to ground the whole top? I am going to be bolting the top down to some tabs which obviously won't be painted on the top so it has a nice connection.

A few more little things, a tidy up and paint.
 

Attachments

  • IMG_9086.jpg
    IMG_9086.jpg
    134 KB · Views: 58
  • IMG_9087.jpg
    IMG_9087.jpg
    134.5 KB · Views: 55
  • IMG_9088.jpg
    IMG_9088.jpg
    138.5 KB · Views: 73

f150skidoo

Well-known member
Joined
Dec 29, 2012
Messages
1,206
Location
Ontario, Canada
MarkG,

I was told by the steel guy that you can just weld right onto the coating as it doesn't matter, should I be taking it off?

Shane

Yes grind the paint off, your welds will look better. Plus you breathing in the paint smoke is not the best for your health, your bench is looking really good.
 
OP
A

andsonsvd

Well-known member
Joined
Feb 7, 2012
Messages
169
Location
Mandurah, Western Australia
1/2 Cup,

Thanks Im not 100% happy with it but hey for my first project I think I did ok.

It is almost perfectly level so thats something.

My concern about mounting the earth clamp on the piece I'm welding is that sometimes i work with 20mm SHS and the clamp obviously doesn't work well as it adds to much weight. I guess I can just clamp to the work surface as that will be unpainted.

What should I coat that with to stop surface rust?

Should I paint the underneath of it?

Shane
 

1/2 Cup

Member Emeritus
Joined
Apr 28, 2012
Messages
19,283
Location
Shepparton. Victoria. Australia
Shane,

There I no reason not to paint underneath and I just wipe mine down with CRC or kero and it keeps well.
Try a magnetic clamp, they seam to be the flavor of the month.

Cheers
 
Last edited:

BBChevro

Well-known member
Joined
Jan 24, 2014
Messages
2,235
Location
Brisbane, Qld., Australia
Hey Shane, great 1st project - your welds are way better looking than my early attempts (a lot of mine still aren't very pretty - and it's always the ones in a highly prominent position that get ugly :().


In one of your earlier posts you mentioned the "tip welding over" - that was something I thought was "par for the course" with a MIG, until I discovered anti-spatter spray.
Any welding supply shop sells it (I think I recall seeing some at SuperCheap as well) - buy a couple of cans (you don't use very much, it's just good to have a spare can on the shelf), spray it all over the tip and up into the nozzle before you start welding - it will change your life! :lol:


As for removing the paint, etc. before you start - yes, you should. (any time that I have been lazy and not done this bit, I usually end up stuffing around longer to get a decent weld - so no real benefit to skip it).


Regarding grinding the welds down - it depends on where the weld is.
Any time that I've lengthened steel fence posts, etc., I've ground them down so that the post appears to be one piece.
With structural fabrication (particularly if it's out of sight), I usually leave them proud.
The main reason for grinding the welds down is for aesthetics (refer to my first paragraph above :eek:), but if the weld is excessively messy it could reveal a poor weld (poor penetration, etc.) that would have otherwise been over-looked.


If your going to bolt the top on, I'd weld the tab/s for the earth strap directly to the underside of the top.


If you mentioned what the welder was, I missed it - what is it?


A welding table is still on my "to do list" (I'm cheap/poor - waiting for a suitable piece of free steel :lol:) - you've done well. :thumbup:
 
OP
A

andsonsvd

Well-known member
Joined
Feb 7, 2012
Messages
169
Location
Mandurah, Western Australia
Thanks Mark,

I have a Cigweld/transmig 200i.

I enjoy welding and I will pick some anti static spray up tomorrow, sounds like that could help me!

Going out to work on the table now hopefully have it already for paint after tonight, thats if I don't get distracted like I normally do lol.

Shane
 

jimgood

Well-known member
Joined
Aug 4, 2014
Messages
2,394
Location
Marshall, VA
I don't grind down the welds unless they're in the way of fitting something. My welds are pretty ugly.

Nice work.
 

Divcod

Well-known member
Joined
Jan 9, 2015
Messages
319
Location
Pacific Northwest
Just finished a mining project in Australia where all of the local steel was provided with a weld able primer, same color as in you pictures.
 
OP
A

andsonsvd

Well-known member
Joined
Feb 7, 2012
Messages
169
Location
Mandurah, Western Australia
Getting Closer......

Today I finally fitted my top.

Also mounted my Grinders, Helmets and my slides for the extension table top and vice mount.

Pretty happy with it all so far.
 

Attachments

  • IMG_9735.jpg
    IMG_9735.jpg
    49.5 KB · Views: 68
  • IMG_9736.JPG
    IMG_9736.JPG
    142.4 KB · Views: 61
  • IMG_9737.JPG
    IMG_9737.JPG
    127.5 KB · Views: 63
  • IMG_9740.JPG
    IMG_9740.JPG
    94.6 KB · Views: 66
  • IMG_9741.JPG
    IMG_9741.JPG
    90.5 KB · Views: 56
OP
A

andsonsvd

Well-known member
Joined
Feb 7, 2012
Messages
169
Location
Mandurah, Western Australia
Maybe I missed it, but whats the recess in the lower rail for?

Racingtadpole,

That is just a recess so I can sit with my knee's under the top. I am 6ft7 and have big feet haha.

I thought it would benefit me when i have a lot of laying out to do etc.

It fits me perfectly almost like it was made just for me!!

Shane
 

racingtadpole

Well-known member
Joined
Dec 3, 2011
Messages
2,029
Location
The far side of crazy.. but sometimes Australia
Racingtadpole,

That is just a recess so I can sit with my knee's under the top. I am 6ft7 and have big feet haha.

I thought it would benefit me when i have a lot of laying out to do etc.

It fits me perfectly almost like it was made just for me!!

Shane

Thought you may have been planning ahead for when you buy a TIG, either way its a good idea
 

Duker

Well-known member
Joined
Sep 25, 2010
Messages
10,861
Location
Livingston, TX
Adsonsvd,

The table looks great. :thumbup:

As racingtadpole said, the recessed spot will come in handy if/when you decide to go TIG.
 
To avoid these ads, REGISTER NOW!
Top Bottom