To avoid these ads, REGISTER NOW!

My little garage

isetech

Active member
Joined
Jul 5, 2010
Messages
33
Location
south africa
Just a brief run down of how i got to this point.

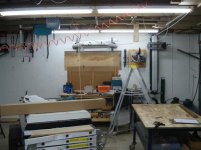
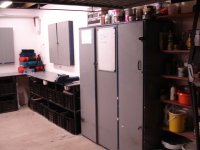
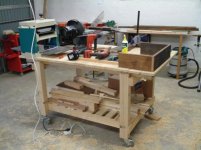
I have had a small electrical bussiness for a couple of years and have always been proud of my little workshop until i found this website, now i have sleepless nights trying to figue out how i will fund my revamp. For now i collect every little piece of wood i come across, take it home and clean it and stack it.

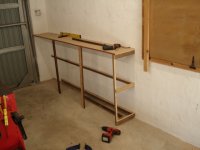
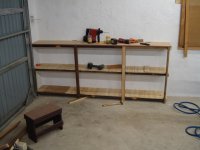
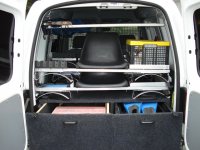
I have a few challenges...one being that the garage has a thru section and the boat parks at the back of the workshop. for this reason i cannot build work benches deeper than 300 mm otherwise i cannot get the boat out.

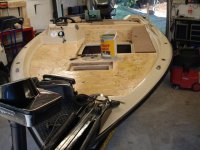
the other problem is that i do different things in the workshop not only electrical work, which include building pontoon boats as a hobby and wood working.

I build the pontton boats and sell for the price it costs me to build them, i dont put any markup on the items, i do it to help people who cannot afford to buy big bass rigs to fish off and are stuck bank angling.

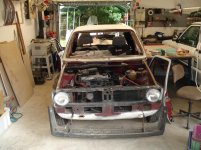
I do the wood working just to take my mind off the stress of everyday survival. I collect wood then take the wood clean it up and just make anything that comes to mind with the wood i have available.

anyway enough yada yada.

if anyone has any suggestions as we go they would be welcomed :)
 

Attachments

  • first pic.jpg
    first pic.jpg
    43.7 KB · Views: 311
To avoid these ads, REGISTER NOW!
OP
I

isetech

Active member
Joined
Jul 5, 2010
Messages
33
Location
south africa
i know it looks like chaos, but its a start :bounce:

I decided to fit the electrical into the walls...so i chased the walls with a hilti dustless extrction system. I cleared out one corner of the workshop and let the games begin.
 

Attachments

  • the start .JPG
    the start .JPG
    118.8 KB · Views: 84
OP
I

isetech

Active member
Joined
Jul 5, 2010
Messages
33
Location
south africa
i have found one big problem, nothing is straight...not the walls nor the floors.

Unfotunatley i cannot strip and fix it so i will try figue out a way to brace stuff to make it straight then fill the gaps with a filler, for cost reasons.

I managed to purchase this property about 2 years ago and setup a temp. workshop so i could keep my little bussines going while deciding what to do and how.

this is a pic of the opposite wall in the workshop. the cupboards and stuff you see here is from my previous workshop i built. when i moved into this workshop i just relocated all the stuff, but as i am sure you all know if never is quite the same dimmensions.

Most of the stuff in my workshop is built by me from scraps of wood and steel etc i find on my rounds.
 

Attachments

  • opposite wal.JPG
    opposite wal.JPG
    131.2 KB · Views: 193
OP
I

isetech

Active member
Joined
Jul 5, 2010
Messages
33
Location
south africa
The wood i am using here is from my pub which i built many years ago and no longer have a use for it. I have stripped the pub, but my only concern is the wood seems to be cracking from age, maybe because i didnt treat it properly.

I only have pics of the pub in photo albums, not loaded on the computer.When i scan them i will post them so you can see what it looked like.

The rest of the wood i will be using is from crates i collected from companies who have had big machines delivered to their premises.

I will also add some steel into the design for strength to hold support brackets.

Please note there is no design for what i am doing i just build as it comes to mind. I layout what i have available then build with what i have.
 

Attachments

  • first steps .JPG
    first steps .JPG
    80.8 KB · Views: 91
OP
I

isetech

Active member
Joined
Jul 5, 2010
Messages
33
Location
south africa
You will also notice sometimes the wood will not tbe the same because i dont have enough of a specific type.
 

Attachments

  • step 2.JPG
    step 2.JPG
    87.1 KB · Views: 70

Daniel Dudley

Well-known member
Joined
Sep 4, 2009
Messages
3,546
You will also notice sometimes the wood will not tbe the same because i dont have enough of a specific type.

Paint makes everything the same. BTDT. I already like your shop BTW. It has integrity, it is neat, and has a purpose. :thumbup:
 
OP
I

isetech

Active member
Joined
Jul 5, 2010
Messages
33
Location
south africa
thanks

Every single hole that is drilled has to be carefully planned. I have fitted and stripped the walls a few times already.

I built a french cleat racking system which didint work because the walls not straight i could get the boxes to sit straight, so i removed the whole system and busy looking into something more practical, like a shelving system with a strip along the back to keep all the boxes straight and even in the front.

I decided to throw this workbench together from some scraps for the thicknisser and sander as a temp. measure. I need to prepare the crate wood because it is rough and the thicknisser makes it nice and smooth. I also use it to clean the old pieces of wood.

I am having problems with the old wood, it seems because i didnt treat it, it has become brittle and has split.
 
OP
I

isetech

Active member
Joined
Jul 5, 2010
Messages
33
Location
south africa
Just to give you an idea of the type of work that is done in my workshop.

this was the last project before i started the revamp.

I overhauled this bass boat for a mate...recarpet...respray motor and trolling motor...fitted pipes to the back to guide the boat back onto the trailer...rubber mats on the front for when you step onto the boat from the side of the lake...removed the built in tank to repair a bilge pump...repainted the trailer...etc.
 

Attachments

  • boat recarpet.JPG
    boat recarpet.JPG
    101.3 KB · Views: 144
OP
I

isetech

Active member
Joined
Jul 5, 2010
Messages
33
Location
south africa
Almost done, just have to sand blast the wheels and have them powder coated and fit a high five stainless steel prop because the boat cavitates when i try lift the nose running full tilt. I believe we can get another 15 km/hr if i can get the nose up.
 

Attachments

  • almost done.jpg
    almost done.jpg
    43.7 KB · Views: 101
OP
I

isetech

Active member
Joined
Jul 5, 2010
Messages
33
Location
south africa
I also build these pontoon boats for bass fishing.

This picture is of my van kitted out and ready to go fishing
 

Attachments

  • van packed 1.JPG
    van packed 1.JPG
    145.3 KB · Views: 128
OP
I

isetech

Active member
Joined
Jul 5, 2010
Messages
33
Location
south africa
This project was done last year, but the vehicle was involved in a bad back end accident before we could finish it properly.
 

Attachments

  • bakkie rebuild.jpg
    bakkie rebuild.jpg
    121.4 KB · Views: 107
OP
I

isetech

Active member
Joined
Jul 5, 2010
Messages
33
Location
south africa
This was the vehicle just before the accident, so we never got to finish it.
 

Attachments

  • rebuild 11.jpg
    rebuild 11.jpg
    67.5 KB · Views: 58
To avoid these ads, REGISTER NOW!

Amitygravel

Well-known member
Joined
Mar 26, 2010
Messages
1,188
Location
Claremont Illinois
Isetech , some damn cool stuff going on in that shop of yours! That single seat pontoon looks awesome. I can appreciate where you're coming from with the salvage issue. Its hard not to drag stuff home but if you don't or can't store it properly it deteriorates and you end up pitching it. There's always the storage issue too. Sometimes it just takes up too much space. Neat place ! Keep us updated .
 
OP
I

isetech

Active member
Joined
Jul 5, 2010
Messages
33
Location
south africa
It has been a challenge manufacturing the steel frame to hold the machines.

I started welding the steel frame on the workbench, but found the steel bent too much and caused the whole frame to bend out of square. I decided to bolt the frame against the wall weld and level as i progressed. the problem with doing it that way. the wall plugs melt from the heat then pull the bolts out the wall.

i have started tac welding first, to hold then weld opposite side to and let it cool.

Another problem was the steel had to be cleaned up to get a good weld. The better the prep work the better the weld.

It is taking a lot longer than i expected.
 
OP
I

isetech

Active member
Joined
Jul 5, 2010
Messages
33
Location
south africa
The start of the steel frame.

i found 2 things while welding this frame.

1 clean the material with a sander before you begin welding.
2 only tac weld in the beginning then weld opposite sides otherwise the metal will bend up towards the weld
 

Attachments

  • steel frame 1a.jpg
    steel frame 1a.jpg
    69.5 KB · Views: 46
OP
I

isetech

Active member
Joined
Jul 5, 2010
Messages
33
Location
south africa
I decided to secure the frame against the wall then tac the rest of the frame together.

It is rather frustrating working with uneven walls and floors.

The legs on the frame are 10 mm different.

I am using a laser level to setup the frame.
 

Attachments

  • steel frame 2.jpg
    steel frame 2.jpg
    42.2 KB · Views: 48
OP
I

isetech

Active member
Joined
Jul 5, 2010
Messages
33
Location
south africa
Isetech , some damn cool stuff going on in that shop of yours! That single seat pontoon looks awesome. I can appreciate where you're coming from with the salvage issue. Its hard not to drag stuff home but if you don't or can't store it properly it deteriorates and you end up pitching it. There's always the storage issue too. Sometimes it just takes up too much space. Neat place ! Keep us updated .

the pontoon boat is made of aluminum, which makes it super light.

We have 3 diiferent sizes that we make, a small one for kids, a medium sized one without the trolling motor, forsmall dams and then the big one which is the one in the picture. We do it as a hobby.

I get just over 5 km/hr on the pontoon boat.
 
OP
I

isetech

Active member
Joined
Jul 5, 2010
Messages
33
Location
south africa
My very first pontoon boat put together with scraps i found.
 

Attachments

  • kickboat ready to launch sealine.jpg
    kickboat ready to launch sealine.jpg
    53.2 KB · Views: 57
OP
I

isetech

Active member
Joined
Jul 5, 2010
Messages
33
Location
south africa
all the wheels fell off and i have been experiencing some difficult times...but we seem to be getting back on track...so back to the garge...not much has changed since my last post.

have chased the walls and installed the cabling for socket outlets

fncjma.jpg


frames being welded into position

xeq2b9.jpg


as the frames progress

qyd4bl.jpg
 
OP
I

isetech

Active member
Joined
Jul 5, 2010
Messages
33
Location
south africa
the frames completed in the storage position, the reason i have had to make these frames pack away is because i only have 300 mm space from the wall because the boat gets stored in the back behind the workshop

1pz4w7.jpg


the frames ready for to fit machines

mmzo04.jpg


machines clipped into place

29w4l8k.jpg
 
Last edited:
OP
I

isetech

Active member
Joined
Jul 5, 2010
Messages
33
Location
south africa
frames and machines packed away so i can move the boat out to the front ready for a fishing trip

mux3b9.jpg
 
Last edited:
OP
I

isetech

Active member
Joined
Jul 5, 2010
Messages
33
Location
south africa
and if you are asking why am i going to so much trouble to limit the distance from the wall to 300 mm, here is a pic of the boat in the back.
it only just fits through the door with a limited space of about 100 mm on either side.

i could have cut the whole door out and moved it across by 2 metres to the right, which would have given me enough spece to build full length work benches.


15o9ikj.jpg
 

47p2

Well-known member
Joined
Sep 24, 2011
Messages
288
Location
Scotland
Nice work there, I had a similar situation with my last garage and had to keep everything to the sides and 250mm deep
 
To avoid these ads, REGISTER NOW!
Top Bottom