To avoid these ads, REGISTER NOW!

My long awaited shop

walt111

Well-known member
Joined
Nov 25, 2006
Messages
305
Location
TN
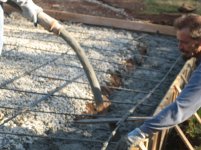
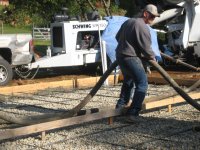
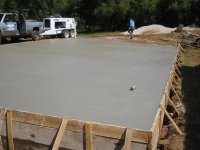
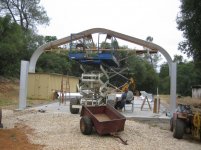
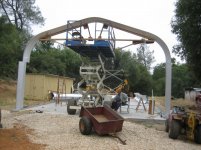
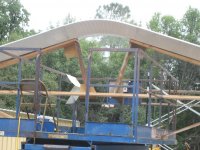
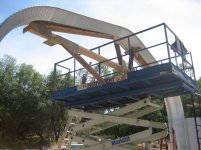
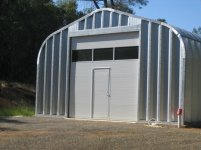
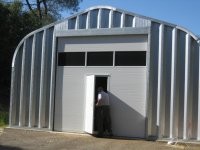
Last year I put up my play pen. With the help of my wife and an occasional visit from the neighbors. I spent two summers making a flat spot to build on, I do not have any pictures of the spot. I made a pad 100 x 55 for my first 40 x 80 building I bought in 2001. I could not find any body to form pour and finish for less than thirteen thousand dollars labor only. My building sat in the field on the pallets it came on for five years. I finally sold it for what I paid for it. Another year went by and I bought another building this one 25X50 I thought if I had to I could do my own cement work in pieces. Then I had to have a talk with the man in the glass, he won. I started looking again for cement workers. I read a post on this site about a man in my town having a pad done for his shop and found out who did it. I contacted this person and he gave me a bid I thought I could live with $9000.00 complete I had to buy the steel that's all. Well nine months later he backed out and said I would have to buy all materials and his labor was going to be at least $5,000.00. Back to the drawing board again. I got another bid for $4800.00 labor only to form, set the steel pour and finish. I bit the bullet and went with this. I will try to post pictures from the start to now. This will give me a pad to work on. I left the concrete for a month before I started any work on it. All I did was water it for four days then let it sit. If this works I will start the build on the next installment.
Walt
 

Attachments

  • shop pictures 019.jpg
    shop pictures 019.jpg
    150.7 KB · Views: 325
  • shop pictures 021.jpg
    shop pictures 021.jpg
    136.5 KB · Views: 291
  • shop pictures 022.jpg
    shop pictures 022.jpg
    150.5 KB · Views: 262
  • shop pictures 025.jpg
    shop pictures 025.jpg
    138 KB · Views: 305
  • shop pictures 027.jpg
    shop pictures 027.jpg
    142.3 KB · Views: 312
To avoid these ads, REGISTER NOW!

Uncle Buck

Banned
Joined
Mar 7, 2005
Messages
9,120
Location
Kansas
No doubt about it, there are a lot of construction guys scrambling for the few jobs out there these days. It is easier to find good labor a bit cheaper, great for you, not so keen for the contractor though.
 
OP
W

walt111

Well-known member
Joined
Nov 25, 2006
Messages
305
Location
TN
The man in the glass is a reflection of yourself looking in a mirror. The man in the glass is more level headed and realistic.
Walt
 
OP
W

walt111

Well-known member
Joined
Nov 25, 2006
Messages
305
Location
TN
Well after a month I figured my concrete was as good as it was ever going to get. I know you get different answers on how long it takes for concrete to cure, some say it will take forever. I have it at least five inches thick and 4000 psi mix with half inch re bar on two foot centers that should last me until I die.
The first thing on the agenda is to drill 110 half inch diameter holes five inches deep to mount my c-channel. I had already drilled the holes in the channel. All the holes were drilled at least two times in the metal, started with a one eight bit then tried to go to half inch just that way is equivalent to two hundred and twenty holes in the metal. Well drilling in the concrete wasn't to bad, I thought it was going great until I got to hole number eight. The bit will no longer drill anything, gee if I can only get eight holes per bit I am going to the poor house buying bits. This bit was right at twenty dollars out the door. The place I bought it was closed for the weekend.
Down to lowes to get a new one and it was only sixteen dollars out the door, I bought two of them. Back to drilling again. I could not believe how long this bit lasted ninety holes later it died. Put in the new bit and finished the holes.
Now that I am ready to actually mount my channel to the concrete I put a couple off beads of sealant between them and the concrete, also made snake tracks between the beads placed the channel and bolted it down. The man at the store recommended this sealant and adhesive to seal between the metal and the concrete.
Now to begin the actual erection of this building YA HOOOOO.
I laid out all the pieces in the order they went thinking this would make it easier, not really. The instructions say to bolt together all seven pieces laying on the ground and then with the help of three or four other guys stand it up. This turns out to be like trying to stand up a piece of cooked spaghetti. Oh well managed to get two up without getting any body hurt, now day light is going fast. I tied these two arches to my scissor lift and called it a day.
I must have built this building a million times in my head an this night was no different. I had one of my famous revelations that I shared with my wife about this, she always says what now.
Next day it is time to get serious putting this together. My wife had to go to work so I was by myself. I built a model of the roof pitch, full scale on my scissor lift now I think I can put an arch together by myself. By the time I am ready to put this arch up my wife got home. She looked at what I had done and said " So this is your latest brain storm". I said it would work like a charm, maybe a little unpolished charm but still a charm. This is the system I used to construct all the rest of the arches. I told my wife by the time we are done with these arches we will be experts at it.
Being as I am a hut and peck one fingered typist I will call it a day.
 

Attachments

  • shop pictures 046.jpg
    shop pictures 046.jpg
    149.4 KB · Views: 322
  • shop pictures 042.jpg
    shop pictures 042.jpg
    133.9 KB · Views: 307
  • shop pictures 047.jpg
    shop pictures 047.jpg
    148 KB · Views: 301
  • shop pictures 048.jpg
    shop pictures 048.jpg
    149.6 KB · Views: 288
  • shop pictures 041.jpg
    shop pictures 041.jpg
    144.9 KB · Views: 279
  • shop pictures 028.jpg
    shop pictures 028.jpg
    143.1 KB · Views: 272
  • shop pictures 029.jpg
    shop pictures 029.jpg
    139.5 KB · Views: 327

marty_p

Well-known member
Joined
Aug 1, 2008
Messages
1,411
Location
SE LoUiSiAna
This looks like a great start to a cost-effective, spacious new shop.

But I do have one question: is it more difficult and time consuming to erect than the fast-talker selling it to you on the telephone promised??? :headscrat
 
OP
W

walt111

Well-known member
Joined
Nov 25, 2006
Messages
305
Location
TN
More time to build but not really more difficult. If you can put a nut on a bolt and tighten it you can build this building. I think the most difficult part is the slab. With a bunch of helpers I can see building this in three or four weekends. Again the slab must be there and completed first. Would I do it again? yes.
walt
 
OP
W

walt111

Well-known member
Joined
Nov 25, 2006
Messages
305
Location
TN
I bought the Marklift five or six years ago.I thought it would be a great tool to assemble my first steel building. That 40x80 building never went up, but I found the lift was great for trimming trees, and putting a new roof on the house. It came in so handy to trim trees I used it to trim all the trees on the road to our house,we live one mile of the main highway on a private road. I know Marklift has been out of business for a long time. You can still get any part you may need for repairs. After I got the second building it was worth it's weight in gold for that assembly. I also bought some scaffolding and it was just as valuable.
walt
 
OP
W

walt111

Well-known member
Joined
Nov 25, 2006
Messages
305
Location
TN
when I left off we had about three arches up, at this point they start getting stable. We continued on to finish the remaining twenty two arches. The instructions said to get bracing for the inside to maintain the shape I bought 50 14 foot 2x4 to brace the inside and found them not necessary,they only got in the way. I finally realized that instructions are only recommended procedures from the manufacturer, something I already knew. As with anything else a person does the first time they want to follow the instructions to the letter.
After the arches are all assembled and tightened you need to grout the base in the c channel. I did not buy the channel from the building manufacturer I had it formed locally for less than half of there cost. I used the recommended mixture of concrete to fill the channel. I mixed it to loose and did not get the slope on the outside for rain water to run off. Well I have a few leaks than I am still trying to figure the best way to attack. Now that the grout is in time to build end walls. I figured the approximate cost to buy materials to construct the ends versus buying metal ends from the manufacturer. Metal ends won, if for no other reason than termites have not evolved yet to eat metal. My end walls both have a twelve by twelve framed door opening. I do not have any pictures of the end wall construction just a completed picture.
 

Attachments

  • shop pictures 030.jpg
    shop pictures 030.jpg
    150.9 KB · Views: 207
  • shop pictures 032.jpg
    shop pictures 032.jpg
    147.3 KB · Views: 221
  • shop pictures 031.jpg
    shop pictures 031.jpg
    138.8 KB · Views: 197
  • shop pictures 039.jpg
    shop pictures 039.jpg
    141.8 KB · Views: 250
OP
W

walt111

Well-known member
Joined
Nov 25, 2006
Messages
305
Location
TN
walls and ends are up time for some doors. I looked all over for doors, the least expensive door that I wanted came from Alabama. I wanted an insulated door for both ends the openings are both 12x12. For the south end I got a Clopay sectional roll up with one section of windows. I put the window section second from the top, this means no one can look in unless they are over eight feet tall.
For the north end I got another Clopay door with a pass thru (people door) in the middle of the bottom section , again one section of windows put second section from the top. I now have a secure , weather tight building.
 

Attachments

  • shop pictures 004.jpg
    shop pictures 004.jpg
    139.3 KB · Views: 169
  • shop pictures 005.jpg
    shop pictures 005.jpg
    144.4 KB · Views: 154
  • shop pictures 006.jpg
    shop pictures 006.jpg
    144.8 KB · Views: 170
  • shop pictures 008.jpg
    shop pictures 008.jpg
    138.2 KB · Views: 219
  • shop pictures 009.jpg
    shop pictures 009.jpg
    143.2 KB · Views: 205
  • shop pictures 010.jpg
    shop pictures 010.jpg
    145.8 KB · Views: 243

autoclassicnut

Well-known member
Joined
Nov 24, 2007
Messages
1,383
Location
Montana
I've never seen a walk-in door in the middle of a overhead door ...slick! Do you have close-up photos of it? Lookin great!
 
Last edited:
To avoid these ads, REGISTER NOW!
OP
W

walt111

Well-known member
Joined
Nov 25, 2006
Messages
305
Location
TN
I took my photo taker AKA my wife to take pictures today. Well that did not work?????? Back to the drawing board.
walt
 
OP
W

walt111

Well-known member
Joined
Nov 25, 2006
Messages
305
Location
TN
Well it is a new day perhaps I will be successful in posting pictures. I have a few pictures of the people door in my 12x12 sectional role up door. The last picture is one of my hit and miss engines. these are what I play with in my play pen.
walt
 

Attachments

  • shop pictures 049.jpg
    shop pictures 049.jpg
    139 KB · Views: 183
  • shop pictures 050.jpg
    shop pictures 050.jpg
    136.2 KB · Views: 221
  • shop pictures 051.jpg
    shop pictures 051.jpg
    159.3 KB · Views: 197
  • shop pictures 052.jpg
    shop pictures 052.jpg
    173.1 KB · Views: 196
  • shop pictures 053.jpg
    shop pictures 053.jpg
    149.1 KB · Views: 205
  • shop pictures 054.jpg
    shop pictures 054.jpg
    146.6 KB · Views: 367

autoclassicnut

Well-known member
Joined
Nov 24, 2007
Messages
1,383
Location
Montana
I see you have spray foam in the shop... Are you going to use it in the whole thing? More pics of the sprayed side (please)?
 

thomask

Well-known member
Joined
May 28, 2009
Messages
354
Location
Sunshine State
Great shop. They have some of those "hit and miss" engines in Tallahasssee at the car museum on I-10 if you ever go that way.
 
OP
W

walt111

Well-known member
Joined
Nov 25, 2006
Messages
305
Location
TN
After I had a secure building I knew I wanted to insulate it but these accordion style walls don't lend themselves to conventional insulation. After a lot of mental deliberation and research i knew I wanted spray foam. The beauty of spray foam is that it seals all air infiltration at the seams. The worst part of spray foam is the price. Like everything else I do it is pay as you go. I had money to buy two spray foam kits so I ordered them. These were ordered Monday morning out of Chicago and I had them in my hands on Friday. Not bad considering I live in northern California. One kit will cover six hundred square feet at one inch thick. I now had my starting kits of foam but I couldn't just spray it on the walls. I wanted to have plywood on my walls so I could mount things and they would stay. I decided to put 2X4 mounted on there side screwed right to the metal. I thought it would be best if I put a piece or tar paper between the wood and the metal. I cut pieces three and a half inches wide an stapled them to the 2x then put 1 1/2 inch screws with a neoprene washer on them to seal the screws against the metal on the outside. This worked very good. I now had a void between the 2x to fill with foam. I sprayed my first kit on and it worked out just fine. The foam is almost instantly cured. If you stop spraying for thirty seconds you need to put a new nozzle on to continue. Once you have the foam sprayed you take a serrated edge knife and trim the excess that is above the edge of the 2x4 now you can mount whatever material you want to the walls. I am now in the saving mode to buy two more spray foam kits to be able to continue my walls.The plan is to go about ten feet up the walls with plywood and then it will be just foam on the ceiling. You know how plans are always subject to change. Till I get some more foam and get more work done i"ll sign off.
walt
 

Attachments

  • shop pictures 057.jpg
    shop pictures 057.jpg
    143 KB · Views: 155
  • shop pictures 058.jpg
    shop pictures 058.jpg
    141.9 KB · Views: 148
  • shop pictures 059.jpg
    shop pictures 059.jpg
    145 KB · Views: 149
  • shop pictures 061.jpg
    shop pictures 061.jpg
    144.9 KB · Views: 189
  • shop pictures 064.jpg
    shop pictures 064.jpg
    143.5 KB · Views: 188
  • shop pictures 066.jpg
    shop pictures 066.jpg
    144.2 KB · Views: 192
  • shop pictures 065.jpg
    shop pictures 065.jpg
    145 KB · Views: 170
OP
W

walt111

Well-known member
Joined
Nov 25, 2006
Messages
305
Location
TN
While waiting for the good fairy to bring me money I played with other things associated with my play pen. I did not want to listen to my air compressor in the shop so I left it in the garage at the house. It is about 350 feet from the house to the shop. I buried a two inch between the two and that left the shop nice and quiet. Picture one shows the set up in the garage. I have a compressor that puts out 175 pounds of air max and an eighty gallon tank, more than enough CFM for my application. I ran an air hose 3/8 diameter to the shop from the house and used it that way for almost a year without any problems. If it worked with a 3/8 inch hose it will work even better with the two inch pipe. The air goes from the compressor to an refrigerated air dryer then under ground to the shop. Picture two shows the 120 gallon storage tank at the shop. The air goes in and out of this tank thru a 3/4 copper line. All the air supply lines from this 120 gallon tank are 3/4 copper all over the shop. All the air lines are in the wall with a stub for the quick disconnects. I discovered an added bonus the other day I had a guard at the front door. He is shown in pic four five and six.
walt
 

Attachments

  • shop pictures 056.jpg
    shop pictures 056.jpg
    141.2 KB · Views: 156
  • shop pictures 089.jpg
    shop pictures 089.jpg
    150.9 KB · Views: 138
  • shop pictures 067.jpg
    shop pictures 067.jpg
    157.8 KB · Views: 144
  • shop pictures 068.jpg
    shop pictures 068.jpg
    142.4 KB · Views: 180
  • shop pictures 071.jpg
    shop pictures 071.jpg
    152.9 KB · Views: 210
  • shop pictures 069.jpg
    shop pictures 069.jpg
    155.6 KB · Views: 167

autoclassicnut

Well-known member
Joined
Nov 24, 2007
Messages
1,383
Location
Montana
Not sure where you live, but don't you have to insulate it from freezing?

Looks like your freezer will be filled this winter!
 
Last edited:

Fins/413

Well-known member
Joined
Jan 27, 2009
Messages
161
I like your ballast tank, one thing I'd consider is to put some kind of posts around the copper lines. It wouldn't take much of a bump to cause a leak. Nice rack on that buck my nephews would have his head on the wall and tenderloins in the freezer.
 

krooser

Well-known member
Joined
Jun 3, 2005
Messages
2,377
Location
Waupaca, Wisconsin
Good use of that scissor lift. Most guys use a forklift or small crane but that lift worked slick.

The next time you need to drill so many holes as you did in the base plate find a shop with an ironworker... they can punch the holes a lot faster , and easier, than you can.

What did that building kit cost?
 

joeleeper

New member
Joined
Jul 3, 2009
Messages
2
Location
Monroe, GA
I did not buy the channel from the building manufacturer I had it formed locally for less than half of there cost.

Great build Walt. I have one of these buildings my brother-in-law bought back in 2002 before he found out his county wouldn't allow metal buildings...anyway, my building doesn't have the channel to mount the building to the slab.

Do remember what gauge metal you bought?
And, where/who/type of business where you were able to get it from?

I have looked at a couple local places here in GA but they say they can't help me.

Again, great build. I am at the slab stage and your photos are getting me as excited as a kid at Christmas.

Joe
 

krooser

Well-known member
Joined
Jun 3, 2005
Messages
2,377
Location
Waupaca, Wisconsin
Great build Walt. I have one of these buildings my brother-in-law bought back in 2002 before he found out his county wouldn't allow metal buildings...anyway, my building doesn't have the channel to mount the building to the slab.

Do remember what gauge metal you bought?
And, where/who/type of business where you were able to get it from?

I have looked at a couple local places here in GA but they say they can't help me.

Again, great build. I am at the slab stage and your photos are getting me as excited as a kid at Christmas.

Joe


Check with a steel fabrication shop... they can usually help you or tell you where you can get it done.
 
To avoid these ads, REGISTER NOW!
Top Bottom