To avoid these ads, REGISTER NOW!

My new drill press

f575gtc

Well-known member
Joined
Jul 14, 2013
Messages
654
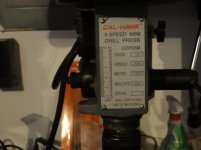
I just came across a new (to me) drill press, it is nothing fancy. 1/3 hp 5 speed Cal-Hawk. I know Cal-hawk is cheap Chinese made, but I got it for free so I am not complaining.

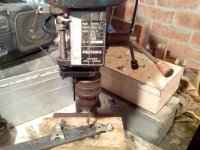
It works fine, tried all the rpm, but it is missing a part I would like to have and I need some advice on how to replace it, or make a DIY.

The depth gauge is missing on this thing. I was going to take a 1/2 wide bolt and drill it sideways then run a smaller thinner screw through it to point to the markings, almost like a "T" shape, but then I can't think of a way to attach it to the drill head so it moves up and down. Only thing I can think of is maybe getting a hose clamp and tack welding the bolt to the clamps screw hosing.

Pardon the bench mess, been working on a valve head and haven't had time to clean up.
 

Attachments

  • DSC01822.jpg
    DSC01822.jpg
    121.9 KB · Views: 90
  • DSC01819.jpg
    DSC01819.jpg
    130.1 KB · Views: 118
To avoid these ads, REGISTER NOW!

jakemac

Well-known member
Joined
May 21, 2013
Messages
9,035
Location
New England
Processing ...............................................................................................
 

sac02

Well-known member
Joined
May 15, 2011
Messages
446
It is hard to translate words online into a visualization of how to make your depth gauge. Pics of what you're working with would help, a sketch of you concept would be better.
 
OP
F

f575gtc

Well-known member
Joined
Jul 14, 2013
Messages
654
Did the pictures not load?

Im sorry if they didn't I uploaded two attachments on the drill.

Ill reload them when I get home.
 

sac02

Well-known member
Joined
May 15, 2011
Messages
446
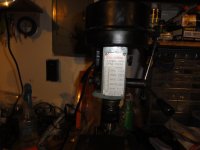
I see one pic that is very dark and all that is visible is the label (looks like the flash reflected off the label), and one pic that is a shot of the entire drill press (can't really see any detail).
 

jakemac

Well-known member
Joined
May 21, 2013
Messages
9,035
Location
New England
Try part #'s 8-11 on this Craftsman model to see if they'll work for you.
http://www.searspartsdirect.com/partsdirect/part-model/Craftsman-Parts/Drill-Parts/Model-137280050/0247/0713080?blt=05

If not you can search through this list of DP's to see if there is a similar model to yours here :
http://www.searspartsdirect.com/partsdirect/brands-products/Craftsman-Parts/Drill-Parts?page=1

One of them may be close enough for you to use the parts.

What size is your DP ?
(measured from the center of the chuck to the post x2)
(a 15" DP would have a measurement of 7-1/2")
 

Bill Ramsey

Well-known member
Joined
Dec 28, 2011
Messages
579
Location
Tulsa
I can't tell from the pictures...was this press originally equipped with a depth stop mechanism, and the parts are simply missing? Or was it never equipped, and you're looking to fabricate a functional depth stop?
 

jakemac

Well-known member
Joined
May 21, 2013
Messages
9,035
Location
New England
It looks like it was originally equipped with the depth stop, judging by the casting on the left side of the head. What's missing, besides the threaded rod and pointer, is the collar that clamps to the spindle shaft and holds the threaded rod. The bit that sticks out from the head casting is a guide for the threaded rod.

The gauge is printed on the front label.
 
OP
F

f575gtc

Well-known member
Joined
Jul 14, 2013
Messages
654
I think I have an idea that can work, those parts to the sears press would take me 90% of the way, but the gauge is on the front, not the side so I would still need a proper pointer.

Here is a better picture, and what I will try tomorrow, I will report back with my success or failure :sad:. Sorry about the quick Photoshop, I am home for lunch and only had a few minutes.

This method will also allow me to use a nut in there to use as a stop.
 

Attachments

  • DSC0182b7.jpg
    DSC0182b7.jpg
    127.2 KB · Views: 49
  • DSC01827.jpg
    DSC01827.jpg
    129.5 KB · Views: 27
To avoid these ads, REGISTER NOW!

sac02

Well-known member
Joined
May 15, 2011
Messages
446
I like the hose clamp as a proof of concept. For regular use, I'm thinking you will probably wind up needing something more sturdy for reliable, repeatable use.
 
OP
F

f575gtc

Well-known member
Joined
Jul 14, 2013
Messages
654
What about conduit clamps? The clamps use to secure pipe to the wall. Maybe take two and use them to sandwich the drill. Then weld to that. I can use two screws to tighten the clamps together so they don't slide anywhere.
 

jakemac

Well-known member
Joined
May 21, 2013
Messages
9,035
Location
New England
I still think that the Craftsman parts would be the way to go. They're not too expensive, look better, and will save time. As for the pointer, IIRC, the one on the parts list is a piece of thin sheet that wraps around the top of the threaded rod. You could make a new one based on the original that attaches the same way, but comes around to the front.

If you tack a threaded rod to the bottom, and then another at the top. How will you insert or remove the new gauge ? It will be trapped by the guide casting.

Don't forget that you will need 2 nuts on the threaded rod as drill stops. One to set the depth, and the other to lock it in place.
 
Last edited:
OP
F

f575gtc

Well-known member
Joined
Jul 14, 2013
Messages
654
I still think that the Craftsman parts would be the way to go. They're not too expensive, look better, and will save time. As for the pointer, IIRC, the one on the parts list is a piece of thin sheet that wraps around the top of the threaded rod. You could make a new one based on the original that attaches the same way, but comes around to the front.

If you tack a threaded rod to the bottom, and then another at the top. How will you insert or remove the new gauge ? It will be trapped by the guide casting.

Don't forget that you will need 2 nuts on the threaded rod as drill stops. One to set the depth, and the other to lock it in place.

I was going to tack weld the bottom, but drill the rod up top and thread a screw through it with a nut on the other end so it can be removed.
 

uart

Well-known member
Joined
Nov 17, 2011
Messages
1,226
Location
Australia
I know Cal-hawk is cheap Chinese made, but I got it for free so I am not complaining.
I "inherited" a really similar looking cheap Chinese drill, might even be a "rebadge" of the same thing as yours. When I got mine it was a bit worse for wear but after just a bit of a clean up and a new belt it functions perfectly.

Mine also had the depth gauge broken, but at least it still had most of the parts though the pointer was missing and the attachment collar was broken.

Here is a picture from when I had partially fixed it. You can see that it's only a hard plastic collar that it attaches with, and if you look carefully the collar is broken over on the right hand side in the photo. I'm attaching this picture as I assume this is probably what yours would have originally looked like. BTW. I've repaired that break a little more substantially now (with a metal band) and it functions well enough.

The pointer on mine was made from the clip of an old broken metal pen. I just bent it into a loop and soft soldered it so it was a firm press fit onto the top of the threaded rod and put a dob of red paint on the tip. Works fine. :)

BTW. No matter how old and crappy, this drill press makes drilling metal 100 times easier than using a hand drill. I absolutely can't drill steel (other than thin sheet) with a hand drill without destroying bits.
 

Attachments

  • drill press 2.jpg
    drill press 2.jpg
    125.6 KB · Views: 18

Bill Ramsey

Well-known member
Joined
Dec 28, 2011
Messages
579
Location
Tulsa
With uart's picture as a guide, you could even fab up a depth stop collar from cabinet-grade plywood, or plastic (if the original was plastic, what the heck). The part clamps around the quill (what you described as the non-spinning part). You'll need to fabricate a way to clamp it around the quill...either a kerf with a bolt & nut to squeeze that kerf (that's the arrangement most DPs use) or maybe a kerf and then wrap a long hose clamp all the way around your new collar to tighten it down. Leave an extension on one side of the collar, long enough to drill a hole and mount your depth-stop threaded rod.

Fabricating that collar would likely give you a more sturdy arrangement than the hose clamp you were considering.

What I'm describing looks something like this:

<img src="http://i.ebayimg.com/00/s/OTY4WDEyOTY=/z/-SwAAOSwF1dUQpxi/$_12.JPG" alt="DELTA-ROCKWELL-MILWAUKEE-17-DRILL-PRESS-DP-600-DEPTH-STOP-ROD-COLLAR-BRACKET"/>
 
Last edited:

Bill Ramsey

Well-known member
Joined
Dec 28, 2011
Messages
579
Location
Tulsa
I agree in theory with jakemac in Post #7 that finding a replacement part is the easiest way to go. Problem is, not all quills are the same diameter and it's a ****-shoot whether the one you order will work for you. There's also the matter of the distance (on the collar) between the center line of the quill hole and the center line of the rod hole, because that dimension has got to match your press too.
 
To avoid these ads, REGISTER NOW!
Top Bottom