To avoid these ads, REGISTER NOW!

My new Legacy floor

gobble

Well-known member
Joined
Apr 9, 2013
Messages
75
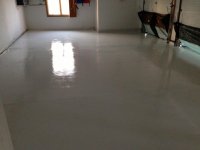
Thought I'd post a few pictures of my floor project. I'm happy with the result but being a perfectionist there are a few things I'd do differently the second time around. I won't write a big long story, but just a few points.

1. The prep work is no fun.
2. Get the right joint filler the first time. I started with something from home depot and had to strip it out.
3. When you do the base coat be careful not to miss any spots. I had a couple unpleasant surprises when I blew the flakes off. When I did the repairs, I brushed additional epoxy too heavy and ended up with humps that I needed to then scrape down. This resulted in a mix of epoxy and flake showing in one spot rather than just the flakes. The spot is whiter and shines more. It's like having a big pimple on an otherwise clean floor.
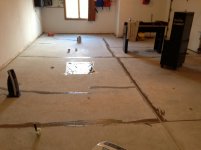
4. See the two lighter streaks from left to right? These were the dividing lines of the three sections I worked when applying the three kits. My flake spreader got too close to the edge of each section and when I rolled the subsequent sections I ended up rolling epoxy over some flakes. I suspect that's why you see more expoxy down these lines which gives a white streak effect. I'd be more careful next time to keep the flake spreading far enough behind the epoxy rolling.
5. I like the look of the 1/8" flake when going full coverage.
6. The polyurethane doesn't give the stated coverage when you have full flake. I should have purchased an extra gallon to have more uniform coverage. Two coats would be better but the stuff is too expensive.

Overall I guess I'm happy.
 

Attachments

  • 1.jpg
    1.jpg
    128.5 KB · Views: 453
  • 2.jpg
    2.jpg
    150.6 KB · Views: 463
  • photo 1.jpg
    photo 1.jpg
    166.5 KB · Views: 501
  • photo 2.jpg
    photo 2.jpg
    159.6 KB · Views: 470
  • photo 3.jpg
    photo 3.jpg
    153.4 KB · Views: 508
  • photo 4.jpg
    photo 4.jpg
    147.1 KB · Views: 514
To avoid these ads, REGISTER NOW!

jethrodawg

Well-known member
Joined
Dec 16, 2012
Messages
115
Location
Southern NH
Thanks for posting. Not much shine but I like that full coverage and seems like it does better job of hiding flaws (now and in future) than light flake coverage.
 

DefSport

Member
Joined
Jan 19, 2013
Messages
24
What would you say the total time invested is? I've been wondering about the true time to do a quality epoxy job vs. tile as I'm getting further in the tile work.
 
OP
G

gobble

Well-known member
Joined
Apr 9, 2013
Messages
75
I'd guess 5 hours of removing cabinets and stuff from the garage, 10-15 hours of grinding and filling cracks/expansion joints, 2 hours of cleaning/vacuuming, 3 hours of primer, 3 hours of epoxy/flakes, 3 hours of clear, and a few hours of cleanup. Add to that maybe 20-40 hours of reading and looking at this website and trips to and from the store for various things and I've invested a whole bunch of time. Now that the floor is done I'll need to spend more time painting the walls, reinstalling the baseboards and reinstalling the cabinets.
 

SteveCh

Well-known member
Joined
Dec 21, 2012
Messages
1,053
Lots of time and labor, but, hey, now every time you go out there, you will smile. Nice job.
 
OP
G

gobble

Well-known member
Joined
Apr 9, 2013
Messages
75
I forgot to add about 5 hours so far of just looking at it.
 

DefSport

Member
Joined
Jan 19, 2013
Messages
24
I'd guess 5 hours of removing cabinets and stuff from the garage, 10-15 hours of grinding and filling cracks/expansion joints, 2 hours of cleaning/vacuuming, 3 hours of primer, 3 hours of epoxy/flakes, 3 hours of clear, and a few hours of cleanup. Add to that maybe 20-40 hours of reading and looking at this website and trips to and from the store for various things and I've invested a whole bunch of time. Now that the floor is done I'll need to spend more time painting the walls, reinstalling the baseboards and reinstalling the cabinets.

That's not too bad. I figure I'm averaging about 15-20 sq ft/hour on my porcelain floor (grouting not included, but that won't add up too much). So 15 sq ft/hr and 600 sq ft for me comes out to about 40 hours just laying the tile, maybe 45 hrs once a bunch of cleanup is accounted for.

The epoxy looks great though. It's easy to be critical of a project when doing all of it, but I'm sure no body sees the small flaws that jump out at you. Enjoy the floor.
 
OP
G

gobble

Well-known member
Joined
Apr 9, 2013
Messages
75
Base is off-white with a mixture of white, gray, black, blue, yellow flake.
 
OP
G

gobble

Well-known member
Joined
Apr 9, 2013
Messages
75
I decided my walls needed to be painted right away.
 

Attachments

  • photo.JPG
    photo.JPG
    140.4 KB · Views: 249
Last edited:
To avoid these ads, REGISTER NOW!
OP
G

gobble

Well-known member
Joined
Apr 9, 2013
Messages
75
Very cool, hard to make up any contrast, is the ceiling yellow as well?

It looks much different with the flourescent lights I installed last night. The ceiling is white.
 

Attachments

  • photo.jpg
    photo.jpg
    131.7 KB · Views: 209
OP
G

gobble

Well-known member
Joined
Apr 9, 2013
Messages
75
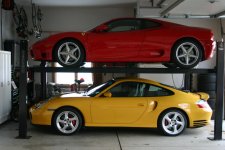
It's a 2004 Gallardo. The garage used to be cluttered with all of this. I like the new cleaner look.
 

Attachments

  • IMG_7251a.jpg
    IMG_7251a.jpg
    131.8 KB · Views: 129

EMC2

Well-known member
Joined
Nov 25, 2012
Messages
229
Location
Georgia
It's a 2004 Gallardo. The garage used to be cluttered with all of this. I like the new cleaner look.

I don't like clutter either, but for those 2 cars, I'd make an exception :bounce:

Great job on the floor.
 

dubber

Well-known member
Joined
Dec 31, 2012
Messages
5,326
Location
Canada's Capital
That's the kind of clutter i would take any day of the week. Normally I'm a huge Ferrari fan and can vouch that model drives really well but that Turbo is beautiful!
 

thomaskept

Member
Joined
May 14, 2013
Messages
16
Location
Australia
Thought I'd post a few pictures of my floor project. I'm happy with the result but being a perfectionist there are a few things I'd do differently the second time around. I won't write a big long story, but just a few points.

1. The prep work is no fun.
2. Get the right joint filler the first time. I started with something from home depot and had to strip it out.
3. When you do the base coat be careful not to miss any spots. I had a couple unpleasant surprises when I blew the flakes off. When I did the repairs, I brushed additional epoxy too heavy and ended up with humps that I needed to then scrape down. This resulted in a mix of epoxy and flake showing in one spot rather than just the flakes. The spot is whiter and shines more. It's like having a big pimple on an otherwise clean floor.
4. See the two lighter streaks from left to right? These were the dividing lines of the three sections I worked when applying the three kits. My flake spreader got too close to the edge of each section and when I rolled the subsequent sections I ended up rolling epoxy over some flakes. I suspect that's why you see more expoxy down these lines which gives a white streak effect. I'd be more careful next time to keep the flake spreading far enough behind the epoxy rolling.
5. I like the look of the 1/8" flake when going full coverage.
6. The polyurethane doesn't give the stated coverage when you have full flake. I should have purchased an extra gallon to have more uniform coverage. Two coats would be better but the stuff is too expensive.

Overall I guess I'm happy.

Gobble, you done very well flooring, it is not give a good shining but it's covering area is very well. I know this type of Legacy flooring is more difficult and I really like your sharing point ideas and stories.
 

jasonvt

Well-known member
Joined
Mar 22, 2013
Messages
85
Location
Wesley Chapel, NC
Looks good. I know from the instructions to mix the epoxy in the bucket, pour it on the floor and spread with the rollers. Is this the best way to apply the primer and clear as well or is there a better way?
 
OP
G

gobble

Well-known member
Joined
Apr 9, 2013
Messages
75
It's all laid out in the instructions when you buy the product.
 
To avoid these ads, REGISTER NOW!
Top Bottom