

jmarkwolf
Well-known member
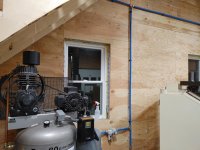
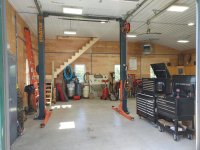
I decided after watching numerous Youtube videos and reading accounts on this and other forums that I would install the Rapidair Maxline piping product in my 28ft x 30ft shop to compliment my new 40-gallon PUMA air compressor.
I'd been getting by with two separate compressors and dragging hoses wherever I needed them, which gets old. Plus one of the compressors was an old Craftsman 33-gallon oil-less type and it was just too damn loud. The other was a 30 year old 8-gallon Sanborn that had never been drained, and that fact concerned me after seeing Youtube videos of air compressors exploding due to internal rusting.
I was surprised at how stiff the 3/4in Maxline tubing was to uncurl. I had considered making the roller straightener tool to help straighten out the curl, but decided to buy one, and will likely sell it once I'm done using it. I'd seen that some guys just dragged the Maxline through lengths of PVC tube, but I elected to purchase the roller straightener.
In some of the videos I'd seen, the user would would clamp the roller straighter in the bench vise, but end up dragging the bench around while pulling the pipe through, if the bench was too light. In my case, my bench and vise were heavy enough, but the vise end of the bench was too close to the wall to straighten longer pieces of pipe. So I ended up bolting the straightener to a hitch mounted vise plate that I had lying around, and attaching it to the trailer hitch on my Jeep. I wont be dragging that around! See pic below.
The straightener works good for removing most of the curl of the pipe out of the box, but it doesn't really "straighten" the pipe very well, even after a couple run-throughs of the straightener. That takes a little extra persuasion. Once you get it "mostly" straight it's relatively easy to manually "adjust" it, and the wall clips are generally strong enough to hold it straight thereafter.
The thin wall aluminum pipe is polymer clad inside and out and is pretty stout as mentioned earlier, but can also be kind of flimsy, even under it's own weight, and will bend if you're not careful, sometimes requiring another run through on the straightener.
Apparently, it's important to cut the pipe ends as square as you can to avoid leaks, This can be a little tricky due to parallax error when squeezing the supplied cutters. I would sometimes have to make several cuts, an inch or so long, before getting nice square cuts. I hope the extra cuts of wasted pipe doesn't stack up to any significant loss of the 100ft of pipe they provide. I'm already running a little close on available pipe. I'm not cutting any drops until I know how much pipe I'll have left after running the perimeter of the room, at 110in from the floor, then cut the length of the drops accordingly.
The outer cladding of the pipe can be slippery when de-burring. I found it tiring to manually keep the pipe from spinning while deburring. I ended up pinching the pipe near the end with the bench vise, just enough to "assist" arresting the torque while using the supplied de-burring tool.
I also found that trying to hold longer lengths of pipe, while ascending and descending ladders, without introducing bends, and extended lengths of the tape measure, was a little tricky. My two go-to buddies that I typically rely on to help on such projects were both preoccupied, so I've been solo on this project.
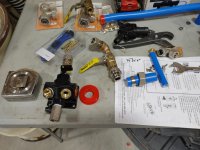
So far the Rapidair kit is everything it claims to be.
As I progress, I'll update this thread.

I'd been getting by with two separate compressors and dragging hoses wherever I needed them, which gets old. Plus one of the compressors was an old Craftsman 33-gallon oil-less type and it was just too damn loud. The other was a 30 year old 8-gallon Sanborn that had never been drained, and that fact concerned me after seeing Youtube videos of air compressors exploding due to internal rusting.
I was surprised at how stiff the 3/4in Maxline tubing was to uncurl. I had considered making the roller straightener tool to help straighten out the curl, but decided to buy one, and will likely sell it once I'm done using it. I'd seen that some guys just dragged the Maxline through lengths of PVC tube, but I elected to purchase the roller straightener.
In some of the videos I'd seen, the user would would clamp the roller straighter in the bench vise, but end up dragging the bench around while pulling the pipe through, if the bench was too light. In my case, my bench and vise were heavy enough, but the vise end of the bench was too close to the wall to straighten longer pieces of pipe. So I ended up bolting the straightener to a hitch mounted vise plate that I had lying around, and attaching it to the trailer hitch on my Jeep. I wont be dragging that around! See pic below.
The straightener works good for removing most of the curl of the pipe out of the box, but it doesn't really "straighten" the pipe very well, even after a couple run-throughs of the straightener. That takes a little extra persuasion. Once you get it "mostly" straight it's relatively easy to manually "adjust" it, and the wall clips are generally strong enough to hold it straight thereafter.
The thin wall aluminum pipe is polymer clad inside and out and is pretty stout as mentioned earlier, but can also be kind of flimsy, even under it's own weight, and will bend if you're not careful, sometimes requiring another run through on the straightener.
Apparently, it's important to cut the pipe ends as square as you can to avoid leaks, This can be a little tricky due to parallax error when squeezing the supplied cutters. I would sometimes have to make several cuts, an inch or so long, before getting nice square cuts. I hope the extra cuts of wasted pipe doesn't stack up to any significant loss of the 100ft of pipe they provide. I'm already running a little close on available pipe. I'm not cutting any drops until I know how much pipe I'll have left after running the perimeter of the room, at 110in from the floor, then cut the length of the drops accordingly.
The outer cladding of the pipe can be slippery when de-burring. I found it tiring to manually keep the pipe from spinning while deburring. I ended up pinching the pipe near the end with the bench vise, just enough to "assist" arresting the torque while using the supplied de-burring tool.
I also found that trying to hold longer lengths of pipe, while ascending and descending ladders, without introducing bends, and extended lengths of the tape measure, was a little tricky. My two go-to buddies that I typically rely on to help on such projects were both preoccupied, so I've been solo on this project.
So far the Rapidair kit is everything it claims to be.
As I progress, I'll update this thread.


")