To avoid these ads, REGISTER NOW!

My Racedeck Experience

racerx51b

Member
Joined
May 29, 2012
Messages
12
I finished my install yesterday and wanted to share my experience and provide some lessons learned for others. The perspective is from a very inexperienced home improvement person so please keep that in mind. I am fairly mechanically inclined when it comes to things on 2 wheels but have little to no interest in doing home improvement work. So that is one of the reasons I was sold on Racedeck. It seemed fairly simple even for me. However, if I was to do it again I would do things a little different. See below.

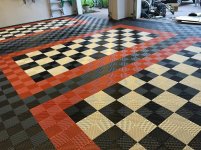
  1. If possible, complete your design with solid colored 2'x2' patterns or rows. My measurements didn't allow this so the amount of labor was increased dramatically. If you keep your design so that it's in 2x2 tiled layout you simply pull out of the box and lay it down. Install goes real fast.
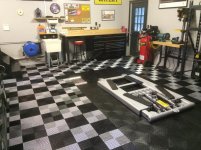
  2. Absolutely use a table saw for cutting in the edges! A circular saw will probably work but if you're anything like me your edges will be all crooked.
  3. I had very little luck with using a jigsaw. I bought a blade for plastice but cutting in around my hot water heater was a PIA. I ended up making a template with cardboard and using a utility knife. Doesn't look awesome but it's good enough.
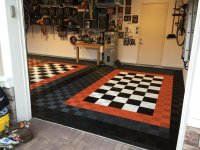
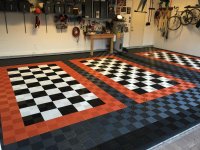
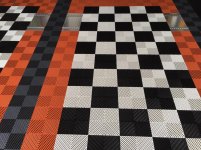
  4. I used the free flow design. I wanted a black border with gray inserts. My design appeared to have good contrast but in reality the graphite tiles look very similar to the black tiles. Still looks good but not the look I was going for. I should've chosen the alloy. Oh well.
  5. I bought the parking stops and love them. They integrated in very well. I will caution you that if you have less than a 6" margin of error for your parking position you could potentially not be able to use them unless you are willing to do some cutting. They need to fit in your tile pattern so you have to move them in 12" segments when positioning them. My garage is real tight but luckily the tiles laid down exactly as I needed them too so it worked perfectly.
  6. My wife and 12yr old daughter were huge helps. I laid out the pattern and the tag teamed snapping them into place so it can be a family fun activity.
  7. I have a 3 car garage and from start to finish it took me about 6hrs. This included emptying out the garage (20mins), sweeping and mopping, installation, and then putting everything back. The estimate of 2-3hrs for a two car garage is presumptive of a scenario I doubt few will experience. If you had a brand new house (nothing to clean out) with a nearly square floor I'd guess that time is possible.
  8. Overalll, I got exactly what I wanted with the exception of the graphite tiles being darker than what I thought from the design program. The GJ discount was great! My garage is now the envy of my neighbors. Racedeck was great to deal with and I am very happy with the end result.

Here are the pics:
 

Attachments

  • 2015-01-10 11.36.55.jpg
    2015-01-10 11.36.55.jpg
    142.8 KB · Views: 233
  • 2015-01-10 11.11.51.jpg
    2015-01-10 11.11.51.jpg
    144.5 KB · Views: 210
  • 2015-01-10 12.07.36.jpg
    2015-01-10 12.07.36.jpg
    147.1 KB · Views: 220
  • 2015-01-10 13.39.59.jpg
    2015-01-10 13.39.59.jpg
    146 KB · Views: 213
  • 2015-01-10 17.40.33.jpg
    2015-01-10 17.40.33.jpg
    151.5 KB · Views: 249
  • 2015-01-11 10.24.41.jpg
    2015-01-11 10.24.41.jpg
    152.5 KB · Views: 211
  • 2015-01-11 10.41.33.jpg
    2015-01-11 10.41.33.jpg
    147.2 KB · Views: 256
Last edited:
To avoid these ads, REGISTER NOW!
OP
R

racerx51b

Member
Joined
May 29, 2012
Messages
12
Here are a few more pics.
 

Attachments

  • 2015-01-10 17.40.52.jpg
    2015-01-10 17.40.52.jpg
    145.1 KB · Views: 121
  • 2015-01-10 17.41.12.jpg
    2015-01-10 17.41.12.jpg
    148.6 KB · Views: 134
  • 2015-01-10 17.41.08.jpg
    2015-01-10 17.41.08.jpg
    152.1 KB · Views: 120
  • 2015-01-11 10.34.30.jpg
    2015-01-11 10.34.30.jpg
    148.3 KB · Views: 137
  • 2015-01-11 10.34.43.jpg
    2015-01-11 10.34.43.jpg
    150.7 KB · Views: 130
  • 2015-01-11 10.35.15.jpg
    2015-01-11 10.35.15.jpg
    150.1 KB · Views: 130
  • 2015-01-10 17.41.23.jpg
    2015-01-10 17.41.23.jpg
    150.8 KB · Views: 138

Al G

Well-known member
Joined
Jan 5, 2015
Messages
340
Location
Arizona
It looks great. Thanks for the tips. I was also thinking black and graphite for my garage but may need to take a closer look. I have samples coming this week.
 

RaceDeck1

Well-known member
Joined
Oct 8, 2007
Messages
3,001
Location
Salt Lake City , Utah
Your garage really looks great, nicely done. you mention that some of your trimming was not that great? we'd be happy to send you a few free tiles to re-do the cut out your are not happy with. Thanks for choosing RaceDeck :beer:
 

dieselvrr

Member
Joined
Jan 12, 2015
Messages
5
Thanks for the pics, I was thinking graphite as well but I see what you are saying in similarity to black.
 

David Paul

Well-known member
Joined
Jul 11, 2014
Messages
677
Location
Western New Jersey
I also had a very good experience with my Racedeck install and in fact was going to go with the black/graphite combination. I asked for a few samples (free) and ended up doing the black/alloy combo and could not be happier.
 

Attachments

  • image.jpg
    image.jpg
    147.6 KB · Views: 198
OP
R

racerx51b

Member
Joined
May 29, 2012
Messages
12
Yeah, I guess it was my fault for not getting samples. The rendering from the design studio led me to believe there was more contrast.

It's really not the biggest deal in the world. It still looks great. Just wanted to provide that info for anyone else considering that combo. Looks like it was helpful to a few.

Sent you a PM Racedeck1
 

blue flame

Active member
Joined
Sep 16, 2013
Messages
27
Your garage really looks great, nicely done. you mention that some of your trimming was not that great? we'd be happy to send you a few free tiles to re-do the cut out your are not happy with. Thanks for choosing RaceDeck :beer:

Now this is customer service well done. :thumbup:
 

mechanix311

Well-known member
Joined
Nov 27, 2012
Messages
59
Your garage looks sharp. Very nice design and layout. A huge thumbs up for racedeck looking to make it perfect by offering some free tiles. Way to go the extra mile.
 
To avoid these ads, REGISTER NOW!
OP
R

racerx51b

Member
Joined
May 29, 2012
Messages
12
UPDATE: Racedeck is going above and beyond as usual. Sending me a few tiles to fix my lack of measure twice cut once skills. Embarrassing to admit but I actually ordered 4-6 extra tiles of each color just to be safe. I have plenty of white and orange tiles. I burned through all the black ones. Actually had to go to my scrap pile to finish off a couple of pieces.

In case anyone was wondering, my inspiration to finally do the flooring was due to the pending arrival of a Tesla Model S for my wife. I wanted a garage worthy of storing my Range Rover and her Tesla. So if anyone is in the market for a 2007 Honda CR-V or 2007 Ford F150 give me a holler!

Here are a few more tips to add to my list above that I just remembered.

I purchased a fine blade for the table saw. Home Depot had a 60t and an 80t. The 80t was $50 and the 60t was only $20 so I cheaped out. The blade worked fine but it did grab a few tiles and shear off small sections. I think this would only be a problem with the free flow due to the nature of the design. Solid tiles would probably be no issue.

I have no experience with cutting the solid tiles but I would imagine it would be a lot easier than trimming the free flow tiles. With my lack of skills, I found it hard to make perfect 90 degree corners and especially the arc to fit around my hot water heater due to the ribbed design. Again, if you are experienced with flooring you'll probably have no issue but for an amateur like me I found it a little outta my comfort zone.

I would order 1-2 extra tiles of each color that won't require a cut just in case you somehow mess up the install or somehow damage one later.

I would order 6-8 extra tiles of the color you plan to be cutting. Again, this is from my perspective. If you are an expert then you are probably laughing at me right now.
 
Last edited:

CENTPA

New member
Joined
Jan 12, 2015
Messages
1
racerx51b,

The blade you used, was it just a normal carbide tipped blade (just a higher tooth count)? I'm considering getting Race Deck for my workshop and will need to cut all the tiles along several edges. I don't have a table saw but was hoping to use a circular saw. My cuts won't have to be super straight since I plan on installing some molding over top at the wall edges. I'm planning on using the solid circle pattern tiles so like you said I may have less issues with chipping. Did you cut the tiles right side up or up side down on your table saw?

Thanks,

John
 
OP
R

racerx51b

Member
Joined
May 29, 2012
Messages
12
racerx51b,

The blade you used, was it just a normal carbide tipped blade (just a higher tooth count)? I'm considering getting Race Deck for my workshop and will need to cut all the tiles along several edges. I don't have a table saw but was hoping to use a circular saw. My cuts won't have to be super straight since I plan on installing some molding over top at the wall edges. I'm planning on using the solid circle pattern tiles so like you said I may have less issues with chipping. Did you cut the tiles right side up or up side down on your table saw?

Thanks,

John

Here is the blade I used from Home Depot. Don't know if it's carbide. Sorry.

I cut 95% of the tiles face up. I cut a few face down due to the part of the tile I was cutting and the setup of my table saw. I didn't notice much difference but really didn't cut enough upside down to say for sure. Sorry.
 

James-W

Well-known member
Joined
Feb 3, 2013
Messages
12,432
Location
Southeastern Wisconsin
Looks really nice. I want to do my garage this Spring when the weather warms up and the snow is gone. Maybe I should wait till Summer when it is hot out so that the tiles will be expanded about as far as they will expand when I sit some of my heavy equipment on them.
 

nolimits76

Well-known member
Joined
Jul 11, 2013
Messages
959
Location
Oklahoma
Congrats on the new Tesla! I'd say the floor is up to snuff, lol.

Quick question -- looking at your pictures and several others of the free flow tiles they always appear to have a "checkered design" in a single tile. For instance, the white tiles look like the tile is divided into 4 perfect squares -- two are light & two are kind of dark.

I know sometimes cameras catch oddities that the human eye doesn't necessarily see. I like the free flows but not sure I like that visual effect.

Also, any closeups of the tire stops? I'm using chock blocks now and they move after a few weeks of parking, etc. I'd like a more permanent solution. But the location is different for my truck and my wife's car. I don't have much wiggle room for my truck so 6" as you noted could be a deal breaker.
 
OP
R

racerx51b

Member
Joined
May 29, 2012
Messages
12
Congrats on the new Tesla! I'd say the floor is up to snuff, lol.

Quick question -- looking at your pictures and several others of the free flow tiles they always appear to have a "checkered design" in a single tile. For instance, the white tiles look like the tile is divided into 4 perfect squares -- two are light & two are kind of dark.

I know sometimes cameras catch oddities that the human eye doesn't necessarily see. I like the free flows but not sure I like that visual effect.

Also, any closeups of the tire stops? I'm using chock blocks now and they move after a few weeks of parking, etc. I'd like a more permanent solution. But the location is different for my truck and my wife's car. I don't have much wiggle room for my truck so 6" as you noted could be a deal breaker.

Thanks! The free flow design makes it appear you have 6"x6" tiles so your eyes aren't deceiving you. I like the look but that is my personal taste. However, it does play tricks on your eyes. The floor kind of changes it's look as you walk around.

As for the parking stops, I would order one (2 stops come in a box) and then use one for each car and see if it situates in the spot you need it too. Like I said, you may be able to cut tiles to move it to a more precise location but if you just want it to "snap" in you are limited to 12" increments. If you happen to get it to work for you you can order another one and then you'll have stops for both wheels of both cars.

Before getting RaceDeck I was in the same boat as you. My stops would move each week and I would have to re-position. I gave up on them and just bolted 2x4 directly to the concrete floor to solve that. The stops supplied by RaceDeck will NOT move. These things are solid. You snap in 2 solid tiles length wise and the diamond plate parking stop adheres to them. The entire backside of the parking stop is a double sided taped material. Assuming the adhesion doesn't give way they aren't going anywhere.
 
Last edited:
To avoid these ads, REGISTER NOW!
Top Bottom