To avoid these ads, REGISTER NOW!

My Rust Bullet install

Gcrop

Well-known member
Joined
Mar 29, 2015
Messages
70
Location
Memphis, TN
So yesterday (Saturday) I installed my Rust Bullet floor. No flakes or clear coat, just RB gray.

This is a new construction detached garage that is 30x22 (660 sq ft). Justin recommended a 5 gallon bucket of RB gray.

The first coat seemed to use more than the 2nd and 3rd coats. Part of that might be the curbs I cut in before I started the floor. Wish I should have recruited help for the curb. That was the most time consuming part of this by far. Also, when you cut in the curb, I would also cut in the expansion joints. I actually forgot about them until I started the second coat.

Some pre-work pics and 1st coat pics.
 

Attachments

  • IMG_9251.jpg
    IMG_9251.jpg
    144.2 KB · Views: 198
  • IMG_9263.jpg
    IMG_9263.jpg
    137.8 KB · Views: 212
  • IMG_9265.jpg
    IMG_9265.jpg
    131.8 KB · Views: 215
  • IMG_9266.jpg
    IMG_9266.jpg
    135.8 KB · Views: 224
  • IMG_9254.jpg
    IMG_9254.jpg
    145.7 KB · Views: 213
  • IMG_9259.jpg
    IMG_9259.jpg
    144.9 KB · Views: 218
  • IMG_9252.jpg
    IMG_9252.jpg
    138.2 KB · Views: 175
Last edited:
To avoid these ads, REGISTER NOW!
OP
G

Gcrop

Well-known member
Joined
Mar 29, 2015
Messages
70
Location
Memphis, TN
Second coat was done by 3:00pm. Temp/hum was about 94*/45%.

Here is where I had to send my wife to Lowes for an emergency purchase of a new roller (not the roller itself but the handle that the roller goes on). I bought extras of everything but these and the RB had hardened it to where it wouldn't roll period. I should have known/thought about that.

I added anti-skid before the 2nd coat. I added roughly 2 pounds. As you can see in the picture, there was about 2.75 gallons left after the first coat.

2nd coat pictures.
 

Attachments

  • IMG_9275.jpg
    IMG_9275.jpg
    137.5 KB · Views: 181
  • IMG_9278.jpg
    IMG_9278.jpg
    132.3 KB · Views: 211
  • IMG_9281.jpg
    IMG_9281.jpg
    138.1 KB · Views: 216
Last edited:
OP
G

Gcrop

Well-known member
Joined
Mar 29, 2015
Messages
70
Location
Memphis, TN
3rd coat was done by 8:30pm.


I used all back strokes but I still have pretty strong roller marks but it is what it is. I'm sure I did something incorrectly. Some flakes and clear coat might have covered up some of these but oh well.


Last two pictures were taken this morning (the morning after).
 

Attachments

  • IMG_9293.jpg
    IMG_9293.jpg
    136 KB · Views: 245
  • IMG_9292.jpg
    IMG_9292.jpg
    140.1 KB · Views: 234
  • IMG_9291.jpg
    IMG_9291.jpg
    136.8 KB · Views: 228
  • IMG_9290.jpg
    IMG_9290.jpg
    139.8 KB · Views: 214
  • IMG_9288.jpg
    IMG_9288.jpg
    136.1 KB · Views: 178
Last edited:
OP
G

Gcrop

Well-known member
Joined
Mar 29, 2015
Messages
70
Location
Memphis, TN
And panoramas of each stage of this project.


1. Cleaned and prepped just before the 1st coat was applied.

2. After 1st coat.

3. After 2nd coat.

4. After 3rd coat.


ImageUploadedByTapatalk1438573568.812177.jpg

ImageUploadedByTapatalk1438573578.314946.jpg

ImageUploadedByTapatalk1438573586.953511.jpg

ImageUploadedByTapatalk1438573598.341619.jpg
 
Last edited:

racerex

Well-known member
Joined
Dec 3, 2013
Messages
345
Location
NY
I so much want to use RB for the floor in my newly built detached garage (18x24), but the roller marks would just get to me. Yeah, my garage is going to be a working garage, (i.e., restoring my project cars) and the floor is going to see enough abuse in the years to come, but knowing how I am, I'll always notice those roller marks.

I've painted countless rooms and the exterior of two homes, but doing a floor will be new to me, so I can pretty much guarantee that I'll not doing something correct at some point and I'll end up with roller marks.

It sounds like going with the flake and clear is the only sure fire way to not end up with noticeable roller marks.
 

Garage Flooring

ALLIANCE MEMBER
Joined
May 21, 2011
Messages
5,288
Location
Grand Junction, CO
I so much want to use RB for the floor in my newly built detached garage (18x24), but the roller marks would just get to me. Yeah, my garage is going to be a working garage, (i.e., restoring my project cars) and the floor is going to see enough abuse in the years to come, but knowing how I am, I'll always notice those roller marks.

I've painted countless rooms and the exterior of two homes, but doing a floor will be new to me, so I can pretty much guarantee that I'll not doing something correct at some point and I'll end up with roller marks.

It sounds like going with the flake and clear is the only sure fire way to not end up with noticeable roller marks.

The Roller marks would get me too. The OP worked very hard on the floor and they did a nice job and it is really easy to sit at the computer and look at a picture and pick apart what went wrong.....

Unfortunately my first look at the picture I can tell why the roller marks are there. You see very nice, very straight long lines. That is not how the product is to be installed. The product is to be installed using very short 'W' rolling technique.

We've had three different times where we or the manufacturer were onsite with someone who had never rolled out the product or coated a garage floor. If the instructions highlighted in the video are followed it came out perfect.

Forgive the poor picture I grabbed it from the video:

perfect-rolling.jpg

Our battle at this point it to explain this clearly. We thought the video did it.
 

Jackfre

Well-known member
Joined
Dec 26, 2010
Messages
4,406
Location
N CA
I watched the video prior to doing my floor as well. I have roller marks throughout. Short stroking my be the way but when you are putting it down it handles very well and with the long handle on the roller the product goes down easily and when you see that, never having done something like this I thought, "this is good", and I went for it. I was doing areas probably 4-5" deep and 5-6' wide prior to back rolling. As noted before, mine had the mottled darker look upon rolling it out at first. back rolling completely changed the color to a nice consistent gray, but the roller marks remained.

It is my shop/garage floor. I intend to beat the hell out of it. If I was using it for display or to help market my business then I would view it differently, but as it is the RB went down easily without having to grind the floor. Simple prep was key for me. It's a good surface.
 

Garage Flooring

ALLIANCE MEMBER
Joined
May 21, 2011
Messages
5,288
Location
Grand Junction, CO
I watched the video prior to doing my floor as well. I have roller marks throughout. Short stroking my be the way but when you are putting it down it handles very well and with the long handle on the roller the product goes down easily and when you see that, never having done something like this I thought, "this is good", and I went for it. I was doing areas probably 4-5" deep and 5-6' wide prior to back rolling. As noted before, mine had the mottled darker look upon rolling it out at first. back rolling completely changed the color to a nice consistent gray, but the roller marks remained.

It is my shop/garage floor. I intend to beat the hell out of it. If I was using it for display or to help market my business then I would view it differently, but as it is the RB went down easily without having to grind the floor. Simple prep was key for me. It's a good surface.

I hear you. So if we would have had a big red sticker on the can or install instructions that said to watch the video and follow the procedure outlined or roller marks will appear, would that have made you more cautious?
 
OP
G

Gcrop

Well-known member
Joined
Mar 29, 2015
Messages
70
Location
Memphis, TN
I think clarifying in the video to use "W" formations when rolling might have helped. I used nothing but back strokes with no pressure on the roller for my 3rd and final coat (like the lady in pink in the background). I actually did use "W" formations when I did the 1st and 2nd coats. I also worked in 5' wide and 4' deep (roughly) areas before reapplying paint to my roller.

For the record, I don't blame anyone for the roller marks. I understood the risk I was taking. Like Jackfre said, simple prep and a good surface was key.

Just hoping my experience and comments can help people going forward a little bit.


Sent from my iPhone using Tapatalk
 

Overhaulin63

Well-known member
Joined
Feb 22, 2012
Messages
103
Location
Akron, Ohio
Can you change the color or is silver/grey the only choice for this product?

Also does putting paint chips or flecks in the Rust Bullet reduce the products integrity?
 

bullnerd

Well-known member
Joined
Sep 17, 2012
Messages
5,690
Location
Jersey
I read what you said about watching the vid Justin, and I hope that helps everyone, including me when the time comes. But I just wanted to ask, how about some type of flow control/additive to help the coating flow out better? I have no idea if its possible with this stuff or not , just throwing it out there.
 
Last edited:

Garage Flooring

ALLIANCE MEMBER
Joined
May 21, 2011
Messages
5,288
Location
Grand Junction, CO
I read what you said about watching the vid Justin, and I hope that helps everyone, including me when the time comes. But I just wanted to ask, how about some type of flow control/additive to help the coating flow out better? I have no idea if its possible with this stuff or not , just throwing it out there.

I can't get into specifics due to some obligations I have, but the product being shipped from my warehouse has taken these types of things into consideration. I should be ably to give more detail soon.
 

Jackfre

Well-known member
Joined
Dec 26, 2010
Messages
4,406
Location
N CA
I hear you. So if we would have had a big red sticker on the can or install instructions that said to watch the video and follow the procedure outlined or roller marks will appear, would that have made you more cautious?

Yeah, you could do that. You can also see to it that the instructions that you put on the "outside" of the package don't get rip/torn and have it be necessary for me to tape them back together and call to tell you about it. You can also see to it that when someone orders that the material received has the same model numbers on the cans as what was ordered. There were no other instructions included with the densifier and sealer other than those on the can, which I guess rule the day, but I thought I was going to get additional information from you. That said, I've all ready demonstrated that I don't follow instructions, so no biggie!
 

benwah

Well-known member
Joined
May 21, 2014
Messages
980
Location
Crested Butte, Colorado
Is it too late to put more on to fix this? I would definitely try at least one if not two more coats, rolling the rest perpendicular to what you've already put down.
 

Garage Flooring

ALLIANCE MEMBER
Joined
May 21, 2011
Messages
5,288
Location
Grand Junction, CO
Yeah, you could do that. You can also see to it that the instructions that you put on the "outside" of the package don't get rip/torn and have it be necessary for me to tape them back together and call to tell you about it. You can also see to it that when someone orders that the material received has the same model numbers on the cans as what was ordered. There were no other instructions included with the densifier and sealer other than those on the can, which I guess rule the day, but I thought I was going to get additional information from you. That said, I've all ready demonstrated that I don't follow instructions, so no biggie!

We are looking at a couple things including the sticker. The problem with the instructions on the can is they are generic but a resolution is in the works for that. We have all the instructions online and downloadae for RustBullet

What are you missing re densifier. ????
 

Overhaulin63

Well-known member
Joined
Feb 22, 2012
Messages
103
Location
Akron, Ohio
Do you offer different size flecks? Do I need to put clear coat
over the flecks to make them wear resistant too?

Do you also sell anti-skid and how much would you add for a 32x60 job?
 
To avoid these ads, REGISTER NOW!

Garage Flooring

ALLIANCE MEMBER
Joined
May 21, 2011
Messages
5,288
Location
Grand Junction, CO
Do you offer different size flecks? Do I need to put clear coat
over the flecks to make them wear resistant too?

Do you also sell anti-skid and how much would you add for a 32x60 job?

We offer all the different sizes of flake and we are happy to supply the anti skid at no charge. I will send a PM for pricing
 

TwinFins

Member
Joined
Mar 22, 2015
Messages
11
Location
Clarkston MI
The Roller marks would get me too. The OP worked very hard on the floor and they did a nice job and it is really easy to sit at the computer and look at a picture and pick apart what went wrong.....

Unfortunately my first look at the picture I can tell why the roller marks are there. You see very nice, very straight long lines. That is not how the product is to be installed. The product is to be installed using very short 'W' rolling technique.

We've had three different times where we or the manufacturer were onsite with someone who had never rolled out the product or coated a garage floor. If the instructions highlighted in the video are followed it came out perfect.

Forgive the poor picture I grabbed it from the video:

perfect-rolling.jpg

Our battle at this point it to explain this clearly. We thought the video did it.

I installed rust bullet a couple weeks ago and had roller marks after 3rd coat as well. Watched the video before, during, and just now...No where does it state to use "W" type pattern...in fact, it specifically says back rolling is accomplished by simple pulling the roller back towards you with no pressure"..To me that sounds like pull it straight back ...99% of the video is people rolling straight back and forth

I didn't care too much as I put down a heavy flake to cover other imperfections, but I honestly don't think a roller mark free floor should be promised/advertised. I just don't think it is possible to consistently achieve each and every time.

I like the product and the results. I would recommend them to others, but only with flake or with the understanding that there will be roller marks.
 
OP
G

Gcrop

Well-known member
Joined
Mar 29, 2015
Messages
70
Location
Memphis, TN
Kind of felt the same way TwinFins but I knew I was taking a chance doing it myself. I knew it wasn't looking right on my 3rd coat doing the "pull" method and I should have just done it whatever was looking the best on my floor. Of course the most obvious roller marks are right in front of the French doors entering the garage where the most foot traffic (and eyes) will be. Ah well.


Sent from my iPhone using Tapatalk
 

Joeys79

Well-known member
Joined
Nov 28, 2013
Messages
50
Location
Southern Indiana
Can any of you folks give a little better description of "roller marks". I experienced two things happening, all having to do with the wet edge. Starting out the material leveled well on the wet edge, but it cured darker where it rolled over, so you had this darker irregular stripe in the floor. Then there was another issue with the material starting to cure at the edge, and when rolling over the edge it was a bit tacky. When this cured the material never leveled and left a rough streak, looking almost white when the light hits it. What concerns me about these are they will pick up dirt and you will never just wipe up an oil spill.

I had a 34 x 28 floor, and have been seeing folks with bigger floors having issues, I think because you just can't get back to the wet edge fast enough for it to level smooth. Everybody that has had better luck are around 400 - 500 sq. ft. I did find, unfortunately too late, that a taped line does not leave much of a mark. I could have split the floor into two applications. The little line would have been easier to live with than what I got.

Air movement is also a problem. The most trouble I had was at the doors.

As far as the "W" pattern, I believe that's how you're supposed to roll any paint, but it's more to distribute the paint. The pull back here has to be straight to even it out. I had a darker "V" in one spot after it cured where I missed on the roll back.
 

OJ Bartley

Well-known member
Joined
May 18, 2009
Messages
605
Location
Toronto, ON
Grcop, nicely done, and you have a good looking floor. Sure, there are some roller marks, but at least you did them neatly and they're pretty consistent!

Good attitude to have as well. No matter how much we prepare, read, ask experts, etc., there's no substitute for actually DOING something yourself to learn what to do and what not to do. Taking on something new may leave you with a less than perfect result, but knowing that ahead of time and being OK with it is important. That was the case with my porcelain floor, and I'm OK with it. If I were to do another floor now, I think the results would be about 25% better. That's just how it goes.

Also keep in mind that doing flakes would probably cover up the roller marks, but there's always the possibility of having roller marks in the clearcoat if the technique isn't quite perfected.

It is also refreshing to not see a less-than-perfect result blamed on the product or manufacturer right away. We see a lot of comments like "it went down poorly" or "It wasn't coating properly" and then eventually a user error like improper mixing is revealed. Sometimes DIY is hard. Sometimes we make mistakes. It's all part of the process. At the end of the day you have a strong, good looking floor that will be better than 99% of your neighbours, and one that you can be proud of.
 
OP
G

Gcrop

Well-known member
Joined
Mar 29, 2015
Messages
70
Location
Memphis, TN
Can any of you folks give a little better description of "roller marks".


Look at my 3rd post. Most of those pictures show the roller marks. Some spots more prevalent than others.


Sent from my iPhone using Tapatalk
 

bullnerd

Well-known member
Joined
Sep 17, 2012
Messages
5,690
Location
Jersey
Well put Sir!

Grcop, nicely done, and you have a good looking floor. Sure, there are some roller marks, but at least you did them neatly and they're pretty consistent!

Good attitude to have as well. No matter how much we prepare, read, ask experts, etc., there's no substitute for actually DOING something yourself to learn what to do and what not to do. Taking on something new may leave you with a less than perfect result, but knowing that ahead of time and being OK with it is important. That was the case with my porcelain floor, and I'm OK with it. If I were to do another floor now, I think the results would be about 25% better. That's just how it goes.

Also keep in mind that doing flakes would probably cover up the roller marks, but there's always the possibility of having roller marks in the clearcoat if the technique isn't quite perfected.

It is also refreshing to not see a less-than-perfect result blamed on the product or manufacturer right away. We see a lot of comments like "it went down poorly" or "It wasn't coating properly" and then eventually a user error like improper mixing is revealed. Sometimes DIY is hard. Sometimes we make mistakes. It's all part of the process. At the end of the day you have a strong, good looking floor that will be better than 99% of your neighbours, and one that you can be proud of.
 

Garage Flooring

ALLIANCE MEMBER
Joined
May 21, 2011
Messages
5,288
Location
Grand Junction, CO
I LOVE THIS THREAD. Before you get pissed off about that, let me explain. I gave away, at below cost, multiple jobs on the forum to get feedback so we could get the best set of instructions possible for our customers.

I've been in this business for over a decade. The reviews I received on this product and the personal experiences I have had with this product inspired more confidence than I have ever had in a coating. The way the manufacturer has worked with us, and forum members behind the scenes to make sure this product is as perfect as possible is honestly unbelievable. The sales to problems ratio is unprecedented and I have never once had them take the you screwed up so screw you approach to dealing with issues.

In the last couple of months there have absolutely been some application issues that have come up. Is that the products fault. Nope. Is the product perfect Nope. Have we changed our instructions multiple times. Absolutely. 
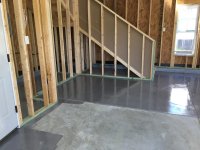
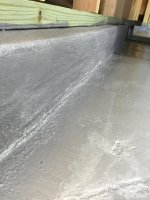
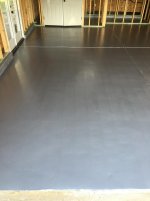
Can Rust Bullet Be Installed to create a beautiful floor? I have 100's of pictures that say it can. Did I overestimate how easy it was to get there. It would appear so.

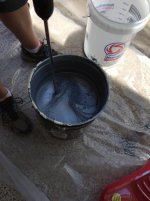
The majority of our projects have in fact been installed using short straight strokes and back-rolling. It is highly effective when done properly. We switched to the W pattern and really went out of our way to highlight it in the video because it forces people to work in smaller sections -- not to mention as someone else said its just a generally accepted principle of painting. While we have had several people with roller marks of late, it is an incredibly small percentage of our projects, but its an issue I want to address as best I can via education. Just yesterday I added this to my instructions:

rb install.jpg

I asked the other day about a big red sticker. I was not kidding or being sarcastic.

Other Things That Have Come Up

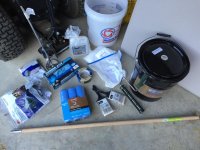
It was brought to our attention that apparently Gorillas have been imported by a certain shipping company and they play catch with our pails. A forum member sent me pictures and we got a couple back. I started packaging all 5's personally and found a method that worked (knock on wood). It was taking me 6 minutes per pail. We had a package company come from Denver and they got us a machine that does it better.

Solvent Bubbles

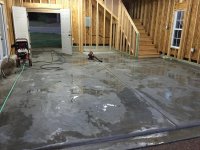
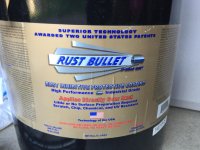
Using round numbers, 30% of a 5 gallon pail of Rust Bullet is solvent. That is why it stinks. We have coverage's ranging from 300SF - 400 SF per gallon depending on concrete condition and the product being used. More is not better. If you get a thick spot on your floor the solvent can't get out. Its trapped. The surface is cured, it tried to get out and it produces a texture that we can reproduce easily. It was just very simply put on to thick. The average guy is not to sit there and measure wet film, so we try to explain how to get the correct coverage. When we see two or three people have the same issue we update our instructions.

We've also made other changes... Like we shortened our recoat time because just telling people if the humidity was over 70% the product cured faster, was not enough. SO we shortened it for everyone.

So why do I love this thread? At the end of the day, my job is to take product, get it to your door and teach you how to put it down right. That's why I introduced this product the way I did. We needed feedback on the instructions. This thread gives me more ideas on how to make an outstanding product easier to apply for the average Joe.

I keep going back and making it better. I don't think I will ever write a set of instructions that will be 100% foolproof (figure of speech people) but I take stuff to heart, point stuff out to the manufacturer and we work together to get as specific and detailed as we can be.

I made a mistake lowering the price of the product. What I should have done was kept the price where it is and include the correct rollers. I am working the manufacturer to determine which is the absolute best cover to use and then I will figure out how to deal with that -- either raise the price, or sell it and tell you where to get it locally.

So at the end of the day here is the deal. If you have a problem with you floor and you think its my fault, the manufacturers fault or the fault of poor instructions, send me a PM and lets get it fixed.

If you have a floor where you made an honest mistake and want help fixing it I will sell you the product at my cost.

If you feel like it was a combination of things, I will get you replacement product at 50% off.

I am not obligating the manufacturer to any of this. I'm saying regardless of where they stand I will do this. My only caveat is I will PRINT and send the most current instructions and you need to follow them. (This applies to orders installed prior to the date of this post and expires the end of next week )

The difference between my company and buying from a big box store is I have a vested interest in your success and will do everything in my power to get you there. Here is the latest update to our instructions. If you think something should be added, let me know. http://www.garageflooringllc.com/wp...st-Bullet-over-Concrete-for-Garage-Floors.pdf

This page also has some great tips: http://www.rustbullet.com/rust-bullet-for-concrete

I have had the manufacturer read this post. They are going to add the following sentence to their concrete page: Roller marks/brush strokes may be visible on the surface of the completed application depending on the surface, the applicator or application method and equipment. These marks will not affect the performance of the coating. Adding a decorative flake and/or a nonskid material to the project may decrease and/or eliminate the visibility of these marks.

They also asked that we point out that regardless of these aesthetic imperfections do not affect the incredible protection Rust Bullet provides to the concrete.
 
OP
G

Gcrop

Well-known member
Joined
Mar 29, 2015
Messages
70
Location
Memphis, TN
Nice write up Justin and that is good feedback (off of customers' feedback). Says a lot about a company IMO.

Glad this thread has helped too.

If I were instructing a friend before they installed it, I probably wouldn't even mention backrolling. But maybe it is because I back rolled incorrectly. The "W" formation seemed to work better during my install of the 1st and 2nd coats. I did the 3rd coat with all pull/back strokes and that was when they were most prevalent.

Would applying a 4th coat doing the "W" pattern help? And most importantly, can I do it with no prep to the 3rd coat?

My wife is on to me about getting my stuff out of the attached garage and into the detached (where the RB is), so figured I would ask before moving anything in.


EDIT: I also agree with that last paragraph.
 

Garage Flooring

ALLIANCE MEMBER
Joined
May 21, 2011
Messages
5,288
Location
Grand Junction, CO
Nice write up Justin and that is good feedback (off of customers' feedback). Says a lot about a company IMO.

Glad this thread has helped too.

If I were instructing a friend before they installed it, I probably wouldn't even mention backrolling. But maybe it is because I back rolled incorrectly. The "W" formation seemed to work better during my install of the 1st and 2nd coats. I did the 3rd coat with all pull/back strokes and that was when they were most prevalent.

Would applying a 4th coat doing the "W" pattern help? And most importantly, can I do it with no prep to the 3rd coat?

My wife is on to me about getting my stuff out of the attached garage and into the detached (where the RB is), so figured I would ask before moving anything in.


EDIT: I also agree with that last paragraph.

Thank you. Once 24 hours is up you have to prep it. Light sanding (150 grit on pole sander) or metal blast and rinse well and dry. Yes putting another coat on with the w stroke will help tons.
 
OP
G

Gcrop

Well-known member
Joined
Mar 29, 2015
Messages
70
Location
Memphis, TN
Thank you. Once 24 hours is up you have to prep it. Light sanding (150 grit on pole sander) or metal blast and rinse well and dry. Yes putting another coat on with the w stroke will help tons.


Can you PM a cost for my 660 sq ft for a 4th coat? I will discuss with my wife on whether it is worth it. If you have a slightly smaller size that would be cheaper, I would be ok with not applying a 4th coat to all of the 660 sq ft garage. The back room where the lawn equipment will be can stay as is.


Sent from my iPhone using Tapatalk
 

IPACA9

Well-known member
Joined
Jul 18, 2013
Messages
489
Location
Independence, Mo
Did my 30x40 a couple months ago. I took a lot of pictures along the way. Maybe I'll do a thread as well. I also wound up with some roller marks. Drove me nuts at first but I've kinda forgot about them already with having stuff in there now. Just glad to have the floor protected before I did something and kicked myself for not covering it when I had the chance.
uploadfromtaptalk1438959905814.jpg

Sent from my XT1254 using Tapatalk
 

bullnerd

Well-known member
Joined
Sep 17, 2012
Messages
5,690
Location
Jersey
IPAC, Please do a thread if you can, the more info on RB the better.

And I am going to do my 30x40 also, so this would be very good info.

Thanks, Looks good BTW.
 

IPACA9

Well-known member
Joined
Jul 18, 2013
Messages
489
Location
Independence, Mo
I did a little video showing how tough this stuff is. Almost ruined my expensive 18" roller...lol. The smell when it's curing! My neighbor come over to check on me because she could smell it from her back deck. We have acre lots and my building is on the back of it. She was so glad I was wearing a respirator.
8b242e7b7378801a5b467b5c32beefa9.jpg

d35a88b99d7d11e6b6aae3074beaa238.jpg


I had some spiked shoes. Guess they helped for the extra coats
5f6abd00145a29f71a5168b09226c075.jpg


Sent from my XT1254 using Tapatalk
 

Garage Flooring

ALLIANCE MEMBER
Joined
May 21, 2011
Messages
5,288
Location
Grand Junction, CO
I did a little video showing how tough this stuff is. Almost ruined my expensive 18" roller...lol. The smell when it's curing! My neighbor come over to check on me because she could smell it from her back deck. We have acre lots and my building is on the back of it. She was so glad I was wearing a respirator.
8b242e7b7378801a5b467b5c32beefa9.jpg

d35a88b99d7d11e6b6aae3074beaa238.jpg


I had some spiked shoes. Guess they helped for the extra coats
5f6abd00145a29f71a5168b09226c075.jpg


Sent from my XT1254 using Tapatalk

I would love to see the video.
 

IPACA9

Well-known member
Joined
Jul 18, 2013
Messages
489
Location
Independence, Mo
Hmmm. I never realized that. I'll see what settings I need to change. Other than watching something on YouTube I really don't upload much

Sent from my XT1254 using Tapatalk
 
To avoid these ads, REGISTER NOW!
Top Bottom