

Quite a process, but it goes down easily. 960 Sq ft, 4 month old slab. Only doing 800Sq ft with RB as the remaining corner will be more welding area and will get the densifier/sealer. I'll also do the exterior apron, sidewalks and deck area with the densifier/sealer as I will have enough.
Anyway, this was a hand troweled finish. It was well done, but is still hand troweled, so some inconsistency of surface. I swept x2, vacuumed, power washed twice, squeegied it off, let it dry and vacuumed it off this morning. I was sorely temped to rent the Dimabrush and take it down, but Justin said it wouldn't be necessary with a new, clean slab so I did not do the grinding. Happily as it turns out!
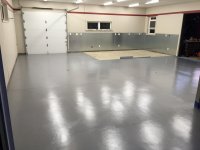
Temp this morning was 82*, 50% RH. 88* right now for coat two. Opened the 5 gallon can, mixed it for the spec'd 3 minutes. Working it pretty hard it did not throughly mix the black into the gray. There is some black material that gives a kind of swirled, curdled look to the RB. No matter what I was trying with the mixing it remained somewhat separate. Kind of unsettling, but, for once I decided to just follow the directions. Once rolled on it is a consistent color. 9" X 3/8" nap roller on a telescoping handle and I was off. I poured off two gallons and put in the thinner, mixed that up a bit, sealed up the big bucket and began rolling. Took 1:10 min to do the 800 sq ft. There wasn't a cup left of the two gallons. Coverage was very good and it looks good. Strong stuff. The shop is 90' from the house and my wife was hollerin', "What are you doing?" A good respirator is a must. BTW, I would not mind a wider roller, but have to say that the 9" was easy to handle in the corners and against walls. I guess if it was a really big floor, the 9" on the edges and a bigger roller in the field would be ok, but I don't think you gain much.
It has been just over two hrs since I finished the first coat. I just walked on it and it is close to being ready to go to coat two. With three gallons left I expect I'll get three more coats. As fast as it is drying I guess that will work out ok. Pics to follow.
Anyway, this was a hand troweled finish. It was well done, but is still hand troweled, so some inconsistency of surface. I swept x2, vacuumed, power washed twice, squeegied it off, let it dry and vacuumed it off this morning. I was sorely temped to rent the Dimabrush and take it down, but Justin said it wouldn't be necessary with a new, clean slab so I did not do the grinding. Happily as it turns out!
Temp this morning was 82*, 50% RH. 88* right now for coat two. Opened the 5 gallon can, mixed it for the spec'd 3 minutes. Working it pretty hard it did not throughly mix the black into the gray. There is some black material that gives a kind of swirled, curdled look to the RB. No matter what I was trying with the mixing it remained somewhat separate. Kind of unsettling, but, for once I decided to just follow the directions. Once rolled on it is a consistent color. 9" X 3/8" nap roller on a telescoping handle and I was off. I poured off two gallons and put in the thinner, mixed that up a bit, sealed up the big bucket and began rolling. Took 1:10 min to do the 800 sq ft. There wasn't a cup left of the two gallons. Coverage was very good and it looks good. Strong stuff. The shop is 90' from the house and my wife was hollerin', "What are you doing?" A good respirator is a must. BTW, I would not mind a wider roller, but have to say that the 9" was easy to handle in the corners and against walls. I guess if it was a really big floor, the 9" on the edges and a bigger roller in the field would be ok, but I don't think you gain much.
It has been just over two hrs since I finished the first coat. I just walked on it and it is close to being ready to go to coat two. With three gallons left I expect I'll get three more coats. As fast as it is drying I guess that will work out ok. Pics to follow.
")


 I am going to have to steal that line... I just tell people my wife says it stinks like.....
  the more we include in the instructions the less people read them