To avoid these ads, REGISTER NOW!

My Shop AKA the obsession

W-Cummins

Well-known member
Joined
Jan 9, 2006
Messages
1,639
Location
Iowa
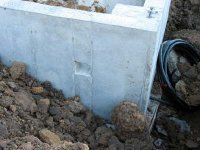
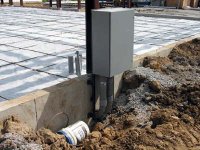
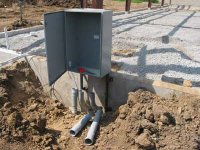
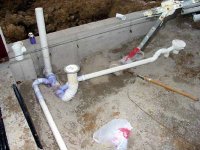
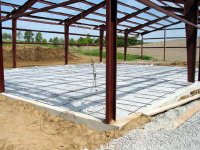
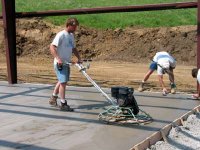
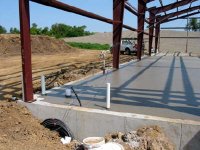
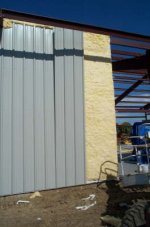
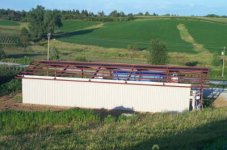
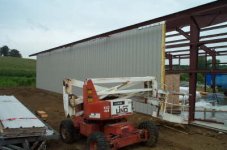
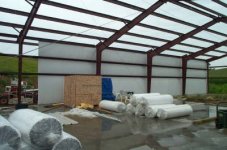
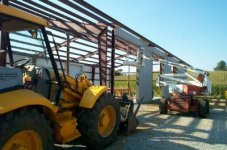
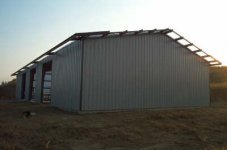
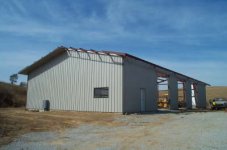
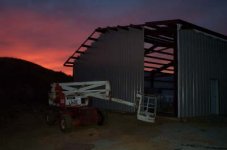
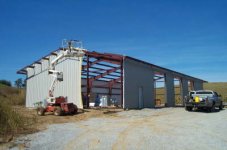
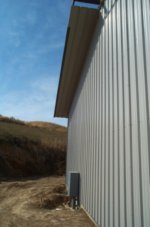
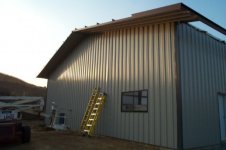
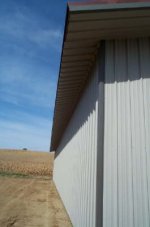
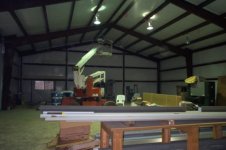
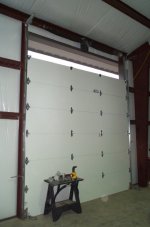
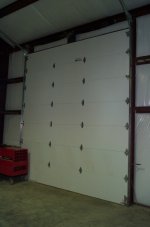
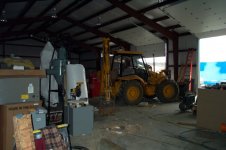
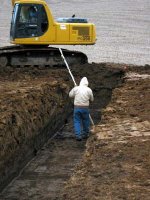
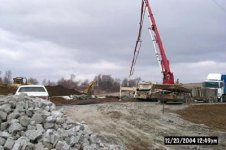
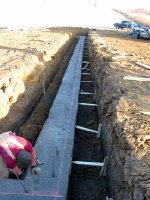
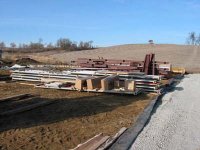
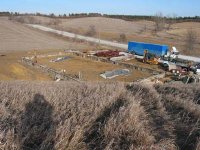
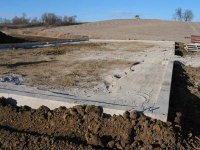
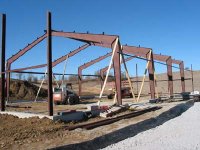
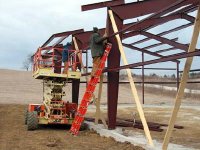
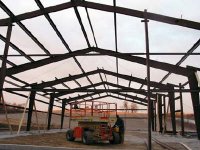
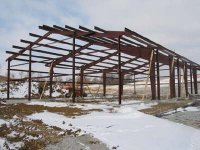
Here are some pictures of the shop I built. I originally wanted to construct it all by myself, but in the end I had to sub out some of it (the site prep, concrete footings/walls and the slab {there is just no way one person can pour and finish large amounts of concrete} plus a few other things I will describe later). I guess it's what you would call a rather large garage/shop @ about 5400 sq ft of finished space ( 50'X100' floor space). So here are some of the pictures of the foundation. The machine dug a 5' wide trench for the footings, the frost walls, and piers for the red iron to attach to.
 

Attachments

  • footing 1.jpg
    footing 1.jpg
    22.1 KB · Views: 5,560
  • footing 2.jpg
    footing 2.jpg
    16.3 KB · Views: 5,149
  • footing 3.jpg
    footing 3.jpg
    23.3 KB · Views: 5,460
Last edited:
To avoid these ads, REGISTER NOW!
OP
W

W-Cummins

Well-known member
Joined
Jan 9, 2006
Messages
1,639
Location
Iowa
I purchased the Building as package from an online firm. They delivered it to my site and I rented a fork lift to unload it from the 53' semi truck. The Foudation crew placed the metal forms and then as with the footings they were filled with the concrete pumper truck. After a few days the forms were striped and most of the site backfiled.
 

Attachments

  • db_Echo_Project_12-23-2002-7b3.jpg
    db_Echo_Project_12-23-2002-7b3.jpg
    18.5 KB · Views: 5,065
  • stm walls 1.jpg
    stm walls 1.jpg
    22.8 KB · Views: 5,305
  • stm walls 2.jpg
    stm walls 2.jpg
    21.8 KB · Views: 5,200
  • site backfilled.jpg
    site backfilled.jpg
    22.5 KB · Views: 5,073
OP
W

W-Cummins

Well-known member
Joined
Jan 9, 2006
Messages
1,639
Location
Iowa
After looking at the main frames for the red iron structure, and the plans it quickly became clear that I could not lift them in place by my self. So I hired a local crew of 4 guys for one day to help me to erect the main frames. We used a bob cat with a jib crane attachment to place the main frames ( the large rafters weigh 500lbs each w/o the uprights). Then we used their man lift to set just enough of the purlans and girts so the frames would not blow down in the wind. By working as fast as we could we were able to set all 4 main and the 2 end frames in one day. This turned out to be a bad idea though as in the haste NONE of the purlans or the girts were put in the correct places ( there all numbered and can only be installed in the correct bays). So later after they left I got to take them all down and ....
 

Attachments

  • main frames up.jpg
    main frames up.jpg
    14.5 KB · Views: 5,177
  • main frames going up 1.jpg
    main frames going up 1.jpg
    21.5 KB · Views: 5,258
OP
W

W-Cummins

Well-known member
Joined
Jan 9, 2006
Messages
1,639
Location
Iowa
After seeing how use full the man lift was I knew that I would need one to complete the erection of the red iron, so I rented one to play with for a month! As mentioned in the above message, I then started to move the purlans and girts to their correct positions and place the rest of them up. Oh yeah a few things I forgot to mention about this project, it was started in late December and now it was January and Iowa and ..... what was that... oh I remember now.... it was COLD! Below freezing and a nasty north wind blowing every day. Well from time to time a couple of my GOOD friends took pity on me, (or maby they had temporary insanity) none the less they took turns and offered to help me put up some of the steel. So the procedure was to haul the steel over to the lift and drag it up on the railing. Then ride up with it in on the lift, and place it on the frames with your back to the wind/sleet/snow. Next you got to take off your gloves and line up the holes with the spud wrench, place the bolts in the holes and tighten them up with the nice cold wrenches. After about a week each the helpers had come to their senses and figured out that I was crazy and they had enough! I finished the rest of it and returned the manlift.
 

Attachments

  • rental JLG.jpg
    rental JLG.jpg
    25.2 KB · Views: 4,699
  • T and S red iron.jpg
    T and S red iron.jpg
    23.8 KB · Views: 4,843
  • red iron gerrtin there.jpg
    red iron gerrtin there.jpg
    24.2 KB · Views: 4,761
  • red iron time for a brake.jpg
    red iron time for a brake.jpg
    22.4 KB · Views: 4,937
Last edited:
OP
W

W-Cummins

Well-known member
Joined
Jan 9, 2006
Messages
1,639
Location
Iowa
midlf said:
I showed this to one of the guys at work. His comment: "he must be single."

Nope married for 20 years! And in fact She/We are living in the shop right now:)

You see it works this way......
I purchased the land to build the shop and my house on. I knew that if I built the home first the shop might not ever get constructed ( or it would be scaled WAY down). So I built the shop FIRST! That way there is interest in finishing it so I can start the home:)
 
OP
W

W-Cummins

Well-known member
Joined
Jan 9, 2006
Messages
1,639
Location
Iowa
Here are a few more pictures. Another truck delivered the insulation. The power panel arrives. A few holes were cut/hacked/drilled into the frost wall for services to be installed.
 

Attachments

  • power panel arives.jpg
    power panel arives.jpg
    19.7 KB · Views: 6,219
  • Insulation Delivery.jpg
    Insulation Delivery.jpg
    14.4 KB · Views: 4,646
  • electrical hole.jpg
    electrical hole.jpg
    23.6 KB · Views: 4,562
  • plumbing hole.jpg
    plumbing hole.jpg
    18.9 KB · Views: 4,544

bmwpower

Super Moderator
Staff member
Joined
Apr 24, 2005
Messages
12,578
Location
NJ
Holy power panel! I hope this is a commercial building.
 

shopking68

Well-known member
Joined
Jan 12, 2006
Messages
255
Location
Kansas
That is the same kind of insulation I have. The electrical panel is insane, what are you gonna be doin in there, just curious? :thumbup:
 
OP
W

W-Cummins

Well-known member
Joined
Jan 9, 2006
Messages
1,639
Location
Iowa
The power panel was a great deal for me. It was part of a larger panel that was to be installed in a new home depot. What happened was the building was not completed and had an open over head door by the panel It rained and some water splashed up off the floor and got on some of the panels. The customer came by, freaked out, and made the electrical contractor pull all 16 sections of the panel out. About $80k wholesale and it was "scraped". The sections I got didn't even have any water spots on them. The panel is a GE switch board with a 800 amp bus and main breaker in the big section. I re-rated the main breaker down to 600 amp by changing the rating plug, as I didn't need 800 amps of 3 phase 480volt :) I was going to run the home off that panel, but I have changed my mind because there is a HUGE (well to me anyway, about $50-60 per month) power outlay to run the transformers (75kva for 200 amps @ 208 volt at the shop and 112 KVA that I was going to run at the house to have a 300 amp service). I did run the 480 up to the home site though (about 80 amps just in case I want to run some thing at 480 at the house:)
 
Last edited:
OP
W

W-Cummins

Well-known member
Joined
Jan 9, 2006
Messages
1,639
Location
Iowa
After using the rented manlift I decided that if I was going to be able to construct the building by myself I needed one. So this snorkelift UNO41d followed me home. I also had to get the services, and the under slab plumbing ( bathroom,shower and kitchen) setup before I could have the slab finished.
 

Attachments

  • power box 3.jpg
    power box 3.jpg
    26.4 KB · Views: 1,819
  • power box 2.jpg
    power box 2.jpg
    25.2 KB · Views: 1,774
  • power box 1.jpg
    power box 1.jpg
    26.2 KB · Views: 1,878
  • plumbing stack.jpg
    plumbing stack.jpg
    22.1 KB · Views: 2,035
  • uno 41d.jpg
    uno 41d.jpg
    26.2 KB · Views: 1,914
OP
W

W-Cummins

Well-known member
Joined
Jan 9, 2006
Messages
1,639
Location
Iowa
Here is the slab pour. I made a mistake and only did 3000 sq ft of the 6" slab. Some thing that I later came to regret, had thought that I could just have gravel over on the part of the building w/o the slab to save some $$ but I should have just done it all in one shot. The parts of the building w/o the slab became a HUGE mud hole while I was building.
 

Attachments

  • slab 1.jpg
    slab 1.jpg
    28.3 KB · Views: 1,820
  • slab 2.jpg
    slab 2.jpg
    24.6 KB · Views: 1,822
  • slab 3.jpg
    slab 3.jpg
    23.1 KB · Views: 1,891
  • slab 4.jpg
    slab 4.jpg
    23.1 KB · Views: 1,839
OP
W

W-Cummins

Well-known member
Joined
Jan 9, 2006
Messages
1,639
Location
Iowa
I had a few small things I need to do to finish on the red iron frames before I could start siding them. I added a few supports for the gable end over hangs (BTW 3' over hangs all around). The Building kit did not come with any wind bracing ( the structure is designed to be diaphragm braced) But I wanted to add some, becuse I figured that it would help me to hold the building square while I skined it.
 

Attachments

  • Cable Wind bracing attachment to red iron frame.jpg
    Cable Wind bracing attachment to red iron frame.jpg
    6.7 KB · Views: 1,641
  • Cable wind bracing.jpg
    Cable wind bracing.jpg
    14.1 KB · Views: 1,572
  • red iron gable 1.jpg
    red iron gable 1.jpg
    20.9 KB · Views: 1,594
To avoid these ads, REGISTER NOW!
OP
W

W-Cummins

Well-known member
Joined
Jan 9, 2006
Messages
1,639
Location
Iowa
Before you attach the sheeting you need to have some way to attach the bottoms of the sheets to the edge of the frost wall. The place I purchased the kit from had an extra cost option they called deluxe base trim, I will not tell you what I was calling it before I was done sheeting the walls but it sure wasn't deluxe..... To enable me to install the insulation I adapted a trick I got from the customer service guy at the building supplier. They give you some double sticky tape to attach the bottom of the insulation to the base trim. This did not really work worth a dam. So what I did was to cut back the insulation from the scrim about 4". Then I would take the piece and hang it from the manlift, raise it up until the bottom of the insulation was even with the base trim and fold the scrim over and secure it with carefully spaced sheet metal screws with fender washers on them ( set to fall where the high rib of the panel was located for clearance). Then I would lower the manlift down climb over the railing and ride up, stretch the insulation as tight as I could get it. Then using Visegrip C clamps to clamp it to the eve strut. Then I would predrill the sheets (3'X16') for the screw holes to keep them all even for the side walls and place it up to the wall and lift it to the ledge on the base trim. Place a screw in it on the bottom so it could not fall out, and ride up and install the screws in the sheets top to bottom row by row to keep the sheets plumb.
 

Attachments

  • base trim.jpg
    base trim.jpg
    91.4 KB · Views: 2,133
  • sheeting insualtion intall cutting.jpg
    sheeting insualtion intall cutting.jpg
    20.5 KB · Views: 2,038
  • sheeting insualtion intall.jpg
    sheeting insualtion intall.jpg
    20 KB · Views: 2,328
  • sheeting insualtion intall 2.jpg
    sheeting insualtion intall 2.jpg
    15.6 KB · Views: 2,128
Last edited:
OP
W

W-Cummins

Well-known member
Joined
Jan 9, 2006
Messages
1,639
Location
Iowa
looked back and I see that I missed some Questions/Comments in my messages.

1st Thanks for all the nice comments about the project!

so lets see

Is the shop a commercial building?

Not at this time, got any good ideas?? I'm open to any projects that would allow the money pit to be transformed into a pile of cash:)

What am I going to do in there??

Well I enjoy metal working, wood working, I have way too much **** to repair. Trucks to build, a sail boat building project I put on hold, a tube frame buggy/kart project is in the works and of course all the wood related projects for the house ( kitchen cabinets, all the built in's and the doors)... all starting just as soon as I finish the shop:)
 
Last edited:
OP
W

W-Cummins

Well-known member
Joined
Jan 9, 2006
Messages
1,639
Location
Iowa
So here are some more sheeting pictures. Oh yeah and that little MUD problem too..
 

Attachments

  • sheeting back 3.jpg
    sheeting back 3.jpg
    18.4 KB · Views: 2,166
  • sheeting back 2.jpg
    sheeting back 2.jpg
    16.8 KB · Views: 1,928
  • sheeting back 1.jpg
    sheeting back 1.jpg
    20 KB · Views: 2,039
  • sheeting mudhole.jpg
    sheeting mudhole.jpg
    19.5 KB · Views: 2,176
OP
W

W-Cummins

Well-known member
Joined
Jan 9, 2006
Messages
1,639
Location
Iowa
Here are some of the front
 

Attachments

  • sheeting front.jpg
    sheeting front.jpg
    16.1 KB · Views: 1,633
  • front 2.jpg
    front 2.jpg
    22.5 KB · Views: 1,640
  • front door.jpg
    front door.jpg
    15.1 KB · Views: 1,673
  • front 3.jpg
    front 3.jpg
    12 KB · Views: 1,688
OP
W

W-Cummins

Well-known member
Joined
Jan 9, 2006
Messages
1,639
Location
Iowa
The end walls were a bit more "challenging" to put up as some of the panels are a lot longer than the side walls. In the center they are almost 23' long. I had to adapt the install by placing a trench along the frost wall about 2 feet deep and then hold the sheet about in the middle and run at the building plant the end in the hole like a pole vault and stand it up. Needless to say this is NOT a job to try in ANY wind!!
 

Attachments

  • sheeting 4 walls.jpg
    sheeting 4 walls.jpg
    9.8 KB · Views: 1,691
  • sheeting 3 down one to go2.jpg
    sheeting 3 down one to go2.jpg
    12.4 KB · Views: 1,780
  • sheeting sunset.jpg
    sheeting sunset.jpg
    9.2 KB · Views: 1,727
  • side wall1.jpg
    side wall1.jpg
    14.4 KB · Views: 1,772
Last edited:

bigfredtn

Active member
Joined
Dec 6, 2005
Messages
29
Location
tennessee
That is a very nice garage. From the pictures, I can not see any gravel on the muddy part. Did you put any gravel down before the rain?
 

MMiller

Member
Joined
Dec 28, 2005
Messages
9
Location
Libertyville IA
Where in Iowa are you at? Great building. If you would have put some field tile down under the building cite, you would have had less mud problems. The buildings I've helped my dad put up, usually end up with large ruts in them, needing to be leveled out before putting equipment in.

Michael
 

subtle71

Member
Joined
Dec 7, 2005
Messages
12
Location
B'haven, MS
50'x100'? Down here we don't call that a shop, we call it the volunteer fire department! (lol) My wife is freaking out about my stakes I have laid out for my new shop. It is 30' wide x 40' deep. She told me that I don't need to go overboard, I only have two trucks. I told her that she was right, but I may need to hide a "project" from her one day. My way of turning around that closet thing on her. "No honey, that's not new! I have had that for months!"
 
OP
W

W-Cummins

Well-known member
Joined
Jan 9, 2006
Messages
1,639
Location
Iowa
MMiller said:
Where in Iowa are you at? Great building. If you would have put some field tile down under the building cite, you would have had less mud problems.
Michael

The Building was built on compacted lifts (about 6" each of rather non-draining soil {Iowa silty clay}) This would have rendered any drain tile useless under the building and is part of the problem with the mud! Also I can't think of any need for the tiles under the building because after the roof was installed the mud dried out :)

The building did not have any gravel in the mud hole until after I let it dry, smoothed it out, and put the roof on. The mud would have made a mess out of the gravel if I had done it before the roofing, as the water would have still pooled there as it couldn't get out due to the above. I guess I could have placed some geotech fabric under it like I did in the parking lot.
Anyway, moot point now as I have finished the floor in the whole building now. The graveled side was a constant pain. Gravel was always tracking over on to the finished floor, and the last over head door was a HUGE pain in the **** to install w/o the same level of the floor ( the frost walls are notched out for the slab to extend to the outer edge of the wall

My advice bite the bullet and pour the whole floor!
 
Last edited:
OP
W

W-Cummins

Well-known member
Joined
Jan 9, 2006
Messages
1,639
Location
Iowa
shopking68 said:
wow, thats bad building. Thats how big I want my next one, like a 50x100x14, thats sweet :pimpflash

Lots more space to heat, cool and pay taxes on etc..... I'm not sure that I would have built mine as large as I did if I had thought out how big it was (when your looking at the buildings online 50X100 dose not seem that large:) I got my building at www.steelbuilding.com and you can put in the different sizes and see how much the cost is in an interactive format. I think that got me into trouble. It starts like 40x60x14 hummm only 3k more for 40X80 humm..... etc... next thing a know 50X100X16 sounded good:) I did want to go with 16' walls so I could have a second story inside.
 
Last edited:
OP
W

W-Cummins

Well-known member
Joined
Jan 9, 2006
Messages
1,639
Location
Iowa
Here are a few more pictures of stuff I had to get ready before I put on the roof. the sofit on the gable ends was a pain and I had my friend come back and help install those panels. I put him in the bucket of the backhoe with a harness encase he fell out. I then raised him up with one end of the panel and I got in the man lift raised the other end up to the ridge then we balanced it on our heads and screwed it up from the under side. I did come up with a way to do one of them by myself, but it was less pain with another set of hands!
 

Attachments

  • sofit1.jpg
    sofit1.jpg
    98.2 KB · Views: 1,420
  • sofit 2.jpg
    sofit 2.jpg
    168.2 KB · Views: 1,461
  • sheeting back sofit.jpg
    sheeting back sofit.jpg
    10.3 KB · Views: 1,432
Last edited:

shopking68

Well-known member
Joined
Jan 12, 2006
Messages
255
Location
Kansas
W-Cummins said:
Lots more space to heat, cool and pay taxes on etc..... I'm not sure that I would have built mine as large as I did if I had thought out exactally how big it was (when your looking at the buildings online 50X100 dosent seem that large:) I got my building at www.steelbuildings.com and you can put in the diffrent sizes and see how much the cost is in an interactive format. I think that got me into trouble. It starts like 40x60x14 hummm only 3k more for 40X80 humm..... etc... next thing a know 50X100X16 sounded good:) I did want to go with 16' walls so I could have a second story inside.


Thats what I kept doing too, I started out only wanting a 30x50x12, then a I went to a 40x60x12, and I just kept wanting it bigger, finally had to draw the line and say hey I dont have enough to fill this thing.

So 40x70x14 it was, big enough for me, I am only 23, I dont have alot of stuff. :thumbup:
 
OP
W

W-Cummins

Well-known member
Joined
Jan 9, 2006
Messages
1,639
Location
Iowa
shopking68 said:
So 40x70x14 it was, big enough for me, I am only 23, I dont have alot of stuff. :thumbup:

When I was 23 I would have killed to have a shop! Before I built this place I worked in the big-sky garage on my cars and trucks for like 10 years! I had my bridgeport and my lathe in the car port to keep it out of the weather!

William....
 
OP
W

W-Cummins

Well-known member
Joined
Jan 9, 2006
Messages
1,639
Location
Iowa
So I don't have many pictures of the roof sheeting as I "wimped out" and hired some help for that part. After dealing with the long sheets on the wall ends I figured that I was going to have problems with the 28' long roofing sheets. I could pick them up ok but they were so long that they would almost bend to the ground on each end when I carried them on the my head! I was sure that at least some of them would have kinked over, and any wind would have been a lift off! So anyway I hired 3 workers to help me install the roof it took us 3 days ( it would have taken me 3 months!) to put the roof on.
 

Attachments

  • int 04.jpg
    int 04.jpg
    39.7 KB · Views: 1,745
  • int 03.jpg
    int 03.jpg
    42.8 KB · Views: 1,843
  • int 02.jpg
    int 02.jpg
    17.9 KB · Views: 1,635
  • int 01.jpg
    int 01.jpg
    20.7 KB · Views: 1,902
Last edited:
OP
W

W-Cummins

Well-known member
Joined
Jan 9, 2006
Messages
1,639
Location
Iowa
here are the 3 clopay 3200 ( 12'X14') doors with the follow the roof pitch going up
 

Attachments

  • int 02.jpg
    int 02.jpg
    44.5 KB · Views: 1,405
  • int 3.jpg
    int 3.jpg
    37 KB · Views: 1,355
  • DCP_2053.jpg
    DCP_2053.jpg
    49.4 KB · Views: 1,333
  • DCP_2062.jpg
    DCP_2062.jpg
    101.7 KB · Views: 1,505
To avoid these ads, REGISTER NOW!
Top Bottom