To avoid these ads, REGISTER NOW!

My Shop AKA the obsession

OP
W

W-Cummins

Well-known member
Joined
Jan 9, 2006
Messages
1,639
Location
Iowa
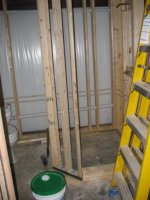
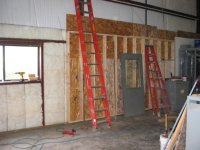
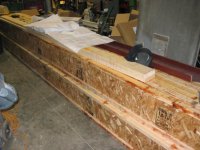
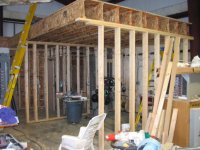
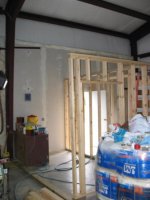
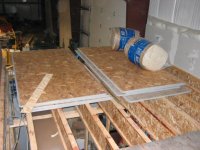
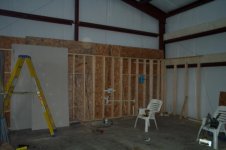
I had planed on building a bathroom, office, storage room, and a machine room for metal work . I allocated 1000 sq ft for that, the 1st whole 20X50 bay. I wanted to make it 2 levels and put all my wood working tools up stairs. I have a sander that weighs 3000lbs another one @ 1500lbs etc... so lots of weight up there. I planed on a 140lb per sq ft live load floor load ( could drive a fork truck on it if you could get it up there:) I wanted to use a steel I beam for the supports and put steel posts in, but a quick calculation shot that down. The dam posts would have punched through the 4000 psi 6" slab unless I put huge plates on them or used way too many of them. So some more calc's and it looked like a 2"X6" stud wall double plated top and bottom with blocking and sheeted would support the load. So that was the plan, Then I looked into the floor joists the parts where they needed to have a clear span the loading was HUGE and I couldn't come up with some thing that would have worked out of wood for a price I could live with. I then started looking at steel floor truss's I found a co in Canada that made some really slick stuff. The only problem is they did not have any distribution near me :-( They would sell me a whole semi truck load of them, but not the 50 of them I would need..... I also wanted to insulate that space better than the whole building ( R13 walls and roof and double foil double bubble radiant insulation in the roof) So I had a space of about 8" from the purlans and girts so I went with some R-25 bats for that space.
 

Attachments

  • south wall 1.jpg
    south wall 1.jpg
    37 KB · Views: 1,669
  • south wall 2.jpg
    south wall 2.jpg
    45.5 KB · Views: 1,646
Last edited:
To avoid these ads, REGISTER NOW!
OP
W

W-Cummins

Well-known member
Joined
Jan 9, 2006
Messages
1,639
Location
Iowa
Well kind of it's in the Utility room. The original idea was to put the old washer and dryer in the shop to clean all thouse nasty dirty coveralls and rags and stuff that the wife would kill you to put in the new machine:)
 

snorvet

Well-known member
Joined
Oct 29, 2005
Messages
777
Location
Northern Illinois
W-Cummins said:
Well kind of it's in the Utility room. The original idea was to put the old washer and dryer in the shop to clean all thouse nasty dirty coveralls and rags and stuff that the wife would kill you to put in the new machine:)

great idea!
 

ColeTrickle

Member
Joined
Jan 20, 2006
Messages
6
Location
Texas
Nice shop ya got going on. :drool:

I was wanting to ask if ya had thought about putting the office/storage room upstairs and your heavy equipment beneath it.

Reason I ask was to get your opinion/thoughts on the 16' eave height. I'll be in the market for a 60x40' shorthly and was planning on doing the same for my building as yours....(allocating a third [20X40'] of the building for a one bedroom apartment on the second floor, workroom beneath). My floorplan now puts the kitchen on one sidewall and the bedroom on the other. This complicates things for the kitchen cabinets being at level with the top of the eaves.

I'm having trouble deciding whether to do this or not or just planning on a bigger one-story building.

Appreciate the suggestions.
 
OP
W

W-Cummins

Well-known member
Joined
Jan 9, 2006
Messages
1,639
Location
Iowa
ColeTrickle said:
Nice shop ya got going on. :drool:

I was wanting to ask if ya had thought about putting the office/storage room upstairs and your heavy equipment beneath it.

Reason I ask was to get your opinion/thoughts on the 16' eave height. I'll be in the market for a 60x40' shorthly and was planning on doing the same for my building as yours....(allocating a third [20X40'] of the building for a one bedroom apartment on the second floor, workroom beneath). My floorplan now puts the kitchen on one sidewall and the bedroom on the other. This complicates things for the kitchen cabinets being at level with the top of the eaves.

I'm having trouble deciding whether to do this or not or just planning on a bigger one-story building.

Appreciate the suggestions.
Well bigger is nice but you can go too big too:) I wanted the 2 story and I think that the 16' sidewalls are needed for the max floor space upstairs. With the red iron building you get a clear span as soon as you move away from the walls your head space opens up. I used a 3:12 pitch and that allows more height upstairs ( I would have gone for a 4:12 if they had offered it when I purchased mine)
As your requirement for the apartment is a "temp" one ( as was mine) you need to think about what you do with the space after you no longer need to live there. As for heavy stuff up vs down I wanted to have them BOTH up and down. Your building needs might be effected if you are required to have an inspection for an apartment/dwelling in your area. If you don't need the high floor loads you can get away with the wood I joists and your 20' span and for go the cement floor. Your most likely will need/want a 1 hr firewall between the shop space and the living space, and a fire rated door at the bottom of your stairs too.
 
Last edited:

ColeTrickle

Member
Joined
Jan 20, 2006
Messages
6
Location
Texas
Thank you for setting out the time to reply.

I apologize for sorta hi-jacking your thread. Thank you for your informed suggestions. I'll leave it be and have since posted one up over at "ask the pro's".

Please keep us informed of your structure. I could only wish to be doing something of that magnitude right now.

Best of luck. :thumbup:
 
OP
W

W-Cummins

Well-known member
Joined
Jan 9, 2006
Messages
1,639
Location
Iowa
I needed to put up 8' of dry wall and paint it so I could place the power panel and get off the dam temp power (extension cord from over by the road into the building). Then, I needed to run the service laterals in to the bottom of the panel. They are dual runs of 350Kcmil THHN that run through 2, 3" conduits, so there are 4 conductors in each conduit. A little fact about the 350kcmil wire is it's very hard to bend!! It was all I could do to bend it by hand. This made the hookup very, shall we say interesting:) Also you must maintain the same length for all the conductors for each of the phases. The panel board has it's own power metering and provides all kinds of information about the incoming supply. This metering requires that the conductors pass through a set of CT transformers on my side of the system.
 

Attachments

  • power panel outside 1.jpg
    power panel outside 1.jpg
    52.5 KB · Views: 1,466
  • power panel lower main 1.jpg
    power panel lower main 1.jpg
    72.6 KB · Views: 3,017
  • power panel side top.jpg
    power panel side top.jpg
    43.6 KB · Views: 2,922
  • power panel front open.jpg
    power panel front open.jpg
    34.5 KB · Views: 3,162
Last edited:
OP
W

W-Cummins

Well-known member
Joined
Jan 9, 2006
Messages
1,639
Location
Iowa
To pass the electrical rough in inspection I had to have 120V power outlets. This was a problem as the incoming power was 480volts and I needed to use a transformer to reduce the 480v to 208/120v I had never run the 75kva transformer and had no way to know how loud it would be. So I didn't want to install it in the building until I knew how much noise it would make. I arranged with the electrical inspector to allow me to install the transformer with out bolting it to the ground and permently wiring it to the switchboard. This turned out to be a good thing as it made WAY too much noise for me to want to live with it in the building.... This last picture was before calling for the inspection
 

Attachments

  • power panel to transformer temp.jpg
    power panel to transformer temp.jpg
    45.7 KB · Views: 1,205
  • power panel transformer temp.jpg
    power panel transformer temp.jpg
    49.3 KB · Views: 1,347
  • power panel rough.jpg
    power panel rough.jpg
    76.1 KB · Views: 3,383
Last edited:
OP
W

W-Cummins

Well-known member
Joined
Jan 9, 2006
Messages
1,639
Location
Iowa
So as I finished up the last few details and waited for the electrical inspector to show up @3:30 I hear a knock on the door it's the inspector and he is early ( before I was completely done ) only thing is it wasn't the electrical inspector, he was the plumbing inspector! The electrical inspector had quit the day before. So we started on the inspection. I explained to him all about the system, and how it works , after about 20 min he said " I'm going to pass you on your electrical inspection.... But I see a problem with your plumbing" :) So its ALIVE!
 

Attachments

  • power panel meter back.jpg
    power panel meter back.jpg
    67.7 KB · Views: 3,104
  • power poll 3 phase.jpg
    power poll 3 phase.jpg
    25.3 KB · Views: 1,413
  • power box hot.jpg
    power box hot.jpg
    48.6 KB · Views: 1,464
  • power meter hot.jpg
    power meter hot.jpg
    41.7 KB · Views: 1,567
Last edited:
OP
W

W-Cummins

Well-known member
Joined
Jan 9, 2006
Messages
1,639
Location
Iowa
So after power, the shop needed some water. I thought about diggen the well, but in retrospect it was better to farm out that job!
At allmost 500' deep it would have taken quite a while to dig!
 

Attachments

  • well 1.jpg
    well 1.jpg
    11.6 KB · Views: 1,155
  • well 2.jpg
    well 2.jpg
    12 KB · Views: 1,128

DynoDave

Well-known member
Joined
Mar 25, 2005
Messages
1,685
Location
Michigan
Holy cow! A 500' deep well? Just curious, is that a common depth to go to in your area? Most around here are in the 100 foot range.
 

bmwpower

Super Moderator
Staff member
Joined
Apr 24, 2005
Messages
12,578
Location
NJ
Insane (good) wire job there, man! I would have no idea what I was doing with 480v. I had my fill of wiring when I did my 240v.

I may have missed it before, but how many amps do you now have at your disposal?
 
OP
W

W-Cummins

Well-known member
Joined
Jan 9, 2006
Messages
1,639
Location
Iowa
The well was a little deeper than I had planed on. The county park across the road has a well that's about 380' deep. I got the geo reports from the state on the aquifers here at the site, and I had planed on around 400' You can hit a sand well here some times much higher. If you go about 15 miles from my site it's 50-100' for the wells and 10 miles the other way the city has a well that's over 1200' deep. There are 2 different aquifers under my site and I'm in the upper one at the 500' the lower one is about 800' and is rather "hot" with radioactive compounds. So I'm lucky that I didn't have to go that deep!! As it is/was the little ole hole was rather $$$$ over $8000.00 just to drill and case it. The water is VERY hard @ 60 grains hardness, but it has rather low dissolved iron. So I guess it's a trade off but the well will produce over 20 gal per min.


The electrical service at the main panel is now set at 600 amps @ 480 volts. However currently I can't pull that much power. The power co charges a fee for the 3phase transformers at the pole to sit there ( the larger they are the more $$ they charge ) I get to pay that fee ( that includes an allotment of the charged amount in power KW's at the current billing rate) So the current transformers cost me a min of $40 per month (use the power or pay for it anyway:) If I want larger transformers they will install them and then the rate goes up for the min power use ( I'm running more power per month than that now so it's not a problem) The next little deal with this type of service is the NASTY demand charges. They work like this... During the peak months (3 summer, 3 winter) I can not exceed a power demand of more than 75Kva average in one 15 min period. IF I do that my monthly bill jumps to $750.00 for that month PLUS any KW charges... So needless to say I'm not going to ever let that happen!!!
 
Last edited:

stensi

New member
Joined
Feb 12, 2006
Messages
2
Location
Skee, Sweden
Man, that is one sick garage!! Im not at all envious..... =)

I'm just curious.... What is the price tag for all this???? Building that in Sweden would cost a fortune, not to speak of Norway, where I originate from..

Keep up the good work.
 

330Scott

Well-known member
Joined
Feb 6, 2005
Messages
195
Location
Skeeter Bite, Eyewa
Jeez you guys. What gives? :dunno: This is just your typical Iowa pole barn. :lol:

Very, very nice, W-C. I hadn't read this thread until just now.

I am truly envious. Not just with your building, but more so with your ability and knowledge to build such a monstrosity.

Btw, I live in Des Moines. Let me know when the party is & I can be there in short time. :beer:
 
To avoid these ads, REGISTER NOW!
OP
W

W-Cummins

Well-known member
Joined
Jan 9, 2006
Messages
1,639
Location
Iowa
So after they drilled the well they wanted to install the well pump. The only problem was they wanted about $2500 to do it.... So my "thrifty" side came out again, I bet I could install it! :) They wanted almost $2.00 per foot for the drop pipe to hang the pump @ 240' of it ... hummmm what makes it so special?? Well nothing it's just 1 1/4" Sec 80 PVC pipe that's threaded on both ends. Local place sells it with out the threaded ends for much less. Some special plastic dies for the ridgid threader and a few min per end.
Next problem was the chance of dropping the pump into the hole Not some thing I wanted to have to fish out of the bottom of the 500' well :scared: So I looked at the pipe clamps they have to install the pumps. About $400 for one too much... So I made one. Picked up some surplus military blocks and hung it from my man lift...
 

Attachments

  • well pump install 3.jpg
    well pump install 3.jpg
    24 KB · Views: 1,908
  • well pump install 2.jpg
    well pump install 2.jpg
    89.5 KB · Views: 2,164
  • well pump install 1.jpg
    well pump install 1.jpg
    26.2 KB · Views: 2,182
  • well pump install 4.jpg
    well pump install 4.jpg
    62.5 KB · Views: 2,366
Last edited:
OP
W

W-Cummins

Well-known member
Joined
Jan 9, 2006
Messages
1,639
Location
Iowa
A few more pictures of the water pump install. You hang the pump in this type of setup from a fitting called a pitless adapter that passes through the well casing below the frost level . I had never seen one before I did this, I think they are rather slick. As I mentioned before I have to get rid of the nasty hardness in the water so this is the setup I plan on running.
 

Attachments

  • pitless 1.jpg
    pitless 1.jpg
    43.8 KB · Views: 1,192
  • pitless 2.jpg
    pitless 2.jpg
    45.2 KB · Views: 1,185
  • Well pump install 6.jpg
    Well pump install 6.jpg
    44.7 KB · Views: 1,328
  • well tank and filters.jpg
    well tank and filters.jpg
    44 KB · Views: 1,236

camarojim

Active member
Joined
Jun 14, 2005
Messages
25
Location
Iowa
very cool building and great project reports...love the whole deal.
I'm from Waterloo and can appreciate what you have done and gone thru.

Jim
 

DynoDave

Well-known member
Joined
Mar 25, 2005
Messages
1,685
Location
Michigan
That's quite the setup.

How many gallons is that tank? It's about 3xs the size of mine.

And what are the 4 black tanks? Softeners? I've never seen them on that scale before....
 

trs900

Well-known member
Joined
Feb 26, 2006
Messages
46
Location
Georgia
Thats a nice building, I have been going to steelbuildings.com for the last year easy to price projects etc.. Hurry up and get done so you can come to Georgia and help me :lol: I also was going to go with the 100x50ft with 16ft eves. only 1 ft on overhangs. Building alone was $31000 without doors, insulation etc.. when I get closer I might have a few questions concerning company for you if I decide to go with steel.
 
OP
W

W-Cummins

Well-known member
Joined
Jan 9, 2006
Messages
1,639
Location
Iowa
Dave,
The well tank is a 81 gal but its got a bladder in it and so has a draw down rating from 30 to 22 gal, depending on pump pressure. The fiberglass tanks are Kenitico softeners, the smaller one is a 60 grain model and the larger is a 100 grain. They are the caddy of softeners but they are way too $$$ the model 60 seems to "retail at about $1800-$2000 I don't know how much the model 100 is but more :) The water treatment sales people are about 1/2 a step sideways from a used car salesman!! I got mine used or I wouldn't have them. I thought that I would need to convert one of them to an oxidizing Fe filter to remove the dissolved iron from the water but I lucked out and the one unit operating as a softener can remove all the iron I have.


Banzaitoyota,
Yes it would but they didn't build any of them in Iowa :) They look like a hell of a good deal though, the feds GAVE them away for many years!

Trs900,
Sure ask away.. I know that the cost of them has gone up a bunch after I got mine but what has not??

William....
 
Last edited:
OP
W

W-Cummins

Well-known member
Joined
Jan 9, 2006
Messages
1,639
Location
Iowa
Ok even though it's out of the real time sequence, I guess it's time for the trench from ... or was it to hell :) The upper part of the utility trench is about 100' long and 6'-13' deep and terminates at the site of the utility room in the unbuilt house. I went that deep so I would not disturb the lines when I dig the footings for the house. The lower section is about 360' long and is also 13'+ deep at the Utility room end ( I placed a temp well house on the site above the utility room to hold the pressure tank and stuff ) and the rest of the trench is about 6' deep. I only had to hand dig a little bit of it near the building foundation. Thank god as I would still be digging other wise!
 

Attachments

  • trench 02.jpg
    trench 02.jpg
    77.8 KB · Views: 698
  • trench 03b.jpg
    trench 03b.jpg
    59.8 KB · Views: 659
  • trench 04.jpg
    trench 04.jpg
    114.2 KB · Views: 661
  • trench 05.jpg
    trench 05.jpg
    98.5 KB · Views: 679
  • trench w 01.jpg
    trench w 01.jpg
    66.8 KB · Views: 670
  • trench w 02.jpg
    trench w 02.jpg
    71.7 KB · Views: 708
Last edited:

Cannoli

Member
Joined
Feb 22, 2005
Messages
24
Location
Carlsbad, CA
W-Cummins said:
A few more pictures of the water pump install. You hang the pump in this type of setup from a fitting called a pitless adapter that passes through the well casing below the frost level . I had never seen one before I did this, I think they are rather slick. As I mentioned before I have to get rid of the nasty hardness in the water so this is the setup I plan on running.


I use a similiar system in house ... whole house water filtration and softening system, by Kinetico.

http://www.kinetico.com/residntl/index2.htm

What sold me on this type of system is that it doesn't require an electrical source to power the control valve. Kinetico uses a mechanical flow meter to trigger the control valve which controls the backwash and regenerating cycle for mixed bed (water softening). No more chlorine taste, no more mineral deposits on the shower door and tile, no more calcium deposits on the faucet fixtures, and no more water spots on our cars! We love it! We use potasium chloride ($8/40 pound bag) to regen the system instead of sodium chloride ($4/40 pound bad) ... we use about a bag and a half (60 pounds) per month. Two adults with occasional guests.
 

Attachments

  • Water Filter - Softener System.jpg
    Water Filter - Softener System.jpg
    168.2 KB · Views: 1,131
OP
W

W-Cummins

Well-known member
Joined
Jan 9, 2006
Messages
1,639
Location
Iowa
Ok one more out of sequence picture We got water in now we need it out:) So the shop had to have it's own septic system as the house is 45 feet higher in elevation and you all know about that old one S#*@ don't run up hill :evil: 
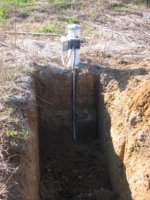
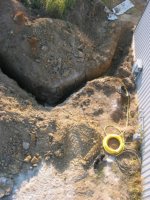
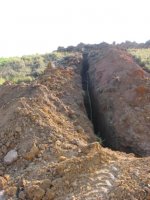
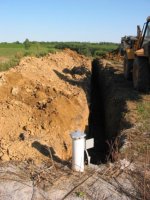
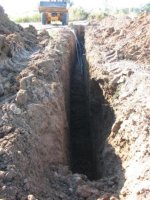
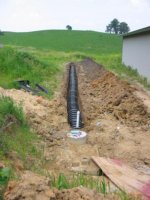
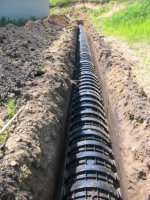
So I installed a 1000 gallon tank and 100' of a 36" wide chambered leach field system. Much faster than the normal drain pipe/drain rock system to install.
 

Attachments

  • drain 01.jpg
    drain 01.jpg
    86.5 KB · Views: 855
  • drain 02.jpg
    drain 02.jpg
    37.7 KB · Views: 859
  • drain 04.jpg
    drain 04.jpg
    53.3 KB · Views: 937
Last edited:
OP
W

W-Cummins

Well-known member
Joined
Jan 9, 2006
Messages
1,639
Location
Iowa
So back to the inside build out. Here are some pictures of the framing for the bath room, utility room, and kitchen areas. Also some more plumbing
 

Attachments

  • bathroom framing 1.jpg
    bathroom framing 1.jpg
    47.4 KB · Views: 849
  • bath pocket door.jpg
    bath pocket door.jpg
    44.2 KB · Views: 836
  • bath room back wall.jpg
    bath room back wall.jpg
    26.5 KB · Views: 845
  • bath rough in.jpg
    bath rough in.jpg
    58.7 KB · Views: 1,009
OP
W

W-Cummins

Well-known member
Joined
Jan 9, 2006
Messages
1,639
Location
Iowa
More inside work. The main advantage that a wood framed building has over the red iron framed one, is in the attachment of the dry wall and additional insulation. I had to fight to get more insulation in the finished space. I wanted to have about a R35+ value in the walls and roof. I started with r13 in the walls and that plus the radiant insulation in the roof. The standard metal building insulation has a vapor barrier on the inside, so I wanted to use un-faced batts ( there was going to be nothing to attach them to anyway) So I needed to get some way to "hold" the 8" r25 batts up in the space behind the walls/drywall until they were installed. I found that if I stacked them up horizontally and retained them by drilling small 5/16" holes in the top of the frost wall and also into the bottom edge of the 1st girts ( spaced every 2 feet) I could install 1/4 cold rolled rods to hold the insulation in place until I put up the walls. Then after the walls were up I pulled them out and reused them on the next section. On the non load bearing walls I attached the 2x4's to the girts by driling the bottom edge and screwing them from the top into the end of the joists. I had to extend some of the brackets for the anti twist struts that go from the girts to the main frames (so they would extend through the drywall). I also re-enforced the main walk door with an additional frame, and placed a wire pass through (conduit) at the top of the door and foamed in the space around it. Then needed to sheet rock and tape the east wall so I could continue framing the office, hallway, and computer server room.
 

Attachments

  • south wall 03.jpg
    south wall 03.jpg
    54.3 KB · Views: 1,171
  • south wall 3a.jpg
    south wall 3a.jpg
    52.5 KB · Views: 797
  • south wall 4a.jpg
    south wall 4a.jpg
    41.9 KB · Views: 787
  • east wall 01.jpg
    east wall 01.jpg
    22.8 KB · Views: 817
  • walk door reinforced.jpg
    walk door reinforced.jpg
    15.8 KB · Views: 757
  • office east wall 01.jpg
    office east wall 01.jpg
    46.4 KB · Views: 1,092
  • east wall office 02.jpg
    east wall office 02.jpg
    36.6 KB · Views: 776
Last edited:
OP
W

W-Cummins

Well-known member
Joined
Jan 9, 2006
Messages
1,639
Location
Iowa
maa139 Thanks!

Here is some more progress on the 2 story wood house in side the building:) I did not like the engineered wood floor joists OR wafter board that were used in the last home I owned they flexed like mad, and I was not interested in having them here either. But I have to say If you use enough of the heavy type joists and 1 1/8" T&G sturdi floor it makes a nice package. I'm thinking that I will have to reconsider their use in my home when I build it ( might have to make it 140lbs per ft live load rated too:)
 

Attachments

  • floor joists.jpg
    floor joists.jpg
    60.2 KB · Views: 701
  • joists kitchen 1.jpg
    joists kitchen 1.jpg
    54.2 KB · Views: 715
  • joists kitchen 2.jpg
    joists kitchen 2.jpg
    57.4 KB · Views: 779
  • kitchen framed and 2nd level.jpg
    kitchen framed and 2nd level.jpg
    67 KB · Views: 910

REFLEXX

Well-known member
Joined
Aug 14, 2005
Messages
913
Location
Riverside, CA
William,

Evey time I think that my shop is too big a project for me, I just look at yours and breathe a sigh of relief!

Lookin good, and I know just how hard and time consuming all that work is.

Here's to hard work! :beer:
 
OP
W

W-Cummins

Well-known member
Joined
Jan 9, 2006
Messages
1,639
Location
Iowa
REFLEXX said:
William,
Evey time I think that my shop is too big a project for me, I just look at yours and breathe a sigh of relief!


Dam and here I was hoping that you were going to say that your fly'en out to help put up drywall:)

So here is the framing for the hallway, office, and the computer server room
 

Attachments

  • server room 1.jpg
    server room 1.jpg
    29.8 KB · Views: 464
  • server room 2.jpg
    server room 2.jpg
    63.6 KB · Views: 460
  • server room 3.jpg
    server room 3.jpg
    56.9 KB · Views: 628
  • server room 2nd floor.jpg
    server room 2nd floor.jpg
    60.3 KB · Views: 476
OP
W

W-Cummins

Well-known member
Joined
Jan 9, 2006
Messages
1,639
Location
Iowa
So I figure that one of the perks of building your own place is that you can justify all the tool purchases. I wanted to do a bunch of tile/stone work for the house. So no better place to learn to do it than the shop ( well the tile anyway) So this MK212 tile/stone bridge saw followed me home. Now that I had it, I had to put it to use... so the bathroom and utility room, office, and kitchen floors all got the tile treatment. I also put down some industral linoleum tiles in the hallway ( will also put them down in the server room later)
 

Attachments

  • mk 212.jpg
    mk 212.jpg
    59.1 KB · Views: 568
  • bathroom floor tile 1.jpg
    bathroom floor tile 1.jpg
    49.9 KB · Views: 515
  • bathroom floor tile 2.jpg
    bathroom floor tile 2.jpg
    34.3 KB · Views: 445
  • bathroom floor tile 3.jpg
    bathroom floor tile 3.jpg
    57.8 KB · Views: 620
  • kitchen floor tile.jpg
    kitchen floor tile.jpg
    50.4 KB · Views: 481
  • intry hall floor.jpg
    intry hall floor.jpg
    25.5 KB · Views: 514

oldgoat

Well-known member
Joined
Feb 7, 2006
Messages
4,529
Location
Wichita Kansas
Your tile work looks pretty nice. For the drywall I saw a product by a place called trim tex that looks like would help if you have many **** joints and it also has other corner pieces that might help. To me though **** joints have always been an impossible job. I've never been able to get them to come out looking good. Anyway it might be worth looking at.

http://www.trim-tex.com/index.htm
 

Sneaky Pete

New member
Joined
Mar 31, 2006
Messages
4
Location
TN...Via , NJ
W-Cummins said:
Nope married for 20 years! And in fact She/We are living in the shop right now:)

You see it works this way......
I purchased the land to build the shop and my house on. I knew that if I built the home first the shop might not ever get constructed ( or it would be scaled WAY down). So I built the shop FIRST! That way there is interest in finishing it so I can start the home:-)

Damn ...you are one smart dude....I need to remember that theory for the next house.
 

bmwpower

Super Moderator
Staff member
Joined
Apr 24, 2005
Messages
12,578
Location
NJ
So, what do you have going into the "server computer room"???
 
To avoid these ads, REGISTER NOW!
Top Bottom