
You are using an out of date browser. It may not display this or other websites correctly.
You should upgrade or use an alternative browser.
You should upgrade or use an alternative browser.
My Shop AKA the obsession
- Thread starter W-Cummins
- Start date
The "server" room is going to be a storage room and also the computer room for the building I had 2 42u full racks of IBM servers I managed to sell one of them before they diminished in value. But I still have one, so that's where its located. The room is wired for it, ( and the new blue gene rack I want too") and the ethernet, and fiber lines go to that room. The office is also connected to that room with a 2" pass over conduit that I can pass cables through as needed. KVM etc... the room is served with its own HVAC ducts and is insulated for heat and noise and has an exterior insulated door on it.
and the ethernet, and fiber lines go to that room. The office is also connected to that room with a 2" pass over conduit that I can pass cables through as needed. KVM etc... the room is served with its own HVAC ducts and is insulated for heat and noise and has an exterior insulated door on it.
William..
and the ethernet, and fiber lines go to that room. The office is also connected to that room with a 2" pass over conduit that I can pass cables through as needed. KVM etc... the room is served with its own HVAC ducts and is insulated for heat and noise and has an exterior insulated door on it.William..
Attachments

Last edited:
cdrewferd
Well-known member
Man. I just joined this site and I have to say that this is one sweet build you have going on William. I to would like more clarification on what the fiber is for. What kind of line do you have feeding this beast?
Oh and what are the specs on the whole server rack?
Oh and what are the specs on the whole server rack?
Yes the fiber is running between the shop and the house site ( presently it runs to the garden shed that is "hosting" my well tank and water softener stuff
I got it from the phone company for 30 cents per foot so I couldn't pass that up. It's 12 fiber, long haul stuff in an armored direct bury cable. If you went and purchased it the cost would be probably $3-4 a foot. They also gave me the 12 pair armored phone line to put in the trench. So I figured hell why not kinda future proof the install The only down side it the drivers for it are diffrent from the wide campus network fiber. I have seen some stuff to light it, on flee-bay for rather cheep though. After I build the house I will light it up at gigbit speed.
As I mentioned above the server equipment is no longer current stuff and I should have liquidated it while the time was right. I purchased it all new and now it's not worth 10 cents on the dollar:-( I figure that I can still run it to test n-tier applications and systems configurations, you don't need 3 GHz 4 way machines for that I see that MS is now giving away their vitural server software might have to look into that for a cheep way to run multi configurations of winblows and linux on each machine...... Now back to your regularly scheduled building thread
I got it from the phone company for 30 cents per foot so I couldn't pass that up. It's 12 fiber, long haul stuff in an armored direct bury cable. If you went and purchased it the cost would be probably $3-4 a foot. They also gave me the 12 pair armored phone line to put in the trench. So I figured hell why not kinda future proof the install
The only down side it the drivers for it are diffrent from the wide campus network fiber. I have seen some stuff to light it, on flee-bay for rather cheep though. After I build the house I will light it up at gigbit speed.As I mentioned above the server equipment is no longer current stuff and I should have liquidated it while the time was right. I purchased it all new and now it's not worth 10 cents on the dollar:-( I figure that I can still run it to test n-tier applications and systems configurations, you don't need 3 GHz 4 way machines for that
I see that MS is now giving away their vitural server software might have to look into that for a cheep way to run multi configurations of winblows and linux on each machine...... Now back to your regularly scheduled building thread
Last edited:
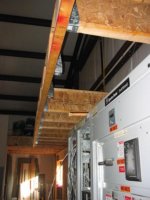
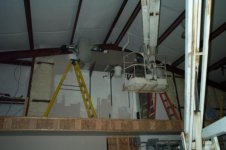
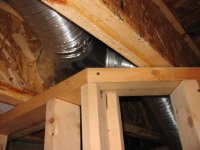
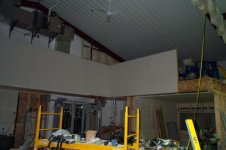
Here is the temp setup to get from one side to the other of the second floor ( untill some day and I make the whole space 2 levels) It also allows me to cheat the local codes that require 16' of working space above the switchboard
Attachments


4t64rd
Well-known member
W-Cummins said:So after power, the shop needed some water. I thought about diggen the well, but in retrospect it was better to farm out that job!
At allmost 500' deep it would have taken quite a while to dig!
500 feet huh? Here we can put 2 8' lengths of PVC together with a wellpoint, run the garden hose down the center and let it do the work. Probably have to cut 2 feet off the PVC to make it low enough to hook up to the 1hp well pump.
JoetheMobster
Member
holy **** that is one hell of a garage!!! 
shopking68
Well-known member
damn, just when I thought my shop was cool
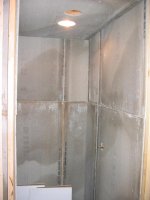
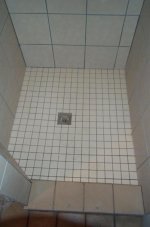
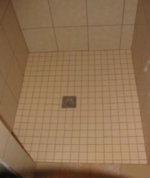
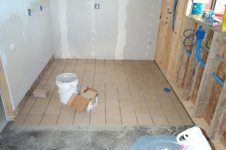
On to the bathroom shower I roughed in the shower with a floor drain. Back when I was just thinking that it would just be a shop. I thought I would just pour a concrete curb for the base of the shower and be done with it. Well this actually turned out to be a really good idea, when the plans changed it was easy to convert it to the "real" shower install. Better planning would have allowed me to just use a fiberglass shower surround and would have been cheaper in the long run:-( But as it was the spot of the drain was not centered in the space for the shower ( I could have hammered out the concrete but I didn't want to to move the drain over) So it was on to a full on, mud base, tiled shower! I was in a hurry so I installed the dura rock tile backer board on the walls and celing of the shower ( mistake :-( I had to remove it and cut it shorter for the mud base before I could proceed. I found a slick product called pro-slope that I cheated and used on the base it's styrofoam tapered base that sets up the proper slope for the floor to the drain. It wasn't quite large enough for the size of the shower so I attached it to the floor and then used it to carefully screed the deck mud to the edge of the walls. The next day after the mud had dried I installed the panliner and installed more deck mud about 1.5" thick over the liner, after this dried I placed the lathe over the shower curb and formed a mud curb. After all this dried I could then reinstall the dura rock on the walls for the tile. I set the drain height and installed the floor tiles 2"X2" and then started on the walls and ceiling tiles. When I got up the the last course of tiles on the walls you could see that the thing wasn't exactly square. The small space left for the last course of tiles would have made this look like ****. So I came up with my plan to hide the defects It worked GREAT it totally fools your eye and you can't tell it's not square but it took me a hell of a long time to cut all those tiles!
It worked GREAT it totally fools your eye and you can't tell it's not square but it took me a hell of a long time to cut all those tiles!Attachments

Last edited:
Toolmaann
Well-known member
Well done sir!
Spooled-up
New member
That's an unbelievably nice shop! I'll have to remember the bit about building the shop first and then the house.
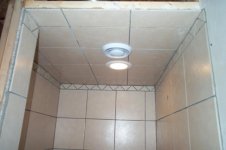
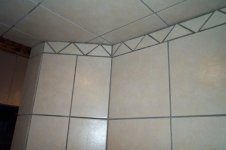
So after installing all the tile in the shower, I had to grout it. I used epoxy grout because it's more flexible and I didn't want to use the sanded caulking for the joints ( I may come to regret this choice but so far it's fine)
Well grouting the floor=cake
grouting the walls=pain in the @##
grouting the ceiling well .... lets just say it *****!
Even with a grout bag it's a huge mess and epoxy grout=messX2
Well grouting the floor=cake
grouting the walls=pain in the @##
grouting the ceiling well .... lets just say it *****!
Even with a grout bag it's a huge mess and epoxy grout=messX2
Attachments


Last edited:
SCOOTER
Well-known member
I have only epoxy grouted..so I don't know the difference 
maa139
Well-known member
W-Cummins said:So after installing all the tile in the shower, I had to grout it. I used epoxy grout becuse it's more flexable and I didn't want to use the sanded calking for the joints ( I may come to regret this choice but so far it's fine)
Well grouting the floor=cake
grouting the walls=pain in the @##
grouting the celing well .... lets just say it *****!
Even with a grout bag it's a huge mess and epoxy grout=messX2
Well, as with everything else you've shown us - beautiful job!
Matt
Well now that I'm back from vacation I guess I should post some more pictures of the ole project
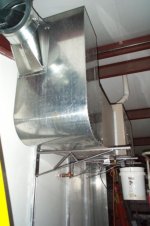
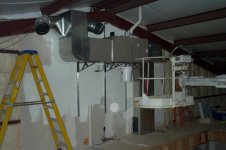
I needed to have some heat and cooling in the shop so I picked up a 5 ton ser 13 ac and 120kbtu 93% eff gas furnace to install. The unit is not large enough to totally heat or cool the whole space but, it is large enough to temper the air in the space. To totally cool the space I would need between 8-10 tons of cooling, and to heat the whole space to say 65° about 250k btu. The plan was to only heat the living space to the target 65° or so and the rest of the space to say 40° or so ( keep it from freezing). For the cooling, drop the temp about 20° and cut the humidity way down.
The plan was to install the unit on the south gable wall about 17' up. I looked at a few "normal" mountings for HVAC stuff and didn't like them. I was looking through a catalog for a metal strut system and saw the mounting system what looked like what I wanted. The only problem was that they wanted almost $80 for each of the "arms" Too much so I got out the welder and made 3 of them. Cost about $20 for all 3. Next I had to put tougher the AC coil, air handler/furnace, and the HP media filter. I picked up the units as a scratch and dent furnace and the AC coil was a current years model and the furnace was last years, so the supplied mounting brackets didn't fit So time to fab up some new ones. I also needed some return and supply air plenum's. So I had a place with a press break and shear cut up some 18 gauge galv sheet metal, and bend it into "L"s. Then I cut it out bent the curved sections and bent the tabs on it to make the plenum's.
I needed to have some heat and cooling in the shop so I picked up a 5 ton ser 13 ac and 120kbtu 93% eff gas furnace to install. The unit is not large enough to totally heat or cool the whole space but, it is large enough to temper the air in the space. To totally cool the space I would need between 8-10 tons of cooling, and to heat the whole space to say 65° about 250k btu. The plan was to only heat the living space to the target 65° or so and the rest of the space to say 40° or so ( keep it from freezing). For the cooling, drop the temp about 20° and cut the humidity way down.
The plan was to install the unit on the south gable wall about 17' up. I looked at a few "normal" mountings for HVAC stuff and didn't like them. I was looking through a catalog for a metal strut system and saw the mounting system what looked like what I wanted. The only problem was that they wanted almost $80 for each of the "arms" Too much so I got out the welder and made 3 of them. Cost about $20 for all 3. Next I had to put tougher the AC coil, air handler/furnace, and the HP media filter. I picked up the units as a scratch and dent furnace and the AC coil was a current years model and the furnace was last years, so the supplied mounting brackets didn't fit
So time to fab up some new ones. I also needed some return and supply air plenum's. So I had a place with a press break and shear cut up some 18 gauge galv sheet metal, and bend it into "L"s. Then I cut it out bent the curved sections and bent the tabs on it to make the plenum's.Attachments


Last edited:
Winmon
Well-known member
Wow, what a shop!!! Very nice!!! Great work you have been doing on it.....
shopking68
Well-known member
why would u put a shower in a shop??
Der Bugmeister
Well-known member
- Joined
- Dec 29, 2005
- Messages
- 445
Cuz I like to have good clean fun in my shopshopking68 said:why would u put a shower in a shop??

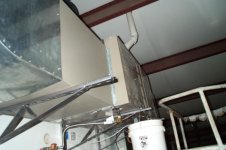
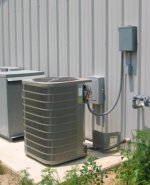
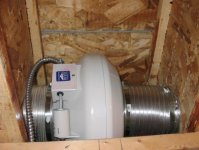
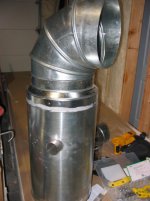
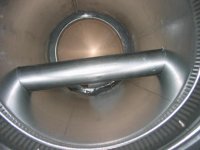
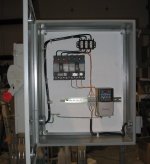
Anyway, I needed to have a place to put that noisy transformer and the 5 ton condenser, so I poured a 6" thick floating slab on the south side of the building and moved the transformer and the condenser out there, and hooked them up. I wanted to have ample ventilation for the bathroom so I got a remote fan and installed it. I'm planing on installing a 225 amp 480V 3 phase bus duct down the back wall of the shop. That required that I have a conduit to run the 4-0 copper to it. Only problem was that it cut across the space in the floor joists that I needed for the 12" HVAC duct. Another problem is that you can't run an electrical PVC conduit through a HVAC duct. So I made an adapter for the duct
I up sized a section of the 12" to 14" so I wouldn't loose any flow and found that a 2 1/4" piece of muffler pipe just slid over the 2" pvc conduit.William....
Attachments

Last edited:
 Nice work.
shopking68
Well-known member
Looks more like a house than a shop, but its nice...
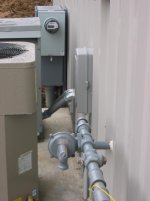
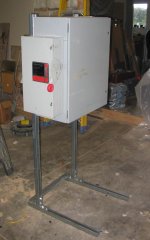
Well I finally got tired of paying to keep the 30kva transformer hot in the pump house. It was costing me about $50 per month or so to have it running 7X24 to power the well pump. So I got off my **** and wired up a new pump controler. I have an incomming voltage of 480V to the pump house and the pump runs at 208 3 phase. The transformer powered the pump and a 120V heater to keep the pump house above freezing. The new controler has a 80 amp disconect and then powers a A&B Powerflex 40 VFD. The VFD softstarts the pump and down converts the 480V to 215V ( higher than the required 208V to off set the line loss from the wire to the pump. I also picked up a 480V 5kva heater to keep the place warm in the winter and mounted it on the side of the hoffman box
Attachments
Last edited:
comp
Well-known member
 good read also
dre2142 said:Nice! So what will be IN the garage?
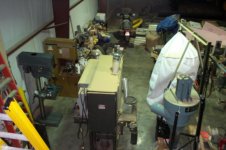
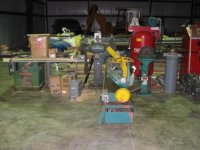
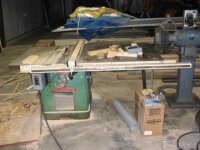
Well no cows in there yet but here are a few pictures of some of the mess....
Attachments

bmwpower said:Holy moly, that is the biggest grinder I've ever seen.
It is rather large, its got 14"X3" wheels on it. Baldor makes one that has more HP, 7.5 vs mine with "only" 5hp, but it still has the same size wheels on it.
William...
Attachments

REFLEXX
Well-known member
William,
let me know if you ever get tired of that grinder. I've got that on my wish list!
let me know if you ever get tired of that grinder. I've got that on my wish list!
REFLEXX said:William,
let me know if you ever get tired of that grinder. I've got that on my wish list!
Baldor has one with your name on it, just waiting for you to call! $2300 w/o the stand. The dam wheels are over $200 each for it....
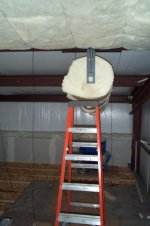
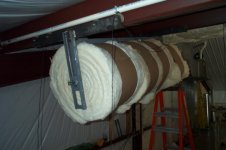
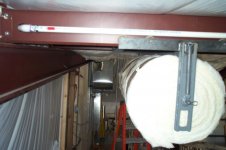
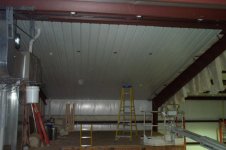
The next job was to install the r-25 15" wide non faced insulation into the space in the roof between the purlans ( they are on 5' centers in the roof. Of course I had to do this solo... It took me a while to come up with a method that I thought would work. Four rows side by side of the insulation would fill the space nicely but how to hold it up until I put the steel liner panel up for the finished ceiling? The rolls are 22' long or so... Time to make the Cummins Super deluxxx insulation trolley (TM). The purlans are a "Z" shaped member and when installed in the roof with a pitch make a nice track on the bottoms of them. So I made a trolly that would hold up 4 rolls of insulation at a time on a 5/8" crs rod with bearings on the ends mounted in sliders with springs to hold the rolls tight to keep them from unwinding all at once. The trolley rolls on inline skate wheels. So I machined out the parts and welded version 1.0 up of the trolley. The only thing I didn't plan on was that it was rather hard to install the rolls of insulation on it, when its attached to the purlans. When I put the 4th roll on it I pushed too hard and pushed the whole thing off the purlans.... SMASH the whole thing fell (20 feet) to the floor. Of course that bent the hell out of it:-( So a new design Ver 2.0 made so it couldn't fall off the purlans, and I was in business! So now I could "dispense" the insulation into the space but I needed to hold it up until I installed the sheeting, I came up the idea to suspend the insulation with plastic bailing twine. I took the twine and cut it into 30' lengths and started at the top and attached it to the sides ( at the very bottom of the purlans ) with a self drilling and tapping screw with a fender washer. I would roll out the insulation then put the bottom screw in and pull the twine as tight as I could get it and then tighten the screw. It worked rather well....
Attachments

Last edited:
neblinc
Well-known member
You are an amazing guy! Did you have to special order the insulation?
My shop is kinda at a standstill until I get the saw cuts filled and the epoxy down.
Then I will be ready for insulation & drywall.
I also noticed that the metal side panels get really really hot from the sun! I am sure the roof is even worse since it is black. Did you use any kind of foil backed insulation at all?
Randy
The insulation I put up with the trolley is just standard unfaced r-25 rolls I picked up at the local menards.neblinc said:Did you have to special order the insulation?
I also noticed that the metal side panels get really really hot from the sun! I am sure the roof is even worse since it is black. Did you use any kind of foil backed insulation at all?Randy
Yes but you can not see the reflective foil stuff I used as it's above the r-13 wpm-50 faced stuff that you can see under the thicker r-25 bats
I had thought about making more of them, There are a few problems with my "method" though....bmwpower said:Two words....
Patent....
Now
1st there are better ways to add insulation to a metal framed building that I have seen after I did mine:-(
2nd If you did want to do it with the same materials as I used you could just put the liner panel up before you skinned the roof and lay the insulation right down on it from the top and then the double bubble double foil insulation on top over the purlins.
However if some wants to buy the nifty tool or even rent it to put up some insulation??? I would be happy to fix them up!
William...
Last edited:
cdrewferd
Well-known member
Amazing build.
kgear
New member
You are like the freaking McGyver of garages..I wish I had a fraction of your talent and creativty.
Yep now if I can just find a coat hanger ( electrode) and my neighbors car battery (welder) I can turn this BFI dumpster into an aircraft carrierkgear said:You are like the freaking McGyver of garages...
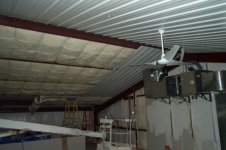
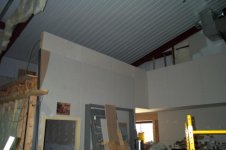
The next step was to install the liner panel. I picked up some cheaper steel from the local Menards for the liner panel as it's not going to get wet, and needs no real strength. I also got it in 2 lengths so it would be easier to install my self. It was still a pain to put up the longer pieces (16') went to the peak and the smaller piece (10') at the eve end. What I did to install it was place my 8' step ladder at the purlan where the lower end would fall and then pick up the longer sheet on the man lift and move over to the edge and balance one end on the ladder and then carefully move up to the peak and clamp it with a vise grip clamp. Then move up and down to screw off the sheets top to bottom one rib at a time so it didn't start running off square. The shorter sheets were easy as I could stand on the 2nd floor parts for that.... It finished off the celing areas nicely and I didn't have to drywall or paint it!!!
William....
Attachments


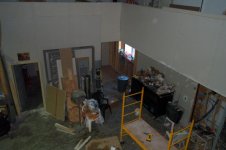
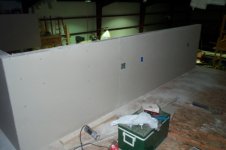
So I now had to do a job I hate, more drywall. I framed out the short walls for the mezzanine, then drywalled them, the server room walls and the hallway. I also rocked some of the "lunch " room walls and hung some more duraRock for the tile back splash in there. Then I put down some more quarry tile in the office area.
William...
William...
Attachments

Last edited:
REFLEXX
Well-known member
William,
I'm starting to have "shop envy."
Your place is looking damn good!
I'm starting to have "shop envy."
Your place is looking damn good!