To avoid these ads, REGISTER NOW!

My shop build-In progress.....

2500hd4x

Member
Joined
Mar 18, 2006
Messages
19
Location
Statesboro, GA
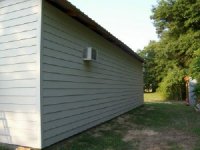
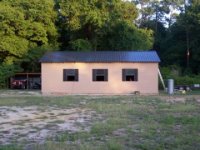
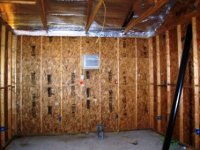
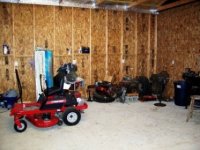
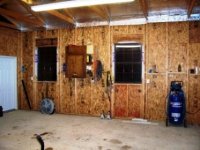
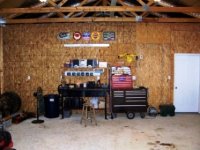
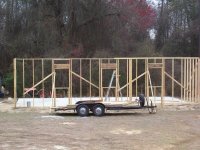
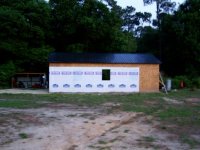
Love the site, It has given me some great ideas, and a lot of garage envy. :bowdown: Here are some pictures of my shop buildup that I am grinding away at as I have time.... It is a 24' x 40' stick built, with 10' 4 1/2" height on the walls and a 24'X25' workshop/fabshop area, and a 24'x 15' game room in the rest that will be fully insulated with a/c and a pool table. There are 3 windows in the front facing the house, I plan on installing a "lean to" off the back to shelter the boat, tractor, etc...There is a 10'x8' garage door and a 3' man door in the gable end. Heres some pics (hopefully they will post..) :headscrat
 

Attachments

  • Form w house.jpg
    Form w house.jpg
    46.9 KB · Views: 169
  • Form w Jeep.jpg
    Form w Jeep.jpg
    44.8 KB · Views: 146
  • Slab 1.jpg
    Slab 1.jpg
    65.7 KB · Views: 187
  • Wall 1.jpg
    Wall 1.jpg
    59.6 KB · Views: 135
  • Trusses.jpg
    Trusses.jpg
    70.5 KB · Views: 242
  • Gable End.jpg
    Gable End.jpg
    54.6 KB · Views: 274
To avoid these ads, REGISTER NOW!

mleichtle

Well-known member
Joined
Aug 10, 2005
Messages
223
Location
Wisconsin
A pool table is a great idea, plenty of storage under, and a solid work surface above :D

Did you excavate? Or pour the slab right on the grass?
 
OP
2

2500hd4x

Member
Joined
Mar 18, 2006
Messages
19
Location
Statesboro, GA
Did you excavate? Or pour the slab right on the grass?

The slab is monolithic- but there is an 18" wide and 24" deep footer with a lot of rebar around the entire perimeter. I am not sure why the concrete guys went that deep/wide with it (it never freezes hard around here), but I have no worries about it cracking or shifting...:thumbup: 
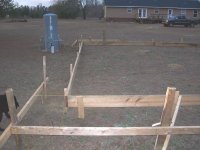
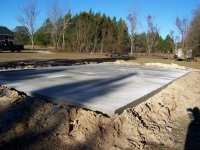
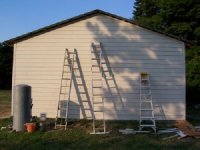
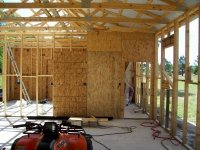
It is 8" thick on the first 5' where you drive up on it and 4-5" thick throughout the rest of the slab. I did the site prep and grading, but the slab was formed up, dug out and finished by a concrete contractor. There are 24 yards of 3000psi concrete w/fibermesh in the slab alone.

This is where I am at today. Most of the roof is done (~ 3/4)- Hopefully, it will cool off enough this evening to finish putting the roof on. That black galvalume is brutal in the afternoon....You can see in one photo where I put up some astrofoil foil bubble bubble foil in between the trusses. It works-really well- you can't feel any heat from the roof above in that section...even when you are right under it!!! :rocker:
 

Attachments

  • Insulation 2.jpg
    Insulation 2.jpg
    57.6 KB · Views: 169
  • Insulation 1.jpg
    Insulation 1.jpg
    57.9 KB · Views: 189
  • Interior Wall.jpg
    Interior Wall.jpg
    65.3 KB · Views: 159
  • Roof 1.jpg
    Roof 1.jpg
    73.2 KB · Views: 244
OP
2

2500hd4x

Member
Joined
Mar 18, 2006
Messages
19
Location
Statesboro, GA
Well, the roof is done- Just finished this afternoon. I have been helping my brother finish up his house build the last few weeks so I haven't been spending a lot of time on my shop. I did have the slab/exterior treated for termites last week as well. Most of the exterior walls are completely closed in, there are 4 sheets of OSB missing across the back - Must have miscounted when I bought the OSB :headscrat . Tomorrow- Get to finish the back exterior wall, finish wrapping it, maybe install the windows ($?) and start roughing in the electrical (landing boxes,etc) . Heres a picture of the completed roof. I left the house wrap over two of the windows for now to keep the rain from blowing in.
 

Attachments

  • Roof+Completed wall.jpg
    Roof+Completed wall.jpg
    50.2 KB · Views: 133
OP
2

2500hd4x

Member
Joined
Mar 18, 2006
Messages
19
Location
Statesboro, GA
Well, More progress has been made... Siding is complete on one gable end. Even caulked and painted it..... Used 8 1/4" Hardiplank to match the house. Painted it the same color as the house-"Sauteed mushroom". 3 more sides to go. Then on to wiring. All the boxes for the wiring are mounted, I am waiting till the siding is all nailed in to run the romex so I don't hit it with the siding nails. :shocking: 
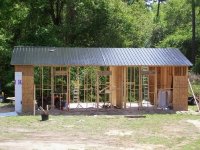
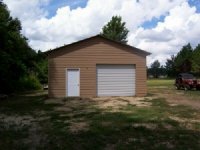
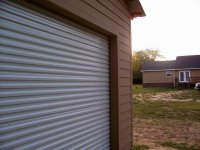
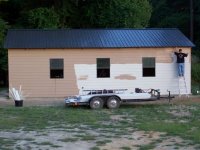
The roll up door will be installed next week... I have a lot more time to work on it now that we are done with my brothers house....

I had the power company out this morning to look at where they wanted the meter base on the exterior and the service pole. I am going to have to cut about a 30' path through a fencerow next week so they can run the power out to it. Always something else to do.....:drool:

Also- its already full!! Engines (4), four wheeler, Project truck....ETC. Where did all this **** come from?!?! :wtf:
 

Attachments

  • Siding.jpg
    Siding.jpg
    75.5 KB · Views: 119
  • Door Siding.jpg
    Door Siding.jpg
    54 KB · Views: 96
  • Interior.jpg
    Interior.jpg
    66.3 KB · Views: 192

snorvet

Well-known member
Joined
Oct 29, 2005
Messages
777
Location
Northern Illinois
looks good! good idea on waiting to run the romex until the siding's up. I put a siding nail thru my romex on my last house and I had a bear of a time fixing it.
 
OP
2

2500hd4x

Member
Joined
Mar 18, 2006
Messages
19
Location
Statesboro, GA
snorvet said:
looks good! good idea on waiting to run the romex until the siding's up. I put a siding nail thru my romex on my last house and I had a bear of a time fixing it.

Yep- I have been there and done that as well- It stinks having to rerun wire... Even when it is exposed like most of mine will be..

More progress pics. The shutters are ordered for the shop windows to match the shutters on the house -of course they are special order so they cost $14 dollars more per pair than the ones Lowes has in stock. The siding/paint looks pretty good, but it is too plain without shutters to me...


My door contractor that was on vacation last week apparently enjoyed it so much he is still on vacation....He was out of town last week and was supposed to be here this week to install my roll up door. I can't get him to return any calls Monday or today. If he hasn't called me back by lunch tomorrow I am going with the next highest bidder. ~$200 More but he is supposedly very reliable. I should be done with siding and painting this weekend. I have to cut a hole in the back wall for the A/C unit (10K BTU Window unit for the game/man room) and trim around it this weekend as well. Then on to wiring next week while I am on vacation....:thumbup:
 

Attachments

  • Shop Front-siding.jpg
    Shop Front-siding.jpg
    52 KB · Views: 92
Last edited:
To avoid these ads, REGISTER NOW!
OP
2

2500hd4x

Member
Joined
Mar 18, 2006
Messages
19
Location
Statesboro, GA
86swb said:
Looks like a job well done.

Thanks!

The siding is done! Finished the back wall and gable end today! YAHHH!!!-


Tomorrow will be a caulk and paint day...Day 1 of my official vacation. I should be able to finish getting it painted. Day 2- Finish the insulation in the ceiling in the morning while it is cool. Install meter base/service panel (200A main) and run Romex throughout. Day 3 (Wednesday)- Roll up door install. I did wind up going with the next highest bidder. He has one in stock and is coming out to install it-White to match the man door... The original guy finally called back yesterday-He really was still on vacation!!! :lol_hitti It would take two weeks for him to order it (galvanized-no color) and he doesn't know when he would be out here to put it in....SO, the other door guy seems like a better deal. While the guy is doing that-I will be clearing trees through a fencerow for the power company to run the overhead to the shop....I don't have Thursday and Friday planned out yet. If I actually get all this stuff done I may just sleep!! (My wife probably wants me to mow the yard too...)
 

Attachments

  • Back Wall.jpg
    Back Wall.jpg
    37.3 KB · Views: 23
  • Gable wall-.jpg
    Gable wall-.jpg
    38.2 KB · Views: 24
  • Angle View.jpg
    Angle View.jpg
    39.2 KB · Views: 45
Last edited:

W-Cummins

Well-known member
Joined
Jan 9, 2006
Messages
1,639
Location
Iowa
2500hd4x said:
Roll up door is installed and working well....Its coming together. :thumbup:

Looks nice and your doing a great job on it! are the wall studs 2X4 or 2X6?

William...
 
OP
2

2500hd4x

Member
Joined
Mar 18, 2006
Messages
19
Location
Statesboro, GA
W-Cummins said:
Looks nice and your doing a great job on it! are the wall studs 2X4 or 2X6?

William...


Thanks! :beer: Its nowhere near as nice as your build- Your garage/build thread is amazing...


Wall studs are 2X4- 10' 4 1/2" to the eaves. Purlins/Fireblocking at 5' in the walls. 1/2" OSB sheathing. Tyvek housewrap. 4' Band of 30# tar paper at the bottom. 12" Galvanized flashing at the bottom again. Hardiplank caulked tight over all that...I don't want any water intrusion/termites...

I wish I had used 2x6's now- I could have gotten more insulation in the game room that way. (R19 instead of 13/15) Im thinking of putting reflective barrier insulation in the wall cavity in that room under the batts to gain a little more R-value. I want it to be like a walk in fridge. Its too hot out to do much right now....July stinks to be doing construction stuff.....
 
OP
2

2500hd4x

Member
Joined
Mar 18, 2006
Messages
19
Location
Statesboro, GA
Shutters came in today and are installed. The other pic is the view from the front yard-I have been trying to make the shop match the house, after looking at it I am probably going to paint the window frames white-they are brown right now and blend....I'll have to see what the boss says. Today I also trimmed out/painted around the roll up door-still working on roughing in the wiring and the panel. Will do more on that tonight as it is much cooler after dark.....Excuse the grass in the pics. I still haven't mowed....
 

Attachments

  • Front View-Shutters.jpg
    Front View-Shutters.jpg
    39.5 KB · Views: 41
  • House View.jpg
    House View.jpg
    30.1 KB · Views: 58
  • Door Trim.jpg
    Door Trim.jpg
    47 KB · Views: 37
Last edited:

W-Cummins

Well-known member
Joined
Jan 9, 2006
Messages
1,639
Location
Iowa
Your mowing looks good to me... I just "mowed" the 4-5' tall weeds at my place with the back hoe loader bucket (more like smashed them down:) Kinda a crude methoud but it's better than nothing:)

I asked about your studs, as you mentioned that your running some romex. I assume that your drilling the studs. You might want to pickup some metal wire protector plates to use on the studs. They were required here by code and they seem to offer some protection from fasteners poking into the wires. They will not stop a framing nail gun, but you really have to be determined to put a dry wall screw through one:)

I really like the radiant insulation I'm sure that it's helping keep my place cool. I kinda wish I had installed it on the side walls too....

William....
 
Last edited:

Elky

Well-known member
Joined
Jan 16, 2005
Messages
131
Location
Lowell, MA
cranemanjr said:
Looks like you are going to have a nice garage. If you are looking for the ULTIMATE garage tool check out www.snaptrac.com . It is a crane designed for garages to light industrial applications. It can handle lifting anything up to 1,000 lbs. and prices starting at $335 and MADE IN THE USA from a company that makes industrial cranes.


how did i know i would find this post at the end of this thread?
 

RAYJAY

Well-known member
Joined
May 29, 2006
Messages
2,638
Location
UNION DALE PA
Elky said:
how did i know i would find this post at the end of this thread?

lmao was just think the same thing .....................p.s. I'm coming to steal your end loader..............:drool:

Jeff
 
OP
2

2500hd4x

Member
Joined
Mar 18, 2006
Messages
19
Location
Statesboro, GA
W-Cummins said:
I asked about your studs, as you mentioned that your running some romex. I assume that your drilling the studs. You might want to pickup some metal wire protector plates to use on the studs. They were required here by code and they seem to offer some protection from fasteners poking into the wires. They will not stop a framing nail gun, but you really have to be determined to put a dry wall screw through one:)

I really like the radiant insulation I'm sure that it's helping keep my place cool. I kinda wish I had installed it on the side walls too....

William....

Yep-The part of the shop that is going to be finished on the inside will have the wire protector plates on the outside of the studs before I put up any drywall/paneling.

Depending upon how much of the astrofoil I have left- I am at least going to do the West + North facing walls of the game room. I will probably have to go get another roll to complete it but it will be close with what I have on hand. The south side of the shop is shaded most of the day and the east wall faces the inside of the work shop, so there should not be a lot of radiant heat absorbtion from those two sides. I am still insulating the roof on the back side of the shop. It has been slow going on that-I have been fighting with an old stapler that broke while installing insulation on Monday, So i bought a new one that broke before firing the first staple on Wednesday, and having to go get a new stapler yesterday.

Wiring rough in is pretty much done save the mast/meter base on the exterior, I have to go pick the meter base up at the power company and get some 2" galvanized w/weatherhead to finish that up later on today. I also need to get the light fixtures for the workshop area. I wound up with 5 Receptacle circuits, two lighting circuits, one dedicated A/C circuit so far-I will be adding the Air Compressor, welder, and plasma cutter circuits down the road when I figure out exactly where they will land in the shop. I have plenty of space in the panel. Have to get the rough in wiring inspected next week and must get the fencerow cut this weekend so the power company can run the pole/hookup after the inspector clears it next week (hopefully).
 
OP
2

2500hd4x

Member
Joined
Mar 18, 2006
Messages
19
Location
Statesboro, GA
Some updated pics....Got the power hooked up. Everything is done, save for insulating/paneling/flooring the game room and moving the pool table in there. Basically the whole game room part of it needs to be be finished out.

I have been too busy working on stuff in the shop part to finish up. Note the oil/****** fluid stains....Getting the Jeep ready for the Jeep Jamboree next month and working on my new K5 project (starting to swap in a 14BFF, 8 Lug outers, TH400/203 or maybe a 205). Too many projects and after the power was hooked up it was way too tempting to devote time to my true love of wrenching on old 4wd **** than to finish up the game room part of it. Maybe when it cools off I will be inspired....:thumbup:
 

Attachments

  • game room 2.jpg
    game room 2.jpg
    38.5 KB · Views: 26
  • Game room 1.jpg
    Game room 1.jpg
    43.4 KB · Views: 29
  • Inside 3.jpg
    Inside 3.jpg
    40.5 KB · Views: 30
  • Inside 2.jpg
    Inside 2.jpg
    39.1 KB · Views: 35
  • Inside Pic 1.jpg
    Inside Pic 1.jpg
    39.9 KB · Views: 48
  • Blaire + Jeep.jpg
    Blaire + Jeep.jpg
    42.4 KB · Views: 61
  • Blazer.jpg
    Blazer.jpg
    43.3 KB · Views: 30
To avoid these ads, REGISTER NOW!
Top Bottom