To avoid these ads, REGISTER NOW!

My snowblower project

IMCA38

Well-known member
Joined
Sep 21, 2007
Messages
998
Location
Bennet, NE
Sharing what is the culmination of a process lasting about five years.
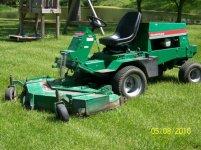
It all started out when I decided I wanted to upgrade my mower to a large front deck unit. I was looking at the Ransomes/ Cushman family because there seem to be quite a few around here (Cushmans used to be manufactured nearby in Lincoln) and they seemed to be built like tanks.
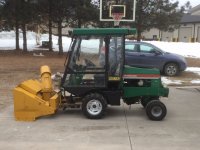
I located a used Ransomes a couple of hours away from here. I looked at it and determined it was what I was after. It is a 23 hp diesel with a 72" high flow deck.
In the back of my mind, I knew that getting a snow blower setup for this machine was possible.
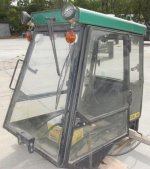
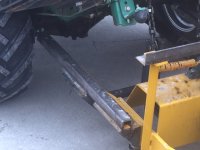
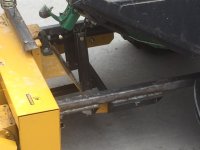
Here is the mower after I brought it home.
 

Attachments

  • 100_3267_web.jpg
    100_3267_web.jpg
    71.1 KB · Views: 88
Last edited:
To avoid these ads, REGISTER NOW!
OP
I

IMCA38

Well-known member
Joined
Sep 21, 2007
Messages
998
Location
Bennet, NE
I immediately started watching for snow blowers that would work on the mower. The trick is that they are a bit of an oddball. The PTO shaft comes directly off of the flywheel meaning it rotates clockwise and goes around 2800 RPM. Therefore, converting a 3PH unit isn't really an option.

About three years ago, I came across a Jodale Perry cab made specifically for Ransomes on an on-line auction. Amazingly enough, this cab was only about an hour away also.
The opening bid was $10. I put in a bid and added up to what I was willing to pay (which was a lot more than $10!).
Nobody else put in a bid, and I got the winning bid for $10!
Total cost was about $13 with the 10% premium, tax, etc. :beer:
I got the cab, and installed it on the mower. Needless to say, I spent more than the original $13-ish investment on fuel to go get it, new weatherstrip, wiring components, and bolts.
Here it is after that phase.
 

Attachments

  • B5233C.jpg
    B5233C.jpg
    84.7 KB · Views: 84
  • IMG_0254.jpg
    IMG_0254.jpg
    145.7 KB · Views: 103
Last edited:
OP
I

IMCA38

Well-known member
Joined
Sep 21, 2007
Messages
998
Location
Bennet, NE
Then a couple of years ago, there was a used Hanson 60" snowblower listed on eBay. Problem was it was in upstate NY, probably about 1800 miles away from here. I just wasn't in the mood to drive that far to go get it. Also, it was used and looked like it might need a little bit of TLC.
I decided to take a pass on that one.
 
OP
I

IMCA38

Well-known member
Joined
Sep 21, 2007
Messages
998
Location
Bennet, NE
Then last summer, I found a candidate on the same on-line auction where I got the cab. This one was located in central Kansas, about 150 miles away.
It was a 60" Hustler blower, made to fit a Hustler 4500 front deck mower. The blower was several years old but had never been used.
I began researching the Hustler equipment to see if this one might be adaptable to my Ransomes. I discovered that Hustler drives directly off of the motor as well, so rotation direction and speed were good.
After studying the photos, I felt that I could make brackets to adapt it to the Ransomes.
I had to bid several times and ended up paying more than what I had hoped, but still, the purchase price was probably about 1/3 of what it cost new.
 

Attachments

  • BG9972 (2).jpg
    BG9972 (2).jpg
    84.4 KB · Views: 68
  • BG9972J (2).jpg
    BG9972J (2).jpg
    76.5 KB · Views: 67
OP
I

IMCA38

Well-known member
Joined
Sep 21, 2007
Messages
998
Location
Bennet, NE
After mowing season finished, I pulled off the mower deck and moved the power unit and the blower together in my shop.
The first big relief was to find that the PTO shaft coupling would fit on the stub on the blower (1" shaft with a woodruff key). Also, the positioning was such that the shaft length was good.
The Hustler has some kind of a "C" channel bracket on the bottom of the power unit that slides over the 1/2" x 3" flat brackets. The 1/2 bars are then captured by the channels.
These flat brackets were about 21" apart. The mounting points on the Ransomes are 5/8" holes in the frame up near the front wheels. The mower deck is mounted on Hemispherical rod ends that bolt to the frame holes. These holes are about 27" apart.
The first thing I did was to flip the back brackets over, this widened out the brackets by 1" on either side. I then used the existing holes to mount fabricated brackets made from 3" angle with reinforcing gussets on the ends.
I had the blower sitting on blocks to keep it level, and I needed to raise up the mount points to reach the holes on the Ransomes and still keep the blower close to level.
I used 1 1/2" square tubing mounted on top of the angle brackets to get the mount points raised up.
The first two pictures show the mounting arms before and after reversing them. The third picture is showing how I mocked up the parts.
 

Attachments

  • IMG_0861.JPG
    IMG_0861.JPG
    115.3 KB · Views: 118
  • IMG_0870.JPG
    IMG_0870.JPG
    129.1 KB · Views: 96
  • IMG_0869.JPG
    IMG_0869.JPG
    126.9 KB · Views: 90
Last edited:
OP
I

IMCA38

Well-known member
Joined
Sep 21, 2007
Messages
998
Location
Bennet, NE
I had some various rod ends left over from when I used to race. I found two new 3/4" ends that would work good for this application. I bushed the joints down to 5/8" to attach to the mower, and then got two 3/4 fine coupling nuts to attach them to. The square tubing was 1" on the inside, so I ground a little bit off of the opposite points and the coupling nuts slid into the end of the tubing. I put some plug welds into the sides of the coupling nuts and welded a washer onto the end of the tubes to hold them in place. Since they are mostly pushing, this is more than adequate.
 

Attachments

  • IMG_0894.JPG
    IMG_0894.JPG
    136.3 KB · Views: 39
  • IMG_0895.JPG
    IMG_0895.JPG
    72.9 KB · Views: 33
OP
I

IMCA38

Well-known member
Joined
Sep 21, 2007
Messages
998
Location
Bennet, NE
I checked the distance needed on the PTO shaft and came up with the length for the square tubes. They were cut to length, attached to the mower, squared up and tacked to the angle brackets. Once everything was in place, they were removed and finish welded.
Then I had to make a bracket to attach the lift chains. There is a hydraulic cylinder inside the steering podium for lifting the mower deck and now snow blower. I used the 1/2 pegs to capture part of the cradle and then welded some 2" by 3/4" channels to the cradle to bolt to the lift chains in double shear.
These photos show all of that.
 

Attachments

  • IMG_0921.JPG
    IMG_0921.JPG
    91.8 KB · Views: 89
  • IMG_0920.JPG
    IMG_0920.JPG
    86.9 KB · Views: 88
OP
I

IMCA38

Well-known member
Joined
Sep 21, 2007
Messages
998
Location
Bennet, NE
The last step on the blower fabrication was to attach a piece of angle across the top of the blower to attach two tension springs that assist with lifting the mower or blower. That piece is visible in the prior photos.
Also, I bought a pair of 23x10.5-12 bar tread tires to use with the blower instead of the turf tires. I had previously bought a pair of wheels off of a Cushman mower at an auction. I cleaned up these wheels (as you can see, they needed it!) and repainted them. Not real happy with the cheesy silver color, I thought it would be more gray like the back wheels.
 

Attachments

  • IMG_0882.JPG
    IMG_0882.JPG
    126.3 KB · Views: 42
  • IMG_0883.jpg
    IMG_0883.jpg
    56.2 KB · Views: 51
OP
I

IMCA38

Well-known member
Joined
Sep 21, 2007
Messages
998
Location
Bennet, NE
And here is the finished product as it stands right now.
I have had it out once so far and I think it will work pretty well.

I still need to fix up some kind of chute rotation. The Hustler uses a hydraulic cylinder, but mounting a second control valve on the mower would be pretty difficult. I will likely go with a 12V linear actuator from Surplus Center.
Also, I still need to hook the cab heater up to the cooling system of the mower. However, just being out of the wind and blowing snow is a huge step up. Having a heater would be the ultimate!

Once I've finished up using the blower this winter, I'll assess if I need to make any modifications or repairs, and then I'll take my fabricated parts and blast them clean and paint them yellow to match the rest of the blower.
 

Attachments

  • IMG_0919.JPG
    IMG_0919.JPG
    117.3 KB · Views: 122
Last edited:

CNGsaves

Well-known member
Joined
Sep 26, 2012
Messages
13,233
Location
KS and OK
With my OCD way of thinking, you should have painted the winter snow-tread wheels YELLOW to match the snow blower deck. That way when you're old and senile, all you'll need to remember for winter is put on the yellow snow blower deck . . . AND . . switch out to the yellow wheels !!!!! :D

Great work on fabbing up the snow blower, hope the setup for chute movement works as well. :beer:
 
To avoid these ads, REGISTER NOW!
OP
I

IMCA38

Well-known member
Joined
Sep 21, 2007
Messages
998
Location
Bennet, NE
What does it use for shear pins?

I don't believe it has any.

The input shaft turns a pulley with two V-belts that goes over to a 90 degree gearbox mounted on the left side of the blower. The pulley on the input shaft is small and the pulley on the gearbox is larger, thus reducing the speed. Behind the large pulley is a chain sprocket that drives back over to the impeller shaft. The output shaft on the gearbox runs a chain down to the left end of the auger.
I suppose if it gets jammed up, the belt just slips. There is a spring tensioner on the belts. You can see the spring on the views of the back of the blower.

I need to contact Hustler and see if they'd be kind enough to provide an owner's manual.
I've looked on line and can't find one.
 

dkmc

Well-known member
Joined
Jan 20, 2008
Messages
949
Location
NYS--Upstate in the corn fields
Nice adaption project!

Couple thoughts...
Is 23HP really even near enough for that monster 60" blower?
And, I think heat will be more important for defrosting all that glass than to keep you
comfy.
 

sublime68charger

Well-known member
Joined
Sep 9, 2014
Messages
5,415
Location
SW Wisconsin
Very nice, but if you get any big snow you are going to need tire chains.

I'll 2nd the chains as well, though what area are you blowing snow?
If it pretty flat you can get by without.
Can you force power to other drive wheel if you end up with one on ice/hard pack spinning?

Tip if you put chains on, jack up wheel, let air out put tire chains on tight as you can get, then air tire back up! Now chain is super tight and won't give you problems. That is what I have done on my atv tires with chains.

Though blowing snow dosnt require the traction as pushing snow does.

Awesome work and project!
 

sublime68charger

Well-known member
Joined
Sep 9, 2014
Messages
5,415
Location
SW Wisconsin
Nice adaption project!

Couple thoughts...
Is 23HP really even near enough for that monster 60" blower?
And, I think heat will be more important for defrosting all that glass than to keep you
comfy.

If the mower is hydro drive you just adapt ground speed to the amount of snow,

I have a 44" with 11hp engine for my atv and it does okay.

Just have to match ground speed to the amount of snow you have to blow!
 
OP
I

IMCA38

Well-known member
Joined
Sep 21, 2007
Messages
998
Location
Bennet, NE
Thanks for all of the great replies!

A couple of follow up items.
The heater in the cab does have a blower which is wired up and functional. I did use the blower to defrost the windshield. Just no hot air.

It handles pretty good going forward, but I do have trouble getting it to turn in reverse as the **** end is pretty light (even with 250# attached to the back!)
Ransomes did have a turning brake option for the front wheel brakes. I have seen the parts listed on eBay before, and the next time I see them, I will be buying. If none come up soon, I can probably make up what I need.

I do have a set of tire chains that I used on an old JD garden tractor. I will install if needed.

As far as power, it is a hydro, so I can go as fast or slow as the snow load dictates.
 

WoodsTruck

Well-known member
Joined
Jan 12, 2013
Messages
1,019
My did bought a snowblower for the front of his quad. Worked good but had a hand crank to rotate the chute. I picked up a rear window wiper motor from a salvage yard and we mounted it in place of the hand crank with a (on)-off-(on) rocker switch on the left hand grip. Works awesome.

Could you do something similar but use a length of bike chain around the base of the chute and a small sprocket on the 12V motor to make it turn?
 
To avoid these ads, REGISTER NOW!
Top Bottom