bartsworld
Member
- Joined
- Nov 3, 2011
- Messages
- 12
Hello all,
I'm new to the forum and have been browsing around and it seems very interesting. Live on the Kenai peninsula in Alaska. I have had u huge summer project building my steel master 25x30 shop. I'm kind of a cheap skate in that I would get quotes on the slab and the dirt work. I didn't like these high quotes so instead I decided to do all the work myself.
The key way foundation i used turned out great but I played with it on and off for about a month before I had it poured. I hired and fired two different so called career carpenters to lend a hand . I found that the saying " If you want it done right you have to do it yourself " is very true.
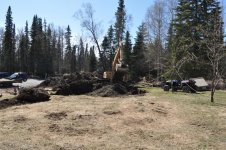
Rented an Excavator for the dirt work. So after I returned it and realized my pad was not perfectly level I had to do a lot of wheel barrel loads to get it right. Prices for work as well as just about anything in Alaska are very expensive compared to the lower 48.
I had 3 quotes to do the whole concrete work and they ranged from 7500-10k
I haven't added up all the costs from buying the concrete stakes and the form boards and all the hardware to get the slab ready to pour but I belive with doing it myself I am into the concrete slab about 4500. I was told that I went a little overkill with the slab. Someone told me it was strong enough for a three story building. I went by what the engineered drawings said and poured 18x18in footers.
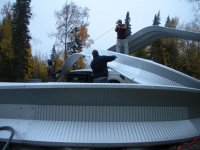
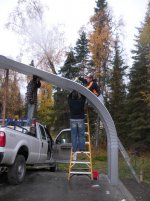
Anyways the build went great. I assembled all the arches on the ground and had two guys help stand them up. The arches started standing well by themselves after you have about three of them together. The first one is hard to stabalize all by itself but I managed to get it up and get two more bolted together without having to secure the first arch. i didn't use scaffolding cause like i said I'm to cheap to rent it or buy it. I used the back of a pickup truck with a ladder in it. You will see what I'm talking about in the pictures I'm going to attach. I decided to use hilti bolts to secure the building and realized its best to get the whole building up before you start securing it to the slab. I'm not sure if the building accordianed but when all the arches were assembled The building stood 3inches off the slab. I just had a few friends push each section to massage the building to end or the other and after some pushing and pulling it worked out just fine. I also noticed that when the building sits in the trough the directions do not say if it should ride on the inside or outside edges of the trough.
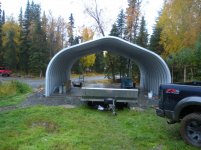
Now, I have the arches all erected and the back end wall up and secured. I found it really easy to trim the edge pannels and instal. I'm waiting on steelmasters to send me a new garage door header beam. Someone looked at the measurements and gave me an 8ft beam instead of a 10 ft beam. Once it arrives I can complete my front end wall.
So, the plan forward it to get the front end wall done. I made a mistake and being as cheap as I am I didn't order a pre hung man door for the building. I'm going to have to cut one in cause I need a man door. I wonder if anyone on the site has any ideas or has ever done this type of task before. I was just going to buy a door from home depot and hold it up to the corrugated pannles on the end wall and trace it with a marker and then use a plasma torch to cut out the metal. Any other ideas ? I'm all ears..
Next step is to get the thing wired up. I have no experience in wiring , but i didn't have any in cement slabs or construction either. I want to get everything in place before I have the thing sprayed with Eurethane. I also want to get some ideas on how to mount some shelves, light fixtures, or anything else I may need to anchor , bolt to before the Eurethane goes in.
My idea is this. Being that there is some threads still avaliable on the inside of the building i was going to use couplings and then some all thread so it can stick out of the Eurethane which will provide points to secure whatever it is that I need to hang. Does anyone have any other ideas on fastening items to the walls.?
Enough rambling. I will attach pictures of where I am at on this project.
Thanks Hope to hear some helpful ideas or If anyone has any questions on constructing a steelmaster building I will do my best to help.
Stay Motivated.
I'm new to the forum and have been browsing around and it seems very interesting. Live on the Kenai peninsula in Alaska. I have had u huge summer project building my steel master 25x30 shop. I'm kind of a cheap skate in that I would get quotes on the slab and the dirt work. I didn't like these high quotes so instead I decided to do all the work myself.
The key way foundation i used turned out great but I played with it on and off for about a month before I had it poured. I hired and fired two different so called career carpenters to lend a hand . I found that the saying " If you want it done right you have to do it yourself " is very true.
Rented an Excavator for the dirt work. So after I returned it and realized my pad was not perfectly level I had to do a lot of wheel barrel loads to get it right. Prices for work as well as just about anything in Alaska are very expensive compared to the lower 48.
I had 3 quotes to do the whole concrete work and they ranged from 7500-10k
I haven't added up all the costs from buying the concrete stakes and the form boards and all the hardware to get the slab ready to pour but I belive with doing it myself I am into the concrete slab about 4500. I was told that I went a little overkill with the slab. Someone told me it was strong enough for a three story building. I went by what the engineered drawings said and poured 18x18in footers.
Anyways the build went great. I assembled all the arches on the ground and had two guys help stand them up. The arches started standing well by themselves after you have about three of them together. The first one is hard to stabalize all by itself but I managed to get it up and get two more bolted together without having to secure the first arch. i didn't use scaffolding cause like i said I'm to cheap to rent it or buy it. I used the back of a pickup truck with a ladder in it. You will see what I'm talking about in the pictures I'm going to attach. I decided to use hilti bolts to secure the building and realized its best to get the whole building up before you start securing it to the slab. I'm not sure if the building accordianed but when all the arches were assembled The building stood 3inches off the slab. I just had a few friends push each section to massage the building to end or the other and after some pushing and pulling it worked out just fine. I also noticed that when the building sits in the trough the directions do not say if it should ride on the inside or outside edges of the trough.
Now, I have the arches all erected and the back end wall up and secured. I found it really easy to trim the edge pannels and instal. I'm waiting on steelmasters to send me a new garage door header beam. Someone looked at the measurements and gave me an 8ft beam instead of a 10 ft beam. Once it arrives I can complete my front end wall.
So, the plan forward it to get the front end wall done. I made a mistake and being as cheap as I am I didn't order a pre hung man door for the building. I'm going to have to cut one in cause I need a man door. I wonder if anyone on the site has any ideas or has ever done this type of task before. I was just going to buy a door from home depot and hold it up to the corrugated pannles on the end wall and trace it with a marker and then use a plasma torch to cut out the metal. Any other ideas ? I'm all ears..
Next step is to get the thing wired up. I have no experience in wiring , but i didn't have any in cement slabs or construction either. I want to get everything in place before I have the thing sprayed with Eurethane. I also want to get some ideas on how to mount some shelves, light fixtures, or anything else I may need to anchor , bolt to before the Eurethane goes in.
My idea is this. Being that there is some threads still avaliable on the inside of the building i was going to use couplings and then some all thread so it can stick out of the Eurethane which will provide points to secure whatever it is that I need to hang. Does anyone have any other ideas on fastening items to the walls.?
Enough rambling. I will attach pictures of where I am at on this project.
Thanks Hope to hear some helpful ideas or If anyone has any questions on constructing a steelmaster building I will do my best to help.
Stay Motivated.