To avoid these ads, REGISTER NOW!

my turn to score a vise

blaze_125

Well-known member
Joined
Mar 4, 2008
Messages
260
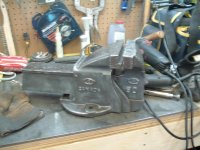
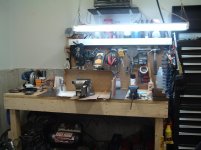
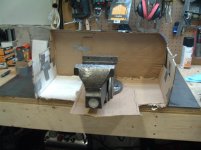
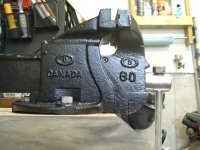
I don't know if I got a good deal or not... but I think I got something decent.

25$
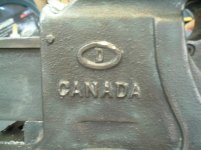
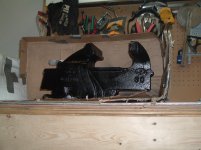
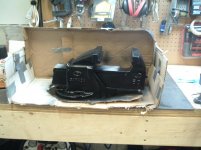
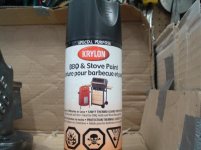
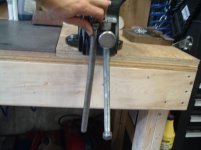
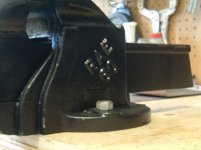
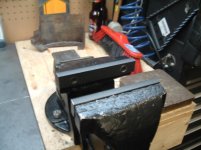
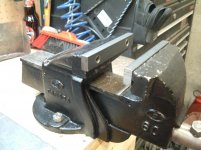
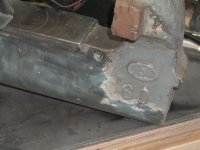
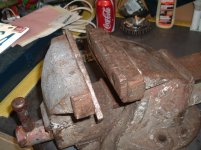
The jaw needs a bit of work, and the whole thing needs a fresh coat of paint, but other than that, it works fine. The handle is a bit bent, so I'll be replacing that tomorrow.
 

Attachments

  • vise1.jpg
    vise1.jpg
    143.3 KB · Views: 70
  • vise7.jpg
    vise7.jpg
    145.7 KB · Views: 43
  • vise6.jpg
    vise6.jpg
    141.8 KB · Views: 46
  • vise5.jpg
    vise5.jpg
    145.6 KB · Views: 49
  • vise4.jpg
    vise4.jpg
    147.6 KB · Views: 40
  • vise3.jpg
    vise3.jpg
    147.9 KB · Views: 43
  • vise2.jpg
    vise2.jpg
    142.4 KB · Views: 55
Last edited:
To avoid these ads, REGISTER NOW!
OP
B

blaze_125

Well-known member
Joined
Mar 4, 2008
Messages
260
Re: my turn to grab a vise

She's already looking a whole lot better, and she's ready for paint.
 

Attachments

  • visecleanedup1.jpg
    visecleanedup1.jpg
    140.1 KB · Views: 61
  • visecleanedup2.jpg
    visecleanedup2.jpg
    129.4 KB · Views: 33
  • visecleanedup3.jpg
    visecleanedup3.jpg
    114.2 KB · Views: 32
Last edited:

lauver

Well-known member
Joined
Nov 11, 2007
Messages
1,433
Location
Belton, TX
blaze 125,

I think you did real good. That's an awesome specimen of a vise. Hurry up and lay some paint on it. I would like to see what it looks like all cleaned up.
 

caper

Well-known member
Joined
Feb 12, 2006
Messages
3,185
Location
cape breton
Those Rae's are a nice vise.We have one in the shop that's been abused quite a bit.Check out a set of Record jaws if you can't find Rae's.I think they're the same jaw.
 

t100

Well-known member
Joined
Sep 3, 2009
Messages
6,101
I was few minutes too late on this one: $30 Wilton 4"

http://indianapolis.craigslist.org/tls/1846686992.html

3na3o13pa5T15Q45W4a7gb6c6b9b716ac1e6c.jpg


maybe next time.
 
OP
B

blaze_125

Well-known member
Joined
Mar 4, 2008
Messages
260
Since she's now clean and ready to keep going, I set her up in a custom paint booth :spit:

At first I wanted to paint her with fireproof paint. I was at the store with the can in hand and started looking for a primer that was also fireproof. The color was going to be gunmetal. While looking for primer, I stumbled upon a can of BBQ paint for 1/3 the price of the fireproof paint I already had so I went with the BBQ paint.

She looks mean in black.
When I tried to take the vise appart, I wasn't able to get the slider out of the casing. For some reason it blocked near the end and I couldn't see anything that had to be removed to completely slide it out... So I'll paint the slider in 2 parts.

The pictures are of the first coat.
In the second picture, you can see the vise it's going to replace.
 

Attachments

  • visefirstcoat2.jpg
    visefirstcoat2.jpg
    141.6 KB · Views: 49
  • visefirstcoat1.jpg
    visefirstcoat1.jpg
    123.4 KB · Views: 47
  • visepaint.jpg
    visepaint.jpg
    104.6 KB · Views: 40
  • custombooth2.jpg
    custombooth2.jpg
    120.9 KB · Views: 50
  • custombooth1.jpg
    custombooth1.jpg
    112.9 KB · Views: 39
Last edited:

caper

Well-known member
Joined
Feb 12, 2006
Messages
3,185
Location
cape breton
Sure you can make your own!I usually make them out of aluminum so they are strong enough to bite but don't damage what your clamping.That Rae is a copy of the Record design and like some Records in order to get the sliding jaw out you have to drive the pin out that retains the threaded collar on the inside.The end of the sliding jaw isn't open like most other vises so when you try to slide it out it hits the threaded collar.You have to drive out the pin and wind the handle out while holding the jaws closed.This will force the sliding collar to the end of the screw till it falls off and you can pull it out of the sliding jaw.Once it's out the sliding jaw can slide all the way out of the stationary jaw.
 
OP
B

blaze_125

Well-known member
Joined
Mar 4, 2008
Messages
260
All I'm missing now is the jaw and I'll work on that sometime this week.

Here she is installed and almost ready to rock!
As you can see in the handle comparison picture, I couldn't find a smooth rod, so I went with a threaded rod and respected the overall length of the original piece.
 

Attachments

  • viseHandle.jpg
    viseHandle.jpg
    90.3 KB · Views: 50
  • viseinstalled4.jpg
    viseinstalled4.jpg
    144.7 KB · Views: 40
  • viseinstalled3.jpg
    viseinstalled3.jpg
    90.3 KB · Views: 31
  • viseinstalled2.jpg
    viseinstalled2.jpg
    118.5 KB · Views: 34
  • viseinstalled1.jpg
    viseinstalled1.jpg
    139.5 KB · Views: 27

Catamount

Well-known member
Joined
May 26, 2010
Messages
547
Location
New England, USA
Looks nice! I've never seen a Canadian vise before!

Is there any reason you left the two sides together while painting? The only recommendation I'd have is to put paste wax on the slide... otherwise the paint on your slide is going to start flaking off with every use; not that it matters though!
 
To avoid these ads, REGISTER NOW!
OP
B

blaze_125

Well-known member
Joined
Mar 4, 2008
Messages
260
Is there any reason you left the two sides together while painting?
Only because I saw Caper's post after it was already painted.
I wasn't able to take it appart completely.

The only recommendation I'd have is to put paste wax on the slide... otherwise the paint on your slide is going to start flaking off with every use; not that it matters though!

The paint on the upper portion of the slide will peel off, but the lower portion should stay intact. If the upper portion doesn't peel off fast enough, I'll actually wirewheel it.

I wasn't sure what type of grease I should put on the screw, so I put a **** load of "long lasting" bicycle grease on it. I also baked the paint with a heat gun since my girlfriend wouldn't let me use the kitchen stove.
 
OP
B

blaze_125

Well-known member
Joined
Mar 4, 2008
Messages
260
So it appears at least 1 of the screw hole to hold the jaw is stripped.
Instead of forcing a new screw in there, I figured I should probably re-tap the hole. I've never held a tap in my life ever before.

The screw size is 5/16, do I tap with a 5/16, or do I go 1 size up?
What's the procedure to re-tap a hole?
 

spongerich

Well-known member
Joined
Apr 17, 2010
Messages
2,339
Location
Monroe, NY
Depends on how buggered the threads are. I'd start with a 5/16 and see if you can just clean up what's there. If that doesn't work, you'll need to drill and tap 1 size up.
 

Underdog

Well-known member
Joined
Sep 24, 2007
Messages
1,135
Location
Treasure Coast, Florida
Drill bit the same size as the tap size?
So let say the tap was to be 1/4, the drill bit would also have to be 1/4?

NO NO NO, Drill bit has to be under size so the tap can cut new threads, otherwise the the tap would not have any metal to cut. You need a tap chart that will say what size drill bit to use with the appropriate size tap.

http://www.shender4.com/thread_chart.htm
 
Last edited:
OP
B

blaze_125

Well-known member
Joined
Mar 4, 2008
Messages
260
So she's done and has new jaws.
I'm just anxious to see how well parts are going to hold up in a jaw that doesn't have the texture. Time will tell I guess.
 

Attachments

  • visejaw1.jpg
    visejaw1.jpg
    100.2 KB · Views: 17
  • visejaw2.jpg
    visejaw2.jpg
    111.6 KB · Views: 17
  • visejaw3.jpg
    visejaw3.jpg
    128.8 KB · Views: 27
To avoid these ads, REGISTER NOW!
Top Bottom