To avoid these ads, REGISTER NOW!

My version of the ultimate workbench...

Always_Thinkin

Well-known member
Joined
Aug 14, 2012
Messages
300
Location
Illinois
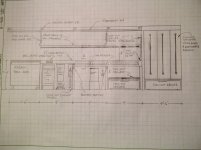
I have been getting ideas from a number of workbenches here on the forum and on the web. You guys have a lot of good ideas. I am trying to incorporate useful features and utilize the available space in the workbench. What does everyone think? One feature that I thought was neat was a tool tray under the workbench surface. I used the idea and added a drawer that is not the full depth of the workbench so not to waste the entire area. I want your comments to tweak things before I comit to building it. Thanks in advance for your input.

EDIT: Trying to capture the comments:

I plan to mount my machinist vice and benchtop grinder to two different square tubing lengths. Those will slide into the two tool receivers.

I currently have my bench top drill press on a roll around stand and I may keep it that way.

I am thinking of mounting air connections with the self coiling air hoses to my overhead lighting beam.

I plan to have 4 foot shoplights continuous for the entire length of the workbench.

I have a retractable extension cord mounted under the workbench.

My design of the pull-out shelving includes a shelf depth of 13 inches and removeable/hight adjustable shelves with a 1 inch front lip on each shelf. The entire back of the shelving units have pegboard attached so I can remove all shelves and hang hooks to organize the shelving unit.
 

Attachments
  • IMG-20121029-00094.jpg
    IMG-20121029-00094.jpg
    144.5 KB · Views: 1,774
  • IMG-20121029-00095.jpg
    IMG-20121029-00095.jpg
    141.6 KB · Views: 1,105
Last edited:
To avoid these ads, REGISTER NOW!

akdiesel

Well-known member
Joined
Aug 8, 2008
Messages
2,617
Location
Wasilla, AK
Well thought out. One thing about the outlet strip though is with that many plugs low and I front of the bench will lead to having lots of cords hanging down getting tangled up and possibly fought in drawers.
 

Outlawmws

Well-known member
Joined
Aug 9, 2011
Messages
39,325
Location
The Badlands
I think you will want at least a few outlets on the back wall as well sometimes It's not convenient to have a cord coming from behind a tool on the bench, and out to the front.

I'd also consider moving one of those strips to the bench side of the right side cabinet with the pull out shelves (Great Idea BTW). You can attach it to a 2X2 so it is facing forward, and not hanging cords all over the bench.

But all that aside, my most used outlet is one I have hanging from a rafter that is just withing arms reach to the right of and in front of my machinists vise. It was originally one of two I hung like that to hang on each side of my race car so we had convenient outlets without tripping on the cords. Both are still there, but the one by the vise gets all the use.
 

balane

Well-known member
Joined
May 4, 2011
Messages
2,996
Location
Pacific Northwest
Will the handle on the wood vise get in the way when you try to pull your tool cart in and out?

Nice that you're making a plan. I just start nailing **** together most of the time.
 

softailgarage

Well-known member
Joined
Apr 20, 2011
Messages
5,153
Location
Bullhead City, Az.
If you have an air compressor, I would incorporate a couple of air outlets. If you dont have a compressor, try a small one or pancake one under the bench.
 
OP
A

Always_Thinkin

Well-known member
Joined
Aug 14, 2012
Messages
300
Location
Illinois
Well thought out. One thing about the outlet strip though is with that many plugs low and I front of the bench will lead to having lots of cords hanging down getting tangled up and possibly fought in drawers.

Good point. I hadn't thought of that. You and Outlawmws has me thinking on outlet locations now.

Will the handle on the wood vise get in the way when you try to pull your tool cart in and out?

Nice that you're making a plan. I just start nailing **** together most of the time.

I seen someone on here use two pipe clamps side by side as a wood vice. My plan is to copy their idea and this eliminates the longer wood vice handle.

If you have an air compressor, I would incorporate a couple of air outlets. If you dont have a compressor, try a small one or pancake one under the bench.

I have not figured out where to put the outlets so they are out of the way and not have a line layed across the top of the workbench. I am looking to use a self coiling air line.


Thanks for all of the great input...keep them comming.
 
Last edited:

PECVD2

Well-known member
Joined
Oct 30, 2009
Messages
1,380
Location
Albuquerque, NM
AThinking,

I like the idea of a cubby for the shop cart.

GALLERY]


Looking good and your off to a great start by drawing it up first.
 

TMCCuda

Well-known member
Joined
Sep 17, 2010
Messages
61
Nice drawing. I find it helps to organize your thoughts visually to begin with.
 

W650Mike

Well-known member
Joined
Dec 17, 2010
Messages
1,093
Location
North Central Texas
I like the pull out shelving on the right. Line a couple of the shelves with valley tin for oil and other lubricants that always seem to seep and make a mess. Since you are a planner, take a little time to measure items that will be stored there, Group them by purpose and size to maximize the use of the volume. With heavy duty guides, you should be able to pack serious weight and still move it easily.

I also like the limited use of pegboard. I did a whole sheet above my bench and now I'm having second thoughts and thinking of shallow cabinets to replace part of it. No matter how I try to keep the shop somewhat clean, the stuff on the pegboard always stays dusty - which makes it look even more cluttered.

Subscribed!
 
OP
A

Always_Thinkin

Well-known member
Joined
Aug 14, 2012
Messages
300
Location
Illinois
I like the pull out shelving on the right. Line a couple of the shelves with valley tin for oil and other lubricants that always seem to seep and make a mess. Since you are a planner, take a little time to measure items that will be stored there, Group them by purpose and size to maximize the use of the volume. With heavy duty guides, you should be able to pack serious weight and still move it easily.

I also like the limited use of pegboard. I did a whole sheet above my bench and now I'm having second thoughts and thinking of shallow cabinets to replace part of it. No matter how I try to keep the shop somewhat clean, the stuff on the pegboard always stays dusty - which makes it look even more cluttered.

Subscribed!

My design of the pull-out shelving includes a shelf depth of 13 inches and removeable/hight adjustable shelves with a 1 inch front lip on each shelf. The entire back of the shelving units have pegboard attached so I can remove all shelves and hang hooks to organize the shelving unit.
 

aka Larry

Well-known member
Joined
May 2, 2012
Messages
8,089
Location
Eastern, NC
I'll be building new (long) workbench too so I'm subscribed.

A couple of comments/questions.

42" is too high for a workbench IMO. I'm 6'-3" amd my last one was 39" and was too high for comfort. My new one will be the standard 36" height.

How will the roll-out drawers work? Do you plan to use standard slides? In my searched I've found that slides good enough to hold the weight of a large drawer are quite pricey.

I draw EVERYTHING before I build it. I'm glad to see someone else is a pre-planner as much as I am!
 

KSwiss

Well-known member
Joined
Dec 26, 2011
Messages
111
Location
Indianapolis
Aka Larry Has it right. I'm 6'6" and regretting my bench being 45" if I was to redo it I would go with a range between 36"-40".
 

woodrail

Well-known member
Joined
Feb 23, 2012
Messages
2,456
Location
Lorain, Ohio
Looks like a good plan. My issue would be not being able to access the cart when stowed. I would end up putting **** in front of it making it a PITA to move!
 
OP
A

Always_Thinkin

Well-known member
Joined
Aug 14, 2012
Messages
300
Location
Illinois
I'll be building new (long) workbench too so I'm subscribed.

A couple of comments/questions.

42" is too high for a workbench IMO. I'm 6'-3" amd my last one was 39" and was too high for comfort. My new one will be the standard 36" height.

How will the roll-out drawers work? Do you plan to use standard slides? In my searched I've found that slides good enough to hold the weight of a large drawer are quite pricey.

I draw EVERYTHING before I build it. I'm glad to see someone else is a pre-planner as much as I am!

The reason I went with a 42 inche height was because I use my bench for more automotive/smaller size projects. I like my projects closer to me to help me better see my work and so I am not bent over my workbench while working. I plan to have a smaller rolling workbench with 33-36 inch height for more bulky or wood working projects.

The roll out drawers are simply large drawers on four casters that roll on a concrete floor. This alllows you to store heavier and bulky items.
 

John in OH

Well-known member
Joined
Jun 2, 2007
Messages
2,444
Location
SE Ohio & Eastern Virginia
looks good but the drill press seems a little too close to the cabinet on the right.

I agree with BPJ's concern .... you should leave plenty of space around the drill press to maneuver longer work pieces. Your plan for the drill press is too close to the tall cabinet.

I like being able to sit on my stool and have my knees under the bench ... do you have adequate "knee space" below the under-top drawers when seated on your stool?

Suggestion for the air hose ... someone here on GJ mounted a short length (maybe 20" or so??) of 4" PVC pipe horizontally on the underside of their bench top (mounted with an open end facing outward). Their coiled air hose is kept stored inside the PVC pipe with the connection to the fixed air line at the rear of the PVC pipe. A neat compact storage for the hose and still readily available for use. Not my idea, but I like it and plan to add the same sort of hose storage to my bench.

Not shown on your drawings, but don't skimp on overhead bench task lighting.

Do you plan to eventually add a benchtop machinist vise? Your current vise plan is typically used for woodworking and you may not find it satisfactory for extensive mechanical work. May be OK to start with, but perhaps you should make provisions in your plan for a future machinist vise.
 
OP
A

Always_Thinkin

Well-known member
Joined
Aug 14, 2012
Messages
300
Location
Illinois
I agree with BPJ's concern .... you should leave plenty of space around the drill press to maneuver longer work pieces. Your plan for the drill press is too close to the tall cabinet.

I like being able to sit on my stool and have my knees under the bench ... do you have adequate "knee space" below the under-top drawers when seated on your stool?

Suggestion for the air hose ... someone here on GJ mounted a short length (maybe 20" or so??) of 4" PVC pipe horizontally on the underside of their bench top (mounted with an open end facing outward). Their coiled air hose is kept stored inside the PVC pipe with the connection to the fixed air line at the rear of the PVC pipe. A neat compact storage for the hose and still readily available for use. Not my idea, but I like it and plan to add the same sort of hose storage to my bench.

Not shown on your drawings, but don't skimp on overhead bench task lighting.

Do you plan to eventually add a benchtop machinist vise? Your current vise plan is typically used for woodworking and you may not find it satisfactory for extensive mechanical work. May be OK to start with, but perhaps you should make provisions in your plan for a future machinist vise.

I currently have my bench top drill press on a roll around stand and I may keep it that way.

As far as the knee space, I do have enough room.

I did see the pvc stored air hose and liked that idea. However, I am thinking of mounting air connections with the self coiling air hoses to my overhead lighting beam unless I go with the underbench air lines with the PVC.

I plan to have 4 foot shoplights continuous for the entire length of the workbench.

I appoligize, I did not show my machinist vice mounting plans. I plan to mount my machinist vice and benchtop grinder to two different square tubing lengths. Those will slide into the two tool receivers.
 
To avoid these ads, REGISTER NOW!

John in OH

Well-known member
Joined
Jun 2, 2007
Messages
2,444
Location
SE Ohio & Eastern Virginia
I currently have my bench top drill press on a roll around stand and I may keep it that way.

As far as the knee space, I do have enough room.

I did see the pvc stored air hose and liked that idea. However, I am thinking of mounting air connections with the self coiling air hoses to my overhead lighting beam unless I go with the underbench air lines with the PVC.

I plan to have 4 foot shoplights continuous for the entire length of the workbench.

I appoligize, I did not show my machinist vice mounting plans. I plan to mount my machinist vice and benchtop grinder to two different square tubing lengths. Those will slide into the two tool receivers.

It appears that you have done your homework well!! Got the bases pretty well covered!

The roll-around stand for the drill press is a pretty good idea. Nothing can be more frustrating than trying to drill a hole in a long piece and finding you don't have enough clearance to get the work piece properly onto the drill table. Ya generally try to find some work-around and end up with an awkward or unsafe drilling technique.

Regarding lights ... don't forget that the T12 bulbs will soon be obsolete BUT the T12 fixtures are still available in most box stores for low $$. Don't let yourself get stuck with T12s, go with T8 fixtures and bulbs.

Make sure you have GFI protection on all of your bench outlets.
 

L84ARACE

Well-known member
Joined
Nov 22, 2005
Messages
173
Location
Ohio
Nice plan. I always find that projects go so much better when I put them down on paper. Even if it's just a sketch.
 

Ksullivan

Well-known member
Joined
Oct 4, 2012
Messages
291
Location
Campbell, NY 14821
The best way to plan some graph paper and pencil! Your workbench looks amazing! I am wanting to build something similar once we have our own place. You can never have enough storage!
 
OP
A

Always_Thinkin

Well-known member
Joined
Aug 14, 2012
Messages
300
Location
Illinois
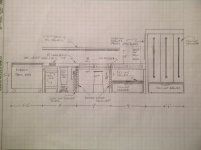
Thanks again to all of you that have gave me input on my workbench. I modified my sketch and like the way it looks. I do have one question. A workbench this size should I make it free standing or mount it to the wall with legs at the front of the workbench? Keep the comments coming.
 

Attachments

  • IMG-20121030-00100.jpg
    IMG-20121030-00100.jpg
    144.8 KB · Views: 393

yhprum

Well-known member
Joined
Jul 27, 2006
Messages
1,401
Location
Brisbane Australia
If you mount it to the wall any hammering or vibration on the bench will transfer to the wall.
Plus its nice to be able to move it if you need to
 

WILD-BILL

Well-known member
Joined
Dec 10, 2011
Messages
875
Location
Brook Park Oh
If your drawing is to scale (as it appears to be) you currently have the outlets planned at 8 feet off the ground. IMHO that's too high to be practical.

My thoughts would be along the back wall, maybe 6 to 8 inches above the work surface. Or perhaps, along the bottom of the 6' shelf facing down.

I would also do the same with the coiled air line. Those coiled lines are not all that long (at least not the cheap yellow plastic ones).

Come to think of it, I would also make all those outlets a double gang.

I also think it would be wise to have it free standing.

And, if you plan on building it out of wood, I suggest building in some provision for a jacking /lift point so you can jack up each end to put it on a furniture /movers dolly if you ever want to move it.
 
OP
A

Always_Thinkin

Well-known member
Joined
Aug 14, 2012
Messages
300
Location
Illinois
If your drawing is to scale (as it appears to be) you currently have the outlets planned at 8 feet off the ground. IMHO that's too high to be practical.

My thoughts would be along the back wall, maybe 6 to 8 inches above the work surface. Or perhaps, along the bottom of the 6' shelf facing down.

I would also do the same with the coiled air line. Those coiled lines are not all that long (at least not the cheap yellow plastic ones).

Come to think of it, I would also make all those outlets a double gang.

I also think it would be wise to have it free standing.

And, if you plan on building it out of wood, I suggest building in some provision for a jacking /lift point so you can jack up each end to put it on a furniture /movers dolly if you ever want to move it.

A few people have recommended moving the electric outlets to the back wall. My concern with this idea is having cords laying across the workbench surface and in my way while I am working. This is why I planned to have the tool magnets mounted to the front of the shelf above the workbench to put the wrenches and screwdrivers that I was using for a project and keep them in plain sight. Also that is why I made the drawers in the workbench shallow so I could push the drawers back and have a shelf below the workbench to put my bulkier tools like a half inch drill. I am trying to reduce the clutter on my workbench when I work on a project. So do the cords get in the way usually or am I over thinking things...its posible just look at my GJ member name?
 
Last edited:

WILD-BILL

Well-known member
Joined
Dec 10, 2011
Messages
875
Location
Brook Park Oh
Yeah, I think you may be over thinking the cord issue a bit.

I have a bench similar in size to yours and all my outlets are just above the bench in the wall. Most of the time the cord is well out f the way while working as it goes behind what I'm working on. Also, when I;m done with a tool but leaving it plugged in for near future use I just put to the back of the bench.

Also, look at the length of cord that most tools come with. I don;t think they would be long enough to plug in that high and still leave enough for the tool to be used comfortably.
 

Toaster1

Member
Joined
Oct 19, 2012
Messages
7
Always Thinkin,
On your drawing where it says "tool reciever", what is that? Like a hitch reciever?
 

Steevo

Well-known member
Joined
Aug 18, 2009
Messages
8,738
Location
43.49600, -112.04300
There is no harm in "pre-planning". I probably have thirty versions of my shop floor layout, and twenty-five different workbench variations documented. It allowed me to ponder the space utilization with each scenario, by dragging things around on paper (computer) before building anything.
The danger is in analysis paralysis. One can forever design and never execute if caught up in too many endless "what-if" loops.

I like the design you have proposed, with the same caveats already mentioned by others.
 

Outlawmws

Well-known member
Joined
Aug 9, 2011
Messages
39,325
Location
The Badlands
If you plan on doing anything serious with the machinist vise in the receiver hitch, then having a mobile bench the size you propose won't work well with the above activity and the bench will move when you don't want it too. In addition, you have rolling drawers that will be independent of the bench to deal with if you do decide you want to move it. Moving it also gets you away from the lighting, power and air as well...

A better solution for a temporary work surface is either a 550 series B&D WorkMate,that can be stored away easily when not in use, or two of the smaller Workmates (225?) and a temp work surface. The work surface can have cleats on it to clamp into the work mate and it is incredibly solid. WorkMates also work very well for temporary setup of bench grinders, miter boxes, cutoff saws, etc...

My bench is solidly anchored to the wall, and I've never had an issue with sound transferring to the wall and the rest of the house; and even if it is a connecting wall, how often is this an issue? Your sig other and/or kids can deal with it for short periods. it's a home shop, not a production shop...
 

iibgdi

Well-known member
Joined
Aug 21, 2013
Messages
195
There is no harm in "pre-planning". I probably have thirty versions of my shop floor layout, and twenty-five different workbench variations documented. It allowed me to ponder the space utilization with each scenario, by dragging things around on paper (computer) before building anything.
The danger is in analysis paralysis. One can forever design and never execute if caught up in too many endless "what-if" loops.

I like the design you have proposed, with the same caveats already mentioned by others.

This is kind of me! Drives my wife and other family members crazy.

HOWEVER, when something DOES get done, it is done WELL......

It's a curse and a blessing at times........:willy_nil
 

go4donuts

Well-known member
Joined
Aug 9, 2013
Messages
72
Location
Regina, Saskatchewan
I'm a bit late to the party, since the original activity on this thread was almost a year ago, but here are my two bits worth about bench design:

- I don't like drawers under the bench, under or beside the vise, because inevitably I will need something in the drawer once I have some low-hanging workpiece all set up in the vise that blocks me from opening the drawer. Or, I forget to close the drawer and it gets full of sawdust or metal shavings.

- I like a lip on the front of the bench about two inches deep so I can clamp things to the bench top.

- I like my bench screwed to the wall so it doesn't move when I'm reefing on something in the vise (like bending a rod or something). Alternately, make the bench really rigid and with lots of weight. I'm actually considering building a free standing one, in violation of my aforementioned principle, but I'm considering putting some concrete blocks on a low shelf to give it ballast.

- remember to mount your vise so the fixed side of the jaw extends past the bench top. Otherwise the bench top will interfere with workpieces in the vise that hang down - like if you clamped a shovel handle or pipe vertically in the vise.
 
OP
A

Always_Thinkin

Well-known member
Joined
Aug 14, 2012
Messages
300
Location
Illinois
Agreed, iibdgi!

go4donuts, good point on the drawers. I agree on the clamping lip on the front of the bench. Thanks for the input. So far I have not been able to incorporate these mods into my existing bench. Someday though.
 

OctoMan

Well-known member
Joined
Jul 10, 2012
Messages
270
Location
Newport News, VA
You might want to add a 220 outlet as well if you have a welder or compressor that uses 220. You might also want to add a rack/shelf for holding air tools. I cut slots and hang them by the air ******.
 

ez-duzit

Well-known member
Joined
Jun 24, 2013
Messages
5,104
Location
Marina del Rey
An alternative to building a custom bench with custom drawers, etc, is to use available modular elements; for example: solid core door supported atop rollaway cabinets with or without the wheels removed, depending on desired work height. This approach provides nearly limitless options for future rearrangements and new projects.

My main bench measures 4'x8' and is constructed from a heavy timber frame supporting a heavy top of laminated 3/4" ply and 1" MDF covered in replaceable 1/4" tempered Masonite. Its frame comfortably accepts 2 rollaway cabinets (sans casters), on one side, and a 2' deep shelf on the other; the shelf height allows space for plastic milk crates below. The top overhangs the frame by 4", along its long edges, and by 15" at its ends, for storage.

Don't diddle around substituting clamps for a real vise. Plan it right and the handle will not get in the way. I like a large woodworking vise because it leaves the benchtop completely clear and protrudes beyong the bench very little.
 

D rock

Well-known member
Joined
Jun 19, 2012
Messages
157
Location
Fayetteville, NC
I just start nailing and screwing stuff together...:wtf:then when I see how bad it ***** I tear it apart and draw it out.:scared: If I'd learn to draw something beside stick figures maybe my concept would go a little smoother.:headscrat

Looks like you have a good idea started.:beer:
 
To avoid these ads, REGISTER NOW!
Top Bottom