To avoid these ads, REGISTER NOW!

My vintage Craftsman projects/restorations

M. Blue 240

Well-known member
Joined
Nov 8, 2011
Messages
261
Location
Beaverton, OR
Thanks to GJ I gained a Craftsman addiction. It started with a toolbox, then I added a block grinder, then I decided I needed a garage full of vintage tools...even the ones I'm not likely to use. Like all my hobbies I've upgraded and sold off what I don't need or flip some of my finds to help fund my own addiction.

One of my first finds was a 1/2hp block grinder. This one I recently sold.

52272166627_3d3da331a4_z.jpg20220323_161214 by M. Blue 240, on Flickr

Then I got another grinder. This one has also sold.

52272166657_642f495d2b_z.jpg20220323_161255 by M. Blue 240, on Flickr

Then I found yet another grinder. I have now (you guessed it) sold this one.

52273133366_fd5e81a237_z.jpg20220714_144626 by M. Blue 240, on Flickr

My current users are a pair of 1/2hp grinders. I'm fond of this pair as they both have lights and my first cooling tray.

52273395574_24dd7109f3_z.jpg20220723_164735 by M. Blue 240, on Flickr
 
To avoid these ads, REGISTER NOW!
OP
M

M. Blue 240

Well-known member
Joined
Nov 8, 2011
Messages
261
Location
Beaverton, OR
I grabbed my first vise from an estate sale. I planned on restoring it, but once I cleaned off years of dust it was too nice to touch.

52273399209_f8992e865c_z.jpg20220207_165442 by M. Blue 240, on Flickr

52272164077_0de202c8ba_z.jpg20220323_172740 by M. Blue 240, on Flickr

Then I bought a vise with the intent to restore and flip it. I wish I could find vises easier, as these seem to be the easiest restorations I've tried.

52273136546_6a5031be98_z.jpg20220307_180257 by M. Blue 240, on Flickr

52273626210_a0c3afc3f3_z.jpg20220323_161223 by M. Blue 240, on Flickr

The first vise serves its purpose well on a bench I have dedicated to gun building and the kid's RC cars, but it's too small for when I'm working on my cars, so I found a larger unit.

52273624405_e08bf5ed65_z.jpg2022-08-08_06-32-44 by M. Blue 240, on Flickr

52273396434_b359daaa1c_z.jpg20220505_191316 by M. Blue 240, on Flickr
 
OP
M

M. Blue 240

Well-known member
Joined
Nov 8, 2011
Messages
261
Location
Beaverton, OR
One of the reasons I fell for Craftsman was the machine-turned bits, so I've kept my eyes out for the power tools. During covid I was able to find my first deal. The best part was the seller only living ten minutes away.

52272166377_588fab4c51_z.jpg20210817_151240 by M. Blue 240, on Flickr

52273158593_51f82cfce3_z.jpg20210817_151210 by M. Blue 240, on Flickr

I prefer the gray machines over the gold, but beggars can't be choosers. Not being a woodworking man I had to google what a jointer was after I bought it. I did a basic clean and lube, then made a stand for the saw. Before I could use it my preferred gray version came up for sale. I called the seller and said I'd come right away, since I thought it would get bought out from under me at $50. Thanks to rush hour it was an hour away and when I showed up the seller said he thought I'd flake, since no one would want the saw enough to drive for an hour. After a short conversation he was very generous and gave me the saw for free.

52273399159_4f2e0acd35_z.jpg20211112_200944 by M. Blue 240, on Flickr

The kids got to work cleaning off rust, but otherwise I haven't been able to work on this one yet.

52273136456_cec7634d7d_z.jpg20211112_201331 by M. Blue 240, on Flickr
 
OP
M

M. Blue 240

Well-known member
Joined
Nov 8, 2011
Messages
261
Location
Beaverton, OR
Then one night we were driving to my folk's for dinner and one of their neighbors put a bandsaw on the curb with a free sign. It was on a homemade stand, but was in good shape and had the original motor. It got a good cleaning, adjusting, and polishing of the paint. A couple of months later another bandsaw popped up for $50. It was in worse shape but had the correct stand. I moved the good saw and motor over to the correct stand. Then I cleaned up the newest saw, painted the stand, and installed a new power cord. It then got turned for a profit.

Here you can see the pair before I really did any work. I kept the saw and motor on the right, but installed them on the original stand.

52272163792_f9f665ed79_z.jpg20220704_130901 by M. Blue 240, on Flickr

I need to find the original motor mount and cut off this homemade version. The stand is in far worse shape than the saw, so I'll strip and paint it rather than leaving it original.

52272163677_ed9ca3e481_z.jpg20220704_131443 by M. Blue 240, on Flickr

This is the bandsaw as I sold it.

52273622825_48bc2cb8cd_z.jpg20220711_130428 by M. Blue 240, on Flickr
 
OP
M

M. Blue 240

Well-known member
Joined
Nov 8, 2011
Messages
261
Location
Beaverton, OR
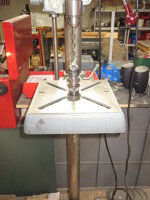
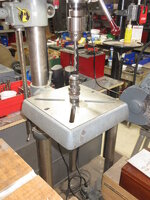
This summer has been the summer of drill presses. I bought my most expensive purchase to date, $80, and got the #1 tool I was after.

52273396629_026b170366_z.jpg20220416_144333 by M. Blue 240, on Flickr

A floor-standing drill press from a church basement. It had a homemade slow speed adapter and safety cover, both of which I removed. I then tore it apart and cleaned it. It's reassembled, but the motor is in pieces on the workbench, since I got distracted with another drill press.

52273396629_026b170366_z.jpg20220416_144333 by M. Blue 240, on Flickr

52272163977_d2c4e5dbec_z.jpg20220416_145148 by M. Blue 240, on Flickr

52273623445_1b8b4b2464_z.jpg20220416_150731 by M. Blue 240, on Flickr

52273133671_96526fac5f_z.jpg20220619_163926 by M. Blue 240, on Flickr

Before I could fix the motor I found a benchtop unit at an estate sale for $45. I spotted it in the pictures on craigslist and we drove across town showing up an hour before it closed. I thought I struck out at the whole sale, everything I saw in the pictures was long gone. Then as we leave I looked across to another garage and saw the drill press hiding behind a box. I asked if it was way out of the way because it had been sold, but nope it was mine for the taking.

52273395644_efc4ae42de_z.jpg20220723_110833 by M. Blue 240, on Flickr

52273395539_f3e723cba5_z.jpg20220723_171034 by M. Blue 240, on Flickr

52273132851_1abd6e8d72_z.jpg20220803_121821 by M. Blue 240, on Flickr

52273622175_d621471dee_z.jpg20220803_141817 by M. Blue 240, on Flickr

52273132731_9673c5e07a_z.jpg20220803_141823 by M. Blue 240, on Flickr

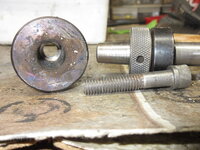
All I have to do is install a new belt, then I was going to give this drill press to my Dad. I got my hands on an even better example though, so this one is going up for sale this week. I drove across town and met an older gentleman with a patio covered in old drill presses. He said he had been repairing them and flipping them for 20 years, but it was time for him to stop. He had many brands, but I'm an amateur so I stuck with what I know and shopped for Craftsman. He had three drill presses on the patio which he stated were best for parts. Then he had another three in the garage which he felt would be good for flipping. I made an offer on what I could afford and got the three drill presses for parts and one floor standing unit from the garage. This week I started working on two from the parts bin. my hope is to make one good floor standing unit from the two parts units. They may not be a perfect match on the parts, but they're getting a full restoration and it should look like new when I'm done.

Press #1 is a worktop tool.

52272164212_9e773b5e38_z.jpg20220806_132929 by M. Blue 240, on Flickr

52273623680_0beac7d37c_z.jpg20220806_132939 by M. Blue 240, on Flickr

#2 is an older floor standing tool.

52273132181_2cd19e9a8d_z.jpg20220807_145902 by M. Blue 240, on Flickr

52273621760_47b379595b_z.jpg20220807_145834 by M. Blue 240, on Flickr

52273394874_85b9d3b4d2_z.jpg20220807_145858 by M. Blue 240, on Flickr

52273154358_4e62e0acc2_z.jpg20220807_145846 by M. Blue 240, on Flickr

I have the metal band and emblem for the green unit. My plan is to use the head from the green unit with the shaft, table, and base from the blue one. The blue one has bands that I haven't seen before and after stripping the paint it looks like they're made of brass.

52273132036_c3c00cbc31_z.jpg20220807_150033 by M. Blue 240, on Flickr

52273132261_2f3c0885ef_z.jpg20220807_150023 by M. Blue 240, on Flickr

This is the four I came home with.

52273622035_9a146bacf6_z.jpg20220805_202259 by M. Blue 240, on Flickr

This one appears to be missing a couple levers, but otherwise be complete. I'm hoping to replace the missing parts and do a simple clean/lube job. it may need some paint to really pop, but time will tell.

52273154898_7fd346ce2a_z.jpg20220805_202313 by M. Blue 240, on Flickr

This floor-standing unit came from the "expensive" side. It caught my interest as every dimension on it seems to be 20-30% small than every other drill press I have. The shaft is narrower and shorted. The head is shorter in every direction. I'll have to dig through the info pages here on GJ and see what I can learn about it.

52273154683_e8c339273c_z.jpg20220805_202317 by M. Blue 240, on Flickr

The next day I got a call from the gentleman I bought the presses from. I thought he had found one of the missing pieces, but instead he was overly generous. He was concerned I wouldn't make enough profit off what I had bought from him, so he wanted to give me another drill press. He said this one should just need to be cleaned up, then I can sell it quick. Given its nice condition and the great story that comes with it though I plan on cleaning it up and giving it to my Dad.

52273132366_1a35b68b63_z.jpg20220806_194116 by M. Blue 240, on Flickr

That brings me up to date on the projects. The blue and green drill presses are currently in pieces. Paint stripper got most of the ugly paint off, but I have some elbow grease to apply. I plan on painting and polishing all the pieces, then reassembling them. I hope to keep this thread updated as I go, so I can share and keep track of my projects.
 

mogandave

Well-known member
Joined
Nov 4, 2021
Messages
3,052
Location
Bangkok
My dad had the same table-saw. jointer and double-shaft motor. They were both on one stand and you could swap the motor (lift & slide) to power either.

He ended up mounting them on separate stands and buying a second motor for the jointer.

My sister had them now.
 

softailgarage

Well-known member
Joined
Apr 20, 2011
Messages
5,153
Location
Bullhead City, Az.
Those vintage Craftsman bugs are vicious, once they bite they dont want to let go. My first bite led to 8 bench grinders, 5 drill presses, 4 bench saws, 1 jig saw, 1 polisher box and 5 or 6 tool boxes/ roll aways. Oh and 2 vises. They've all been sold, some stolen. I did find some medicine a couple years ago called "Broke" it seemed to help fend off the bug
 

captain14

Well-known member
Joined
Dec 19, 2012
Messages
7,050
Location
Near College Park Maryland 20740
Good thread. My father bought his table saw similar to yours sometime in the late 50’s I think. He must have bought it after he bought the Craftsman circular saw.
 

Attachments

  • 4E13DFF8-45C8-4987-BBDE-E48A45D862F7.jpeg
    4E13DFF8-45C8-4987-BBDE-E48A45D862F7.jpeg
    286.8 KB · Views: 16
  • 651C17F1-7BB4-4133-969C-3B56A17D52B0.jpeg
    651C17F1-7BB4-4133-969C-3B56A17D52B0.jpeg
    339.3 KB · Views: 16
OP
M

M. Blue 240

Well-known member
Joined
Nov 8, 2011
Messages
261
Location
Beaverton, OR
I made some progress on my 2 to 1 project. First, they'll have to remain two separate drill presses, since I didn't realize they have different post sizes. I'm on my third paint stripper, all of which did next to nothing on the rattle can jobs that were done to both presses. I made decent progress with a drill attachment, but I have a can of aircraft stripper to try out today.

The worktop press was seized on the post. I used a lot of PB Blaster and muscle with no effect, so I brought out the big guns.

52290544980_ee2fd148cc_z.jpg20220815_121729 by M. Blue 240, on Flickr

52289082067_9d69bb1631_z.jpg20220813_102348 by M. Blue 240, on Flickr

The first piece got painted. The face will get more polished before I assemble it.

52289081937_2a9af1f7a2_z.jpg20220815_163748 by M. Blue 240, on Flickr
 
OP
M

M. Blue 240

Well-known member
Joined
Nov 8, 2011
Messages
261
Location
Beaverton, OR
Post how you like the 3M paint and rust stripper attachment. I bought the same one at Ace a couple of weeks ago for a future project.

I have enjoyed your adventure so far.
It does "ok." I think it would work better on a smooth surface. It seems to do well on the big flat areas I'm working with, but it's not as efficient in grooves.
 
OP
M

M. Blue 240

Well-known member
Joined
Nov 8, 2011
Messages
261
Location
Beaverton, OR
I spent some time today assembling pieces, so I can quit tripping over them in the garage. I'm in the home stretch on the first two drill presses.

First I had to polish out the poles.

52321074964_d24caf2734_z.jpg20220823_153741 by M. Blue 240, on Flickr

After the second step of sandpaper I wondered if doing 6+ steps was worth it or if no one would notice my extra effort. Then I saw the before and after.

52320961723_9cecaeef87_z.jpg2022-08-29_04-35-42 by M. Blue 240, on Flickr


Before a wire brush:

52321075224_70a0b888d3_z.jpg20220829_111435 by M. Blue 240, on Flickr

After the wire brush:

52321092090_e22ff19e11_z.jpg20220829_122852 by M. Blue 240, on Flickr

A little closer before and after:

52319850572_bc6d766b10_z.jpg20220829_111956 by M. Blue 240, on Flickr

As I go along these parts will get a better polishing to even out the finish. Some parts, like the pole cap, are to pitted to get polished and will need to be painted. The bench top model I need to address the top metal ribbon and logo, as I want to get them close to original. The floor-standing unit was missing those pieces, so I'm thinking of just painting that area black for contrast.

I'm using Ace Machine Gray paint. It's a good match to the original, but missing the hint of blue.

52320961163_8725eba344_z.jpg20220818_122547 by M. Blue 240, on Flickr

I'll also be making a 4 hour round trip to retrieve the last tool I wanted for my own shop. I thought a belt/disk sander would make this work easier. The used market offered Craftsman tools from the 90s and usually at a higher price than I wanted to pay. Then FB marketplace offered up an ad with 2 photos (from the same angle) and minimal description. I contacted the seller and asked for a model number or at least a picture of the Craftsman logo. The logo came back matching all my tools with the machined metal behind, so it's a perfect fit!

52319882247_39496a60a2_z.jpgbelt sander by M. Blue 240, on Flickr

I'll get it working smoothly, so I can get the drill presses out of my side yard before the rain starts. Then It will get the same type of restro the rest of my tools have gotten.
 
OP
M

M. Blue 240

Well-known member
Joined
Nov 8, 2011
Messages
261
Location
Beaverton, OR
4 hour round trip for the sander was a success. I did a quick clean to be able to use it, but it's in line for a deep clean.

52339143332_8c2b2a5580_z.jpg20220906_083123 by M. Blue 240, on Flickr

52340402709_517c5eac81_z.jpg20220906_083151 by M. Blue 240, on Flickr

52339143297_1109de6015_z.jpg20220906_083128 by M. Blue 240, on Flickr

52339143307_6dbfcb3405_z.jpg20220906_083134 by M. Blue 240, on Flickr

52340402719_ce13aac998_z.jpg20220906_083146 by M. Blue 240, on Flickr

52340101191_40598c013a_z.jpg20220906_112902 by M. Blue 240, on Flickr

52339145747_ff7c9eab8d_z.jpg2022-09-06_10-53-36 by M. Blue 240, on Flickr

It went right to work cleaning up parts for the drill presses.

52340402799_6a7f55f99c_z.jpg20220906_125948 by M. Blue 240, on Flickr

I got it mounted on a Craftsman wheel base I had laying around.

52340101291_70ec33d0e2_z.jpg20220906_131600 by M. Blue 240, on Flickr
 
OP
M

M. Blue 240

Well-known member
Joined
Nov 8, 2011
Messages
261
Location
Beaverton, OR
To avoid these ads, REGISTER NOW!
OP
M

M. Blue 240

Well-known member
Joined
Nov 8, 2011
Messages
261
Location
Beaverton, OR
Well I've gone and done it...I bought another grinder.

52439995659_881eebaf5d_z.jpg20221019_103127 by M. Blue 240, on Flickr

52439718401_1c4b583949_z.jpg20221019_103131 by M. Blue 240, on Flickr

This addiction is real. As I have 6 drill presses in my small garage I'm looking on CL at another floor-standing model about an hour away. It's only $100 and has a speed adjuster that I've only seen one other time!

I need to focus though, there are the presses to restore and sell. Which brings me to a speed bump. While using parts of two presses to make one good example I need to move the chuck from one spindle to the other. I bought the special spanner (Amazon has it for less than $10). I backed off the safety collar all the way down, but the chuck won't break from the spindle. Of course now the collar is stuck where it's at, won't move up or down.

52440102541_8859ab7d48_z.jpg20221018_134449 by M. Blue 240, on Flickr

This is the progress I've made so far on the press. I copied 11b30b4 on the paint, since I won't be replacing the metal trim.

52440239658_a6bb1a8c3f_z.jpg20221019_103107 by M. Blue 240, on Flickr

52439995559_8a951b69a6_z.jpg20221019_103110 by M. Blue 240, on Flickr

52439718121_4566571e16_z.jpg20221019_103118 by M. Blue 240, on Flickr
 

FrankLee

Well-known member
Joined
Sep 13, 2010
Messages
3,602
Location
seMI, 48317
I need to focus though, there are the presses to restore and sell. Which brings me to a speed bump. While using parts of two presses to make one good example I need to move the chuck from one spindle to the other. I bought the special spanner (Amazon has it for less than $10). I backed off the safety collar all the way down, but the chuck won't break from the spindle. Of course now the collar is stuck where it's at, won't move up or down.
That looks like a 6A chuck with a separate thrust nut. Generally, those 6A chucks require wedges to remove them from spindles. In addition, that thrust nut looks like a spindle nut from a shaper attachment or the like.

Jacobs 633C chucks require a pin spanner to remove them from spindles.

I suspect that the threads on the thrust collar, the thrust nut or both are now damaged.


I recently had a fubar 6A chuck that refused to separate from the spindle with wedges. I had to drill down through the chuck and pull the chuck off with a puller.
 

Attachments

  • 52440769378_a4865ea1ba_c.jpg
    52440769378_a4865ea1ba_c.jpg
    195.2 KB · Views: 17
  • 52440698135_918dc49277_c.jpg
    52440698135_918dc49277_c.jpg
    160.6 KB · Views: 17
  • 52440769163_f96bce313b_c.jpg
    52440769163_f96bce313b_c.jpg
    128.9 KB · Views: 15
  • 52440523364_8aed55ccf0_c.jpg
    52440523364_8aed55ccf0_c.jpg
    150 KB · Views: 14
  • 52440243986_5b2f76b5e9_c.jpg
    52440243986_5b2f76b5e9_c.jpg
    98.2 KB · Views: 13
  • 52440768798_d547b43ed2_c.jpg
    52440768798_d547b43ed2_c.jpg
    151.3 KB · Views: 14
  • 52440697550_986605b1e3_c.jpg
    52440697550_986605b1e3_c.jpg
    133.9 KB · Views: 15
Last edited:
OP
M

M. Blue 240

Well-known member
Joined
Nov 8, 2011
Messages
261
Location
Beaverton, OR
That looks like a 6A chuck with a separate thrust nut. Generally, those 6A chucks require wedges to remove them from spindles. In addition, that thrust nut looks like a spindle nut from a shaper attachment or the like.

Jacobs 633C chucks require a pin spanner to remove them from spindles.

I used a pin spanner to get the thrust nut down as far as it is. Would the wedges go above that nut and take the nut and chuck out together? That was my next thought, but didn't want to just start pounding and mess it up worse.
 

FrankLee

Well-known member
Joined
Sep 13, 2010
Messages
3,602
Location
seMI, 48317
At this point, I would try to remove the thrust collar with the thrust nut.

Hopefully, that pin in the thrust collar goes all the way through so it can be driven out. Sometimes those pins are in a blind hole.

With the pin removed, slide the collar and nut up over the splines and off. Assess the condition of the threads and repair if necessary. Reinstall the nut on the collar and the collar back on the spindle. Try wedges to remove the chuck.

That thrust nut is not original. That means the chuck was off at one point. Hopefully, the previous owner did not use a retaining compound on the taper. Those can be a real problem, but one thing at a time.
 
OP
M

M. Blue 240

Well-known member
Joined
Nov 8, 2011
Messages
261
Location
Beaverton, OR
I've stalled out with the drill presses, but that doesn't stop me from estate sale shopping! The tools were in a lean-to/barn, very open and very infested with mice. I started with a handful of V series sockets, then found a toolbox. I'm bad at taking the "before" pics, but it had a homemade toolbox on top and a homemade, what can be best described as, trash bin. I managed to bring home two mouse nest and one dead mouse. The family was trying to move items, so the deal was I had to take all the tools in it for $20!

The top box:
52496153680_23dba5964c_z.jpg20221111_161710 by M. Blue 240, on Flickr

This is after we emptied and vacuumed it out. We took off the homemade stand and luckily the castors fit in the factory holes.

52495677346_064ef886e1_z.jpg20221112_162218 by M. Blue 240, on Flickr

52496232633_0fa4a533d5_z.jpg20221112_162223 by M. Blue 240, on Flickr

52496153755_51553c7646_z.jpg20221112_164942 by M. Blue 240, on Flickr

52496153795_00d19b05a3_z.jpg20221112_164959 by M. Blue 240, on Flickr

52495196377_76355cf364_z.jpg20221112_165007 by M. Blue 240, on Flickr

52495196402_d4fd8651e1_z.jpg20221112_165014 by M. Blue 240, on Flickr

52496153870_19a09c2f43_z.jpg20221112_165022 by M. Blue 240, on Flickr

It's pretty rough, so as much as I like to just clean tools up I think this one needs more of a restoration. My plan as of now is to wait till spring, then cleanup and repaint the outer box, drill out the rivets on the homemade dividers, and generally leave the drawers as they are.

The tools had some decent rust, so they sat over night in a citric acid bath. Then I rinsed them off and quick dried them in the oven. Now I'm thinking some will get a light scrubbing, but then soak everything in clean motor oil. I got a TON of taps and dies, plus what looks to be a full set of Proto deep 1/2" drive impact sockets.

52498437629_6b5e448116_z.jpg20221113_175416 by M. Blue 240, on Flickr

52498150876_61b879b95f_z.jpg20221113_173530 by M. Blue 240, on Flickr
 

Jayman17

Well-known member
Joined
Feb 6, 2017
Messages
3,806
Location
Seattle, Wa
I like the cleanup crew that you have at your disposal. Hopefully they are working for a bit more than room and board. :lol_hitti

Jay
 

mogandave

Well-known member
Joined
Nov 4, 2021
Messages
3,052
Location
Bangkok
Most of my best memories of my father were of helping him in the garage and around the house.
He had put a long hose on his hand-pump grease-gun so I could pump while he was under the car. When we were real little he would glue pages from our coloring books on the thin wood from cheese-boxes and have us cut them out on the scroll-saw.

He had a short bench attached on the side of his bench with my own vice and hand-crank grinder. The gifts I most remember from my dad were either tools or fishing gear.
 

Cdb

Member
Joined
Jan 9, 2022
Messages
13
I have a gold table saw, 10" craftsman. Buddy broke the adjustment bolt, is it easier to drill the bolt out, helicore it or get another whole piece?
 

admranger

Well-known member
Joined
Feb 16, 2012
Messages
482
Location
Las Vegas, NV
Did you ever get that chuck off? If so, I have the same issue so a "how to" would be helpful. I'm not sure how to get the whole assembly out of the head w/o the chuck being off first.
 
To avoid these ads, REGISTER NOW!
Top Bottom