EOC_Jason
Well-known member
I asked him how much he was willing to accept for the package since I couldn't see it run and he offered a $1000. I accepted. I'm supposed to go Thursday to pick it up. Almost too good to get excited about it.
If anyone has any additional considerations I should think about prior to pickup let me know now or forever hold your peace. lol
Man, for $1k now you really got a steal! Knowing it had regular maintenance is reassuring too. Being a pressure lube dramatically extends the longevity, being made in the late 90's it's hardly broken in... lol...
I'm sure you found their website: http://www.saylor-beall.com/
SB service and support is top notch from everyone here that I've read that has had to deal with them.
Pretty expensive at $8200. What makes a compressor so expensive?
Saylor Beall is Made in the USA, they are overbuilt & made to last, not the cheap chinesium garbage that is flooding the market these days. Part of the cost is the pump but also you have to realize the cost of a 25HP Baldor (USA) motor... Look those things up by themselves... Probably $2k at least to ship it to your door... Also anything past 7.5HP kind of falls into the realm of "commercial" product, which quantities are produced less and always cost more because it is assumed it will be used in a commercial environment so they have money to spend... lol.
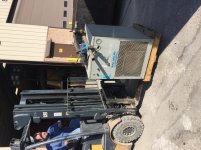
FYI, the model # from the pictures on the CL ad were: PL-92520
PL = Pressure Lube
9 = Model 9000 Pump
25 = 25HP Motor
20 = 200 Gallon Tank
That's how SB numbers work...
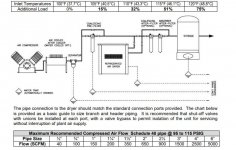
What is a "refrigerated dryer" anyways?
It's basically a contained refrigeration unit that 'chills' the air as it flows through its coils, drawing out the moisture. Not really necessary for blasting, but if you were painting or using air-tools you wouldn't want the water to mess things up.
Last edited: