To avoid these ads, REGISTER NOW!

Need to make a decorative propeller

Thirdyfivepickup

Well-known member
Joined
Nov 15, 2016
Messages
1,940
Location
Portage, Indiana
A really dear friend of mine asked me to make a propeller for her son's bedroom. It's going to be wall mounted purely as decoration.

All she asked for was a big propeller. I'm thinking she is expecting a flat piece of wood shaped like a propeller. I really want to make something nicer for her... rather than just a flat board cut out to look like a propeller.

I will be doing this with my father who is a woodworking guru and between us we have all of the tools to make this happen.

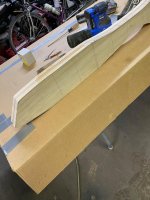
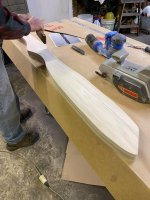
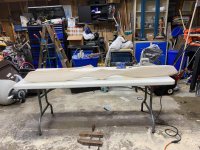
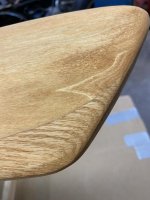
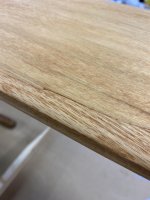
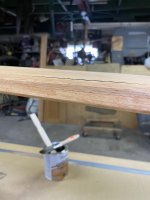
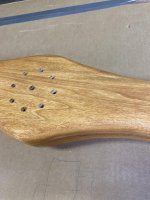
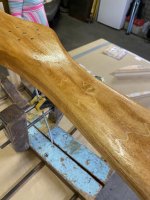
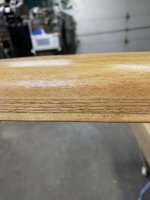
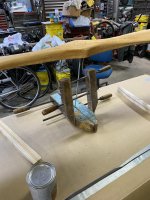
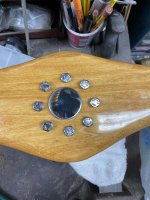
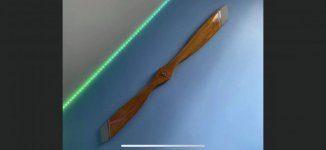
I think the plan is 4 foot long by 4" and maybe 3" thick. Going to start by gluing together 3 1" thick pine boards... cut it to shape on the band saw... shape it with various sanders, then stain, clear and call it a day. (hoping for a finished product like the picture.

I'm sure between the two of us we can make it happen but I'm wondering if anyone out here has some tips?
 

Attachments

  • Prop2.jpg
    Prop2.jpg
    94.1 KB · Views: 164
Last edited:
To avoid these ads, REGISTER NOW!

astroracer

Well-known member
Joined
Jun 22, 2005
Messages
3,001
Location
Mid_Michigan
Just use 1 1" pine board. You can make the hub separately, there is no need to cut away all of that material. Make the two blades the same and just attach them at opposite angles on the hub.
Or.. grab some ceiling fan blades and go to town. :)
Mark
 

APEowner

Well-known member
Joined
Oct 2, 2009
Messages
4,164
Location
Sunny, New Mexico
I think you're on the right track. By mere coincidence You Tube has recently decided (correctly as it turns out) that I'd enjoy some videos by Culver Props about how they make the real thing. You can skip the balancing and you won't have access to their cool carving machine but you might find their videos entertaining and educational.
 

matt_i

Well-known member
Joined
Mar 14, 2008
Messages
10,717
Location
SE Michigan
If you knew the right person with a CNC router you could write a couple of gcode programs to surface the upper and then lower, the opposite side is just a mirror image, or as suggested make the hub as a separate part.

It would be rough coming off the router of course but ideally visually symmetrical, then you could put your time into just smoothing it out and the painted/stained details.
 

Mr.N

Well-known member
Joined
Jul 13, 2005
Messages
2,221
Location
Mpls, MN
A friend of mine asked me to make a propeller for her son's bedroom.
Make sure to post progress pics!

A prop is tricky, the angle-of-attach changes the closer it gets to the tip. This is to allows for increase speed.

My advice, find one to copy. It's easy in increase the size, so maybe find a radio controlled prop. Or have a restaurant that have an aviation theme? Small airport might have one posted as well.
 

txvwnut

Well-known member
Joined
Jan 1, 2015
Messages
7,587
Location
Bedford, Texas
Culver Props has a youtube channel, she also sells decorative props. Check out a few vids it might give you what you need to get what you need done.
 

MushCreek

Well-known member
Joined
Jan 14, 2015
Messages
9,736
Location
Upstate South Carolina
I would just make a thick hub, and attach two 1X boards with a dowel so you can angle them for pitch. Carve away everything that doesn't look like a prop with tools like a draw knife, spoke shave, sander, etc. Paint/varnish to sit your taste. You could add a ring of bolts around the hub for effect. Nobody (well, very few) would notice that the pitch doesn't change as you near the tips.

This sounds like a fun project. I've always wanted an old prop to hang from the wall, but was never willing to pony up the money for one. Now I have a new project....
 
OP
T

Thirdyfivepickup

Well-known member
Joined
Nov 15, 2016
Messages
1,940
Location
Portage, Indiana
LOL thanks for the help everyone. I'm going to discuss this with my pops. Crazy thing is I can order that same prop online for $29.95 + $12 freight. At that price I dont think its even worth the effort to make one.

But I probably will anyways
 
OP
T

Thirdyfivepickup

Well-known member
Joined
Nov 15, 2016
Messages
1,940
Location
Portage, Indiana
Make sure to post progress pics!

A prop is tricky, the angle-of-attach changes the closer it gets to the tip. This is to allows for increase speed.

My advice, find one to copy. It's easy in increase the size, so maybe find a radio controlled prop. Or have a restaurant that have an aviation theme? Small airport might have one posted as well.

Well Its progressing very slowly since I dont have heat in my garage so I go to my Dad's garage because he has heat and the really good tools. Its also nice to have his knowledge to help me along. I don't have a way to host the pics so I'll do my best to lump them up and describe what's going on.

So this is my first attempt at anything of this scope. My first time gluing boards together... my first time shaping wood in this way... and it was a learning experience. I made a lot of errors along the way but so far I'm kinda impressed with it... and kinda disappointed in myself.

First off I chose two pieces of 1x4 Aspen sandwiching a 1/2" piece of red oak. Thought it would give it some character. I glued it using Tightbond glue and even used a foam roller like the cool guys do on YouTube. The thing is the cool guys also use clamps... A LOT of clamps. I don't have any clamps so I put as much weight on the boards as I could.(Picture 1) Turns out that is not enough weight. Lesson learned. The boards did not sit tight together in some spots so 2 days later we used all of my Dad's clamps and got the boards to stay together... mostly... (Picture 2)

We let them dry a few days... Then I grabbed a pencil and ruler and found center and measured every few inches from center to give me some guides for layout. Then I roughed in the shape of the blade I wanted. Then we went to the monster band saw and cut out one side. Once it was cut I traced the shape onto cardboard and transferred it to the opposite side. Picture three shows it fresh out of the band saw.

The last pic is of my Dad fixing where I laid out the contour line for the blade. He helped me not make too many mistakes (Picture 4)
 

Attachments

  • Picture0.jpg
    Picture0.jpg
    155.1 KB · Views: 104
  • Picture1.jpg
    Picture1.jpg
    147.9 KB · Views: 119
  • Picture2.jpg
    Picture2.jpg
    104.5 KB · Views: 118
  • Picture3.jpg
    Picture3.jpg
    114.1 KB · Views: 143
Last edited:
OP
T

Thirdyfivepickup

Well-known member
Joined
Nov 15, 2016
Messages
1,940
Location
Portage, Indiana
From there I grabbed my 3" Black and Decker belt sander and went to town sanding and shaping the blade. It was tough work with that sander so my Dad busted out his 4" Porter Cable sander. WOW what a difference!!! Shape started coming pretty quickly. (Picture 1)

Remember in the last post I mentioned not making too many mistakes? Well in my haste I realized I had transferred the pattern wrong to the opposite blade... instead of spinning the prop 180* and transferring it I just flipped it as a mirror image. ****. I noticed it when I stood it up and backed away from it. (Picture 2) So I spent a week thinking on it (mostly because I had to go home) I continued to shape the prop at my house in the cold (up hill both ways in the snow without boots) and never could shake the tips being wrong. So I went back to Dad's and we cut the tips correctly. We lost some length but I think it still looks pretty proportional. (Picture 3)

Then there was more sanding and more sanding and a little more sanding until it got closer to the shape I wanted. I talked with my friend and she was anxious just to get the thing and display it in her son's room. So I decided that even though the tapered area right at the center are not to my liking I'm going to call it goodish. So now I am on to finishing it up. The plan is to put a center plate roughly 1" diameter dead center in it and surround it with 1/4" bolts. Good thing I sanded away all of the measurements and center point...

We remeasured and determined roughly where center was. It's probably really really close. Then we had to figure out how to get the 8 bolt holes laid out so they looked symmetrical. As we pondered it my Dad noticed the palm sander with the round pad on it which held a piece of sandpaper with 8 holes... all symetrical like. So we traced it. (Picture 4) So that is where we are with it now.

This weekend I will be back there to try and shape around the center a little better. Then drill for the screws and center piece then finish sand and stain and clear the hell out of it. I'll post more pictures shortly.
 

Attachments

  • Picture8.jpg
    Picture8.jpg
    42.7 KB · Views: 122
  • Picture6.jpg
    Picture6.jpg
    112.5 KB · Views: 148
  • picture5.jpg
    picture5.jpg
    158.6 KB · Views: 123
  • Picture4.jpg
    Picture4.jpg
    151.9 KB · Views: 120
Last edited:

Jayman17

Well-known member
Joined
Feb 6, 2017
Messages
3,793
Location
Seattle, Wa
I gotta say that is going to be pretty cool. I might have to try that myself. Thanks for posting your project, keep the updates coming!
Oh and the next best thing to owning a ton of clamps is having a dad that owns a ton of clamps. :bounce:

Jay
 
OP
T

Thirdyfivepickup

Well-known member
Joined
Nov 15, 2016
Messages
1,940
Location
Portage, Indiana
I gotta say that is going to be pretty cool. I might have to try that myself. Thanks for posting your project, keep the updates coming!
Oh and the next best thing to owning a ton of clamps is having a dad that owns a ton of clamps. :bounce:

Jay

I read somewhere "you can never have too many clamps" Now I see why. I'm on the hunt for some because I have some more projects planned with gluing involved.

I'm really enjoying this project... partially because of what I'm learning but mostly because I am working side by side with my Dad.
 

Mr.N

Well-known member
Joined
Jul 13, 2005
Messages
2,221
Location
Mpls, MN
From there I grabbed my 3" Black and Decker belt sander and went to town sanding and shaping the blade. It was tough work with that sander so my Dad busted out his 4" Porter Cable sander. WOW what a difference!!! Shape started coming pretty quickly.
That is awesome, thanks for the story and accompanying pictures!
 
OP
T

Thirdyfivepickup

Well-known member
Joined
Nov 15, 2016
Messages
1,940
Location
Portage, Indiana
Ok we have more progress. Happily (and sadly) I am nearing the finish line. Spend a couple of hours with Dad in the garage yesterday. Did some final sanding and we picked a color to stain it (with the help of 'The Client') I don't have any action shots of me staining it as how interesting would it be watching a fat guy holding a sock? But picture 1 shows the first coat of stain. She really liked the color. Felt it was "bright and natural." If you recall I sandwiched red oak between two sheets of Aspen... when it was natural it was really obvious... once stained the two are harder to distinguish unless you are up close. The tips (pic2) and bottom (pic 3) show the two grains on the face. Pic 3 also shows where the glue didn't grab too well (due to not clamping initially) Picture 4 shows the same. Hopefully the clear will help level things. I'm pretty happy with the grain on the Aspen. (pic5)
 

Attachments

  • Pic1.jpg
    Pic1.jpg
    94.4 KB · Views: 87
  • Pic2.jpg
    Pic2.jpg
    97.4 KB · Views: 71
  • Pic3.jpg
    Pic3.jpg
    76.7 KB · Views: 71
  • Pic4.jpg
    Pic4.jpg
    61.9 KB · Views: 70
  • Pic5.jpg
    Pic5.jpg
    99.9 KB · Views: 72
Last edited:
To avoid these ads, REGISTER NOW!
OP
T

Thirdyfivepickup

Well-known member
Joined
Nov 15, 2016
Messages
1,940
Location
Portage, Indiana
So to clear it we wanted to be able to put it on both sides at the same time to speed things up. So my Dad, being the mechanical genius he is, rigged up this gem. (Pic 1) Hey, it worked! Picture 2 shows the profile of it, I kinda dig the darker in the middle. Like a reverse Oreo. Then we cleared. Apparently I wasn't doing it right so Papa Tom grabbed the brush and slathered it on and we were done for the day. I think its gonna look pretty good. Client is excited to finally get it as we started talking about this in November and I had hoped to get it to her on Valentine's Day...

Hey, you can't rush mediocrity.
 

Attachments

  • Pic5.jpg
    Pic5.jpg
    92 KB · Views: 65
  • Pic4.jpg
    Pic4.jpg
    99.7 KB · Views: 68
  • Pic3.jpg
    Pic3.jpg
    95.3 KB · Views: 68
  • Pic2.jpg
    Pic2.jpg
    78.3 KB · Views: 69
  • Pic1.jpg
    Pic1.jpg
    133.3 KB · Views: 83
OP
T

Thirdyfivepickup

Well-known member
Joined
Nov 15, 2016
Messages
1,940
Location
Portage, Indiana
The finish line (sadly) is coming near. I've really enjoyed playing around with this... mostly I've enjoyed working with my Dad. He always has the answer and isn't afraid of letting me make a mistake to learn from it. I was there last weekend and we added more clear and really that's it. A light sanding between coats. Pic 1 shows a nice long shot of the gloss and grain of the wood. Pic 2 shows that even with being careful the clear didn't level out perfectly like I would have liked. Dad thinks its due to the garage being around 65*. He said he should have turned it up to 70... I came back yesterday and laid out the stripes for the tip. It's only on the front side because I promised this to the client on Valentine's Day and.... I'm a little late. Pic 4 shows the layout of the stripes. Pic 5 is the tip painted grey which is the accent wall color of the room. The small stripe is blue which is the color of the wall the prop will be mounted too. Now If I can only figure out how to remove the tape without peeling up the paint. (Its painted with the same interior paint as the walls)
 

Attachments

  • pic4.jpg
    pic4.jpg
    106.8 KB · Views: 60
  • pic5.jpg
    pic5.jpg
    87.7 KB · Views: 57
  • pic6.jpg
    pic6.jpg
    73.9 KB · Views: 60
  • Pic1.jpg
    Pic1.jpg
    152.8 KB · Views: 54
  • pic2.jpg
    pic2.jpg
    152.1 KB · Views: 51

Jayman17

Well-known member
Joined
Feb 6, 2017
Messages
3,793
Location
Seattle, Wa
That’s pretty cruel to post pics right up to the point of removing the tape, then making us wait for another update! :lol_hitti

Jay
 
OP
T

Thirdyfivepickup

Well-known member
Joined
Nov 15, 2016
Messages
1,940
Location
Portage, Indiana
That’s pretty cruel to post pics right up to the point of removing the tape, then making us wait for another update! :lol_hitti

Jay

I wanted it to dry fully before pulling the tape and risk ruining it. This entire process has been a logistic struggle. I drive 30 minutes to get to my Dad's place. This was a quick tape and paint and go as I was under a severe time crunch on this visit. I'll have the tape off and the hardware installed this weekend... I'll finish the saga then... complete with installation and pictures of the recipient. If you're lucky a pic of his mom too.
 
OP
T

Thirdyfivepickup

Well-known member
Joined
Nov 15, 2016
Messages
1,940
Location
Portage, Indiana
ok I pulled the tape and thankfully the lines are fine. No bleed no pull up. No further progress since the hardware is at my Dad's and the prop is now at my house...
 

Attachments

  • IMG_0924.jpg
    IMG_0924.jpg
    70.7 KB · Views: 59
  • IMG_0930.jpg
    IMG_0930.jpg
    126.3 KB · Views: 56
OP
T

Thirdyfivepickup

Well-known member
Joined
Nov 15, 2016
Messages
1,940
Location
Portage, Indiana
ok due to overwhelming support on here I thought I would give another update... *crickets*

I was over by my Dad's on an unrelated matter and threaded the hardware in for a quick photo op. I have since put the hardware in and glued it up. Other than one hanger its ready to be put on the wall. There will be more pictures once it goes up this weekend
 

Attachments

  • IMG_0967 (1).jpg
    IMG_0967 (1).jpg
    109 KB · Views: 76

Onator

Well-known member
Joined
Dec 20, 2020
Messages
66
Location
Twin Cities
OK so first off - Super cool Mom to have something like this made for son. He may not know how cool that is until he's older, but surface cool for now suffices. Equally cool you agreed to make it and then added points for a project with your Dad! How fun!!
 
OP
T

Thirdyfivepickup

Well-known member
Joined
Nov 15, 2016
Messages
1,940
Location
Portage, Indiana
OK so first off - Super cool Mom to have something like this made for son. He may not know how cool that is until he's older, but surface cool for now suffices. Equally cool you agreed to make it and then added points for a project with your Dad! How fun!!

All the above...

Mom is a rockstar. She is absolutely one of my most favorite people in the world. Both of her sons are great kids so I'm sure they will appreciate it.

I was excited to try this and looking forward to working with my Dad. We had a lot of fun doing it. I really would like to tackle one for myself and build upon what I know and learned to make something a little more realistic.
 

Monza Harry

Well-known member
Joined
Dec 29, 2018
Messages
1,433
Location
Windsor ON
That's +ve Charma to the 2nd power [squared] at least! Bonus on all of the other as well [working with Dad, learning/growing, making Mom the superstar etc.] That turned out pretty stellar for how unsure I remember you being at the beginning of the thread. Life is smiling on you right now use it to your advantage! Congratulations on the multi-faceted Project! Harry
 
OP
T

Thirdyfivepickup

Well-known member
Joined
Nov 15, 2016
Messages
1,940
Location
Portage, Indiana
Ok it's all done. We hung it on Sunday around noon. Mom was happy with it which I was worried about to be honest. It took soooo long for me to get it to her. More importantly her son Colton loved it. I made a couple of other things for him and he enjoyed those too. Thanks for watching and playing along. If I ever decide to make that pizza peel I'll be sure to share. lol

The Tesla sign was a big hit. It was my first attempt to make something light up. It looks neat and impressed him but I really wanted the light to be brighter coming from it. I'll use LED strips for my next one.

The Colton sign with the airplane was a design she sent me. The original had the plane flying over trees which I changed to the Chicago skyline. I delivered it primered white as she didn't know what color to do it in. She painted it and did a great job. :)
 

Attachments

  • IMG_1118.jpg
    IMG_1118.jpg
    72.2 KB · Views: 37
  • IMG_1125.jpg
    IMG_1125.jpg
    17.3 KB · Views: 11
  • IMG_1126.jpg
    IMG_1126.jpg
    16.9 KB · Views: 11
  • IMG_0893.jpg
    IMG_0893.jpg
    62.7 KB · Views: 36
  • IMG_0870.jpg
    IMG_0870.jpg
    38.4 KB · Views: 34
  • 166256454_10159648438557189_7600256216224905726_n.jpg
    166256454_10159648438557189_7600256216224905726_n.jpg
    25.6 KB · Views: 34
OP
T

Thirdyfivepickup

Well-known member
Joined
Nov 15, 2016
Messages
1,940
Location
Portage, Indiana
oh.... and this was his expression from the video his mom took when he came home. He saw the Tesla sign and said "I have to go call Elon!!" He was stuck like this for at least 6 seconds...
 

Attachments

  • IMG_1136.jpg
    IMG_1136.jpg
    42.5 KB · Views: 25
Last edited:
To avoid these ads, REGISTER NOW!
Top Bottom