To avoid these ads, REGISTER NOW!

Needs more fab table....

racingtadpole

Well-known member
Joined
Dec 3, 2011
Messages
2,029
Location
The far side of crazy.. but sometimes Australia
SO.. because there can never be enough variations on the general theme, here is my take on the humble fabrication surface (and a few random life events of absolutely no relevance as some stocking filler)..

Episode 1: THE BACKSTORY

I'm not in the habit of generally posting projects and stuff, mainly because I figure they are largely of no interest to anyone other than myself, however in this instance, my other half suggested I should start a thread on the build after hours while I'm away working, in the thinly veiled guise it might keep me away from the Gumtree and evilBay because frankly, a decent drug habit would probably be cheaper based upon recent spending.. :lol:

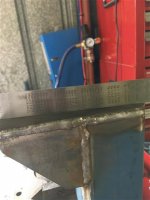
So for the last, I don't know how long, I've been working on a sheet steel top I recovered after a job at my last employer. I decided recently, well maybe a year or so ago (you'll understand why I cant remember exactly when I had this epiphany shortly), it was time to play with the big boys, a 450 x 600 sheet of 6mm plate stitched to a C section frame on a couple of Unistrut cantilever brackets off the wall of the shed just wasn't really what I wanted.

I had been procrastinating somewhat on this particular project because I was looking at options like Certi-flat and doing a cover of some of the other variations on the theme I'd seen here (some very good ideas here by the way). Mostly though, I was just being lazy.. Being charged with a bunch of violent crimes I didn't commit didn't help either, but that's a whole different story.. Anywho, I was talking to one of the mechanics I work with a couple of months ago, who put me on to an auction. And so it was that in the catalogue for that auction shone a two lots, big and bright, guiding me forward...

Hangover notwithstanding, I went to the auction.. Holy ****, what a task that was. Now for the uninitiated, I am the kind of filth that your mother warned you about who works gas and oil for a crust. A condition of my employment is no alcohol.. So as a result, after 15 days in the desert making like a camel, I sometimes find myself, um, a little worse for wear on my first morning home. Auction morning was just such a day, except it was also 45C outside and the auction was in a tin shed with no air conditioning.. and the two lots I went for were about a third of the way through. Somewhere in there I bought a lot of enormous clamps to relieve the boredom (after SWMBO threatened me with death if I procured one of the CNC machines they had on offer) we finally got to the moment of truth.. Money where your mouth is son.. well obviously Bullwinkle we got what we went for or I wouldn't be waxing lyrical at this point and subjecting you to my maniacal ravings :lol:
So having procured what I went for, getting them home proved to be another whole world of amusement for the casual onlooker, but we'll be here forever if I go into that, and besides, I'm pretty certain that you've all clicked the back button by now..

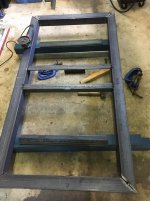
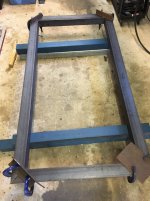
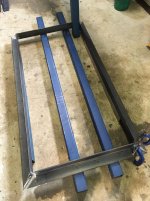
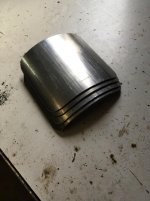
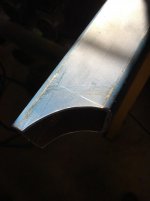
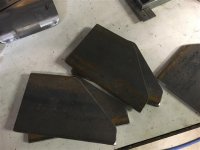
So now that I've teased all and sundry with the tale of the actual reason why you are reading this in the first place.. pictures... sure.. the four big clamps I bought are on the left at the end hanging on the roof truss...:evil:

To be continued...
 

Attachments

  • IMG_0162.jpg
    IMG_0162.jpg
    142.9 KB · Views: 389
To avoid these ads, REGISTER NOW!
OP
R

racingtadpole

Well-known member
Joined
Dec 3, 2011
Messages
2,029
Location
The far side of crazy.. but sometimes Australia
Episode 2…. Size doesn’t matter!!

So having survived the auction experience I had some design work to do.. Actually I had some procrastinating to do because it took me a not inconsiderable time to get off my **** and measure the parts procured.

I’ll spare you the details of my trip to the scrap yard with the idea of building it all from recycled or discarded, there was no f##king way I was paying $2400/tonne (current buy price for a scrap merchant is $70/tonne).
So after I got out of ED having been treated for the shock of what the new material was about to cost me, I went and bought it (at less than $2400/tonne BTW).
I settled on the following for material:
Legs 75x75x5 SHS 3@2000
Leg braces 50x50x5 SHS 4@2000
Top frame outside 75x75x8 Angle 3@ 2000
Top frame inside supports 50x50x8 Angle 2@2000
I ended up calling in a favour from a mate and used his trading account to get the steel because $450 somehow seemed a little more palatable to me than the retail quote I got.:headscratch:
Material list says its going to be a solid table, assuming of course I do my bit right :lol:

So before we get started here, it’s not very often you will hear me espouse ‘its not what you got, its how you use it’, come on boys, we all know that any woman that utters those words is lying :lol: In this case nonetheless, its true.. I generally don’t work with anything past 16G wall, 3mm is a rarity, and if I am messing with 5mm then the zombie apocalypse is upon us! SO, really what I’m saying here is I have no business messing with the material I finally settled on, mostly because my machines are not geared toward that type of work. Long story short, I’m asking the machinery to punch above its weight..
I wheeled the little bandsaw that could out the corner, and got to work..
Now a little note on the little bandsaw that could. Yes it’s a little chinesium unit hailing from the 1980’s, but it’s a Porsche, so its gotta be good right? I know a few of you here don’t like these things, but it has served me well for the five odd years its been mine (Im its second owner, its first was a retired machinist that allegedly worked for Rolls Royce, yeah I didn’t buy it either :lol:). My take on these machines is they are capable of good work if you take the time to set them up properly, just like any machine.

Some creative clamping and a cringy improvised in-feed setup and get to it. For those who are wondering, the coolant dispenser on the little bandsaw that could is being used to cool the blade with low pressure compressed air.
Oh and no project is complete without the mandatory bloodletting to the fabrication dog.. FML that one actually hurt somewhat..
Anywho, enough of my ramblings, pictures or it didn’t happen..

To be continued....

once I get off evilbay :evil:
 
To avoid these ads, REGISTER NOW!
OP
R

racingtadpole

Well-known member
Joined
Dec 3, 2011
Messages
2,029
Location
The far side of crazy.. but sometimes Australia
Episode 2 continued THE PICTURES...

I have beaten the carrier pigeons into submission and hopefully resolved last nights picture issues...

SO.. here is your happy ending :lol:
 

Attachments

  • Raw Material.jpg
    Raw Material.jpg
    141.7 KB · Views: 79
  • little bandsaw 1.jpg
    little bandsaw 1.jpg
    109.2 KB · Views: 80
  • Cut angle.jpg
    Cut angle.jpg
    100.2 KB · Views: 78
  • offering to fab dog.jpg
    offering to fab dog.jpg
    74.1 KB · Views: 84
  • Start of top frame.jpg
    Start of top frame.jpg
    83.7 KB · Views: 58

Thumper68

Well-known member
Joined
May 16, 2013
Messages
5,134
Location
Duluth MN
This is almost as difficult a wait as project Binky.

Nice job so far now get it in motion and lets see the result of some sparks.
 
OP
R

racingtadpole

Well-known member
Joined
Dec 3, 2011
Messages
2,029
Location
The far side of crazy.. but sometimes Australia
Episode 3... Can't Brain, not even...

No maniacal lunatic attempt at wordsmithing this evening.. can't brain... spent the day trying to get a prehistoric power turbine control system working... Instro's don't understand discrete electronics, cue the monkey that does..

Time to drop em and give a little.. :lol:
Few more pics of the frame for the top taking shape

The picture of the turbine wasn't taken today, didn't have time for such things.. For those who are interested it has around 6800HP at the output shaft.

If you've read this far, thanks for taking an interest :)
 

Attachments

  • power turbine.jpg
    power turbine.jpg
    150.8 KB · Views: 68
  • Top frame 5.jpg
    Top frame 5.jpg
    119.2 KB · Views: 46
  • Top frame 4.jpg
    Top frame 4.jpg
    106.7 KB · Views: 41
  • Top frame 3.jpg
    Top frame 3.jpg
    141.7 KB · Views: 41
  • Top frame 2.jpg
    Top frame 2.jpg
    109.8 KB · Views: 41
  • Top frame 1.jpg
    Top frame 1.jpg
    114.1 KB · Views: 41
OP
R

racingtadpole

Well-known member
Joined
Dec 3, 2011
Messages
2,029
Location
The far side of crazy.. but sometimes Australia
Episode 4: What do mudguards and hockey pucks have in common?

So where are we? That’s right, SWMBO’s theory that this would keep me off eBay is totally flawed.. I go pick up the slip roll that I bought from the other end of the continent tomorrow :lol:

Kind of need to take half a step back, and explain that I hate grinding, with the sort of passion that I generally reserve for the days I’m non compus after getting off roster and finding my way into the wine rack a little too quickly.. Its noisy, dirty, smelly and dusty. Material removal by conversion to red hot dust is just a **** way of doing things if you ask me, its never struck me as being particularly efficient. That said, I spent a ridiculous amount of time vee-ing out the anywhere that had to be welded on the frame in the interest of giving the welder a sporting chance, in doing so, I killed my 4” Metabo by dropping a length of angle on it and severing the electrical cord (which, just quietly, woke me up somewhat, because it was plugged in at the time). So with the frame largely tacked together I turned my attention to the question at hand..

Well…. generally not much really, unless you are like me, and create more problems than you solve by trying to achieve things that probably dont need to be achieved.. I think what I did here was solve a problem that probably didn’t need to be solved because, its most likely not even going to be an issue :lol: But you, know he who dies with the coolest fab surface and all that..
On that note, I decided mine needed mudguards. WTF? I hear you say.. Well yes, I put mudguards that overhang the width of the leg to keep the sparks and stuff off the castor when its parked. I had decided to recess the castors because there was more cantilever than I was happy with by not doing so and the gusseting looked uber stoopid when mocked in cardboard (no matter which of the four variations on the topic I looked at). Besides, I dislike seeing open ended tube because it just looks unfinished, we have mudguards :lol: All terrain, GRR!!

The hockey pucks are kind of loosely related here, as we have need to make the thing less on the piss than I am sometimes found to be, and I figure something that is likely to weigh in at around 5-600kg when done needs, well, big feet under it. Some time ago, we had a sizable valve replacement job at work, and we had a lot of studs that were binned as a result. S.O.P is that these only ever get used once, no exceptions (a 550mm gas pipe letting go at somewhere around 7000kPa generally creates the kind of press that is best avoided :lol: ). So I rounded up a couple of buckets worth of them before they were binned (guaranteed this wont be the last time you see these). Mmmm, bright shiny things..

The studs are 1” UNC, 8” long, so I get around 150-160mm of adjustment on the legs (I set the base height of the surface at about 840mm nominal, so it can be adjusted to around a maximum of 1m). I had a local CNC company make up a stack of steel discs for me for what can only be described as not even worth my time considering making them for what they charged.. You’ll get the idea of how it all goes together from the picture of the mock up..

Anywho.. enough diatribe, on to the pictures..
 

Attachments

  • Jack bolt mock up.jpg
    Jack bolt mock up.jpg
    79.1 KB · Views: 38
  • mudguard mock up 2.jpg
    mudguard mock up 2.jpg
    96 KB · Views: 42
  • Mudguard mock up.jpg
    Mudguard mock up.jpg
    77 KB · Views: 32
  • mudguards attempt at art 2.jpg
    mudguards attempt at art 2.jpg
    88.1 KB · Views: 33
  • attempt at artsy picture.jpg
    attempt at artsy picture.jpg
    51.9 KB · Views: 30
  • Castor mark up.jpg
    Castor mark up.jpg
    105.6 KB · Views: 35
OP
R

racingtadpole

Well-known member
Joined
Dec 3, 2011
Messages
2,029
Location
The far side of crazy.. but sometimes Australia
Episode 5 Less talking more pictures..

Basic design is six legs, four with castors, two without.

First couple of pictures are a non castor leg, nothing overly exciting. The welding looks a bit ****, because.. we have discovered the annoying thing called duty cycle (and I need to put more effort into wrapping corners). Although pretty happy with the distortion, or more importantly, lack thereof.

For those that are interested, if you get rid of the moving vice jaw on your import bandsaw in favour of a set of finger clamps for a mill, you can do so much more with it, and an added bonus is that the work tends to stay flatter against the back, giving a more accurate cut.

Having set the little bandsaw that could to work again, we had the makings of the the castor platforms.

To be continued...
 

Attachments

  • Mobile leg.JPG
    Mobile leg.JPG
    65 KB · Views: 34
  • Castor Plate.JPG
    Castor Plate.JPG
    29.5 KB · Views: 27
  • Castor Plate clamped.JPG
    Castor Plate clamped.JPG
    56.8 KB · Views: 29
  • Castor Plate Gussets.JPG
    Castor Plate Gussets.JPG
    37.9 KB · Views: 28
  • Centre Leg Distortion.JPG
    Centre Leg Distortion.JPG
    27.1 KB · Views: 32
  • Centre leg.JPG
    Centre leg.JPG
    23.4 KB · Views: 29
  • Little Bandsaw that could.JPG
    Little Bandsaw that could.JPG
    37.9 KB · Views: 37
To avoid these ads, REGISTER NOW!
Top Bottom