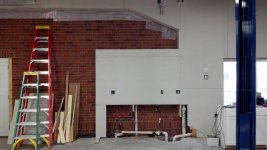
The space is pretty tight above the lifts (about 4 inches). The lifts are about 2 inches short of 12' and the studs are on top of some concrete blocks that sit about 2 inches above the slab. I purchased the lifts first, and then planned the ceiling space around them. My lifts have sliding tops (control plates) that would allow me to adjust them downwards in 6 inch increments, but that would reduce the overall car lift height.

You are using an out of date browser. It may not display this or other websites correctly.
You should upgrade or use an alternative browser.
You should upgrade or use an alternative browser.
New attached 40x60 colonial garage
- Thread starter davesly
- Start date
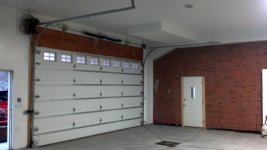
The Drywall is done! You can see how I hoisted up the sheets with a drywall lift set to 12' high. The hardest part was lifting the 5/8" sheets from the floor to the lift. Now on to tape, plaster and paint. The lifts were a bit close to the ceiling after installing the drywall (like 1.5 inches).
Attachments


Last edited:
colt zantop
Well-known member
that is an aweomse build so far! nice collection of cars also.
Are you going to have any "exposed" brick for the interior? that would be really nice!
Are you going to have any "exposed" brick for the interior? that would be really nice!
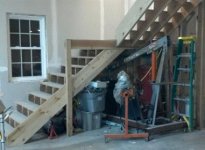
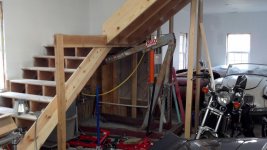
Here are several close-up pictures of how the stairs are attached. You can see that I have a landing that is supported by a cross-beam. Then the stairs attach to this landing and either go to the floor or are nailed to a floor joist in the ceiling. I'll be building a storage room under these stairs, to hide the in-floor heating system, furnace, engine stands and engine crane. I pushed out the support for the landing so that I could get the wide feet of the engine crane under the stairs.
As a side note, notice how close he corner of the window is to the stair step. This actually took a LOT of pre-planning on the stair size, and platform size, as the window position and size was already set.
As a side note, notice how close he corner of the window is to the stair step. This actually took a LOT of pre-planning on the stair size, and platform size, as the window position and size was already set.
Attachments


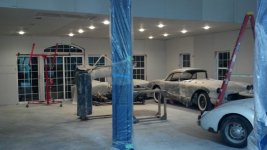
The drywall is now all up. I've decided to hire out the taping and plaster work. The worst part, is that I had to move most of my stuff out of the garage, which means that most of the cars must now sit outside in the Iowa winter for a week or two (luckily it has been very mild so far).
I filled my two-car garage with tools and motorcycles, as well as the kitchen cabinets and lights that I removed from the GarageMahal.
You might notice in one of the pictures that my Epoxy-Coat buckets have arrived. I plan to coat the floor after painting the ceiling and walls, and before moving my tools and cars back in.
Attachments


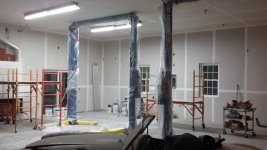
I finally finished the painting. I ended up spraying it and it took most of the weekend (including prep, painting, cleanup, etc.) Now I am starting on preparing the floor for the epoxy (Epoxy-Coat). I completed the etching and cleaning last night.
Attachments


Floor Coating
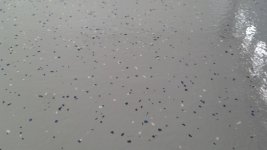
I just finished installing Epoxy-Coat on the Floor. I used the light gray with the Black-Blue-White chips and then a clear top coat. I did it myself, but I would not recommend that, as I was not able to apply it fast enough before it started to dry and get tacky. As a result, I have some spots where it isn't as smooth as other spots (i.e. the material did not flow out well after I ran the roller across it. Overall, I'm very happy with how it all turned out. Of course, I'll notice the imperfections, but the response I received from others has been great!
You'll notice that I filled the expansion joints before applying the epoxy. I used screen spline in the cracks, and then I put Latex caulking in to get a fairly smooth crack dimple. I'm really happy with this approach and highly recommend it (looks great, and easy to clean).
I've put more details and pics in the flooring section of this site.
Attachments


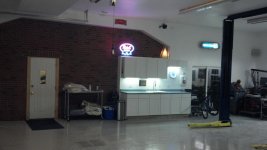
I finally finished the Kitchenette. I mounted the parts washer in the right-side sink cabinet, and the power washer (AR 630 unit) in the left side normal cabinet (with the upper two drawers). I also wired the neon lights into the under-cabinet light switch. I'm really happy with how it came out.
The parts washer fit in the sink cabinet very well, although I had to remove 5.25 inches from the legs.
In addition, I had to re-enforce the bottoms of the cabinets with the parts washer and pressure washer.
The parts washer fit in the sink cabinet very well, although I had to remove 5.25 inches from the legs.
In addition, I had to re-enforce the bottoms of the cabinets with the parts washer and pressure washer.
Attachments


My new closet
I finally finished the closet under the stairs. In addition to housing my engine crane and stands, it also includes the furnace and in-floor boiler.
I finally finished the closet under the stairs. In addition to housing my engine crane and stands, it also includes the furnace and in-floor boiler.
Attachments

completed pictures
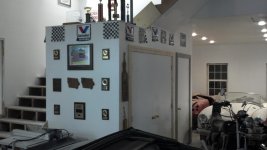
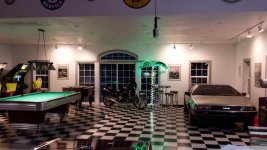
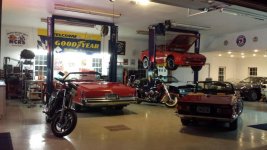
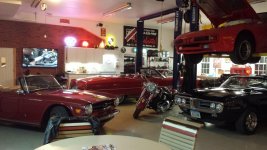
I finally finished hanging all of my pictures (good times). These pics were taken at night, with the main lights off, and only the workbench lights, display lights and beer lights on. I'll get some shots of the garage during the day as well.
I finally finished hanging all of my pictures (good times). These pics were taken at night, with the main lights off, and only the workbench lights, display lights and beer lights on. I'll get some shots of the garage during the day as well.
Attachments


Haven't touched the upstairs yet (except to install the plumbing to the upstairs bathroom). Plan to start the upstairs project next winter. It is getting nice outside now, so I'm shifting my efforts to landscaping around the garage and enjoying the motorcycle and convertibles. Frankly, I need a break from woodwork - time to get back to fixing all those oil leaks that developed over the past 24 months when I was working on the garage!
Homerr
Well-known member
Your shop is looking very sharp, love the mix of cars too!
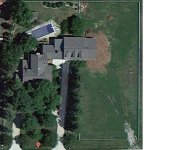
I just got the new satellite image of the site with the garage.
http://www.garagejournal.com/forum/attachment.php?attachmentid=217977&d=1351954246
http://www.garagejournal.com/forum/attachment.php?attachmentid=217977&d=1351954246
Attachments
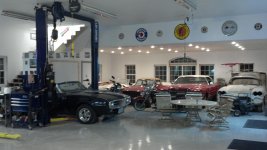
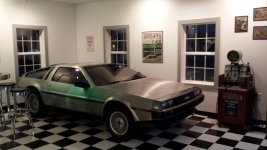
I have finally finished installing the tile in the gameroom/showroom. I have also updated some of the main areas of the garage that I had finished a few years ago.
Attachments

machsnell
Well-known member
wow that looks amazing. I love the layout. How has your floor held up? The epoxy portion?
IronWolfe11
New member
This place is AMAZING....oh yeah, did you know you have a GD DeLorean in your game room??? That is sweet as ****. I hope someday to have a garage/man cave as bad assed as yours. lol
Machnsell, I used EpoxyCoat brand epoxy on the main floor with a gray base that was followed by a clear coat. The color has browned out nearly all over the floor (I have a lot of light). I knew this was going to happen, and it doesn't look terrible (no one has said anything about it).
Otherwise, the floor has held up very well to a lot of use. There is no peeling anywhere and everything (except some old rusty gas that dripped on it) has cleaned up perfectly.
Overall, I'm very happy with the epoxy floor portion after 3 years of heavy use.
Otherwise, the floor has held up very well to a lot of use. There is no peeling anywhere and everything (except some old rusty gas that dripped on it) has cleaned up perfectly.
Overall, I'm very happy with the epoxy floor portion after 3 years of heavy use.
Your garage turned out great; I enjoyed reading through the progress. Quick question: I saw in one of the early pictures that you had a sandblaster. Looked like you put wheels on it? Do you have any closer pics? I just bought a sandlblaster that looks similar to yours and was thinking of putting it on wheels as well.
oh, didn't realize that.
I just bought a similar sandblaster and thought if I put wheels on the rear I could store it out of the way and move it when I need it since it is not a frequently used tool.
when I get around to adding the wheels I'll post something up on here.
I just bought a similar sandblaster and thought if I put wheels on the rear I could store it out of the way and move it when I need it since it is not a frequently used tool.
when I get around to adding the wheels I'll post something up on here.