To avoid these ads, REGISTER NOW!

New compressor base...

burgie

Well-known member
Joined
Mar 26, 2007
Messages
239
Location
Falcon, Colorado
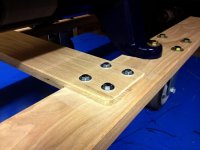
As I get ready for the "Franzinator" and "Camby Cooler" installation I figured I'd better beef up the base of the compressor. So today I processed some 8/4, 6/4 and 4/4 red oak that I have had in my basement.

This oak actually came from back home in Massachusetts. Years ago we cut a dump trailer of beautiful old growth red and white oak, maple, ash and cherry and brought it up to my dad's field. A friend with a Timber Harvester bandsaw mill cut up all the logs into various size boards. They have been dry for years and I still have a nice pile in the basement.

I have the pieces sized and cut and will be putting it together tomorrow. I'll post some pics tomorrow!!!
 

Attachments

  • wood.jpg
    wood.jpg
    136.6 KB · Views: 34
To avoid these ads, REGISTER NOW!
OP
B

burgie

Well-known member
Joined
Mar 26, 2007
Messages
239
Location
Falcon, Colorado
Work completed this weekend on the new base and the water separator. The extended base rails will be to accommodate the water separator...

Will be doing a mock up next weekend...
 

Attachments

  • Base_01.jpg
    Base_01.jpg
    138.8 KB · Views: 43
  • Base_02.jpg
    Base_02.jpg
    140.6 KB · Views: 38
  • Base_03.jpg
    Base_03.jpg
    144.1 KB · Views: 45
  • Separator_04.jpg
    Separator_04.jpg
    146.9 KB · Views: 41
  • Separator_03.jpg
    Separator_03.jpg
    145 KB · Views: 40
  • Separator_02.jpg
    Separator_02.jpg
    145.7 KB · Views: 40
  • Separator_01.jpg
    Separator_01.jpg
    145.9 KB · Views: 54

WhoWhatNow

Well-known member
Joined
Feb 22, 2011
Messages
1,889
Location
Collegeville, PA
Very nice. That wood is beautiful.

Where did you get those fittings for the Frazanator? I want to build one but haven't been able to find fittings. Could you give some more details please.
 
OP
B

burgie

Well-known member
Joined
Mar 26, 2007
Messages
239
Location
Falcon, Colorado
My company was removing a piping system and I got the 2" pipe from there and that included the "T". The two 2" - 3/4" reducers I bought at a local plumbing store. The box stores do not carry the larger diameter items...

They were in stock and inexpensive...
 
To avoid these ads, REGISTER NOW!

WhoWhatNow

Well-known member
Joined
Feb 22, 2011
Messages
1,889
Location
Collegeville, PA
Cool. I'll have to visit a local plumbing store.

As I understand it the 3/4' inlet tube extends into the 2' pipe T correct? How do you do that without welding the 3/4 pipe into the T?

Thanks for the info.
 
OP
B

burgie

Well-known member
Joined
Mar 26, 2007
Messages
239
Location
Falcon, Colorado
I cannot take credit for the design...here is the person who used copper for the transition plumbing. He used what looks like a copper "anti-hammer" tube to, as he says, meter the air. I soldered the assembly and terminated it with an elbow. That way I was able to assemble everything on the bench and then thread it together...ensuring the airflow (elbow) was pointed down. I did do a couple trial fits to ensure the elbow opening was centered properly

Here are a couple pics showing the assembly. Now...not sure if this contraption will even work but everyone seems to thing this is the greatest thing since slided bread for water removal.

The output air from the high pressure cylinder will go into this and the output at the top of this will will go into the "Camby Cooler" system as I have called it)...and then into the tank.

Sans the science...it is a pretty simple concept: compressing air heats it and retains water/expanding air refrigerates it and loses water.

I shall see...
 

Attachments

  • water separator_01.jpg
    water separator_01.jpg
    144.5 KB · Views: 30
  • water separator_02.jpg
    water separator_02.jpg
    142.9 KB · Views: 35

WhoWhatNow

Well-known member
Joined
Feb 22, 2011
Messages
1,889
Location
Collegeville, PA
I think I get it. You go from 3/4" copper to 1/2" using a reducer then solder the male coupling over the reducer to get a 1/2" pipe inside of the 3/4'" threaded coupler? Sorry, I'm a little slow this morning. And I hate plumbing.

You did a really nice job with the soldering.

Thanks for the additional details. Can't wait to hear how it works for you.
 
To avoid these ads, REGISTER NOW!
Top Bottom