Powernerd42
New member
Greetings,
I hope you enjoy my ramblings related to the last 18 months of construction for my 16' x 20' workshop/shed. How and why did I build a three-story workshop, you ask? Well, it started innocently enough and logical, cost-conscious decisions have led me to this monstrous beauty. Initially I was considering either installing a pad (backfill given the steep slope) or install at least six 10' deep x 24" dia. piers (sonotubes) with a retaining wall to create a semi-protected lower space for storage (canoe, snowblower, yard implements, etc; this is why the front piers had to be 10' tall given the height of the hill as the bases would be exposed to air and thus had to be below the frost line at the back of the structure, all required by code and confirmed by the town during permitting). The cost of materials and machines/labor to back fill tipped me into renting a backhoe and doing the excavation myself. I then priced out raw materials for the piers and retaining wall (estimated about 30'-40' perimeter, 6'+ high) and it ended up being more expensive than concrete ultimately (not to mention my own time spent on labor...). I actually wasn't going to request quotes for pouring a concrete foundation, until I saw the total cost of raw materials and thought about the labor investment required (more my wife providing unrequested input... love you honey!). The concrete outfit I ended up working with cost about $1500 less than the raw materials after I let them do it at their own pace (took a couple of months, I wasn't in a rush) and they staged some framing materials for another nearby job in my yard. Hence, I ended up with a workshop with an 8' basement and a solid foundation basically fit for a house (this is not a house or a garage, to be clear, it is an over-engineered shed/workshop and will remain as such, per code and my initial building permit).
Briefly, there are a few areas where I would love input, and I go into more detail below:
- Insulation
- Power (considering an "off grid" solar system and batteries)
- Roof (vented or insulated aka "hot roof") --> also influences what I will use for soffit material
- Heating/Cooling - goal is steady temp in the 50s during cold months, not sure if I should install a wood-stove down below
I will upload a rough parts list if desired, to cover the major purchases. I would also like to put in a plug for everyone's local lumber yard, so support your locally-owned business! When I called the guys in town to ask about pricing, they ended up beating all the big box stores on pretty much every board (including the 16' PT 2x6s and 6x6s I used to build a stationary Gantry at the rear). This was about a year ago, when lumber pricing was still coming down off the post-COVID peak.
Quoted cost of Initial Plan: Over $40k ($5k for back-fill and grading, $30k+ for Reed's Ferry Shed, plus at least $5k more for add-ons by me). Reed's Ferry and the other place I got a quote from, if I wanted to do the pier foundation, both said I'd have to build my own wooden platform to support the shed, which seemed redundant (extra weight, extra materials, extra cost) and would still require significant outlay of materials and labor on my part. So, I decided to slow roll it and gradually chip away at things leading to....
Current Expenses: Around $17-20k to get to the most recent photo.
- Site prep: my own chainsaw and two neighbors (with their saws) for a couple of hours to fell some trees and turn them into firewood (paid in beers + burgers).
- Bobcat Backhoe: $800 for a weekend (rent it before a holiday and you get an extra free day...) + Diesel (before it was $6/gallon, fortunately\).
- Concrete foundation: $5k (quoted about $7-8, discounted by the owner because they did it when they could fit me in to another job, and staged some materials in my yard for a larger job nearby).
- Drainage Tubes & ~10 yards of 1/2" gravel: $2k (did about half of the gravel by hand with a wheelbarrow, then my pride gave in and I asked to borrow a neighbor's tractor)
- Wood and framing: 1) $4k initial order for lumber to construct Bents (including T1-11), 2) $2500 for the tongue-in-groove flooring, 3) $1200 for the roof sheathing (3/4" Advantech).
- Asphalt shingle roof (install scheduled in next 2-3 weeks): $5500
- Two windows (for rear): $1600.
- The doors I am building now (double 4' wide for main level, and single dutch door up top) I have managed to fabricate from excess left over from larger orders, and my hope is they can be replaced later on if I find some nice carriage door plans I like.
Levels: 3 (not intentional.... but logical!). I started with a main level, an attic area for storage, and a crawlspace for gear, gas, and implement storage.
Foundation: Reinforced concrete with frost-wall and footers to code.
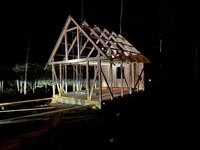
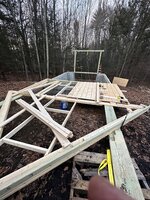
Framing: 6 total Bents, components cut ahead of time by me (from common sizes of KD and PT lumber) and staged on-site. I cut the pieces for a "master" Bent, which we would use as a template, and also adjusted any cuts accordingly and used the updated parameters to then cut the remainder of the pieces (one example is the 16" 2x12s for the floor joists were inconsistent lengths, some as long as 16'3/4", so instead of measuring from one end after the first two, I began measuring out in either direction from the mid-point of the board to ensure that each would fit into the space between the interior walls of the concrete foundation). The template Bent (which would be the front facade, and thus raised last) was critical as it drastically improved our efficiency, and ensured repeatability between each Bent yielding pretty darn level floors later on. The other 5 Bents were assembled and raised over the course of a single day (total of about 10 hours) with 4-5 people total working together. I used a 2 ton jack and tow straps to pull the Bents into place over the foundation, anchored the footings with scrap PT, and also pre-cut and attached the purloins onto the roof rafters so that each Bent wound stand up and stop instead of toppling over. All of these awesome calls are credit to my dad, whos a pretty experienced carpenter (highly recommend asking someone with experience to help if you try this alone).
The framing was designed by myself and my father (both of us are engineers), and I placed the main lumber order about 2 months before we started raising the Bents (work got in the way...). I created a detailed parts list, drawings, and then just cut everything to stage in my lawn. Assembly of the first (front) Bent took about 2 hours to ensure square and proper dimensioning, and after that this was used as a template so assembly took only about 45 minutes for each subsequent Bent. The second Bent which we assembled was the rear, which as you can see my dad made the brilliant call to secure the T1-11 siding before standing it up (still teaching me things...). The photos show how the rest of the Bents were raised in a single day using a two-ton jack from Home depot, a tree behind the workshop, and an extra 50' of cable with a pulley secured to the upper 6x6' on the Gantry (this has been clamped to the foundation for about 10 months).
The flooring was done in stages over several weekends, and I STRONGLY recommend the 2x8 tongue-in-groove. This was hard to find in that it took 3-4 weeks to be delivered to my local lumberyard, but it looks beautiful and smelled amazing whenever it was cut (think the most amazing old wood working shop smell...). Siding of T1-11 was put up soon afterwards.
Rafters: Overlapped 2x10s (45 deg peak angle) with 2x8 vertical studs mounted on opposing sides.
Gantry (for framing: Assembled using 3x 16' 6x6" PT lumber, one each secured at the bottom, floor-level, and top of vertically-positioned wooden I-beams using 2x 1/2" bolts at each joint. Beforehand, I fabricated the I-beams using 3x 16' 2x6" PT boards and 3" deck screws to secure each flange board to the web board (like a zipper).
Cieling Joists (main level): Overlapped 2x10s (secured opposite the rafter boards)
Wall Studs: 2x8s; two vertical boards in each Bent, which we reinforced with diagonals to ensure no front/back rocking of the frame, and also prevent bowing/buckling.
Floor Joists: Each Bent used 2x 16' 2xX PT boards (2x6 for the ends, 2x12s for the middle). All of the paired PT boards were webbed together with 2-3 PT spacers to improve stiffness (to help keep the distance between the boards uniform and stable over time, visible in the flooring photo below). Spacing between each Bent was 4 feet, and a single 16' 2x12" joist was added between each Bent to make the spacing 24" on center and that much stronger (I had to go back and buy 1 extra 16' 2x12, perfect example of the spontaneous additions not included in the total parts list).
Flooring: 16' 2x8s, tongue-in-groove. Critical to align the joint between the two middle boards with the center of the shed, otherwise someone with OCD will notice! This also made it a lot easier on the outside edges, which required more custom cuts and ripping a few boards to be less than 8" wide. Since the tongue-in-groove were each 16', I cut some of the bowed boards into 4' segments to achieve the 20' depth for the footprint (we also alternated the joint between the 4' and 16' boards with each row, like overlapping legos, for added stiffness). I think I ordered a total of about 40 of the tongue-in-groove (not cheap, but worth it), and even after using them on the attic floor I have 5-6 left over still. The tongue-in-groove combined with the 2x12s creates a wonderfully stiff composite structure (like a truss with structural skin) that can support 300+ lbs of human jumping up and down in the middle with minimal movement. Not strong enough for a piece of equipment with a cast iron base, but likely strong enough to support someone doing something dumb without collapsing (and avoids the center pole in the middle down below).
Current Roof: Tarp and 3/4" AdvanTech which I actually installed alone, will update and credit Youtube for that.
Future Roof: Asphalt shingles, installation scheduled in a couple weeks)
Soffits: TBD (any thoughts or advice here would be appreciated, this is also heavily influenced by what I end up doing for roof insulation).
Siding: T1-11, secured to 2x4 strapping on top of the vertical studs and diagonals. On the front and rear we used 2x3 strapping to ensure that the T1-11 overlaps the 16' PT boards that sandwich the vertical studs (we thought about using flashing, then remembered the cost of the strapping for offset was about $100, vs. a LOT more to deal with water leakage problems down the line.
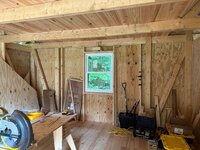
Windows: Two windows, on the main level and upper level, in the rear.
Doors: Main level is a double hinge door constructed with T1-11 as a web over a 2x4 frame. Each is 8'x4'. Hopefully temporary as I'd like to build some nice carriage doors with windows near the top to bring in more light. Upper level is under construction, will be similar structure and framing but will be a dutch-style door (upper and lower halves, for safety).
Major pending items include:
1) Roofing - shingles will be installed soon. The sheathing I did on my own using the Advantech 4'x8' sheets (3/4" thick given the 4' spacing), and a great youtube video gave me the inspiration for using a spare 16' 2x8 to extend the roof rafters to the ground (when I find it, I will post it). Again, using the 2 ton jack I was able to lift all but two of the sheathing boards alone.
Has anyone done a "hot roof" before? My wife wants to be able to use the attic, and I don't want it to be completely covered in sawdust so I plan to seal off the two levels as much as possible (thankfully, heat rises so heating the main level should keep the upper part pretty cozy). I understand the concept of the hot roof (or non-vented roof) and don't plan on putting anything on top of the rafters to "finish" the attic, so I can keep a pretty good eye on things if needed (for leaks, excessive condensation, etc).
2) Windows: I ordered two, got one, and installed it on the main level on top of the T1-11. I wish I'd done the window install way back before the T1-11 was put on. I can't change that now so I plan to add a small awning secured to the T1-11 (including cutting a groove down to the same depth as the existing T1-11 grooves, then use aluminum flashing and caulk to encourage water flow away from the seal and window). Any suggestions for the window trim are welcome (I was thinking just some 1x6 pine, to match the T1-11).
3) Soffits: Will complete these after the roof, not sure what material yet, but I likely have enough Advantech scrap left over. This also will be influenced by whether I do a "hot roof" or have conventional vented rafters (obviously will need soffit vents for the conventional method).
4) Insulation - quote for spray foam was over $15k, so working on getting another quote. In the meantime, I am considering using foam panel insulation for the main level (cut to fit) and will fill the smaller cracks at the floor level somehow (suggestions welcome). There are a lot of smaller nooks and crannies between the foundation and the bottom part of the Bents which I have not yet begin to fill. Other than great stuff, I was just going to let them breathe for now but want to seal them up for the long term so I can keep working and stay warm during the winter).
5) Power - If I had to choose right now, likely solar panels charging a bank of Li-Fe-Phos batteries in the basement, with appropriate disconnect/fuse circuitry to avoid over-charging and appropriate power management during heavy use. Any suggestions for existing power budgets I can use as a template, or what you've done in your own space, are welcome!
6) Heating/cooling - considering a mini-split powered by the battery bank above for year-round stability, but also am considering putting a wood stove at the front of the foundation, then running the exhaust up and back just under the floor (with heat shielding) to maybe dump a bit more heat energy into the main level before venting. This would be something I turn on if I need to get warmer than what the mini-split can do for a project with lots of gluing.
7) The last photos exceeded the 10 pic limit, and they show my mock-up of the L-shaped stairs in the front right corner with a landing at about 30" up from the floor. The only problem is this means the distance from the landing up to the nearby ceiling joist is 65", so my wife and kids won't hit their heads but it's way below the 76-78" recommended (I haven't checked if this would violate code as technically it's a built-in stairs). I really don't want the stairs to take up a big portion of the main door opening either, which is why I'm trying to cram them into as small a footprint as possible and the location of the ceiling joist means I can't put more stairs along the side wall. Alternatively, I have also looked at installing a fold-down ladder like what most people have to access an attic space, as this would also help keep the upper level isolated from wood dust and can be stowed so I'm not as worried about it blocking a big chunk of the main opening briefly.
8) Dust collection - I had an idea to install the PVC now, using about 2" piping, and then run this (taking advantage of gravity) to an outlet in the lower area where I could run either a shop vac (if temporarily) or in the future purchase and install a dedicated system. My only hesitation is the fact that I may do spray-foam insulation, and I do not want them to encase the PVC filled with fine, explosive sawdust in even more hard plastic. If this were your shed, what would you do for dust collection?
I will update with more stuff later as this is already way longer than I was anticipating. I welcome questions, comments, advice, or other feedback! If you want the plans, I have part drawings for the Bents and diagonals and am happy to share, but after the main structure was erected, everything else was cut-to-fit. Also, none of this is to be taken as a guide or direction and you should always follow your local town code and zoning regulations, be safe, and if you're working on a ladder or at elevation consider wearing a harness or safety gear and have a buddy with you (its critical to make sure they can properly document whatever OSHA violation is being committed, so that it can be uploaded to youtube for the likes! Oh, and call 911 at some point).
Happy building, ya'll!
I hope you enjoy my ramblings related to the last 18 months of construction for my 16' x 20' workshop/shed. How and why did I build a three-story workshop, you ask? Well, it started innocently enough and logical, cost-conscious decisions have led me to this monstrous beauty. Initially I was considering either installing a pad (backfill given the steep slope) or install at least six 10' deep x 24" dia. piers (sonotubes) with a retaining wall to create a semi-protected lower space for storage (canoe, snowblower, yard implements, etc; this is why the front piers had to be 10' tall given the height of the hill as the bases would be exposed to air and thus had to be below the frost line at the back of the structure, all required by code and confirmed by the town during permitting). The cost of materials and machines/labor to back fill tipped me into renting a backhoe and doing the excavation myself. I then priced out raw materials for the piers and retaining wall (estimated about 30'-40' perimeter, 6'+ high) and it ended up being more expensive than concrete ultimately (not to mention my own time spent on labor...). I actually wasn't going to request quotes for pouring a concrete foundation, until I saw the total cost of raw materials and thought about the labor investment required (more my wife providing unrequested input... love you honey!). The concrete outfit I ended up working with cost about $1500 less than the raw materials after I let them do it at their own pace (took a couple of months, I wasn't in a rush) and they staged some framing materials for another nearby job in my yard. Hence, I ended up with a workshop with an 8' basement and a solid foundation basically fit for a house (this is not a house or a garage, to be clear, it is an over-engineered shed/workshop and will remain as such, per code and my initial building permit).
Briefly, there are a few areas where I would love input, and I go into more detail below:
- Insulation
- Power (considering an "off grid" solar system and batteries)
- Roof (vented or insulated aka "hot roof") --> also influences what I will use for soffit material
- Heating/Cooling - goal is steady temp in the 50s during cold months, not sure if I should install a wood-stove down below
I will upload a rough parts list if desired, to cover the major purchases. I would also like to put in a plug for everyone's local lumber yard, so support your locally-owned business! When I called the guys in town to ask about pricing, they ended up beating all the big box stores on pretty much every board (including the 16' PT 2x6s and 6x6s I used to build a stationary Gantry at the rear). This was about a year ago, when lumber pricing was still coming down off the post-COVID peak.
Quoted cost of Initial Plan: Over $40k ($5k for back-fill and grading, $30k+ for Reed's Ferry Shed, plus at least $5k more for add-ons by me). Reed's Ferry and the other place I got a quote from, if I wanted to do the pier foundation, both said I'd have to build my own wooden platform to support the shed, which seemed redundant (extra weight, extra materials, extra cost) and would still require significant outlay of materials and labor on my part. So, I decided to slow roll it and gradually chip away at things leading to....
Current Expenses: Around $17-20k to get to the most recent photo.
- Site prep: my own chainsaw and two neighbors (with their saws) for a couple of hours to fell some trees and turn them into firewood (paid in beers + burgers).
- Bobcat Backhoe: $800 for a weekend (rent it before a holiday and you get an extra free day...) + Diesel (before it was $6/gallon, fortunately\).
- Concrete foundation: $5k (quoted about $7-8, discounted by the owner because they did it when they could fit me in to another job, and staged some materials in my yard for a larger job nearby).
- Drainage Tubes & ~10 yards of 1/2" gravel: $2k (did about half of the gravel by hand with a wheelbarrow, then my pride gave in and I asked to borrow a neighbor's tractor)
- Wood and framing: 1) $4k initial order for lumber to construct Bents (including T1-11), 2) $2500 for the tongue-in-groove flooring, 3) $1200 for the roof sheathing (3/4" Advantech).
- Asphalt shingle roof (install scheduled in next 2-3 weeks): $5500
- Two windows (for rear): $1600.
- The doors I am building now (double 4' wide for main level, and single dutch door up top) I have managed to fabricate from excess left over from larger orders, and my hope is they can be replaced later on if I find some nice carriage door plans I like.
-- Workshop Specs --
Permit: Yes, required by town.Levels: 3 (not intentional.... but logical!). I started with a main level, an attic area for storage, and a crawlspace for gear, gas, and implement storage.
Foundation: Reinforced concrete with frost-wall and footers to code.
Framing: 6 total Bents, components cut ahead of time by me (from common sizes of KD and PT lumber) and staged on-site. I cut the pieces for a "master" Bent, which we would use as a template, and also adjusted any cuts accordingly and used the updated parameters to then cut the remainder of the pieces (one example is the 16" 2x12s for the floor joists were inconsistent lengths, some as long as 16'3/4", so instead of measuring from one end after the first two, I began measuring out in either direction from the mid-point of the board to ensure that each would fit into the space between the interior walls of the concrete foundation). The template Bent (which would be the front facade, and thus raised last) was critical as it drastically improved our efficiency, and ensured repeatability between each Bent yielding pretty darn level floors later on. The other 5 Bents were assembled and raised over the course of a single day (total of about 10 hours) with 4-5 people total working together. I used a 2 ton jack and tow straps to pull the Bents into place over the foundation, anchored the footings with scrap PT, and also pre-cut and attached the purloins onto the roof rafters so that each Bent wound stand up and stop instead of toppling over. All of these awesome calls are credit to my dad, whos a pretty experienced carpenter (highly recommend asking someone with experience to help if you try this alone).
The framing was designed by myself and my father (both of us are engineers), and I placed the main lumber order about 2 months before we started raising the Bents (work got in the way...). I created a detailed parts list, drawings, and then just cut everything to stage in my lawn. Assembly of the first (front) Bent took about 2 hours to ensure square and proper dimensioning, and after that this was used as a template so assembly took only about 45 minutes for each subsequent Bent. The second Bent which we assembled was the rear, which as you can see my dad made the brilliant call to secure the T1-11 siding before standing it up (still teaching me things...). The photos show how the rest of the Bents were raised in a single day using a two-ton jack from Home depot, a tree behind the workshop, and an extra 50' of cable with a pulley secured to the upper 6x6' on the Gantry (this has been clamped to the foundation for about 10 months).
The flooring was done in stages over several weekends, and I STRONGLY recommend the 2x8 tongue-in-groove. This was hard to find in that it took 3-4 weeks to be delivered to my local lumberyard, but it looks beautiful and smelled amazing whenever it was cut (think the most amazing old wood working shop smell...). Siding of T1-11 was put up soon afterwards.
Rafters: Overlapped 2x10s (45 deg peak angle) with 2x8 vertical studs mounted on opposing sides.
Gantry (for framing: Assembled using 3x 16' 6x6" PT lumber, one each secured at the bottom, floor-level, and top of vertically-positioned wooden I-beams using 2x 1/2" bolts at each joint. Beforehand, I fabricated the I-beams using 3x 16' 2x6" PT boards and 3" deck screws to secure each flange board to the web board (like a zipper).
Cieling Joists (main level): Overlapped 2x10s (secured opposite the rafter boards)
Wall Studs: 2x8s; two vertical boards in each Bent, which we reinforced with diagonals to ensure no front/back rocking of the frame, and also prevent bowing/buckling.
Floor Joists: Each Bent used 2x 16' 2xX PT boards (2x6 for the ends, 2x12s for the middle). All of the paired PT boards were webbed together with 2-3 PT spacers to improve stiffness (to help keep the distance between the boards uniform and stable over time, visible in the flooring photo below). Spacing between each Bent was 4 feet, and a single 16' 2x12" joist was added between each Bent to make the spacing 24" on center and that much stronger (I had to go back and buy 1 extra 16' 2x12, perfect example of the spontaneous additions not included in the total parts list).
Flooring: 16' 2x8s, tongue-in-groove. Critical to align the joint between the two middle boards with the center of the shed, otherwise someone with OCD will notice! This also made it a lot easier on the outside edges, which required more custom cuts and ripping a few boards to be less than 8" wide. Since the tongue-in-groove were each 16', I cut some of the bowed boards into 4' segments to achieve the 20' depth for the footprint (we also alternated the joint between the 4' and 16' boards with each row, like overlapping legos, for added stiffness). I think I ordered a total of about 40 of the tongue-in-groove (not cheap, but worth it), and even after using them on the attic floor I have 5-6 left over still. The tongue-in-groove combined with the 2x12s creates a wonderfully stiff composite structure (like a truss with structural skin) that can support 300+ lbs of human jumping up and down in the middle with minimal movement. Not strong enough for a piece of equipment with a cast iron base, but likely strong enough to support someone doing something dumb without collapsing (and avoids the center pole in the middle down below).
Current Roof: Tarp and 3/4" AdvanTech which I actually installed alone, will update and credit Youtube for that.
Future Roof: Asphalt shingles, installation scheduled in a couple weeks)
Soffits: TBD (any thoughts or advice here would be appreciated, this is also heavily influenced by what I end up doing for roof insulation).
Siding: T1-11, secured to 2x4 strapping on top of the vertical studs and diagonals. On the front and rear we used 2x3 strapping to ensure that the T1-11 overlaps the 16' PT boards that sandwich the vertical studs (we thought about using flashing, then remembered the cost of the strapping for offset was about $100, vs. a LOT more to deal with water leakage problems down the line.
Windows: Two windows, on the main level and upper level, in the rear.
Doors: Main level is a double hinge door constructed with T1-11 as a web over a 2x4 frame. Each is 8'x4'. Hopefully temporary as I'd like to build some nice carriage doors with windows near the top to bring in more light. Upper level is under construction, will be similar structure and framing but will be a dutch-style door (upper and lower halves, for safety).
Major pending items include:
1) Roofing - shingles will be installed soon. The sheathing I did on my own using the Advantech 4'x8' sheets (3/4" thick given the 4' spacing), and a great youtube video gave me the inspiration for using a spare 16' 2x8 to extend the roof rafters to the ground (when I find it, I will post it). Again, using the 2 ton jack I was able to lift all but two of the sheathing boards alone.
Has anyone done a "hot roof" before? My wife wants to be able to use the attic, and I don't want it to be completely covered in sawdust so I plan to seal off the two levels as much as possible (thankfully, heat rises so heating the main level should keep the upper part pretty cozy). I understand the concept of the hot roof (or non-vented roof) and don't plan on putting anything on top of the rafters to "finish" the attic, so I can keep a pretty good eye on things if needed (for leaks, excessive condensation, etc).
2) Windows: I ordered two, got one, and installed it on the main level on top of the T1-11. I wish I'd done the window install way back before the T1-11 was put on. I can't change that now so I plan to add a small awning secured to the T1-11 (including cutting a groove down to the same depth as the existing T1-11 grooves, then use aluminum flashing and caulk to encourage water flow away from the seal and window). Any suggestions for the window trim are welcome (I was thinking just some 1x6 pine, to match the T1-11).
3) Soffits: Will complete these after the roof, not sure what material yet, but I likely have enough Advantech scrap left over. This also will be influenced by whether I do a "hot roof" or have conventional vented rafters (obviously will need soffit vents for the conventional method).
4) Insulation - quote for spray foam was over $15k, so working on getting another quote. In the meantime, I am considering using foam panel insulation for the main level (cut to fit) and will fill the smaller cracks at the floor level somehow (suggestions welcome). There are a lot of smaller nooks and crannies between the foundation and the bottom part of the Bents which I have not yet begin to fill. Other than great stuff, I was just going to let them breathe for now but want to seal them up for the long term so I can keep working and stay warm during the winter).
5) Power - If I had to choose right now, likely solar panels charging a bank of Li-Fe-Phos batteries in the basement, with appropriate disconnect/fuse circuitry to avoid over-charging and appropriate power management during heavy use. Any suggestions for existing power budgets I can use as a template, or what you've done in your own space, are welcome!
6) Heating/cooling - considering a mini-split powered by the battery bank above for year-round stability, but also am considering putting a wood stove at the front of the foundation, then running the exhaust up and back just under the floor (with heat shielding) to maybe dump a bit more heat energy into the main level before venting. This would be something I turn on if I need to get warmer than what the mini-split can do for a project with lots of gluing.
7) The last photos exceeded the 10 pic limit, and they show my mock-up of the L-shaped stairs in the front right corner with a landing at about 30" up from the floor. The only problem is this means the distance from the landing up to the nearby ceiling joist is 65", so my wife and kids won't hit their heads but it's way below the 76-78" recommended (I haven't checked if this would violate code as technically it's a built-in stairs). I really don't want the stairs to take up a big portion of the main door opening either, which is why I'm trying to cram them into as small a footprint as possible and the location of the ceiling joist means I can't put more stairs along the side wall. Alternatively, I have also looked at installing a fold-down ladder like what most people have to access an attic space, as this would also help keep the upper level isolated from wood dust and can be stowed so I'm not as worried about it blocking a big chunk of the main opening briefly.
8) Dust collection - I had an idea to install the PVC now, using about 2" piping, and then run this (taking advantage of gravity) to an outlet in the lower area where I could run either a shop vac (if temporarily) or in the future purchase and install a dedicated system. My only hesitation is the fact that I may do spray-foam insulation, and I do not want them to encase the PVC filled with fine, explosive sawdust in even more hard plastic. If this were your shed, what would you do for dust collection?
I will update with more stuff later as this is already way longer than I was anticipating. I welcome questions, comments, advice, or other feedback! If you want the plans, I have part drawings for the Bents and diagonals and am happy to share, but after the main structure was erected, everything else was cut-to-fit. Also, none of this is to be taken as a guide or direction and you should always follow your local town code and zoning regulations, be safe, and if you're working on a ladder or at elevation consider wearing a harness or safety gear and have a buddy with you (its critical to make sure they can properly document whatever OSHA violation is being committed, so that it can be uploaded to youtube for the likes! Oh, and call 911 at some point).
Happy building, ya'll!
Attachments
-
 1 - start.jpg1.5 MB · Views: 44
 -
 11 - full view front.jpg1.1 MB · Views: 41
 -
 10 - door interior.jpg636.8 KB · Views: 41
 -
 9 - exterior window close up.jpg142.7 KB · Views: 35
 -
 8 - exterior window detail.jpg57.5 KB · Views: 35
 -
 7 - window inside.jpg641.9 KB · Views: 35
 -
 6 - floor install.jpg914.8 KB · Views: 46
 -
 5 - framing night.jpg635.4 KB · Views: 46
 -
 4 - bent construction.jpg884.6 KB · Views: 50
 -
 3 - gantry install.jpg1.3 MB · Views: 47