To avoid these ads, REGISTER NOW!

New garage project

OP
T

tuip

Well-known member
Joined
May 10, 2008
Messages
79
Location
Snoqualmie, WA
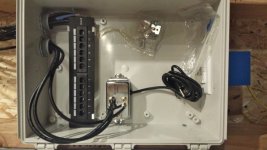
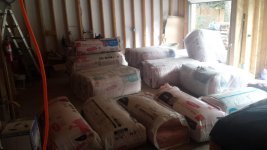
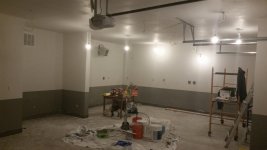
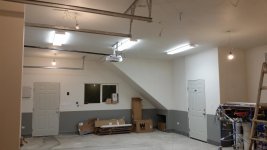
Thanks .. still lots of expensive stuff needing to be done (insulation and sheet rock adds up fast). 6 circuits are fully operational now and I'm glad I'm testing stuff before putting sheetrock up as I ran into one circuit where I forgot one connecting run. :(

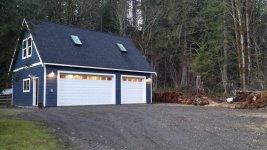
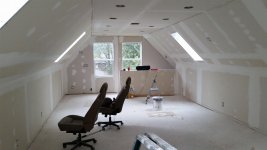
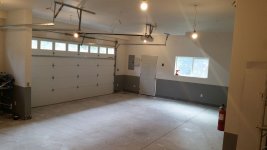
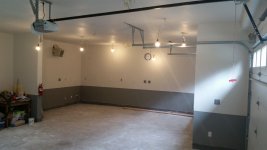
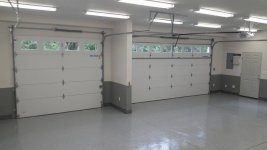
This time of year we don't really have long days here up in Seattle .. it is pitch black by like 5pm so I'm glad I got the lights working. I really want to get this thing done though as I have quite a few more big projects that need to get started and done according to the wife.
 
To avoid these ads, REGISTER NOW!

Stefsgarage

Member
Joined
Oct 20, 2013
Messages
20
Location
Lincoln NE
subscribed! Cool looking garage for sure. I pitched my roof very similarly to get that extra headroom still ended up doing a dormer though! Wish I had your location and width of garage!
 
OP
T

tuip

Well-known member
Joined
May 10, 2008
Messages
79
Location
Snoqualmie, WA
Thanks. The storage upstairs is totally worth it for us as well as the fixed stairs. Yes .. we lose some space inside the garage but not having to climb a ladder is what clinched the deal for the wife. I also solved the age old question last night on 'how much lights I need for X lumens per sqft'. I will end up having 16 fixtures for 2 T8 4ft bulbs. My plan is to get dimmable LEDs which are down to about 10 dollars a pop and install a dimmer switch. Bright when I need it .. dimmer when I don't.

Got one more circuit all wired up today .. waiting for the last of the GFCI receptacles to come in the post tomorrow so that that can be sorted and wrapped up. I will start finishing the networking enclosure over the weekend.
 
OP
T

tuip

Well-known member
Joined
May 10, 2008
Messages
79
Location
Snoqualmie, WA
All the 110 / 240V circuits are now wired in and tested. I've started with the networking / security wiring over the weekend and got the CAT6 patch panel done. Now its time to get connectors on all the other ends.

The driveway / parking area got finally graded with some crushed rock which cleans up the area a bit as well as the left over stumps on the remaining flat area were ground down which is where the raised beds for the wife will go.

Today I should get the airline bits in so that I can run those overhead to a few points in the shop area. I also hope to get the baffles in for the roof line so that I can start insulating. Its been cold here and working in 30F is not much fun .. its pretty but that doesn't get it done any faster.
 

Attachments

  • 20160101_165552_Richtone(HDR).jpg
    20160101_165552_Richtone(HDR).jpg
    141.8 KB · Views: 132
  • 20160101_155929_Richtone(HDR).jpg
    20160101_155929_Richtone(HDR).jpg
    147.9 KB · Views: 119
  • 20151229_161759.jpg
    20151229_161759.jpg
    150.4 KB · Views: 135
  • 20151229_161842.jpg
    20151229_161842.jpg
    153.2 KB · Views: 148

Palmer02

Member
Joined
Jul 4, 2015
Messages
14
Location
Florida/London
All the 110 / 240V circuits are now wired in and tested. I've started with the networking / security wiring over the weekend and got the CAT6 patch panel done. Now its time to get connectors on all the other ends.

The driveway / parking area got finally graded with some crushed rock which cleans up the area a bit as well as the left over stumps on the remaining flat area were ground down which is where the raised beds for the wife will go.

Today I should get the airline bits in so that I can run those overhead to a few points in the shop area. I also hope to get the baffles in for the roof line so that I can start insulating. Its been cold here and working in 30F is not much fun .. its pretty but that doesn't get it done any faster.


Turned out nice
 
OP
T

tuip

Well-known member
Joined
May 10, 2008
Messages
79
Location
Snoqualmie, WA
I have been installing the roof venting since yesterday. I need them since I'm going to insulate this thing and so will need the venting in the roof. Still a pain in the @#$ to keep going up and down installing these.

Need to put connectors on 4 more of the security camera wires and then run 2 CAT6 and a coax line through the underground conduit to the house this weekend. Feels good to have wrapped up the wiring now.

Since I'm going to use a bluetooth amp with speakers in the ceiling I'm contemplating picking up a cheap 30 dollar android tablet of ebay and built it into the wall and use that as audio device. An example is this:

http://www.vidabox.com/kiosks/vidamount-on-wall-tablet-mount.html
 

Attachments

  • 20160106_162527.jpg
    20160106_162527.jpg
    134.3 KB · Views: 84

Stefsgarage

Member
Joined
Oct 20, 2013
Messages
20
Location
Lincoln NE
What kind of insulation are you using in between the rafters Bat or rigid? I've done a few with both but it's always cool to see how other people do it.


Sent from my iPhone using Tapatalk
 
OP
T

tuip

Well-known member
Joined
May 10, 2008
Messages
79
Location
Snoqualmie, WA
I'm going to use bat ... it seems that the spacing between them isn't exactly equal unfortunately and I hate having to manually adjust each rigid board to fit the space. The wife wants drawers on the two sides of the knee wall which should be an interesting add-on to build. The last roll of coax comes in today so I can pull the UTP and coax to the main house through the conduit. When I dug the trench for the conduit I added two extra runs for low voltage and / or expansion. Trench was wide and deep enough anyways and I never want to dig that thing up again with all the rock in it.

I will need to reach out to the contractor this week since the slab developed a crack on one side of the floor that I want to get fixed :(
 

Pluribus

Well-known member
Joined
Dec 16, 2012
Messages
2,143
Location
Skagit County, WA
Enjoying seeing your progress! I was re-reading the earlier parts of the thread and noticed the part about getting approval to build closer to the slope. Did you have to do a geotech study? I'm assuming the slope is over the 40 degree limit. It would be much-appreciated if you would share the details on this.
 
OP
T

tuip

Well-known member
Joined
May 10, 2008
Messages
79
Location
Snoqualmie, WA
We didn't need to do a geotech study as apparently the neighbors had one done on the same slope 15 years ago where it was determined not to be a hazard. We stumbled across that when doing some research and we pulled a copy from the online records and filed that with our building permit. Due to that we were able to stay within the limits we want. It is indeed a slope that is over 40 degrees .. quite the workout to climb up on and I'm using the height to conceal some amateur radio antennas ;)
 

Pluribus

Well-known member
Joined
Dec 16, 2012
Messages
2,143
Location
Skagit County, WA
Great discovery on the neighbor's prior study; I can't believe King County allowed you to use a 15 year old study from a separate parcel! I looked into it once for decreasing the slope setback, and it was going to be around $3k for the digging and the report. As for the antennas, (in my very best Sargent Schultz imitation) "I know notheeng; I see notheeng!"
 
OP
T

tuip

Well-known member
Joined
May 10, 2008
Messages
79
Location
Snoqualmie, WA
I found out that attitude helps a lot when dealing with King County. They will act like a pain in the **** if you are just difficult to deal with ... just be nice and friendly and they seem to be easy to work with (after taking your money).
 
To avoid these ads, REGISTER NOW!
OP
T

tuip

Well-known member
Joined
May 10, 2008
Messages
79
Location
Snoqualmie, WA
Contractor came out to again inspect the crack and it was caused by a wrong cement mixture it looks like. They are standing by their product and will fix the issue for us and make it right. That probably will happen some time in April when the moisture and temps are better suited to ensure that it doesn't get any worse.
 
OP
T

tuip

Well-known member
Joined
May 10, 2008
Messages
79
Location
Snoqualmie, WA
One thing I completely spaced on is on an exhaust fan. I'm thinking about using something like this wall mount fan and i am wondering what others might have used for controller. Its pretty damp here in the PNW so I'm thinking humidity would be the right way to go ?
 
OP
T

tuip

Well-known member
Joined
May 10, 2008
Messages
79
Location
Snoqualmie, WA
Installed the fans this past weekend. The garage one will be computer controlled and automatically run when humidity gets over a certain percentage as well as run scheduled air changes at night (I'm kinda a geek) ;)

Compressed air lines are in .. I'll have a few locations around the workshop area to hook up. I ended up using one of the rapid air kits which are a breeze to install.

Insulation should come in on Monday and holy **** is that stuff more expensive than I thought.
 
OP
T

tuip

Well-known member
Joined
May 10, 2008
Messages
79
Location
Snoqualmie, WA
Here are a few shots of the shop fan installation. It is 10x10 inches and I am surprised on how little noise it actually makes. You can hear it but I bet with the radio on it will be barely noticeable. The main switch is near the entry door as well as a variable fan controller. Eventually once the sheetrock and everything is in I'll swap from the current manual switches to zwave switches that will be controlled by a smartthings hub. That way I can control the outdoor lights and have the fan do some cycles at night or when the temperature / humidity hit a threshold.

PoE powered security cameras are coming in soon as well as all the networking equipment stuff. I have unfortunately some dodgy people living nearby that occasionally 'wander' on my property and I have found that visibly working security cameras are a good deterrent.

Can't wait to get this thing done though.
 

Attachments

  • 20160123_153141.jpg
    20160123_153141.jpg
    146 KB · Views: 82
  • 20160123_153111.jpg
    20160123_153111.jpg
    141.3 KB · Views: 70
  • 20160123_153054.jpg
    20160123_153054.jpg
    139.3 KB · Views: 71
OP
T

tuip

Well-known member
Joined
May 10, 2008
Messages
79
Location
Snoqualmie, WA
I think it is pretty clear on what I'm going to do the next few days ... being itchy ;)
 

Attachments

  • 20160125_112634.jpg
    20160125_112634.jpg
    134.8 KB · Views: 40
OP
T

tuip

Well-known member
Joined
May 10, 2008
Messages
79
Location
Snoqualmie, WA
Insulation is pretty much done .. except for a few difficult places upstairs. Airlines are in as well but I need to redo one of the outlets as it has a slight leak still. Drywall arrived yesterday on a truck so we can start on the next phase of the project.

Per suggestion of user DJJSR I am going to install some trex board as a baseboard since we live in Washington State and water is to be expected one way or another.

In April the contractor is going to remove/repour some of the floor as the crack kept getting bigger and it is simply due to a bad batch of concrete. :mad: Nothing I could have done anything about but at least the contractor is standing behind their work. It will however slow things down as I can't put any sealer / epoxy on the floor until that all is cured ...
 

Attachments

  • 20160229_125228.jpg
    20160229_125228.jpg
    149.2 KB · Views: 38
  • 20160229_133430.jpg
    20160229_133430.jpg
    141.9 KB · Views: 42
  • 20160229_174807.jpg
    20160229_174807.jpg
    139.4 KB · Views: 42
OP
T

tuip

Well-known member
Joined
May 10, 2008
Messages
79
Location
Snoqualmie, WA
Its been a while since I posted updates, but work has been going very slow due to my regular work and simply dealing with contractors. The contractor did cut out chunks of my slab and repoured it after cracks had developed. A bit of a bummer, but we will eventually epoxy the floor so it won't be that bad.

Downstairs is nearly done, except for some small trim pieces and cleanup. A big question is always lights. I ended up with 15 4ft light fixtures with each putting out about 4000 lumens. I am really happy with the amount of light they give with not much shadows. Upstairs will still need to be painted and finished but that will take a lot less work than the shop itself.
 

Attachments

  • 2016-11-27 17.46.27.jpg
    2016-11-27 17.46.27.jpg
    143.6 KB · Views: 113
  • 2016-12-15 17.49.46.jpg
    2016-12-15 17.49.46.jpg
    128.3 KB · Views: 124
  • 2016-12-08 21.02.46.jpg
    2016-12-08 21.02.46.jpg
    140.7 KB · Views: 131
  • 2016-11-02 12.20.49.jpg
    2016-11-02 12.20.49.jpg
    128 KB · Views: 113
OP
T

tuip

Well-known member
Joined
May 10, 2008
Messages
79
Location
Snoqualmie, WA
I'm getting on the final stretch. Last month I painted the upstairs, finished all the electrical trim and Saturday installed the vinyl flooring upstairs. The upstairs will be mostly storage, but the wife insists that it isn't going to look like a dungeon when going up there to get stuff. Eventually it could become a bonus room if needed as it is pre-wired for heating.

The repoured concrete downstairs has cured well ... not as smooth as the rest of the floor but not much I can do about it. Overall I'm pretty happy with the decisions I made in my design. Tomorrow will be the final inspection for electrical so it will be good to hear what the inspector says about my homebrew electrical skills.

For the building final inspection it is down to handrails, some landings on the entrydoors and a few minor bits and pieces that the contractors will do. Once the temperatures rise a little bit again the last big project is putting the epoxy coat on the bottom floor.
 

Attachments

  • 2017-03-18 23.11.46.jpg
    2017-03-18 23.11.46.jpg
    134.3 KB · Views: 89
Last edited:
OP
T

tuip

Well-known member
Joined
May 10, 2008
Messages
79
Location
Snoqualmie, WA
I had final electrical inspection Friday but failed on 3 minor items. Fixed it over the weekend and will try again Monday or Tuesday. The inspector is a pretty good guy and pointed exactly out what the issues were. In general quite a few items in the shop went beyond the minimum code requirements and he was in a way happy to see that.
 
OP
T

tuip

Well-known member
Joined
May 10, 2008
Messages
79
Location
Snoqualmie, WA
I passed the electrical and the final construction inspection with flying colors. The last inspector was pretty nice and he was done in a matter of a few minutes. The contractor is going to fix some of the drywall stuff upstairs as it looked horrible and now it is just matter for waiting for the temperatures to go up so that I can put the epoxy floor in.

Today I finally got the networking stuff to work properly which is a big win as well.
 
OP
T

tuip

Well-known member
Joined
May 10, 2008
Messages
79
Location
Snoqualmie, WA
I am in the final stretch. The floor will be coated with 2 layers of epoxy and a clearcoat that will have some anti-skid material. I've etched and cleaned the floor .. it is so spotless you could eat from it at the moment. I put down a few squares of plastic after a week to check for moisture and they were dry. In preparation of the installation I turned the heat on in the shop so that the slab would be warming up and be above 55F.

Unfortunately the online vendor messed up my order and sent me deck paint instead of clear coat so I miss the opportunity this weekend to install the floor while we have nice weather. Bummer, but in the grand scheme of things a few days more doesn't really matter much anymore. Can't wait to have it all done though.

The shop pictures are from before I installed the LED lighting. There have been some great discussions in the past on this forum on placement and how much lumens per square feet and I used those to calculate what I needed. I have 15 4ft fixtures with 2 LED bulbs each and this has resulted in barely any shadows regardless where you stand or lean over something. Shop heat is a simple electric heater but since the place is insulated it doesn't need to do a lot of work to get it warm enough.
 

Attachments

  • 17308821_10154678260848515_7598715847996436994_n.jpg
    17308821_10154678260848515_7598715847996436994_n.jpg
    42.6 KB · Views: 50
  • 19225737_10154982581903515_5658544347773430612_n.jpg
    19225737_10154982581903515_5658544347773430612_n.jpg
    35 KB · Views: 46
  • 15304229_10154308104488515_6288300690558871411_o.jpg
    15304229_10154308104488515_6288300690558871411_o.jpg
    92.6 KB · Views: 49
  • 15289211_10154308104493515_4828302004657456326_o.jpg
    15289211_10154308104493515_4828302004657456326_o.jpg
    90.3 KB · Views: 48
Last edited:
OP
T

tuip

Well-known member
Joined
May 10, 2008
Messages
79
Location
Snoqualmie, WA
Thanks .. it is awesome to be able to finally move in. The floor turned out pretty decent .. not perfect but that also means I won't cry when the first blemish eventually happens.

I started construction on my workbench .... simply using left over material that was still laying around from construction. Won't win a design prize but functional. The old blue Land Rover will be the first bigger project this winter. Replacing the clutch and rear cross member. Should be fun to do inside.
 

Attachments

  • 19601532_10155038934013515_3921382709360112612_n.jpg
    19601532_10155038934013515_3921382709360112612_n.jpg
    38.2 KB · Views: 27
  • 19731786_10155038933968515_5792462359097230953_n.jpg
    19731786_10155038933968515_5792462359097230953_n.jpg
    75 KB · Views: 34
  • 19748724_10155038933828515_465828236543215911_n.jpg
    19748724_10155038933828515_465828236543215911_n.jpg
    64.3 KB · Views: 31
  • 20280377_10155104220583515_2041204948336081641_o.jpg
    20280377_10155104220583515_2041204948336081641_o.jpg
    86.5 KB · Views: 31
To avoid these ads, REGISTER NOW!
Top Bottom