To avoid these ads, REGISTER NOW!

New gas fire pit

akdiesel

Well-known member
Joined
Aug 8, 2008
Messages
2,617
Location
Wasilla, AK
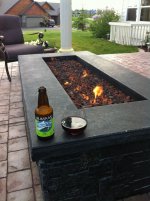
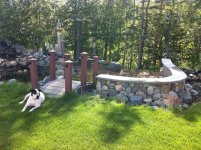
I talked with the wife as to which fire system we wanted to have on our back patio. I was originally going to build an outdoor fire place but talking with her the fire place would on be view able from the front and back sides. So we came up with the idea of a fire pit. We saw one at the Alyeska Prince lodge in Girdwood that struck our attention, so we decided on that style.
So this is what I came up with. It took about total time of two weeks to finish, and that was about 5 days of cure time for the cement topper. Total cost was about $600 and most of that was due to the rock facia.
It runs off of natural gas on a 3/4" line that is necked down to a 1/2" gas valve that produces about 180,000 btu. I was going to go with the 3/4" with 300,000 btu but the 1/2" does just fine. The valve feeds a 1/2" stainless tubing that I bent in a rectangular continuous loop shape that has 1/8" holes every 2". The tube is 48" x 8" loop. I decided to use lava rock since the glass rock would be approx $900 for the amount I needed and that was not including shipping, ouch!
One word of caution when using lava rock. The rock is porous and the heat from the fire will expand the air pockets so that they will pop. Turn the heat up to get rid of those rocks that will pop for about an hour or two. It is entertaining none the less.
The facia is real rock that stacks like a Tetris game piece and I decided to attach it with cement adhesive instead of mortar since it is outside and the heat and cold contacting movement will eliminate failure.
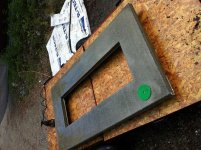
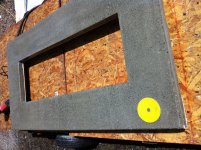
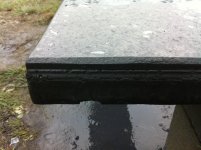
The cement topper is 10" wide and has a 2" over hang out the outside edge. It is 2" this with wire mesh inbeded, polished and stained to match the facia.
That was my first attempt at a concrete topper. I love working with concrete in manageable sizes.
The wife, I, and the neighbors can now sit by the fire outside with our drinks and not be bothered by smoke.
I made another one same style but 8" shorter (64" x 32" outside dimensions) but I used propane for his since it is at the cabin and no NG available.
 

Attachments

  • IMG_1339.jpg
    IMG_1339.jpg
    150.1 KB · Views: 838
  • IMG_1371.jpg
    IMG_1371.jpg
    146.2 KB · Views: 858
  • IMG_1374.jpg
    IMG_1374.jpg
    150.8 KB · Views: 872
To avoid these ads, REGISTER NOW!

the_saint

Well-known member
Joined
Oct 30, 2007
Messages
1,507
Location
Canada
Wow, looks great!

Have you measured to see what temps the concrete on top is exposed to? Was the concrete poured in place?

Great job!

How long did you let the concrete cure before using it?
 
OP
A

akdiesel

Well-known member
Joined
Aug 8, 2008
Messages
2,617
Location
Wasilla, AK
Thank you.
I have not used the temp gun to see how hot it gets but it does get hot at the inside edge. I have two hair line cracks on the surface of the topper but that may have been in transit from the shop. I felt this thread was due to be here since I poured the topper in the shop. It had about a week to cure.
I thought about pouring it in place but I did not want to mess up the patio surface.
I did replace the lime with refractor to help with heat absorption.
 
OP
A

akdiesel

Well-known member
Joined
Aug 8, 2008
Messages
2,617
Location
Wasilla, AK
That looks very nice! How do you light it?

Thanks again. I looked at installing a bbq lighting system but I did not want to take away to much from the rock on the side with another button so I simply use the finger grip disposable lighters. Turn the gas on and light. It does not give a big fire ball when lit, the rocks allow for the gas to be distributed and when lit on one end it will carry over to the other vents. Just like lighting a stove.
 

Kevin54

MEMBER EMERITUS
Joined
Jan 12, 2005
Messages
29,341
Location
Urbana, Ohio
A BBQ ignition system would be simple to put in and that would be a thought for others.

If you don't mind me asking a couple of questions, what is underneath the bottom? By that I mean, did you build it on a concrete slab or is it built over gravel? The reason I ask is about drainage if you get a big rain.

Second question....If you don't mind telling, what kind of price do you have in it total? I have an ideal place for one, but I have also looked into outdoor fireplaces to burn wood. I'd really like to have something though. The bad part about gas would be tyeing into the propane and getting a line ran to the fire pit.

What you have done looks really great.
 
OP
A

akdiesel

Well-known member
Joined
Aug 8, 2008
Messages
2,617
Location
Wasilla, AK
NUTTSGT,
A 1/2" gas valve will allow for about 180,000 btu's on full open, and a 3/4" gas valve allows for 300,000 btu's. When the pit was officially opened for service we used it about 3-4 days a week for a month long for about 1-2 hours a time. I was worried about the bill, but when we got our bill this month (it has been about 2 months in service now) it was about $50 over the previous month. I feel for this is the same for a gas fireplace being used. Most of those are using a 1/2" valve.

Kevin,
A bbq lighter could be easily be installed after the fact.
The main pad is an 8" thick concrete patio with rebar and wire mesh as well as pex tubing for snowmelt. I ran a 3/4" pipe for gas prior to the pour for this purpose. It was stamped and colored by a contractor. The main reason for the 8" is due to the weight I might have if I did go with a fireplace and the origianl patio that we removed for this one was an 8" and we had no cracks for 6 years and wanted the simple ease of mind for no future cracking and weight distribution.
The first layer of the fire pit is the standard 8"x8"x16" concrete blocks, including the middle section. The second level of blocks are for just the outside parameter to incase the rocks and the fire tube. The middle section is now 8" deep (plus 1/2" grout) but since the fire tube willl only be about 2" below the top layer of rock this would leave about 10 1/2" of space in the middle (8" high concrete block, 1/2" grout, and 2" thick concrete topper). So I used the 2"x8"x16" concrete pavers (or you could use the 2"x16"x16" pavers as well) to take up some of the room and give the rocks a bedding place. So this now gives me about 8" of dead space. I used pea gravel to take most of the space at first. Then I placed the fire tube directly on the pea gravel but I also used two of the copper hangers that can have different length 1/4" pipe to add additional support but this is not really needed. Then cover with lava rock or fire glass for you preference.
As for drainage I was going to use 3/8" copper tubing placed in the grout just above the paver bed, but I simply drilled a 3/8" hole in the grout on the inside edge just above the pavers and it simply drains in the void of the blocks so the hole is not visible on the outside. The patio has control joints that you may be able to see in the pictures and I made sure not to fill these joints with mortar when laying the block for drainage.
Now for pricing...it cost me about $650 for all the parts. For the size I built (64"x32")
Price list and materials:
Concrete blocks 29 @ $1.5 each
Pavers 7 @ $4 each
Mortor 1 bag @ $8
Refractor 1 bag @ $40
Heat paint black 1 can @ $10
Pea gravel 6 bags @ $5 each
Lava rock 4 bags @ $7 each
Rock facia 8 boxes @ $40 each including corner sections
Concrete adhesive 6 tubes @ $6 each
1/2"x.035 stainless tubing 10' @$25
Fittings copper & gal @ $10 varies
Gas valve 1/2" @ $25
Concrete (Quickrete) 6 bags @ $5 each
Rebar 4 @ 8' @ $5 each
This is factoring in that you already have a cement mixer, polisher, and any other necessary tools.

For propane it was simply done by burring a 1/2" gal line back to a safe location for the tank. I had to take out the regulator check valve in order to get the flow. The reg would shut off flow if we went over 1/2 throttle on the valve. I tried to take out the regulator and WOW. you really get a flame. DON"T DO THIS. It was simply a test to see what we could do.
This system was done at my father inlaws cabin on the lake. It works great and the flame is actually bigger with the proapne versus NG.
Sorry for the long report.
 

Attachments

  • IMG_1407.jpg
    IMG_1407.jpg
    149.1 KB · Views: 189
  • IMG_1405.jpg
    IMG_1405.jpg
    147.8 KB · Views: 190
  • IMG_1403.jpg
    IMG_1403.jpg
    147.3 KB · Views: 198
  • IMG_1402.jpg
    IMG_1402.jpg
    149.4 KB · Views: 219
  • IMG_1367.jpg
    IMG_1367.jpg
    141 KB · Views: 214
  • IMG_1363.jpg
    IMG_1363.jpg
    147.1 KB · Views: 235
  • IMG_1370.jpg
    IMG_1370.jpg
    69.3 KB · Views: 218

the_saint

Well-known member
Joined
Oct 30, 2007
Messages
1,507
Location
Canada
Looks AWESOME! Thanks for the details.

Is the concrete topper just resting on the lower portion?
In the winter are you covering it up?
 
To avoid these ads, REGISTER NOW!
OP
A

akdiesel

Well-known member
Joined
Aug 8, 2008
Messages
2,617
Location
Wasilla, AK
Saint,
Thanks. The topper is held in place with the same concrete adhesive I used for the facia.
I don't plan on covering it since I plan on using it all year round and all the materials are suitable for hard winters and UV.
 

Kevin54

MEMBER EMERITUS
Joined
Jan 12, 2005
Messages
29,341
Location
Urbana, Ohio
Maybe I didn't see it above, but did you make the concrete topper yourself? I am assuming that you did. What are the red, yellow and green disk on it?

I'll say it again, you did a fantastic job. I have this save into my idea folder.
 
OP
A

akdiesel

Well-known member
Joined
Aug 8, 2008
Messages
2,617
Location
Wasilla, AK
NUTTSGT,
Correct. They are just to show the progressing stages of the grits. I started with the grinding disc to most of it level and then went to 50 grit, 100, 200, 400, and stopped at 800. It is not as smooth as granite counter tops or some of the professional concrete polished tops but it smooth enough to sit on and hold as many Alaskan IPA's as I want.
I wanted to have some sort of finished edge instead of being flat so I choose 2" door molding at Lowes. This gave me the exact thickness I wanted and a not so boring edge. I used the plastic edging so I could also to my knee wall I have been building for my pond as well. I had to pour this one in place but I made the form in the shop I have since then stained it a darker grey but still need to grout the rock. I also installed some led strip lighting on the bottom edge of the cement topper (seat) and turn it on with a 12v wired inverter and a toggle switch which is on the right lamp post. I can take some pictures of when I get back home with the light on and in day time.
 

Attachments

  • IMG_1409.jpg
    IMG_1409.jpg
    150.5 KB · Views: 238
OP
A

akdiesel

Well-known member
Joined
Aug 8, 2008
Messages
2,617
Location
Wasilla, AK
rsa Thank you. I drive a diesel truck and have seen first hand the results of unburnt diesel. Lots of power but not air friendly.
Here is a pic at night during fall. You can see the blue of the natural gas at night much easier.

Richard Thanks for the words. I did not want to sound like I was insulting so I used your other name. I have thought about doing this on the side.
 

Attachments

  • IMG_1803[1].jpg
    IMG_1803[1].jpg
    120.8 KB · Views: 226

JZHeyde

Well-known member
Joined
Apr 28, 2008
Messages
168
Awesome Build!!! I really like it.

Is there any form of "burn back" protection? or is it just a gas line run to a valve and then to the home made burner? I have been thinking about making some natural gas tiki torches for my patio and never did because I didnt want to burn my house down!!! A little info on your safety features would be great.

Thanks.
 
OP
A

akdiesel

Well-known member
Joined
Aug 8, 2008
Messages
2,617
Location
Wasilla, AK
gygeneral
Thank you. Some have reported they slightly angle the burn tube away from the valve for any moisture build up.
I am not able to find any pics of the burner right now. I'm positive I have some. I will have to look at my collection and post if I do.

JZHeyde
Thank you.
The only "burn back" item I am aware of would be those on a propane system that has the check valve in the regulator but that mainly for flow restriction. The research I did never showed any use of a check valve and all indoor gas fire places that utilize the keyed gas valve are set up the same way as mine. Not really enough pressure to utilize a check valve in a natural gas system, plus the gas would be to rich to burn in a gas line when in use.

Rickster55

Thanks, hope it works for you.
Sometimes I feel like we are in Russia with the cost shipping.
 
OP
A

akdiesel

Well-known member
Joined
Aug 8, 2008
Messages
2,617
Location
Wasilla, AK
gygeneral

Sorry it took so long to get pictures of the burner tubes. I finally found them.
The tube is made of 1/2" x .049 wall stainless tubing and 1/2" fittings after the brass valve.
 

Attachments

  • IMGP0006.jpg
    IMGP0006.jpg
    143.7 KB · Views: 193
  • IMGP0007.jpg
    IMGP0007.jpg
    145.7 KB · Views: 150

gygeneral

Well-known member
Joined
Dec 13, 2011
Messages
167
Location
Ontario, Canada
Hey, thanks for the pictures of the burner. I'm glad you didn't forget. This is a future project of mine for sure. Many thanks
 

JimVonBaden

Well-known member
Joined
Dec 2, 2011
Messages
15,716
Location
Northern Virginia
Very nicely done!

I have been contemplating doing a fire pit, but am not sure if I want to use wood or Propane. I do not have gas.

I was going round, but you may have swayed me to square.

Jim :cool:
 

NewShockerGuy

Well-known member
Joined
Oct 12, 2010
Messages
2,481
Location
Northern Virginia / DC
Do you have to cover this when it rains? Or is that even a problem? Any problem with having it ou tall year? Does it need to be covered..etc? (sorry for the lame questions)

I have been thinking of doing something like this next year or doing a normal wood burning. I just have no clue how one would run a gas line from the house to the back yard... Looks freaking awesome! This seems a lot cleaner than wood as well no mess..etc.

Thanks,
-Nigel
 
OP
A

akdiesel

Well-known member
Joined
Aug 8, 2008
Messages
2,617
Location
Wasilla, AK
gygeneral

Hope it works for you. Once again sorry it took so long to get pics.

JimVonBaden

Thank you. We have a cheap Lowes wood burning movable pit and it works well but the smoke is the main problem. The heat it transfered to the downwind side as well as the smoke. This gives a 360 deg use.

NewShockerGuy

Mine is not covered. The one I built at the cabin for my father in law is covered but does not need to be. All the parts are all weather use.
There is a drain hole in the main bed area that drains to the center of the blocks so no holes are visible on the outside, then it just leaches into the ground or out the patio edges.
The one I built at the cabin is with propane. Very similar set up only a 5 or 20 gallon tank is utilized. We staged the tank approx 15' away from the pit and burried a 1/2" gal line to the pit. works very well and a 5 gal tank will last about the same amount as a large bbq grill would. It is about the same amount of BTU's and port holes as a large grill.
You could build a small tank cover to blend in with the surroundings so it is not visible.
 
To avoid these ads, REGISTER NOW!
Top Bottom