To avoid these ads, REGISTER NOW!

New guy with framing questions

Falcon67

Well-known member
Joined
Jun 11, 2009
Messages
18,371
Location
Merkel, TX
2x6 header with 1/2" ply. Or 2x12 with 1/2 ply against the top plate with the window dimension under that. I used 2x6 but my windows were pretty small. 2x4 sill is plenty. If you have a gap between the header and the top plate, be sure and keep with your on center stud runs with jack studs.

http://www.hammerzone.com/archives/window/new/ro_framing.htm

Exterior1.jpg


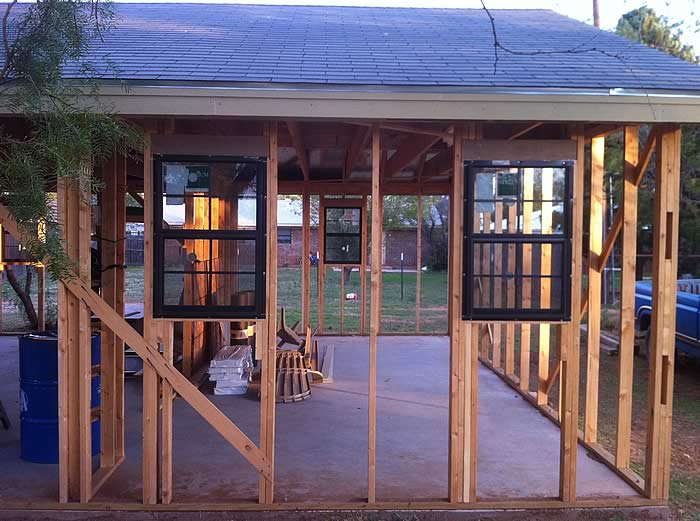
Your concrete guy is/was a slacker - the forms should have been marked for all the openings and the locations of the J bolts all around the perimeter. 12" from corners, no more than 6' apart linear.
 
Last edited:
To avoid these ads, REGISTER NOW!
OP
M

Maxtork

Well-known member
Joined
Sep 12, 2013
Messages
140
Location
Huntsville AL
Thanks Guys

I will have to pick up some more wood tomorrow and rework accordingly. unfortunately that means tearing some things apart that were just put together but better to do it now than wait till I'm much further along.

Falcon...yeah my concrete guy turned out to be an idiot. I'm glad I'm done with him. He wont be getting a call for any new work thats for sure.

Max
 

KnurledNut

Well-known member
Joined
Jan 28, 2011
Messages
8,108
Location
n/a
Did you check his concrete work for level?
Your 32" door will need to be roughed in at 34"W (and probably 82"H).
2x6 double header will be fine.
Make sure to use galvanized nails for toenails in treated bottom plate.
Your OSB should have the strength axis arrows printed on it. Run it accordingly...usually horizontal.
 
Last edited:

Cannonball

Well-known member
Joined
Aug 12, 2010
Messages
50
Location
Alberta, Canada Eh!
I agree. Excellent info on framing.

Not to highjack the thread, but it seems to fit all this information.
What dimension of lumber is used for a 16' garage door opening on a gable end (not load bearing)?
 
OP
M

Maxtork

Well-known member
Joined
Sep 12, 2013
Messages
140
Location
Huntsville AL
Thanks Guys...good info here for sure.

I checked the slab for square but not for level. I guess I should do that although it is probably too late to do much about it now.

I will be using a doubled 2x6 for window and entry door headers with plywood in between. I have the proper rough opening dimensions for the windows and doors I will use so should be good there.

Cannonball...I will be using two 18 ft lvl beams 1 3/4 " x 11 7/8" for my 16' garage door header. I know some folks use doubled 2x12 but I have also heard even that might sag in the middle. I hope the lvl will do better in that respect.

Max
 

Falcon67

Well-known member
Joined
Jun 11, 2009
Messages
18,371
Location
Merkel, TX
My 2x12 header is working so far. Have not measured for any droop, so there might be a bit. As above, the LVL is a bit more but probably worth the stretch even on a gable end. It'll certainly be easier to wrestle into place as opposed to a 2x12 sandwich with a little twist on the end.


If you know how out of square and level my slab ended up, you'd not worry about it much. My edge is that I've owned a bunch of older houses where little is square or plumb, so you learn to roll with it.
 

Falcon67

Well-known member
Joined
Jun 11, 2009
Messages
18,371
Location
Merkel, TX
Update - without getting out the laser, etc, etc a ruff estimate would be that the droop on the 2x12 beam here is 1/4~1/2". Hard to measure because one side is a tad higher than the other and the floor across the door opening varies.
 
OP
M

Maxtork

Well-known member
Joined
Sep 12, 2013
Messages
140
Location
Huntsville AL
Falcon,

Glad to hear you don't have a major sag. Is your header made from 2 full length 2x12s or is it spliced to get that length. I'm not sure what full length 2xs cost but for comparison purposes my lvl beams cost $162 for the pair.

Max
 

Falcon67

Well-known member
Joined
Jun 11, 2009
Messages
18,371
Location
Merkel, TX
I cut down 20' 2x12, used construction adhesive and scrap sheets of 1/2" ply. 2x12's ran about $1.15.ft at that time. So less than $50. I fussed over this beam and from my imprecise calculations it should be sufficient for the roof loading here. We have no snow load to figure in.
 
Last edited:
OP
M

Maxtork

Well-known member
Joined
Sep 12, 2013
Messages
140
Location
Huntsville AL
Well I drove down to Birmingham to get my trusses...looked like the damned circus coming to town.


Now I am heading in to town to get nails for joining the LVL beams together so I can get them up. Once they are in I have to nai up my sheathing before setting the trusses. I still have to fix the framing on the first window as that was the original way that I didn't like (see the left hand window in the pic).


I ended up getting LP tech shield OSB for the walls. Their website says put the foil side out for siding applications but you have to use firing strips. Is this going to be a pain in my ***? Should I just put the foil side in?

Would you guys put the sheathing on first and then trusses or vice versa?

What say the masses?

Thanks
Max
 

Toolfool

Well-known member
Joined
Aug 22, 2011
Messages
4,981
Location
Tallahassee, FL
If you don't sheath the walls before setting trusses, you'll need to put a bunch of diagonal bracing in, and get your LVL beam in and braced diagonally. Setting trusses on the walls in that last picture will result in a total collapse.
 
OP
M

Maxtork

Well-known member
Joined
Sep 12, 2013
Messages
140
Location
Huntsville AL
Thanks Toolfool...thats how I had planned to do it but I wanted to ask to be sure I wasn't missing something obvious. I got all my supplies today but I'm really not looking forward to lifting that heavy *** beam up 9 ft.

Max
 

KnurledNut

Well-known member
Joined
Jan 28, 2011
Messages
8,108
Location
n/a
Why are you using TechShield for the walls? :headscrat
Its usually used for roofs, as its a radiant barrier.

We always sheath before trusses, and i would definitely recommend this to a DIY'er. I would also keep the walls diagonally braced (inside if need be) until the trusses are on, lateral braced, and sheathed.
By sheathing the walls, you create a way to temp brace your first truss.

Here's a pic of one way, as there are many variations.
Dont skimp on your truss bracing. Ive seen 'em come down.
:Violent:
brace_1.jpg


I would also suggest building up your header in place. Get one LVL up at a time and then fasten together. The way you fasten your header is critical for lateral strength. LVL's have weak pullout strength when fastened through the end-grain. You might want to supplement w/ strongtie flat metal straps, or at least fasten your top plate securely.

Dont forget your hurricane ties after you set trusses. Use P10 nails.
:beer:
 
OP
M

Maxtork

Well-known member
Joined
Sep 12, 2013
Messages
140
Location
Huntsville AL
Knurled Nut,

I didn't plan on using the tech shield but the lumber yard ran out of standard 7/16" OSB so I got the tech shield upgrade for free.

I was going to put the LVLs together on the ground sob I could be sure to get them straight but lifting both at once is not going to be a fun time. I may have to take your advice and hoist them individually. Of course then I have the chore of nailing them together off a ladder. Well I'll figure it out tomorrow I guess.

I did get some straps to go across the tops of the LVLs to the top plates of the walls to tie them together. I got the hurricane ties from the truss guy for basically nothing so that is covered too. Now all I need is some motivation and energy...mine seems to be MIA at this point lol.

Max
 

KnurledNut

Well-known member
Joined
Jan 28, 2011
Messages
8,108
Location
n/a
LVL's dont have much of a "crown" if any since they are manufactured. The biggest problem ive had is width difference and cupping, however, minimal.
Bring some elbow grease if your nailing the LVL's by hand.
If using air or cordless, you'll probably still have to beat some in by hand. They are dense and tough. Clamp 'em if you can.
 
OP
M

Maxtork

Well-known member
Joined
Sep 12, 2013
Messages
140
Location
Huntsville AL
Well I got the beams up this morning. Man was that a PITA!. I still have to nail them together but they are fixed and solid now. Believe it or not the corner posts are plumb! I was planning on all kinds of monkey motion to square things up once the beams were in place.

I got all the trusses unloaded too. So now I have to finish nailing the beams together and finish framing in the window. Then I have to cut 10 million short 2x4s for blocking where the OSB sheets come together between studs. Anyone got any tips on that process? I know I'm going to have to toe nail them in but I can see those simple little blocks causing me some grief.


Max
 

Bsj04

Well-known member
Joined
May 28, 2012
Messages
194
Location
Aledo, TX
I'd sheet the walls before putting the trusses up. The blocking isn't too bad. I did mine on the ground. I shot nails from the outside of both studs being attached to the block. The clear side will be nailed like you normally would and the other I just got the gun as close to the previous block and shot the nail at a slight angle into the block you are attaching.
 
To avoid these ads, REGISTER NOW!
OP
M

Maxtork

Well-known member
Joined
Sep 12, 2013
Messages
140
Location
Huntsville AL
I just had another friend suggest using h clips instead of blocking...is that legal according to code?

Max
 

Toolfool

Well-known member
Joined
Aug 22, 2011
Messages
4,981
Location
Tallahassee, FL
I've never seen H-clips used for wall sheathing, only for 1/2" ply on roof between trusses. Your approved plans should call out what's required.
 
OP
M

Maxtork

Well-known member
Joined
Sep 12, 2013
Messages
140
Location
Huntsville AL
I'm no pro but I have never seen the H clips on walls either. I'm gonna call the inspector tomorrow to see what options I have. The plans say 2x blocking at sheathing seams but if I can get around it legally it would be great. I guess I could run my first course of OSB vertically and then a short strip along the top. That way I will only have one row of blocking to deal with. Of course that may not make the wall as strong running them that way according to some folks.

Do you guys run your blocking flat so you are nailing through your sheathing into the edge of the block or upright so you nail into the wide face of the block?

Thanks for all the info...I can't believe I have gotten this far!

Max
 
OP
M

Maxtork

Well-known member
Joined
Sep 12, 2013
Messages
140
Location
Huntsville AL
Well I called the inspector today and he said no blocking was required since my wall spaces are less than 10 ft. That will save me a ton of cutting before I get to putting up OSB. Since LP says to put Techshield on with the silver side out on walls I will have to run firing strips to space the siding out 3/4". So I will have a gap between siding and walls anyway so not very concerned about any funny edges showing through.

I didn't get to work on the garage much after work today since I got home late but I fixed the window framing that was jacked up. Next project is to start drilling for anchor bolts and getting the walls tied down good. Then OSB should go up this weekend.

Thanks for all the help and advice...it has helped a ton already.

Max
 

DarrenF

Well-known member
Joined
Mar 11, 2008
Messages
291
Location
Thunder Bay, Ontario
Run osb horizontal. Full sheets at the bottom, full sheets along the top, strip in the middle. All joints staggered. This makes a stronger wall.
 
OP
M

Maxtork

Well-known member
Joined
Sep 12, 2013
Messages
140
Location
Huntsville AL
Darren

I was planning on running them horizontal but is there much benefit to putting a full sheet at the top and the short strip in the middle? I was going to run full sheets towards the bottom and the short strip up top, simply because it would be easier to lift the half sheets that high up (call me lazy I don't care lol). If the way you explained is really better I can do it that way. If so, should I put the bottom course and the top course on and then cut the short strip to fit?

Max
 

DarrenF

Well-known member
Joined
Mar 11, 2008
Messages
291
Location
Thunder Bay, Ontario
yes. it is better for shear strength and uplift strength. Probably not a huge difference being that your narrow strip will still be 24" wide. If it was say 10" then you definatly want it in the middle for maximum strength. That being said, i have seen it done both ways. Myself, i'd have it in the middle.
 
OP
M

Maxtork

Well-known member
Joined
Sep 12, 2013
Messages
140
Location
Huntsville AL
Hey Guys,

Well I got all the sheathing on finally. As you can see I put the short strip on the top. After doing the bottom row I decided hoisting full sheets to the top of the wall by myself was going to be a pain and possibly dangerous so the short strip went at the top.

I also got the gable end truss put up using my redneck engineering solution. Looks scary but it actually worked ok. My question now is about roof sheathing. I have a drop gable end truss so I can build a 1 ft gable overhang on either end. So this means my 40 foot building will need 42 ft of roof sheathing. With this being the case would you start your sheets at the outside edge of the overhang? Or would you start them at the end gable and scab in a piece for the overhang portion? Obviously each course will have the seams staggered but the same issue comes up as the outside edge of the overhang is only one foot wide. If I start all the way out my next sheet will meet at a space between trusses instead of centered on one. If I start and the end truss and scab in a 1 ft section for the overhang will that allow it to sag or look bad?

Any ideas?


Max
 

sophijo

Well-known member
Joined
Apr 7, 2012
Messages
131
Location
SE Michigan
You'll have some waste; unless you order some 10' sheets. Just dont span less than 3 rafters with a piece of sheathing.
 

mgsb38

Member
Joined
Oct 14, 2013
Messages
17
Max, did you end up going with the Titen HD anchor bolts? If so, what diameter and length did you use? I'm considering using them for my build and just wondering what your experience was. Thanks!
 
OP
M

Maxtork

Well-known member
Joined
Sep 12, 2013
Messages
140
Location
Huntsville AL
Yes I did use the Titen HD bolts. I used 1/2" bolts 6" long. They worked great but drilling into concrete was a chore. Make sure you blow all the dust out of the holes really well before putting them in. Otherwise they tend to get stuck towards the bottom.

Max
 

mgsb38

Member
Joined
Oct 14, 2013
Messages
17
Cheers, Max. Do you know if you used the mechanically galvanized bolts or the zinc plated ones? I'm having trouble figuring out the difference and if one offers better corrosion resistance when anchored in a pressure treated sill plate.
 

CTyankee

Well-known member
Joined
Jan 13, 2013
Messages
3,792
Location
CT
Ideally the sheathing should cantilever out over the end of the roof to pick up the overhang framing. As mentioned, you've got to expect to make some cuts that will result in some "waste".

Off topic from you're question....Is there a reason why the jack studs of the door header aren't directly along side(and attached) to the king studs? I don't believe I've ever seen them spaced away from the ends of the header like that.
 

timewarp

Well-known member
Joined
Feb 24, 2008
Messages
272
Location
Silverdale, WA
If your overhangs will be exposed, what everyone does around here is uses plywood for the overhangs, then OSB for the rest of the roof sheeting. You can put the overhangs with the grain running up and down the roof on the ends, and the rest of the sheeting runs across the roof.
 
OP
M

Maxtork

Well-known member
Joined
Sep 12, 2013
Messages
140
Location
Huntsville AL
Cheers, Max. Do you know if you used the mechanically galvanized bolts or the zinc plated ones? I'm having trouble figuring out the difference and if one offers better corrosion resistance when anchored in a pressure treated sill plate.

I think mine were the galvanized ones. I don't know the difference between the two but I know you are supposed to use galvanized nails in pressure treated wood so you will probably be good with that. The zinc might be better but I don't think I would worry much if using the galvanized.

Max
 
OP
M

Maxtork

Well-known member
Joined
Sep 12, 2013
Messages
140
Location
Huntsville AL
Ideally the sheathing should cantilever out over the end of the roof to pick up the overhang framing. As mentioned, you've got to expect to make some cuts that will result in some "waste".

Off topic from you're question....Is there a reason why the jack studs of the door header aren't directly along side(and attached) to the king studs? I don't believe I've ever seen them spaced away from the ends of the header like that.

CTyankee,

I think I have the overhangs figured out. I am just going to have some waste pieces. I just hope I have enough wood to cover it all. I think I should be ok.

As for your question about the jack studs I don't have a good answer for you. Normally your header is only 6 inches longer on either side than the door opening so the king studs and jacks are right next to each other. Since my header was a bit longer on each side I left the jacks at the door opening and the kings further out. I guess my thought was to cantilever the header a bit. I know it probably isn't traditional but I'm hoping it is still good enough. If the inspector ha an issue with it I can always throw in a couple extra jacks right next to the king studs so it looks like normal out at the ends with and extra jack stud further in at the door opening.

Max
 

CTyankee

Well-known member
Joined
Jan 13, 2013
Messages
3,792
Location
CT
CTyankee,

I think I have the overhangs figured out. I am just going to have some waste pieces. I just hope I have enough wood to cover it all. I think I should be ok.

As for your question about the jack studs I don't have a good answer for you. Normally your header is only 6 inches longer on either side than the door opening so the king studs and jacks are right next to each other. Since my header was a bit longer on each side I left the jacks at the door opening and the kings further out. I guess my thought was to cantilever the header a bit. I know it probably isn't traditional but I'm hoping it is still good enough. If the inspector ha an issue with it I can always throw in a couple extra jacks right next to the king studs so it looks like normal out at the ends with and extra jack stud further in at the door opening.

Max

Gotcha...I kind of figured the header length being larger than needed for the opening played a part of it. I'm honestly not aware if the way it's constructed it is a code issue or not, just never have seen it. Personally I'd throw a couple of studs next to the king studs regardless.... just for some added rigidity....but I've also been told on more than one occasion that I overbuild things...:) Good to see things are progressing along...:thumbup:
 
OP
M

Maxtork

Well-known member
Joined
Sep 12, 2013
Messages
140
Location
Huntsville AL
Hey Guys,

I have another question you might be able to help me with.

What are you guys using for fascia boards on the ends of your trusses and on the gable end overhangs? I was going to use either 2x6 or 2x8 on the eaves and one step smaller board on the gable ends. Since the gable end piece will be cut on an angle it might match up better where it meets the end of the eaves section. Any thoughts?

Also do you let your roof sheathing overhang the fascia on the eaves a bit or do you start it flush? I know I need the metal drip edge but not sure if it works better flush of with the OSB left proud a 1/2" or so.

Your two pesos worth if you please!

Max
 
To avoid these ads, REGISTER NOW!
Top Bottom