Dolfan
Well-known member
I’m back with what I hope is another helpful post and product for MaxJax users. You may remember my original post here in GarageJournal some 10 years ago when the MaxJax was a very new product. That post went through the entire process from transporting, installation, and use. You can see that item here MaxJax V1 Install and Comparision
My original MaxJax was the best tool in my garage. I did some work on my 4-post lift and I far prefer working on a 2-post lift, except for simple things like a fluid change. My original MaxJax cylinders began to leak and I needed to get them serviced. I reached out to my contacts at BendPak for some technical information on the cylinders. As we began to talk, they said it might be better to just go ahead and upgrade to the latest MaxJax. The team at BendPak told me the new product could be requested with product number MJ6-SW. SW indicates MaxJax Switch. While that was a great idea and adding some of the new features would be nice, I really didn’t want to redo the concrete or anchors as the latest MaxJax uses a different mounting plate and hole pattern.
The BendPak team realized that there are likely other people like me who might want to upgrade to the new features but didn’t want to redo the mounting plates. Something like a plug-n-play solution. So, the BendPak team worked with their engineers to build a new MaxJax item that combines the older baseplate with the new MaxJax lift features, like the integrated safety latches, multiple standard lift positions, and other improvements
The BendPak team built an initial version as a prototype for me to drop into place and document the process and any issues that an existing MaxJax owner might experience while upgrading. Then they could offer this new product to the public.
Step 1: Transportation and Unloading
Well, this is almost the same as the original but like me, many of you should be able to make this process a bit easier. The shipping crate fits in a standard pickup just fine, which allowed me to pick it up from the shipping depot. But as many DIY people, I find myself doing many things myself and sometimes ask my wife to lend a hand with items that aren’t super heavy (or greasy) So I unboxed the crate and broken it down in the bed of the truck, pulling out all the items that can be lifted by hand to make room to work on extracting the lift posts. Once I was down to just the posts, I jumped ahead a step and installed the post wheels before I got the posts out of the truck, which helped me as I dropped the posts out of the truck.


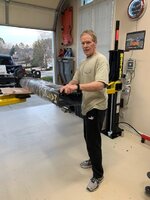
This is where things should be easier for MaxJax users. I used my MaxJax 1.0 to lift and then drop the MaxJax 2.0! No extra equipment needed like an engine hoist. I put the arms together and used a piece of plywood to make a raised platform to pull the post off the truck and then steadily lower the post to the ground. It’s a super easy and smooth process.

Step 2: Assembly
Next, I assembled the power unit. This step helps to get a bunch of parts together and since it is mobile, I can move the unit out of the way to get on with the heavier work. The power unit assembly is pretty simple to do. The only potential issue is lining up the hose from the pump to the distribution box. I chose to leave a bit of an angle to the fitting to help the hose maintain an easy curve that won’t stress the hose ends much. And with all the hydraulic fittings, the thread sealant that is included is a nice upgrade from the previous product.

Next is the heavier work on the posts and cylinders. I found it good to lay the post down on something to make it level, which makes the removal of the cylinders go smooth. Once the cylinders are out, all that is left is to assemble the fittings together and then attach them to the cylinder.

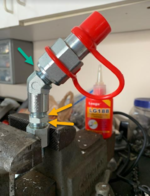
This is where just a little planning on the direction of the hoses is helpful but remember you must be able to insert the cylinder with the attached fittings. If you tighten the fitting assembly and it ends up at 90 degrees to the cylinder, you probably can’t get it through the opening. So, plan ahead with how you tighten the series of fittings on the assembly. If you have a vise, use this to get these together and to tighten them. I tighten the quick connector to the 45 fitting completely (green arrow) because this position won’t move. But the other connections (yellow arrows) will change the orientation of the complete fitting and make the assembly easy, so I tightened these but not 100%. That allowed me to “tweak” the tightening of the entire assemble when in the cylinder and to have it in the direction I wanted.
Once the cylinders are in place, you are ready to continue with the next step.

Step 3: Integrated Safety Lock
Now for the new feature; the integrated safety lock mechanism. This is a nice upgrade from the metal rod on the original V1 MaxJax and only two locations for the rod. I know some people modified the posts, but I didn’t. Assembly of the mechanism is pretty simple, but I did come up with a few tips I think helped. The first tip is to place masking tape where the end of the springs hit the posts so that while assembling and moving the springs you don’t scratch the posts. The second tip is to get one spring in place with the rod and only insert it through one side of the bracket. The tension of the spring will hold it in place. Then it is easy to put the locking assembly in, lineup the hole, push the pin through, add the second spring and cotter pin and you are done!

Continued on next Post
My original MaxJax was the best tool in my garage. I did some work on my 4-post lift and I far prefer working on a 2-post lift, except for simple things like a fluid change. My original MaxJax cylinders began to leak and I needed to get them serviced. I reached out to my contacts at BendPak for some technical information on the cylinders. As we began to talk, they said it might be better to just go ahead and upgrade to the latest MaxJax. The team at BendPak told me the new product could be requested with product number MJ6-SW. SW indicates MaxJax Switch. While that was a great idea and adding some of the new features would be nice, I really didn’t want to redo the concrete or anchors as the latest MaxJax uses a different mounting plate and hole pattern.
The BendPak team realized that there are likely other people like me who might want to upgrade to the new features but didn’t want to redo the mounting plates. Something like a plug-n-play solution. So, the BendPak team worked with their engineers to build a new MaxJax item that combines the older baseplate with the new MaxJax lift features, like the integrated safety latches, multiple standard lift positions, and other improvements
The BendPak team built an initial version as a prototype for me to drop into place and document the process and any issues that an existing MaxJax owner might experience while upgrading. Then they could offer this new product to the public.
Step 1: Transportation and Unloading
Well, this is almost the same as the original but like me, many of you should be able to make this process a bit easier. The shipping crate fits in a standard pickup just fine, which allowed me to pick it up from the shipping depot. But as many DIY people, I find myself doing many things myself and sometimes ask my wife to lend a hand with items that aren’t super heavy (or greasy)
So I unboxed the crate and broken it down in the bed of the truck, pulling out all the items that can be lifted by hand to make room to work on extracting the lift posts. Once I was down to just the posts, I jumped ahead a step and installed the post wheels before I got the posts out of the truck, which helped me as I dropped the posts out of the truck. This is where things should be easier for MaxJax users. I used my MaxJax 1.0 to lift and then drop the MaxJax 2.0! No extra equipment needed like an engine hoist. I put the arms together and used a piece of plywood to make a raised platform to pull the post off the truck and then steadily lower the post to the ground. It’s a super easy and smooth process.
Step 2: Assembly
Next, I assembled the power unit. This step helps to get a bunch of parts together and since it is mobile, I can move the unit out of the way to get on with the heavier work. The power unit assembly is pretty simple to do. The only potential issue is lining up the hose from the pump to the distribution box. I chose to leave a bit of an angle to the fitting to help the hose maintain an easy curve that won’t stress the hose ends much. And with all the hydraulic fittings, the thread sealant that is included is a nice upgrade from the previous product.
Next is the heavier work on the posts and cylinders. I found it good to lay the post down on something to make it level, which makes the removal of the cylinders go smooth. Once the cylinders are out, all that is left is to assemble the fittings together and then attach them to the cylinder.
This is where just a little planning on the direction of the hoses is helpful but remember you must be able to insert the cylinder with the attached fittings. If you tighten the fitting assembly and it ends up at 90 degrees to the cylinder, you probably can’t get it through the opening. So, plan ahead with how you tighten the series of fittings on the assembly. If you have a vise, use this to get these together and to tighten them. I tighten the quick connector to the 45 fitting completely (green arrow) because this position won’t move. But the other connections (yellow arrows) will change the orientation of the complete fitting and make the assembly easy, so I tightened these but not 100%. That allowed me to “tweak” the tightening of the entire assemble when in the cylinder and to have it in the direction I wanted.
Once the cylinders are in place, you are ready to continue with the next step.
Step 3: Integrated Safety Lock
Now for the new feature; the integrated safety lock mechanism. This is a nice upgrade from the metal rod on the original V1 MaxJax and only two locations for the rod. I know some people modified the posts, but I didn’t. Assembly of the mechanism is pretty simple, but I did come up with a few tips I think helped. The first tip is to place masking tape where the end of the springs hit the posts so that while assembling and moving the springs you don’t scratch the posts. The second tip is to get one spring in place with the rod and only insert it through one side of the bracket. The tension of the spring will hold it in place. Then it is easy to put the locking assembly in, lineup the hole, push the pin through, add the second spring and cotter pin and you are done!
Continued on next Post