To avoid these ads, REGISTER NOW!

New Member Tool Box Refurbisb

Clutchrider

Well-known member
Joined
Jun 24, 2018
Messages
49
Location
CT
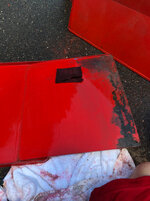
I inherited what I consider a gem or gems from my fil today. I already have a small blue Craftsman top hinge cabinet and the matching top box. But he is cleaning up and out his garage and gave me this amazing opportunity to finally have a place for all my tools so I am not torn between basement and garage.

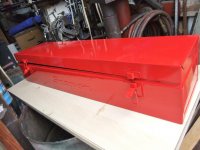
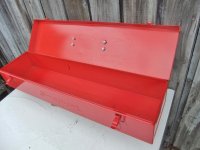
The main roller is Snap-On with a folding shelf and h gong box with internal drawers. The other is a Craftsman and then the other which I can’t think of the name but it begins with math?

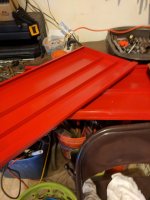
So I’m beginning my journey to disassembled, clean, repaint, and put it to use over the next several weeks/months.

Would love any insight, tips, etc. you can throw my way. I’m pretty handy and hope to keep posting updates. Glad I found this place!

Apparently I cannot post pics until I hit 5 posts. Count this as one and I’ll get pics up soon!
 
To avoid these ads, REGISTER NOW!

Johnny Generic

Well-known member
Joined
Nov 24, 2015
Messages
601
Location
35 miles NE of Pittsburgh, Pa.
Damn Garage Journal, got me addicted to collecting CM tool boxes and chests. Always on craigslist, going to actions, yard sales, estate sales, sniffing them out. Here is what I do to my boxes to get them to my standards.

CLEANING

1. Completely disassemble. pull drawers, sliders, take off chrome pull covers, locks, name badges, casters.

2. Remove any built up grease and grime with a putty knife, soak down box with a degreaser, power wash box and drawers, clean sliders with stiff brush and gasoline.

PAINT PREP

3. Rub down ( scuff ) all areas to be painted with Scotch bright pads ( green ). Wipe down areas to be painted with acetone.

4. Mask off any areas that are not to be painted ( badges handles. stickers ).

PAINT

5. I use Rust-Oleum primer as directed. Light coat on every thing that will be painted.
I use Rust-Oleum Sunrise red for the box frame and Smoke gray for the drawers. Follow directions on paint can!!! I do not paint the bottoms of the boxes nor the insides. Some times I just paint the drawer faces. Most of the time I paint the whole drawer. HINT, if only painting the faces get a large cardboard box cut out area just large enough so that drawer won't pass through and then paint face. just enough area on the sides of the drawers will get paint when drawer is shut.

6. Let paint dry at least 48 hours before assembling. I like to let the boxes bake in the sun for a few hours.

&. Remove tape from masked off areas. Clean chrome drawer handle covers with Mothers polish. Reassemble.

9. After about a week I spray down all exposed areas with a detail wax and then lightly wipe down with soft cloth.

10. I line drawers with cabinet liner or use yoga mat. No glue.

Start sniffing out the yard , estate sales, craigslist, auctions.

FILL UP WITH TOOLS and ENJOY.

FOLOW ALL DIRECTIONS AND WARNINGS THAT ARE POSTED ON THE PRODUCTS THAT YOU WILLBE USING.

THAT'S THE WAY I DO MY BOXS. FEEL FREE TO MAKE ANY COMMENTS. ALWAYS WILLING TO LEARN.

Any questions PM me.

Hoped this is some help to you.

JOHNNY GENERIC
 
OP
C

Clutchrider

Well-known member
Joined
Jun 24, 2018
Messages
49
Location
CT
I was tempted to make an electrolysis tub but not sure I need to be so extreme. One drawer won’t open so I need to troubleshoot and get it out.

Any preference for bottom mat vs foam? I have mat now in my other box but would love to try the cut to your size foam to hold the tools better so nothing slides around but the cost difference seems pretty high.
 

ChaseDE

Well-known member
Joined
Aug 25, 2016
Messages
2,178
Location
Delaware
Need pics!

Usually with the snap-on stuff the handles, badge, etc are detachable so you don't need to tape them off before paint, you can remove them and paint.
 

Attachments

  • IMG_20180620_065816.jpg
    IMG_20180620_065816.jpg
    85.1 KB · Views: 268
OP
C

Clutchrider

Well-known member
Joined
Jun 24, 2018
Messages
49
Location
CT
Dying to post pics as I got the drawers out of the big roller this morning. Kept bending hacksaw blades so I gave up and drilled the rivers. Figured I may end up replacing the friction slides altogether anyways but we shall see.

Apparently you need 5 posts to be able to add pics so I’ve been restricted. I’ll try again later today.

Good to know I can pop the badges. Was going to power wash it quick after decades of dust collections.
 
OP
C

Clutchrider

Well-known member
Joined
Jun 24, 2018
Messages
49
Location
CT
Pics as promised! Is there an issue with Tapatalk posting images? I'll check with the support because it either would not load saying there was an issue or it would tell me I cannot post image links because I did not have 5 posts.

Turns out the box on the lower right is a Waterloo, then a Craftsman on top of the Snap-On
https://scontent-lga3-1.**.fbcdn.net/v/t1.0-9/36087835_10155981483544051_7919488152689967104_n.jpg?_nc_cat=0&oh=2509572effc382aa565e123811671ac2&oe=5BA54474

Here is the roller cart, I ended up drilling out the drawers because they were just getting to frustrating.
https://scontent-lga3-1.**.fbcdn.net/v/t1.0-9/36188455_10155982358129051_5965649693709959168_n.jpg?_nc_cat=0&oh=585d102da4de94a72319534a41ab4d76&oe=5BAD1911
https://scontent-lga3-1.**.fbcdn.net/v/t1.0-9/36199813_10155982358124051_5296393969658232832_n.jpg?_nc_cat=0&oh=3932e89f9a1036004737e50a2534c040&oe=5BA17457
https://scontent-lga3-1.**.fbcdn.net/v/t1.0-9/36176037_10155982358159051_4139594942806753280_n.jpg?_nc_cat=0&oh=eb51e16954aa50123056b2f0ffe41849&oe=5BB3920F
 
Last edited:

Billythekid1

Well-known member
Joined
Jun 30, 2015
Messages
240
U can slip a hacksaw blade between the slides google it and look at a pic there I can't post pics for some reason
 
OP
C

Clutchrider

Well-known member
Joined
Jun 24, 2018
Messages
49
Location
CT
U can slip a hacksaw blade between the slides google it and look at a pic there I can't post pics for some reason


I tried that. Several times and watched several videos. I think they were wedged bad because of decades of sitting in a body shop so the dust, overspray, etc. was bad. I mean I was grabbing handfuls of dust from the bottom of the trays.
 
Last edited:
OP
C

Clutchrider

Well-known member
Joined
Jun 24, 2018
Messages
49
Location
CT
Freshly sprayed down, the dirt was seriously caked on there and I got a model number, KRA-377A.

https://scontent-lga3-1.**.fbcdn.net/v/t1.0-9/36038394_10155982614549051_6782851055240609792_n.jpg?_nc_cat=0&oh=be5a9c4e6534a24c610b87cb6f2cefb5&oe=5BABF301
https://scontent-lga3-1.**.fbcdn.net/v/t1.0-9/36114252_10155982614484051_4786405184949452800_n.jpg?_nc_cat=0&oh=ac20c2df54b772b68fd4860239858701&oe=5BAF14B1
https://scontent-lga3-1.**.fbcdn.net/v/t1.0-9/36177207_10155982614479051_1132094203166195712_n.jpg?_nc_cat=0&oh=9f2b7ad563432b754b1361fb7846f539&oe=5BAEFD7D
 
OP
C

Clutchrider

Well-known member
Joined
Jun 24, 2018
Messages
49
Location
CT
Grabbed my grandfathers hammers and did some adjusting of dents, bends, etc. This one corner was really bothering me. I'm still debating if I want to do a full restore/repaint or just clean it up as best I can re-grease the drawers and put it back together.

https://scontent-lga3-1.**.fbcdn.net/v/t1.0-9/36087462_10155982766574051_6816906044204122112_n.jpg?_nc_cat=0&oh=f78fe95aba68e0cdf283c95fc455716e&oe=5BB705F2
https://scontent-lga3-1.**.fbcdn.net/v/t1.0-9/36175967_10155982766569051_7159917495560699904_n.jpg?_nc_cat=0&oh=8b112bc171017aa5698f4c4db4b700ac&oe=5BA72E66
 

txlonghorn1989

Well-known member
Joined
Feb 27, 2017
Messages
2,786
I was tempted to make an electrolysis tub but not sure I need to be so extreme. One drawer won’t open so I need to troubleshoot and get it out.

Any preference for bottom mat vs foam? I have mat now in my other box but would love to try the cut to your size foam to hold the tools better so nothing slides around but the cost difference seems pretty high.

Congrats, those are some nice toolboxes! I like the Husky liner from HD.
 
Last edited:
OP
C

Clutchrider

Well-known member
Joined
Jun 24, 2018
Messages
49
Location
CT
I hope you caught that your box was made in 1965.

That would be a lot of work to restore.
I wasn't sure if that was the manufacture year. I'm thinking if I can just get some of the paint splatter and other stuff removed (wet sand) and then just cleanup as best I can and get the tracks back in place I'll have a good set of boxes to add to my collection.

I don't think I'm up for sand blasting, paint, etc. as it would end up looking shoddy.
 

flushcut

Well-known member
Joined
Aug 10, 2016
Messages
226
Location
Delavan WI
IMO clean it up, straighten as best as you can, lube'r down, and shoot it with clear. I love that shop patina. If only that box could talk.
 
OP
C

Clutchrider

Well-known member
Joined
Jun 24, 2018
Messages
49
Location
CT
My fil is a body shop guy since his late teens. He does side jobs from home. Just recently fixed my car after someone cut the corner while I sat at a stop sign and drove right into me.

I’m sure these boxes have some good stories to them.

https://scontent-lga3-1.**.fbcdn.net/v/t1.0-9/36188141_10155983580854051_858403936283918336_n.jpg?_nc_cat=0&oh=81e344ea6f7f451f60fbddbd5b5ff8cb&oe=5BE2D221
https://scontent-lga3-1.**.fbcdn.net/v/t1.0-9/36188467_10155983385034051_6665999645249896448_n.jpg?_nc_cat=0&oh=62bf8fba0d31d4600d6f4df66ce42742&oe=5BA83E2B
 
Last edited:

xin

Well-known member
Joined
Feb 13, 2017
Messages
697
Location
ARKANSAS - NWA
Freshly sprayed down, the dirt was seriously caked on there and I got a model number, KRA-377A.

https://scontent-lga3-1.**.fbcdn.net/v/t1.0-9/36038394_10155982614549051_6782851055240609792_n.jpg?_nc_cat=0&oh=be5a9c4e6534a24c610b87cb6f2cefb5&oe=5BABF301
https://scontent-lga3-1.**.fbcdn.net/v/t1.0-9/36114252_10155982614484051_4786405184949452800_n.jpg?_nc_cat=0&oh=ac20c2df54b772b68fd4860239858701&oe=5BAF14B1
https://scontent-lga3-1.**.fbcdn.net/v/t1.0-9/36177207_10155982614479051_1132094203166195712_n.jpg?_nc_cat=0&oh=9f2b7ad563432b754b1361fb7846f539&oe=5BAEFD7D


LOT of history with them boxes I would KEEP them.

:thumbup:
 
OP
C

Clutchrider

Well-known member
Joined
Jun 24, 2018
Messages
49
Location
CT
LOT of history with them boxes I would KEEP them.

:thumbup:

The stickers I actually really like, doubt you could find them around today, adds to the patina. A good cleanup and we shall see where we end up. Will keep posting as I still have to finish this roller, then do the hanging side cabinet and the Craftsman and Waterloo box.

One of the friction sliders is bent so I'm not sure if I should replace or what would be a good solution to bend it back.
 

xin

Well-known member
Joined
Feb 13, 2017
Messages
697
Location
ARKANSAS - NWA
The stickers I actually really like, doubt you could find them around today, adds to the patina. A good cleanup and we shall see where we end up. Will keep posting as I still have to finish this roller, then do the hanging side cabinet and the Craftsman and Waterloo box.

I like them stickers myself (I would keep them on there).
 
To avoid these ads, REGISTER NOW!
OP
C

Clutchrider

Well-known member
Joined
Jun 24, 2018
Messages
49
Location
CT
Looks like I'm going for a full restore on this one.

https://scontent-lga3-1.**.fbcdn.net/v/t1.0-9/36374588_10155991263304051_2753634194960678912_n.jpg?_nc_cat=0&oh=75db5fe669a298287658dde66fb4ef8f&oe=5BEB6AF2
https://scontent-lga3-1.**.fbcdn.net/v/t1.0-9/36345311_10155991263444051_3882919614069342208_n.jpg?_nc_cat=0&oh=fabc821d6ec5c44a7e1941e568497aee&oe=5BA0EDA5
 

Mr_B

Well-known member
Joined
Nov 21, 2016
Messages
5,374
Location
Reading
Get your fil to spray them, I use epoxy and straight colors no clear coat as lasts better and easier buff/touch in .
Fair bit of work prepping them but well worth effort if using decent paint products .
 

Unruh

Well-known member
Joined
Aug 12, 2017
Messages
1,431
Location
Silverdale, Washington
Looks like a fun project and thanks for sharing. I always get really excited doing projects like this and rush the painting process. My advice, make sure to allow everything to really dry before moving on to the next step.
 
OP
C

Clutchrider

Well-known member
Joined
Jun 24, 2018
Messages
49
Location
CT
Was able to get the side cabinet taken apart today, the. Took a scotch pad with water and degreaser to cleanup the cabinet and drawers. Pulled the beat up casters too. Got to see the real red underneath. Used a heat gun for the decals, figure I can find new SO vinyl to put on when I’m done.

Does anyone have a paint color that closely matches?

cd12c9b549e2e92335297543307901f6.jpg
ccfe214a1d05c9270ec388bf32d78fad.jpg
23f10ee4a18f5701a106805ea0293526.jpgd0c4c21109df7be61c09b72fa3480397.jpga387184de1e2cc777e41563cb5157012.jpg35f7c1481078ac6533adbde09afc530c.jpgeea9cb13b4a4c79921f41ae285b9b138.jpg30ae018dbbc5586e9d8f3347710ef0d9.jpg
 

Attachments

  • 30ae018dbbc5586e9d8f3347710ef0d9.jpg
    30ae018dbbc5586e9d8f3347710ef0d9.jpg
    807.6 KB · Views: 8
  • eea9cb13b4a4c79921f41ae285b9b138.jpg
    eea9cb13b4a4c79921f41ae285b9b138.jpg
    851.5 KB · Views: 7
  • 35f7c1481078ac6533adbde09afc530c.jpg
    35f7c1481078ac6533adbde09afc530c.jpg
    1 MB · Views: 7
  • a387184de1e2cc777e41563cb5157012.jpg
    a387184de1e2cc777e41563cb5157012.jpg
    1.1 MB · Views: 7
  • d0c4c21109df7be61c09b72fa3480397.jpg
    d0c4c21109df7be61c09b72fa3480397.jpg
    1.1 MB · Views: 7
  • 23f10ee4a18f5701a106805ea0293526.jpg
    23f10ee4a18f5701a106805ea0293526.jpg
    1.1 MB · Views: 8
  • ccfe214a1d05c9270ec388bf32d78fad.jpg
    ccfe214a1d05c9270ec388bf32d78fad.jpg
    1 MB · Views: 9
  • cd12c9b549e2e92335297543307901f6.jpg
    cd12c9b549e2e92335297543307901f6.jpg
    1,003.5 KB · Views: 9
OP
C

Clutchrider

Well-known member
Joined
Jun 24, 2018
Messages
49
Location
CT
HF had a sale that really made me figure my full restore or 95% restore will be worthwhile. I invested in a grinder and found a paint/rust removal wheel. They had a basic 4.5" grinder for $9.99 with the coupon and I had a 20% for other items. So I picked up two abrasive wheels and the grinder and a set of new wire brushes, $25 out the door.

I know it's not a Milwaukee M18 for over $100 but it will do this job and others I'm sure. Had to test it when I got home and was pleased with how easy it was to strip down the paint and not mess up the metal underneath. Looking forward to some fun tomorrow!

https://scontent-lga3-1.**.fbcdn.net/v/t1.0-9/36679842_10156005541704051_7600655112352038912_n.jpg?_nc_cat=0&oh=f7dc7829dbdb60922b855a344747754a&oe=5BAC2EDE
https://scontent-lga3-1.**.fbcdn.net/v/t1.0-9/36666645_10156005541724051_1852286078979932160_n.jpg?_nc_cat=0&oh=e8280f3799ca6a57eace94d1f3f81765&oe=5BDCA594
 

ChaseDE

Well-known member
Joined
Aug 25, 2016
Messages
2,178
Location
Delaware
Rustoleum Sunrise Red is very close to a match but not perfect. That is what I am using on my SO restore.

attachment.php
 

Attachments

  • IMG_20180619_200222.jpg
    IMG_20180619_200222.jpg
    77.9 KB · Views: 885
OP
C

Clutchrider

Well-known member
Joined
Jun 24, 2018
Messages
49
Location
CT
Rustoleum Sunrise Red is very close to a match but not perfect. That is what I am using on my SO restore.

attachment.php

That's where I was going next. I don't own any other SO boxes so EXACT color matching would not be 100% necessary. I plan on covering in Rustoleum primer first then layering a color like you mentioned. Are you planning to do any clear?
 

ChaseDE

Well-known member
Joined
Aug 25, 2016
Messages
2,178
Location
Delaware
I don't think so, I did a few smaller drawers with 2 or 3 coats of red and let them cure a few days. Threw a bunch of cruddy old ratchets and sockets in them and shook the hell out of them (scientific testing) and didn't see a single scratch. Rattle can cures pretty hard apparently.
 
OP
C

Clutchrider

Well-known member
Joined
Jun 24, 2018
Messages
49
Location
CT
I don't think so, I did a few smaller drawers with 2 or 3 coats of red and let them cure a few days. Threw a bunch of cruddy old ratchets and sockets in them and shook the hell out of them (scientific testing) and didn't see a single scratch. Rattle can cures pretty hard apparently.

Definitely used the scientific method lol! I plan on putting liners or the thicker foam in the drawers anyways, same as I have for my blue Crafstman roller/chest combo. I'm going to take it one box at a time so the roller and drawers first, then the hanging cabinet, then the other two boxes which are Craftsman and Waterloo.

I found that one of the friction slides is bent down slightly, not sure I can get it back in place or just find a replacement. After reading up it seems using Slide Eeze wax is a really good option for these. I do have to re-rivet some of the stop plates.
 

Mr_B

Well-known member
Joined
Nov 21, 2016
Messages
5,374
Location
Reading
I never use clear coat on boxes unless was to do a metalic requiring it .
Generally more trouble than worth as you best off with more coats main color.
rattle can clearcoat just makes finishing harder and light scuffs or chips harder repair down the road .
I like epoxy and 2k paints straight color 4-5 coats and flat and polish all main visible panels. light marks in time also easily improved with bit of flat and polish or just a quality cutting compound .
 
Last edited:

lilredex

Well-known member
Joined
Apr 29, 2006
Messages
5,956
Location
Toronto
Here's a KRA 109 that was repainted using Sunrise Red in rattle can format. You can see it is a really close match. Only the outside was painted.That red also comes in qt. cans if you have a gun. I found two quarts at Walmart in Watertown, N.Y. last time there.
 

Attachments

  • KRA 109  1A.jpg
    KRA 109 1A.jpg
    126.1 KB · Views: 141
  • KRA 109  1D.jpg
    KRA 109 1D.jpg
    131.3 KB · Views: 146
  • KRA 109  1E.jpg
    KRA 109 1E.jpg
    151.9 KB · Views: 153
  • KRA 109  1F.jpg
    KRA 109 1F.jpg
    129.2 KB · Views: 149

Parrothead

Well-known member
Joined
Apr 27, 2014
Messages
5,346
Location
Earth
HF had a sale that really made me figure my full restore or 95% restore will be worthwhile. I invested in a grinder and found a paint/rust removal wheel. They had a basic 4.5" grinder for $9.99 with the coupon and I had a 20% for other items. So I picked up two abrasive wheels and the grinder and a set of new wire brushes, $25 out the door.

I know it's not a Milwaukee M18 for over $100 but it will do this job and others I'm sure. Had to test it when I got home and was pleased with how easy it was to strip down the paint and not mess up the metal underneath. Looking forward to some fun tomorrow!

Good work and enjoy your project! It's great to see someone embarking on a new project.

This is exactly why Harbor Freight had a place in the world. $25 to start a new project that will be very rewarding in the end. If the OP had to shell out hundreds to get started, this project would have never grown the way it did.

Not defending or belittling any brand, but pointing out a positive of getting started! :beer:
 
OP
C

Clutchrider

Well-known member
Joined
Jun 24, 2018
Messages
49
Location
CT
Got started today, went through two discs just getting the top and front done so I'll head to the store to pickup more today but it's definitely fun work. The years of paint, and other products that have been splattered on this is making some sections tougher than others for removal, the sides and back seem to peel right off while the top was a chore.

Any tips for going around the slide guides, I was hoping to not have to paint or disturb them to much because I did not want to cake new paint on them and have the slides not fit/work. Or am I overthinking?

https://scontent-lga3-1.**.fbcdn.net/v/t1.0-9/36736085_10156007368189051_5830746321425793024_n.jpg?_nc_cat=0&oh=9343b4438b40a14fa2fc7f1cfcb127c6&oe=5BAA9EF8
https://scontent-lga3-1.**.fbcdn.net/v/t1.0-9/36678527_10156007368199051_3687524316070543360_n.jpg?_nc_cat=0&oh=06802de4b53c314e1835da0ee58b72e2&oe=5BDB7B79
 
OP
C

Clutchrider

Well-known member
Joined
Jun 24, 2018
Messages
49
Location
CT
Pad upgrade to Avanti Pro. WOW much easier and smoother stripping. I guess sometimes you can’t beat quality.bffc99ae4177b75f5b67d1cc7609990f.jpg

Here is the difference. HB on the left after just doing the top. Avanti on the grinder after a side and a half roughly 3 times the surface area of the top so far.e48426671cbd190ef08de347701328cf.jpg
 

Attachments

  • bffc99ae4177b75f5b67d1cc7609990f.jpg
    bffc99ae4177b75f5b67d1cc7609990f.jpg
    793.9 KB · Views: 17
  • e48426671cbd190ef08de347701328cf.jpg
    e48426671cbd190ef08de347701328cf.jpg
    765.3 KB · Views: 12
Last edited:

Ohmthis

Well-known member
Joined
Jan 20, 2013
Messages
3,009
Location
Outside of Louisville KY
Great work of your box. I always admire the guys on here that tackle a box resto. I have a KR660 that I want to do a resto on, but it’s a pretty big box and that’s a lot of work. After my house is done maybe this is motivation to start that.
 

maxcarp709

Well-known member
Joined
May 10, 2016
Messages
302
Location
Las Vegas Nv
Great job! If you want to replace the casters,the ones from HF work great.I have put them on 3 of my rollers. They are about $7 ea
 
OP
C

Clutchrider

Well-known member
Joined
Jun 24, 2018
Messages
49
Location
CT
Finally got back around to it after a long summer with the kids and other projects. Primer is on the main box, I'm doing this one all the way through first then the drawers and other side cabinets. I went with white primer to make the red pop more when applied, Figured one coat should be plenty with 2-3 top coats of the Sunrise Red spray suggested earlier in this thread.

https://scontent-lga3-1.**.fbcdn.net/v/t1.0-9/40777950_10156145618379051_6723026292565868544_n.jpg?_nc_cat=0&oh=67e1d7772b59eb06861b3e5f0b7bae39&oe=5C2A8E11
https://scontent-lga3-1.**.fbcdn.net/v/t1.0-9/40752376_10156145618374051_4152736202702716928_n.jpg?_nc_cat=0&oh=a370410f8dc9a234f03207412f1f5b12&oe=5BEF98E6
 
OP
C

Clutchrider

Well-known member
Joined
Jun 24, 2018
Messages
49
Location
CT
Thanks! I'll be sure to keep posting as this continues, I took a look today and was amazed how smooth it dried one. Pretty happy with my application skills thus far. I did not spray all the insides intentionally as you will never see them beyond the edges. I was tempted to at least primer it but not even sure it's necessary and I could just clean and lube the rails instead.

Any thoughts on if I should wet sand between coats of red? Thinking it would help reduce any striping or other imperfections as I go.
 
To avoid these ads, REGISTER NOW!
Top Bottom