

leeklm
Well-known member
Wow, I am beat! I have a great appreciation for guys that install floor coatings for approx $2 per ft, including material & labor! After finishing 1280 ft, I would be lucky to have cleared min wage. Also, thank you to everyone that contributes to this site, very useful information and insight.
I have been debating whether or not to coat my floor since it was poured last June. After cleaning it out earlier this week getting ready for final inspection, I decided it would be a lot easier to do something now as opposed to spring after spending the winter building a bench, shelves, piling it full of ****, etc. My original intent was a “sealer” for protection as opposed to a floor that looks like it came from Hendricks Motor Sports, or many of the garages on this site for that matter! (my wife really hates it when I find a new web forum, be it the diesel page, the garage journal, or anything else that prompts me to spend more money than I would have otherwise).
Since this was a last minute decision (I am famous for those), and the forecast called gor 55 degrees on Thanksgiving. I needed to find a product locally. I almost went for the Rustoleum Pro Epoxy, but came across Rock Solid, which is a local company. After some research on this site and a call to the company, I made the trip to Menards. Make that 2 Menards since not a single store within 30 miles of the NW burbs carried more than 3 kits!! I liked the idea of a fast cure time, and if the product is half as good as advertised, it should be good for many years!
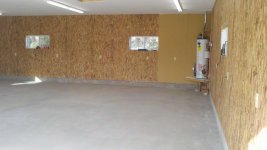
Although concrete is new (other than construction debris and a few paint spots) I used simple green to degrease/clean, scrubbed, then power washed. I etched the concrete with 3:1 ratio of muratic acid, scrubbed, and a good power wash. My buddies pwr washer is a beast, so it made the job a little easier. After squeegee and drying, I did have a few spots with very light surface dust. Since the dust was very minimal, the guys at Rock Solid recommended a mopping with Acetone instead of washing again. Used 1.5 gallons of acetone to complete. The Rock Solid kits come with an etching powder, but I was still thinking Rustoleum Epoxy while etching, hence the acid.
The polyurea went on without incident. I was a little conservative on the first pack so I could determine the coverage. I was hoping to complete the job with 5 kits (total of $625). In hindsight, it would be a good idea to mark out the garage in 250 sq ft sections so I could easily see where I was at for coverage. My only complaint on the product is that my first can of color material had a “clump” in it. After seeing that, I followed the directions and mixed the cans of color together in a pail, then dumped back into their original containers (they come with removable plastic tops).
The coating took me about 6 hours, taking my time and working by myself. My “helpers” are overly sensitive to anything with a stronger oder than distilled water. Although this product is very low voc, it was still plenty strong working in a mostly closed shop. I had a couple of windows open, but it started to snow/rain. I opted to wear my carbon mask to minimize any brain damage. I kept my slab & air temp at about 65 degrees with the radiant heat, and had plenty of working time when applying the material. 5 kits were enough for 1280 ft. The job would have went faster it I used 6 kits, and not worried about using a little extra material.
All in all, I am happy with what I see so far. I also found it kind of funny how satisfying it was sprinkling flakes. Kind of a feeling of “ahhh, another section done…”.
I will take a few pictures of the completed floor and post.
I have been debating whether or not to coat my floor since it was poured last June. After cleaning it out earlier this week getting ready for final inspection, I decided it would be a lot easier to do something now as opposed to spring after spending the winter building a bench, shelves, piling it full of ****, etc. My original intent was a “sealer” for protection as opposed to a floor that looks like it came from Hendricks Motor Sports, or many of the garages on this site for that matter! (my wife really hates it when I find a new web forum, be it the diesel page, the garage journal, or anything else that prompts me to spend more money than I would have otherwise).
Since this was a last minute decision (I am famous for those), and the forecast called gor 55 degrees on Thanksgiving. I needed to find a product locally. I almost went for the Rustoleum Pro Epoxy, but came across Rock Solid, which is a local company. After some research on this site and a call to the company, I made the trip to Menards. Make that 2 Menards since not a single store within 30 miles of the NW burbs carried more than 3 kits!! I liked the idea of a fast cure time, and if the product is half as good as advertised, it should be good for many years!
Although concrete is new (other than construction debris and a few paint spots) I used simple green to degrease/clean, scrubbed, then power washed. I etched the concrete with 3:1 ratio of muratic acid, scrubbed, and a good power wash. My buddies pwr washer is a beast, so it made the job a little easier. After squeegee and drying, I did have a few spots with very light surface dust. Since the dust was very minimal, the guys at Rock Solid recommended a mopping with Acetone instead of washing again. Used 1.5 gallons of acetone to complete. The Rock Solid kits come with an etching powder, but I was still thinking Rustoleum Epoxy while etching, hence the acid.
The polyurea went on without incident. I was a little conservative on the first pack so I could determine the coverage. I was hoping to complete the job with 5 kits (total of $625). In hindsight, it would be a good idea to mark out the garage in 250 sq ft sections so I could easily see where I was at for coverage. My only complaint on the product is that my first can of color material had a “clump” in it. After seeing that, I followed the directions and mixed the cans of color together in a pail, then dumped back into their original containers (they come with removable plastic tops).
The coating took me about 6 hours, taking my time and working by myself. My “helpers” are overly sensitive to anything with a stronger oder than distilled water. Although this product is very low voc, it was still plenty strong working in a mostly closed shop. I had a couple of windows open, but it started to snow/rain. I opted to wear my carbon mask to minimize any brain damage. I kept my slab & air temp at about 65 degrees with the radiant heat, and had plenty of working time when applying the material. 5 kits were enough for 1280 ft. The job would have went faster it I used 6 kits, and not worried about using a little extra material.
All in all, I am happy with what I see so far. I also found it kind of funny how satisfying it was sprinkling flakes. Kind of a feeling of “ahhh, another section done…”.
I will take a few pictures of the completed floor and post.
Attachments
Last edited:

