To avoid these ads, REGISTER NOW!

New shop build approved!

lumpyidle

Member
Joined
Feb 7, 2011
Messages
12
Location
Outside Phoenix AZ
Thought this would be a good place to document my garage build (besides FB) and maybe get some input from some of you here, and hopefully help someone who wants to do a similar project. Love this site!

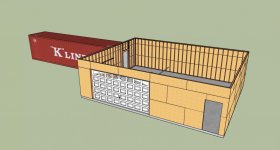
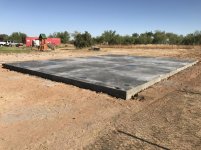
I've had plans in mind to get a 1200-1500 sq ft steel building since buying this house on 1 acre with no HOA a little over a year ago. Primarily trying to stay budget conscience, going down to 1008 sq ft, and building it myself is saving us almost $20k!

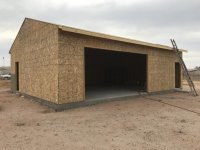
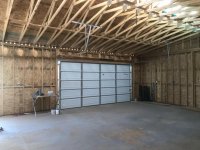
Prior to moving to Arizona I was working out of a 782sq ft garage(see photo), and had enough room to have two project cars going at once, although it was a little tight with one blown apart, and all the shelving and equipment in there too, I was able to make it work, so having just over 1k sq feet, and having all the shelving and most of the portable equipment in an attached container, I think it will do quite nicely!

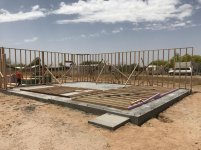
After a few months of studying building methods and county permit requirements, I finally got all the plans together drawn up by hand on 8.5x11 graph paper. I took the day off of work and went down to the county this morning at 8am. They were able to "fast-track" my application and I was out of there before noon with permit in hand! I admit I was super nervous, like waiting for test results, felt they were going to scrutinize every little detail. They had me write in a few minor details to help clarify a couple things right off the bat, but $1100 later I was legal to start building! That included 100 amp service to the shop too! Thanks a ton to all of you here at theGarageJournal for the tons of knowledge readily shared!
 

Attachments

  • IMAG0140.jpg
    IMAG0140.jpg
    143.5 KB · Views: 230
To avoid these ads, REGISTER NOW!
OP
L

lumpyidle

Member
Joined
Feb 7, 2011
Messages
12
Location
Outside Phoenix AZ
More details on designing the build.

I settled on 1008 sq ft, based on affordability. I'll share the actual costs once I have everything done, but looks like should be around 18k for everything. I got quotes from Toughshed, and some local steel building companies, and electricians etc., $35k - $40k to have someone else do it for me turn-key. A couple general contractors I spoke with gave me ballpark ranges from 50-60k!!! Forget that, I've got two good hands, I'll do it myself!

28x36, stick built 2x4 standard construction studs 16"oc, 10 ft wall height. I wanted to go 12ft, but anything over 10ft here needs engineering plans, same with the foundation for a steel building. Anything engineered would add a couple grand to the build. 16Wx8H overhead garage door, two man doors. The rear-side door will open to a 40' high-cube shipping container for a big storage room that will also house the two air compressors. Not sure how yet, but want some sort of exhaust fan with shroud over compressors to expel heat, and to come on when the compressors do perhaps? Haven't worked that bit out yet. I'm going to cut the doors off of the container and it will be butted up against the building and sealed off. Going to have to hire a crane to put it in position, not sure the cost on that yet. That step may have to wait until next year, we'll see what the quotes come in at.

I'm going with a Monolithic slab, 4" 3000# concrete, going to have two areas at poured deeper for a lift to maybe add at a later date. Yes it's only 10' ceiling, but there is a few lifts that don't require much height to operate, If I have a tall vehicle on it, I can still get around under it on a mechanic stool, I don't need to be able to stand up completely. Just high enough do drop a transmission, replace floor pans, install exhaust systems etc... I just ordered 12 floor pull-pots to be installed when the cement is poured. Bought them from autobodytoolmart.com, actually from their eBay store, was a little cheaper than buying from their website. Weird, but whatever, save a few bucks! This way when I'm working on a project that's a bit wadded up, I can tie it down and make some pulls safely.

I'm a visual and tactile learner, so I downloaded Sketchup 2017, Highly recommend this program, and even more, highly recommend watching lots of videos on how to use the dumb thing! I built the garage virtually (minus the roof)(see attached photo) so I can see how everything goes together, including all the studs, headers, sheathing etc. Gives me a good indicator as to how much material I need to put it together. I know exactly how many studs I need and how things go together, like the overhead door opening for instance.

I have 200 amp service coming to the property, and will be sending 100 amp to the shop, almost 200 ft, using aluminum 2/0,2/0,2/0,1 URD cable. This is going to be a lot less expensive than copper. And believe it or not the best price I've found is from a wholesale supplier who also sells on eBay!

The biggest hurdle was financing the project. We haven't been in the house long enough to have a ton of equity, and personal loans are super high interest. We're using our tax return and some other cash on hand to pay for the concrete and permit fees, and the rest of the building is going on a "Project Loan" card through Home Depot. I'm able to purchase almost everything from them through their pro-desk as a package deal. I got a few quotes from local lumber yards for lumber and trusses and sheathing, but they don't supply the roofing, electrical or much of anything else to put it together, and weren't really any cheaper, in fact the trusses cost more than through HomeDepot. Convenience of one-stop shopping and fair interest rate with 6 months before I have to make payments, much easier than a construction loan. My wife's car will be paid off next month, so it's like having another car loan for 5 more years, but with lower payments! Super easy!

Next update will be answering any questions anyone has, or when we are breaking ground, I'll post photos of the progress. For whoever is reading this, thanks, and I hope you get something out of it!
 

Attachments

  • Shop1.jpg
    Shop1.jpg
    131 KB · Views: 152
OP
L

lumpyidle

Member
Joined
Feb 7, 2011
Messages
12
Location
Outside Phoenix AZ
28x36, I figured a multiple of 4 ft would make it easier for construction and more efficient use of materials without any weird excess. The extra 2 ft in height means I'll be ripping some sheets in half longways. The vertical grooved plywood siding to match the house will have to be pieced because it comes in 4x8, but placed vertical so I'll have a weird 4x2 section above each 4x8 sheet. I hope it turns out okay.
 

ncboat

Well-known member
Joined
Aug 20, 2015
Messages
166
Location
Wilmington North Carolina
I look forward to your progress. I am in the process of a similar shop 34x36. Like you I am working through Lowes. One thing to consider I am going to purchase my materials on days where I get my veterans discount. Coupled with project card discount can yield 20% discount. I am going to try and purchase studs, sheathing, trusses etc all at once and figure it can save me $1000. Just a thought.
 

Stever60

Member
Joined
Feb 28, 2017
Messages
10
Location
North Alabama
Not sure what roof pitch you are going with but you can gain some extra head room by using engineered scissor trusses. Still clear span but instead of a horizontal bottom chord the bottom chord slope up. That would give you some added height in the center of your garage.
 

ddawg16

Well-known member
Joined
Jul 11, 2008
Messages
21,005
Location
S. California
Welcome to GJ....

I would suggest spending some time over in the Garage Gallery section....learn from the mistakes of others.

I think you are better off with stick built....your insulation options will be cheaper and I think you are going to be more comfortable in it.

I'm glad you had a good experience with building and safety...what a lot of people don't realize, they are not there to squash your dreams, but make sure those dreams are safe. They have no vested interest in shutting you down if you are willing to do it right.

First off....I think you be prepared for the $$ shock. While your numbers look 'reasonable', in reality, you are going to spend a bit more than you plan. That is just how it works out. I pretty much did my garage the same way you did.....except mine is 2-story.

On the height....If I may suggest....if you know where your lift is going to go then open up the ceiling in that area to the roof. Maybe put in a couple of skylights....it will give you some natural light and in the winter when the temp drops below 80 deg you can open them up for fresh air.

If you want to get fancy, put an access door on the side of the open area into the attic...now you have access for storage.

I like your idea of the shipping container.

Your big expenses are going to be foundation and roof.

On your roof....maybe consider putting a gable roof section over the garage door area? Extend it out a bit? Would give you a little bit of shade at little additional cost.

On the foundation...given the size, consider running a couple of conduits under to foundation from one side to the other for 'future expansion' of 'anything'.

On your walls....since you are going over 8', you might want to consider 2x6's. Less chance of warped walls. The additional cost is minimal....and if you insulate, will most likely pay for itself the first year.

Make sure you post pics....
 
OP
L

lumpyidle

Member
Joined
Feb 7, 2011
Messages
12
Location
Outside Phoenix AZ
I'm going with 4:12 roof pitch. I got a quote for scissor trusses and they are only a couple hundred bucks more and will give me a few more inches, which may count for a lot when the time comes to install a lift. The inside portion of the truss is 2:12 pitch which if I calculated correctly will give me 28 extra inches in the very center, or roughly 1 foot higher off to the side where one of the posts will be. I had planned on blown in attic insulation, but with the vaulted ceiling I'm not quite sure the best way to insulate. Anybody have suggestions for insulation and proper venting?
 

Norcal

Well-known member
Joined
Mar 16, 2008
Messages
13,754
Re: More details on designing the build.

I settled on 1008 sq ft, based on affordability. I'll share the actual costs once I have everything done, but looks like should be around 18k for everything. I got quotes from Toughshed, and some local steel building companies, and electricians etc., $35k - $40k to have someone else do it for me turn-key. A couple general contractors I spoke with gave me ballpark ranges from 50-60k!!! Forget that, I've got two good hands, I'll do it myself!

28x36, stick built 2x4 standard construction studs 16"oc, 10 ft wall height. I wanted to go 12ft, but anything over 10ft here needs engineering plans, same with the foundation for a steel building. Anything engineered would add a couple grand to the build. 16Wx8H overhead garage door, two man doors. The rear-side door will open to a 40' high-cube shipping container for a big storage room that will also house the two air compressors. Not sure how yet, but want some sort of exhaust fan with shroud over compressors to expel heat, and to come on when the compressors do perhaps? Haven't worked that bit out yet. I'm going to cut the doors off of the container and it will be butted up against the building and sealed off. Going to have to hire a crane to put it in position, not sure the cost on that yet. That step may have to wait until next year, we'll see what the quotes come in at.

I'm going with a Monolithic slab, 4" 3000# concrete, going to have two areas at poured deeper for a lift to maybe add at a later date. Yes it's only 10' ceiling, but there is a few lifts that don't require much height to operate, If I have a tall vehicle on it, I can still get around under it on a mechanic stool, I don't need to be able to stand up completely. Just high enough do drop a transmission, replace floor pans, install exhaust systems etc... I just ordered 12 floor pull-pots to be installed when the cement is poured. Bought them from autobodytoolmart.com, actually from their eBay store, was a little cheaper than buying from their website. Weird, but whatever, save a few bucks! This way when I'm working on a project that's a bit wadded up, I can tie it down and make some pulls safely.

I'm a visual and tactile learner, so I downloaded Sketchup 2017, Highly recommend this program, and even more, highly recommend watching lots of videos on how to use the dumb thing! I built the garage virtually (minus the roof)(see attached photo) so I can see how everything goes together, including all the studs, headers, sheathing etc. Gives me a good indicator as to how much material I need to put it together. I know exactly how many studs I need and how things go together, like the overhead door opening for instance.

I have 200 amp service coming to the property, and will be sending 100 amp to the shop, almost 200 ft, using aluminum 2/0,2/0,2/0,1 URD cable. This is going to be a lot less expensive than copper. And believe it or not the best price I've found is from a wholesale supplier who also sells on eBay!

The biggest hurdle was financing the project. We haven't been in the house long enough to have a ton of equity, and personal loans are super high interest. We're using our tax return and some other cash on hand to pay for the concrete and permit fees, and the rest of the building is going on a "Project Loan" card through Home Depot. I'm able to purchase almost everything from them through their pro-desk as a package deal. I got a few quotes from local lumber yards for lumber and trusses and sheathing, but they don't supply the roofing, electrical or much of anything else to put it together, and weren't really any cheaper, in fact the trusses cost more than through HomeDepot. Convenience of one-stop shopping and fair interest rate with 6 months before I have to make payments, much easier than a construction loan. My wife's car will be paid off next month, so it's like having another car loan for 5 more years, but with lower payments! Super easy!

Next update will be answering any questions anyone has, or when we are breaking ground, I'll post photos of the progress. For whoever is reading this, thanks, and I hope you get something out of it!

2/0 AL is not suitable for 200A, 2/0 copper is not either unless it's for a dwelling & meets certain criteria.
 

PhysicsDude

Well-known member
Joined
Jan 28, 2013
Messages
805
Location
Dallas, TX
Re: More details on designing the build.

2/0 AL is not suitable for 200A, 2/0 copper is not either unless it's for a dwelling & meets certain criteria.

I believe he's saying there's a 200A service to the house, and the 2/0 aluminum will feed a 100A service to the shop.

Sounds like an interesting build, especially for the price. Hope it works out well!

I recently completely redid a house, and did it using 90% Home Depot materials. I definitely agree with you that they have really competitive or superior pricing on most products, and the convenience/financing/time saving of using them was definitely worth it to me.
 

matt_i

Well-known member
Joined
Mar 14, 2008
Messages
10,726
Location
SE Michigan
I would spend some time digging thru all of the concrete threads you can stand to read in the "general" section. There's a lot to be learned but with some concentrated effort I don't think more than a few days or so. The knowledge gained will really help you.
 

The Tool Tyrant

ALLIANCE MEMBER
Joined
Dec 19, 2011
Messages
2,182
Location
Bonita, Ca. (San Diego)
Congrats Lumpy! I know that you already pulled your permit, but I have to throw my 2 cents in...

Regarding the shipping container, I'm in San Diego and have a 40 footer that I use for storage and it gets hotter than hell in there. I have 2 turbine fans on it which help a little, but not much.

I have a suggestion, take the money you'd spend for the container and crane to set it and use it toward adding 8' in width to the building. Your existing exterior wall would now become an interior wall, separating the shop from the storage area. Being you're in Phoenix, if at all possible orientate the storage area exterior wall toward your southern exposure to aid in keeping the shop cool. :D

I concur with ddawg's suggestion of using 2x6 studs rather than 2x4 for the insulation cavity depth...you'll be happy you did in the middle of summer!

I am sure of this much...I would NEVER install my compressor in MY conex and expect it to last any length of time. :FIREdevil
 
To avoid these ads, REGISTER NOW!

Falcon67

Well-known member
Joined
Jun 11, 2009
Messages
18,371
Location
Merkel, TX
that will also house the two air compressors. Not sure how yet, but want some sort of exhaust fan with shroud over compressors to expel heat, and to come on when the compressors do perhaps? Haven't worked that bit out yet.

240V contactor on the motor side of the compressor switch, used to switch a 120V fan circuit. Pull 10-3 to the compressor location so you have a neutral to allocate 120V for a fan. I was going to do that using a bath fan because my compressor is in a small closet inside the building - but it doesn't run enough to fuss with. No issues with the compressor and it's been in it's box for 6 years now.

I concur with ddawg's suggestion of using 2x6 studs rather than 2x4 for the insulation cavity depth...you'll be happy you did in the middle of summer!

Make your walls tight and 2x4 will be plenty IMHO. I did not actually, and my west exterior HardiPanel wall exceeds 140F in the summer. The Hardi is nailed right to the studs, no underlayment. Without air running, the surface of the OSB on the west wall inside runs around 95F. If I took that wall apart and used reflective decking under the HardiPanel, and caulked the stud cavities I could knock another 5F off easy (IMHO). Just make sure your sun exposed sides (if heat is the main issue) are made to minimize air movement. Same with the ceiling - I used OSB for ceiling panels. The underside of the roof deck runs 120~130 in summer. I only have R-13 in the attic and caulking the OSB seams and where it meets the walls made a huge difference in performance.
 
Last edited:
OP
L

lumpyidle

Member
Joined
Feb 7, 2011
Messages
12
Location
Outside Phoenix AZ
I'm new to posting on forums, so not sure how to quote people yet, but thanks for the feedback guys!

As far as the compressor setup goes, I have the setup to run an aux circuit to come on with the compressor(see pic) that we used at the old house, it's in a Square D box, hard wired to the Ingersol Rand 5hp unit. I don't have a second starter box for the second unit, just a manual switch on the front that it came with. It's a cheaper Campbell Hausfield 5hp. Both have 80 gallon tanks. I was thinking of running them tandem somehow to share the load, but it's just me using them. With just the CH alone, it runs almost non-stop just to keep up when using my DA sander on big jobs.

I had already purchased the 40 ft container just over a year ago when we bought the house. For access to my tools, and the storage it has provided, it's already paid for itself since I was renting a self-storage locker for everything for a short time before. But yes, it get ****** hot in there. I have a dial thermometer and it goes off the scale in the summer. I think I will install vents above the compressors in the sidewall and then find some reclaimed duct work to use above and draw heat out. Maybe put a small vent about a foot up from the floor on the other side of the isle for a cross-flow ventilation? I'm a visual person so sometimes I need to see it setup to figure out how exactly I'm going to lay things out. I just want to avoid the noise and keep them out of the "spray area" in the shop.

I've already pulled permits so making any major changes like wall studs is not going to happen. I like the idea of a storage room, but if I'm going to frame and cover a storage area with shingles etc, I wouldn't bother putting a partition wall. Doing what I do floor space is at a premium, hence the container for storage. Also, the permit fees go up the larger you go(here about $1.10 a sq ft), plus cost of concrete and other materials makes the container option much more cost effective! Does anyone have any experience with the spray-foam insulation? I think traditional batten strips is what i'm going with because I can install it myself, just wondering if the spray stuff is worth it or not.

I did decide to order the scissor trusses to give me a little extra headroom. I picked out a Bendpak 2 post lift, got all of the specs and had the area for the towers dug deeper where they will potentially get installed (hopefully next year).

Your right Physicsdude, 200A going to the property, branching 100A off to the shop. I had to supply what the county called a "1-line drawing" schematic, and a load calculation worksheet as part of my permit application. They approved it so I should be good to go.
 

Attachments

  • IMG_0357.jpg
    IMG_0357.jpg
    133.9 KB · Views: 27
OP
L

lumpyidle

Member
Joined
Feb 7, 2011
Messages
12
Location
Outside Phoenix AZ
Foundation is done!!! Construction time! Looks pretty good for the most part. They beveled the edge where the garage door goes, and that was done a little sloppy. I spent some time this afternoon spraying it down with water, and could tell there were some high and low spots, but nothing to egregious.

The building materials are to be delivered tomorrow (Friday). I am taking tomorrow and all next week off of work to build. Trusses will be delivered on Monday. I'm hoping to have the structure up and roofing on by the time I have to go back to work. Wishful thinking I know, but I'm going to work from dawn til dusk, or I pass out. Whichever comes first. I can do the electrical the following weekends. I still need to rent a trencher for a 200 foot run from the other side of the property as well for the wire.

I called to to have the underground utilities marked, but they don't have the water line to the house, and the private water Co doesn't either, they could only mark outside the property. I don't have the original site plans for when the house was put in. Anyone have experience using metal detector to find underground lines? Dad let me borrow his. It looks like a nice expensive one, but never used one before. Should be fun! Only worried about the water line going to the house. Big messy inconvenience if I hit it, but at least not super dangerous like gas or electric. Still want to avoid it at all costs! I may hire a plumber to trace them if I can't find them with the metal detector. I will be doing some hand digging in the areas that beep. I think I'll use the detector the entire path to see if there is anything else buried along the route.

For doing body and frame pulls, I had 12 floor pull-pots installed in the floor. They had to dig little pockets and manually pre-set them using bagged concrete so that when they did the main pour they would stay put and not have to worry about them. I haven't inspected them too close yet as they just poured today, but from outside they look nice and even and level. Used CHAMP pots from autobodytoolmart.com. It was a little cheaper buying from their ebay store than right from their website. However it took over a week before they even shipped them out, and their replies were a little slow. FYI tip, the instructions says to tape the lid on upside down. I'm not sure of the reason for this, and the contractor pulled all the lids and taped the tops. When the lids are upside down the tab welded to the bottom of the lid that connects to the chain protrudes up and interferes with spreading and leveling the concrete. I thought about this when wrapping them up as instructed, but I simply followed directions. I figured that the company that makes them probably knows best. I'm sure they have their reasons. Hopefully there is no issues removing the tape and finding cement inside the pots. Ugh! I'll be out there with hammer and chisel if there is. If I had to do it again I would just tape the lids on straight.

I spent the extra money up front to have six footings poured for the container. Was going to do it later but decided since the back-hoe, cement truck and experienced crew was going to be here anyway, might as well have the pros do it since they have the measuring tools to make sure they are level. Apparently my property which is pretty flat, is not perfectly level. I have to dig several inches of top soil from the area where the container is going to set. Even my foundation needed a few extra yards of concrete due to the ground not being level.

Thanks for your reply's and I'm sure I'll be posting more pics of the progress in the coming days. And even more certain that I'll be asking "how-to" questions if I get stuck! G'night!
 

Attachments

  • IMG_0457.jpg
    IMG_0457.jpg
    140.4 KB · Views: 85
  • IMG_0455.jpg
    IMG_0455.jpg
    146.4 KB · Views: 89
  • IMG_0463.jpg
    IMG_0463.jpg
    147.3 KB · Views: 81
  • IMG_0472.jpg
    IMG_0472.jpg
    141.5 KB · Views: 77
  • IMG_0479.jpg
    IMG_0479.jpg
    146.4 KB · Views: 82

ard

Well-known member
Joined
Feb 16, 2015
Messages
4,391
Location
Sierra Foothills... California
You should look into radiant barrier as a component of your insulation.

By blocking heat on the exterior of the building envelope (or just inside), and allowing it to vent, you can have an amazing impact on cooling. IMO way more cost effective than spray foam. fiberglass batts and radiant barrier.

The stuff is cheap- labor is straightforward, easy DIY.
 

Falcon67

Well-known member
Joined
Jun 11, 2009
Messages
18,371
Location
Merkel, TX
You should look into radiant barrier as a component of your insulation.

By blocking heat on the exterior of the building envelope (or just inside), and allowing it to vent, you can have an amazing impact on cooling. IMO way more cost effective than spray foam. fiberglass batts and radiant barrier.

The stuff is cheap- labor is straightforward, easy DIY.

Agree - knowing what I know now, the west side of my shop would have had a layer of Techshield under the Hardi. It does on the gable, but not on the lower wall.
 
OP
L

lumpyidle

Member
Joined
Feb 7, 2011
Messages
12
Location
Outside Phoenix AZ
Rough framing almost done. Trusses will be delivered sometime tomorrow (Monday). Sun-burnt neck, sore muscles. But worth it! Having a good time so far! Everything is coming together as planned! The pics are from this morning and this evening, result of a total of 3 days of framing. I have never done any carpentry before, and I am learning a lot as I go. Looking forward to wiring it and installing the doors. Friday was a record hot day for this time of year, yesterday was cooler but windy which made the walls a bit unwieldy going up, had to learn how to brace the walls property real quick once they were up. Today was a beautiful day, nice and cool with light breeze. Supposed to be nice all week so l hope to stay on schedule.
 

Attachments

  • image1.jpg
    image1.jpg
    137.2 KB · Views: 67
  • image2.jpg
    image2.jpg
    147.2 KB · Views: 72
OP
L

lumpyidle

Member
Joined
Feb 7, 2011
Messages
12
Location
Outside Phoenix AZ
Started framing on 5/5/17, took almost exactly 1 month to get all of the framing and sheathing done and passed inspection on the first try! I have been meaning to login and update but haven't had the time.

I have an issue with heights that I thought I could overcome for this project, but that's another story. So my wife and her mom installed all the roofing shingles themselves! Working in the mornings for about a week and a half. All that's left of the roof is the ridge vent and ridge shingles of course. I had bought the wrong ridge vent, they only stocked one style at the Home Depot, so had to order the correct size off of their website, will be here next Wednesday, so hopefully by the end of next week the roof will be completed. We've had a bit of a heat wave here outside of Phoenix for the beginning of Summer, almost 120 out, so nothing is getting done during the week. Except the garage door company came out today to install the door. I have a 16x8 door, but they only brought out an opener and side trim for a standard 7 foot tall door, so they will have to come out in a few days and finish it. I still need to finish the siding, and then I'll start roughing in the electrical. Speaking of witch, I'm using Romex wire, running vertical up the studs. I have a couple questions for ya'll...

1st, To get the wires into the attic space, should I notch, or drill holes in top plate to run the wires? (I do have the metal nail guards to protect wire either way.)

2nd, Do you all know if I can hang wire through the trusses or do they need to be supported on the "rat-runs" that span the trusses perpendicular. If they need to be on a board can I use some strips of 1/2 in OSB that I have left over, or does it need to be a sturdier 2x4?

I do plan to install insulation in the ceiling and walls, and eventually sheet-rock, but for final inspection I'm leaving everything exposed as I don't know if I'll get that far before next year.
 

Attachments

  • IMG_0566.jpg
    IMG_0566.jpg
    146.7 KB · Views: 67
  • IMG_0567.jpg
    IMG_0567.jpg
    145 KB · Views: 67
  • IMG_0618.jpg
    IMG_0618.jpg
    145.7 KB · Views: 60
  • IMG_0627.jpg
    IMG_0627.jpg
    141.9 KB · Views: 61
  • IMG_0629.jpg
    IMG_0629.jpg
    140.7 KB · Views: 75

jetnow1

Well-known member
Joined
Jun 27, 2016
Messages
511
Location
CT.
I know you are framed but for others I have never seen a building inspector who complained if you built something stronger than the plans showed as long you did not change building materials, ie upgrade from 2 by 4 to 2 by 6 ok, changing to double 2 by 4
studs would require a new permit. The inspectors I have seen do not have the original
application with them, and often show up and ask what they are there to inspect.
Looks like your wife and MIL did a nice job on the roof.
 
OP
L

lumpyidle

Member
Joined
Feb 7, 2011
Messages
12
Location
Outside Phoenix AZ
Lumpy...why didn't you include an overhang on the gable ends? :dunno:

It was just easier for me to not have to frame out the lookouts on the ends. I will just continue the 1x6 trim from the front around and up following the roofline. A lot of manufactured homes and other garages and sheds are done that way. I have drip flashing all around the perimeter of the roof. As far as I am aware it's more of just a cosmetic thing having an overhang on the gable ends, and I'm not too picky about how it looks.
 

matt_i

Well-known member
Joined
Mar 14, 2008
Messages
10,726
Location
SE Michigan
You can run wires spanning across the chords of the trusses. Wire has to be stapled every 4-1/2 feet so the 2' on center allows you to staple every other truss and meet the requirement. Do NOT, however drill or notch the truss in any way. Run up over and around but don't touch the truss with anything but staples.
 
To avoid these ads, REGISTER NOW!
Top Bottom