To avoid these ads, REGISTER NOW!

New Welder's First Table Build Thread

Brian.Evans

Well-known member
Joined
May 10, 2012
Messages
75
Hey guys! *@#$I'm new here, and new to welding in general. I learned to weld with OA when I was a kid, and did a little stick later on, but have been away from it for a while. We bought our house last year and it had a 40x70 pole barn attached to it. I got interested in knifemaking and general blacksmithing, and have been slowly accumulating tools over the past year. *@#$I sold my motorcycle and bought a four year old Lincoln AC/DC with a TIG torch attachment for $300. *@#$
IMAGE_1000001080.JPG


I went home and had Dad give me a refresher, but I'm a long way from where I need to be.*@#$

First thing first, I need a table. *@#$I'm a paramedic in town and one of our students doing ride time is a machinist at a local factory. They were throwing away a perfectly good small table, so he snagged it for me.*@#$
IMAGE_1000001059.JPG


Cleaned it up and painted to match. :D
IMAGE_1000001074.JPG


It's a nice table for practicing, but really a bit too small for much of anything larger/longer. *@#$It's overbuilt though, which is nice.*@#$
This is where the story will seem to go off track, but stay with me.*@#$

One of the local hospitals landed a big contract and they are remodeling. In the dumpster outside the ambulance bay were a BUNCH of suspended ceiling lights. I had to go all the way up to the CFO, but I got permission to salvage the lights. *@#$It took me three trips over a week and a half, but I scored all these lights.*@#$

IMAGE_1000001095.JPG


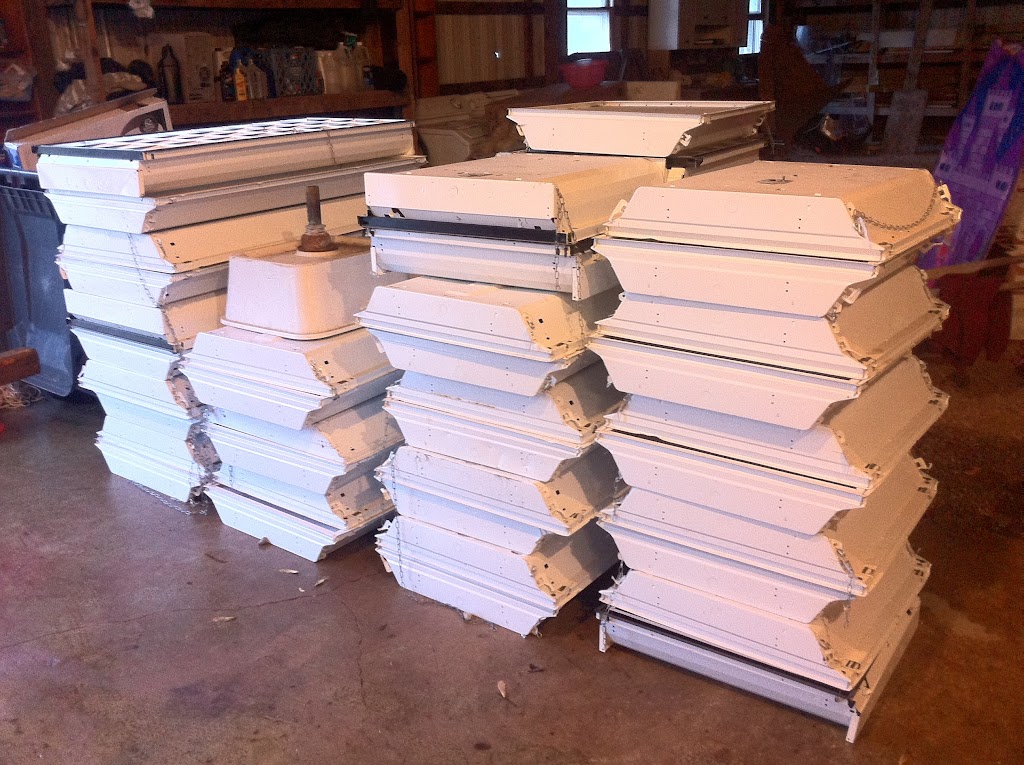
There are 28 4 ft fixtures and 15 2 ft fixtures. All are 4 bulb fixtures and have all the bulb in them. I also scored around 30 extra 2 and 4 ft bulbs out of unsalvageable lights.*@#$

My goal was to keep at least a dozen-ish big lights for my shed, and half a dozen or so little lights. The rest, well, they are trading fodder. :D

Remember, I wanted to make a welding table.*@#$

For my first trade, I swapped the car detailer guy down the street four 4 ft fixtures for this list. *@#$All new, non rusty steel.*@#$
IMAGE_1000001093.JPG


I had thought the long pieces of angle would be decent legs and part of a top frame, and I could build it slowly as I salvaged more steel. You see, we have 5 kids, and my wife works her *** off at home with them, so my check doesn't go real far towards hobbies that don't make money.*@#$

One of our other students at work has a brother who works at a local grain cart manufacturer. *@#$Apparently one of the brothers coworker's needed some lights for his shed. I traded him a dozen 4 ft lights for a piece of steel for the top. *@#$I hadn't decided the dimensions yet, so it was kind of a "to be determined" type of trade. *@#$

Every third day on my way home, I pass a guy's house that is.......a junkyard, putting it nicely. *@#$My kind of picking! *@#$I never could catch him home, so I finally left a message on his car and waited. He called me a week later. After some haggling, I bought this frame for $25.*@#$
IMAGE_1000001081.JPG


It is 1 1/2" 3/16" angle.*@#$

I called in my favor and got the steel for my top. It's 64"x32" which will give me a 4" overhang on all sides.*@#$

This is the piece of steel for the top. It was supposed to be 1/4", but when I piled it up, it was 3/16". *@#$I'm not really in a position to argue about it, as it was free anyway! *@#$Haha

IMAGE_1000001249.JPG
 
To avoid these ads, REGISTER NOW!
OP
B

Brian.Evans

Well-known member
Joined
May 10, 2012
Messages
75
Here's where I'm at now. I cut the back upright off and am in the process of using a flap disc to take off the paint.*@#$

IMAGE_1000001242.JPG


Here is my proposed plan for the table.*@#$

IMAGE_1000001091.JPG


The notes about "heavy angle" are just my way of differentiating between a couple different sizes of angle I have on hand.*@#$

So far, I have $25 in my table. I'm left handed, so I've a shelf on the left for hammers and clamps and not on the right. The right shelf is bigger for small scraps and fixtures.*@#$

Here is my dad's table, the one I learned on when I was a kid. He went to college for welding and he has farmed all his life. This thing has seen some serious action. *@#$

IMAGE_1000001002.JPG


He has a Hobart MIG he uses primarily now, but that Lincoln has seen a lot of welding time.*@#$


So, if you're still with me, I'd love to hear opinions, critiques, attaboys, whatever. I look forward to learning lots here! *@#$


Oh yeah, one more. I stopped by the local machine shop/fab shop/steel supplier today to raid their drop bin for some practice coupons. Here's what I got for FREE!!!
IMAGE_1000001247.JPG


Those 60 3x5"x 3/8" coupons will need cleaned up a bit before practice, but I can handle that! *@#$I want to make a new entryway step for my shed door from the 4" angle. :D
 
OP
B

Brian.Evans

Well-known member
Joined
May 10, 2012
Messages
75
Also, before anyone says anything. The lights aren't 240, 277, or 480 VAC. I have plugged them into 120 and they come on.

Here's the tag inside.
IMAGE_1000001253.JPG


Also, I'm planning on bolting the top down with counter-sunk bolts through the frame rather than welding it down. I don't want it to warp.
 
OP
B

Brian.Evans

Well-known member
Joined
May 10, 2012
Messages
75
Here's a close up of my dad's positioner. Now that he doesn't have any of us kids around to yell at for "holding it wrong", he had to make this. :D

I want to make one that clamps on the edge or has a magnetic base.

IMAGE_1000001003.JPG
 
OP
B

Brian.Evans

Well-known member
Joined
May 10, 2012
Messages
75
Ok, here's where I'm at now. I didn't get enough flap disks, so I'm about 20-30 worth of sanding away from being ready to start marking and cutting. *****, because I had the time to mess with it tonight, but didn't have the equipment. Hate when that happens!

I changed the plans a bit. I'm going to run angle for the front and rear middle legs. I have a couple questions though.*@#$

*@#$*@#$On the front, I'm going to use a piece of thin wall square tube for the top shelf support. The shelf is pretty narrow top to bottom, so this will keep it from having an annoying lip. I plan to keep my slag hammer and electrodes on that shelf and don't want to have to reach over a lip every time. Can I just cut a short piece of tube, weld it into place, and cut the next piece of tube and weld into place for the front support? *@#$

On the back, I planned to use a piece of angle for the shelf support. How do I run a angle across, a angle down, and an angle through? *@#$I am having issues picturing it.*@#$

Basically, the front left center leg has one piece of tubing running perpendicular to it. The back left middle leg has two pieces running perpendicular through it, and the back right middle leg has one piece running perpendicular through it.*@#$

Maybe a picture will help?

IMAGE_1000001257.JPG
 
OP
B

Brian.Evans

Well-known member
Joined
May 10, 2012
Messages
75
Thanks Jack, thanks jhn, thanks lemans.

My wife sometimes gets embarrassed by my scrounging. I like to consider myself a "salvage technician" or maybe an "equipment/material life extender and repurposer."

Is repurposer a word?
 
OP
B

Brian.Evans

Well-known member
Joined
May 10, 2012
Messages
75
Got the legs and shelf supports all cut to length.*@#$

IMAGE_1000001258.JPG


I have to get my 240V outlet switched to one compatible with my welder and I'll be
ready to start fabbing! *@#$Hopefully I can go find one tomorrow.
 
OP
B

Brian.Evans

Well-known member
Joined
May 10, 2012
Messages
75
Also, now accepting color and primer/paint suggestions. I don't have a HVLP gun or air compressor, so will need either rattle can or brush on. I'd like it not to be black. *@#$I need a rust preventative primer as there is still a bit of rust I can't get sanded off.*@#$

So far I've spent:

$25--frame
$20--flap disks

Still need paint and primer.
 

Brian_B_

Well-known member
Joined
May 12, 2012
Messages
505
Location
North Central, AR
Your doing great! Colors? Match it to your car, welder, tool box?

i am trying to work out a barter for a sheet of 1/4" for mine...I can get the rest of it for almost nothing from a scrap bin. Love to recycle.
 

Brian_B_

Well-known member
Joined
May 12, 2012
Messages
505
Location
North Central, AR
Thanks Jack, thanks jhn, thanks lemans.

My wife sometimes gets embarrassed by my scrounging. I like to consider myself a "salvage technician" or maybe an "equipment/material life extender and repurposer."

Is repurposer a word?

Explain to her that you joined the "green" movement in this country and you are recycling on a lot bigger scale than aluminum cans. :rocker:
 

1967lemans

Well-known member
Joined
Dec 18, 2011
Messages
275
Location
Springfield, MO
Also, now accepting color and primer/paint suggestions. I don't have a HVLP gun or air compressor, so will need either rattle can or brush on. I'd like it not to be black. *@#$I need a rust preventative primer as there is still a bit of rust I can't get sanded off.*@#$

So far I've spent:

$25--frame
$20--flap disks

Still need paint and primer.

How about Lincoln Electric Red. Thats what color I painted my Mig cart.
 

nine4gmc

Well-known member
Joined
Mar 24, 2012
Messages
14,357
Location
Dallas
theres a scrap guy that comes to a storage by my warehouse a few times a week. my friends dont understand why i get so excited. like a kid on xmas morning going to dig through his fresh trailer load of **** he dug from dumpsters only minutes before. i get some good shtuff though.

your table is coming out nice and the price is right up my alley! will you be drilling grid holes or leaving it solid?
 

geologist

Well-known member
Joined
Dec 14, 2011
Messages
5,326
Excuse my ignorance but are those welders what you guys refer to as 'Tombstones'?

Yes. I think Lincoln Electric started the trend. They're called tombstones because when they came out they resembled the style of tombstones that were popular at the time:

welder.jpg


tombstone.jpg
 
To avoid these ads, REGISTER NOW!
OP
B

Brian.Evans

Well-known member
Joined
May 10, 2012
Messages
75
1. Where do I find Lincoln Elertric Red?
2. I'm leaving the top solid for now.
3. I have been cross posting from another forum so I only have to type once. Apparently something in the code adds those stupid *@#$ signs for some reason.
 

MScott

Well-known member
Joined
Jun 30, 2009
Messages
1,616
Location
Eastern Ontario
1. I have been cross posting from another forum so I only have to type once. Apparently something in the code adds those stupid *@#$ signs for some reason.

I wondered about that too. I thought perhaps they were curses and that you might be one of those people who can't speak a sentence without using a curse in it.:D
 
OP
B

Brian.Evans

Well-known member
Joined
May 10, 2012
Messages
75
Yeah, I pretty much don't censor myself a whole lot. It is just a programming error between Tapatalk and IPhone's Safari. Sorry to disappoint. Haha.
 

kald

Well-known member
Joined
Mar 31, 2012
Messages
670
Location
Central Fl
1. Where do I find Lincoln Elertric Red?
2. I'm leaving the top solid for now.
3. I have been cross posting from another forum so I only have to type once. Apparently something in the code adds those stupid *@#$ signs for some reason.
I used krylon rattle can for my 30 year old Lincoln I just refurbed. It's an older one though so the color I choose is a bit more orange which matched the older Lincoln red according to my eyeball match. In Lowes, Rustoleum saftey red looked pretty close in color to a new machine like yours.
 

Attachments

  • IMG_20120525_193836.jpg
    IMG_20120525_193836.jpg
    136.8 KB · Views: 42
  • IMG_20120528_172554.jpg
    IMG_20120528_172554.jpg
    133.5 KB · Views: 49
Last edited:
OP
B

Brian.Evans

Well-known member
Joined
May 10, 2012
Messages
75
I got a little bit more done this morning. If I could get an hour or two of straight work in, I'd be able to get the frame finished. Sigh.....such is life with a family. *@#$Maybe I can work on it more tonight.*@#$

IMAGE_1000001327.JPG

IMAGE_1000001328.JPG


I'm happy with it so far. The opening was supposed to be 24", and it is 24 1/16" along it's entire front to back length, which makes me very happy.
 
OP
B

Brian.Evans

Well-known member
Joined
May 10, 2012
Messages
75
More done and a question that needs answered before I can go further. Please please watch the video.*@#$

IMAGE_1000001329.JPG


IMAGE_1000001330.JPG


I'm not at all impressed with my vertical welding skills. Basically I **** donkey ****. Big donkey ****. My horizontal welds look good, but everything vertical looks horrible.*@#$

I blew through the front shelf supports in a couple places. I had to use tubing because I was going to run out of angle. *@#$I tried to run mostly on the angle and wash the puddle over to the tubing, and was only moderately successful. It don't look purty, but I got my 270 lb **** up on them and jumped up and down and both sides held, so it surely will hold rod and slag hammers and wire brushes ok.*@#$

Here's the video. Thanks.*@#$
http://redirector.googlevideo.com/v...E0C7A325424B920BEF1A91576FDC4FDEFDEFB&key=ck1
 

Brian_B_

Well-known member
Joined
May 12, 2012
Messages
505
Location
North Central, AR
Just so you know...you have no need to weld vertical. Just flip the frame over to where the weld is flat. It can't be that heavy yet! :)
 
OP
B

Brian.Evans

Well-known member
Joined
May 10, 2012
Messages
75
Brian, it's not that heavy. It is just a huge pain in the **** to get it flipped in four or five different directions every time I weld a support. I desperately need to get longer leads and a longer power cord. These little short leads are for the birds!
 

kald

Well-known member
Joined
Mar 31, 2012
Messages
670
Location
Central Fl
For my vertical welding I use vertical down. Hold your rod at about 45 degree angle, support the puddle with tip by making your rod a "contact rod", that is keep your rod in contact with your work. Use a hotter setting(essential with vertical down), DC+ and move quickly. I use 7018 or 6013 rod because I also have the option of using AC which I need to sometimes.

It helps a lot if you can position your work so you can stand, this helps you to comfortably articulate the rod. A leather jacket with a high collar and hat is essential. If you don't have a leather apron DO NOT WELD VERTICALLY IF YOUR SITTING DOWN! Hot slag will find your junk! Ask me how I know. :)

With a little practice and you will get the hang of it. And what I say is not set in stone. Most people have their own techniques so don't be afraid to experiment on some scrap. Some people prefer vertical up, which I hate. Finally, don't be embarrassed if you have to grind something down and reweld it, every welder had to when they were starting out and even the best guys still need to once in a while.
 
Last edited:
OP
B

Brian.Evans

Well-known member
Joined
May 10, 2012
Messages
75
Thanks Kald. I'll try that hopefully those evening. I have a lot of stuff that might need ground down. I'm trying to decide if I want to cut the front tubing off and try again or just leave it.
 

kald

Well-known member
Joined
Mar 31, 2012
Messages
670
Location
Central Fl
No problem, hope it helps. Grind down your mistakes and fix them. Make it a learning exerpience and don't let it frustrate you. After you get really good, replace the tubing if it bugs you. I usually like to see my good stuff and scrap my scrap. :)
 
Last edited:
OP
B

Brian.Evans

Well-known member
Joined
May 10, 2012
Messages
75
Like I said earlier, I jumped up and down on the shelf support and nothing moved, so I'm not overly concerned about the structural stability of them, they just look like **** with the holes in the tubing. As far as the other supports, I'm grinding them down, no question.
 
OP
B

Brian.Evans

Well-known member
Joined
May 10, 2012
Messages
75
Decided to say screw it and make the "back" the "front". Now I have
to weld a piece of angle between the middle legs on the new back
side. However, I used nice angle for the new front, and it looks really
great, comparably.*

I think I could have had it done tonight, but my baby girl woke up, so
now I'm inside rocking my sweetheart and not wishing I was welding
even a little. :D *

I have five pieces left to weld in. The support between the back middle
legs, and the four cross members that will hold the top shelves. Then
I have to cut the pieces of expanded metal for the shelves and clean up
the welds/spatter and I'm DONE with the frame.*

The four cross members for the top shelf are going to be a pain, because
they all have to be coped into place. It takes me a little while to get it right
sometimes, but I'm determined to get it as right as I can, within my ability.*

All the legs are perfectly square down to 1/16-1/32" across
their length, which I am very happy about.*

IMAGE_1000001364.JPG


IMAGE_1000001365.JPG


Better view of the top shelf supports. They aren't in their exact places,
just thrown up there so you know what I'm trying to say.*
IMAGE_1000001366.JPG
 

Link-Belt

Well-known member
Joined
May 7, 2012
Messages
512
Location
Arlington Texas
Carefully with the vertical downhill welding. Not all rods are designed to weld downhill such as the 7018. It will probably be fine on your table but if you are ever doing something structural that has to be inspection it will not pass. The reason is because you have to move the rod so fast to control your puddle you don't get proper tie in makeing the weld weak and not structurally sound. It will however make a nice looking weld. When welding an open root v groove weld I will run a a vertical root with a 6010 then take and turn my machine up high and run a downhill pass to burn all the trash out then 7018 for filler and cap. Pass every time but I weld a bunch of dirty metal.
 
Last edited:
OP
B

Brian.Evans

Well-known member
Joined
May 10, 2012
Messages
75
All the shelf supports are coped to roughly fit and*@#$
the rear middle leg stretcher is cut to fit. I can put*@#$
the band saw up now and use the grinder for final*@#$
fit up. I'm thinking only an hour or two of finishing*@#$
up and final prep and I'm ready for primer and paint.*@#$

IMAGE_1000001368.JPG


IMAGE_1000001367.JPG


Regarding the top: *@#$I'm thinking I want to drill three
*@#$or four holes down the long sides and use*@#$
countersunk bolts through the angle below. *@#$
Would that work ok? *@#$My top is 3/16 or 1/4".*@#$

And I still need to figure out a color!! *@#$Right now red with black shelves is leading, but I'm still debating some type of hammertone.
 
OP
B

Brian.Evans

Well-known member
Joined
May 10, 2012
Messages
75
Got outside at a decent time tonight, which means
*@#$I didn't have to work past midnight to make progress.*@#$
And progress I did make!

I was able to finish the shelf brackets quickly. *@#$
Having the coped out the other day really*@#$
helped. Not having to switch back and*@#$
forth from the grinder to the band saw*@#$
saved mucho time. *@#$

I cut my expanded metal to fit.*@#$
I think it looks decent.*@#$

IMAGE_1000001385.JPG


I dragged the whole thing to the middle*@#$
of my shop floor and muscled the top into*@#$
place. Then I put welder where it will sit*@#$
just to get an idea of sizing.*@#$

IMAGE_1000001387.JPG


IMAGE_1000001386.JPG


IMAGE_1000001388.JPG


What do you all think? *@#$I wish I had another*@#$
piece of*@#$plate for the top, or a thicker piece, but*@#$free is free.

I still need to attach the top. I am accepting suggestions.*@#$
Also, I'm still deciding on a color. *@#$
 
To avoid these ads, REGISTER NOW!
Top Bottom