To avoid these ads, REGISTER NOW!

New welding table & my fab space

zmotorsports

ALLIANCE MEMBER
Joined
Oct 20, 2009
Messages
21,360
Location
Northern Utah
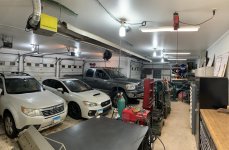
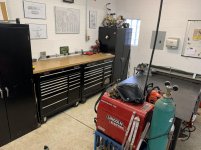
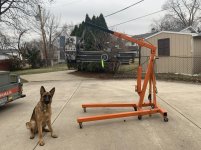
Re: New welding table & my fab space

How do you like the overall fit/finish of the PM machines? Is it above Grizzly or similar?

Fit & finish is great on both of my PM machines, but both are Taiwanese machines vs. mainland China. I don't have a lot of experience with Grizzly but my old neighbor had a Grizzly 14x40 (GO709 if memory serves) and it was a nice machine and probably more equivalent to Matt's Chinese machines. My neighbor drooled over the fit & finish of my PM1340GT and yes, there was an obvious difference in fit & finish between the two.
 
To avoid these ads, REGISTER NOW!
OP
9

90roadster

Well-known member
Joined
Jan 14, 2010
Messages
188
Location
Chicago Burbs
I dropped 240VAC power for my mill as well as my son’s future CNC mill that I knew he would be adding. I also dropped some 110VAC for milk accessories such as PC for his and DRO for mine. I also have some dropped for convenience because I don’t like using cords on floors for powering stationary equipment long term.

Got the bus drop hung up, I want to switch the hook out for carabiner type connector but this will do for now
 

Attachments

  • IMG_2901.jpg
    IMG_2901.jpg
    60.7 KB · Views: 159
OP
9

90roadster

Well-known member
Joined
Jan 14, 2010
Messages
188
Location
Chicago Burbs
Here is sample of ongoing project I am working on. This is a hot iron brand for wedding center pieces. pictures show progress from Solidworks design to 3D printer prototype to metal fabrication. Still have to figure out a better way to heat the brand for applying
 

Attachments

  • IMG_2233.jpg
    IMG_2233.jpg
    101.5 KB · Views: 127
  • IMG_2845.jpg
    IMG_2845.jpg
    92.2 KB · Views: 132
  • IMG_2891.jpg
    IMG_2891.jpg
    76.1 KB · Views: 120
  • IMG_2703.jpg
    IMG_2703.jpg
    55.2 KB · Views: 424
  • IMG_2702.jpg
    IMG_2702.jpg
    98.6 KB · Views: 126
  • IMG_2672.jpg
    IMG_2672.jpg
    90.7 KB · Views: 119
Last edited:
OP
9

90roadster

Well-known member
Joined
Jan 14, 2010
Messages
188
Location
Chicago Burbs
So I was finally able to get the brand up to temperature (nearly red hot :shocking:
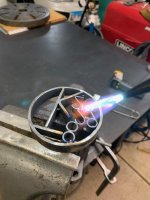
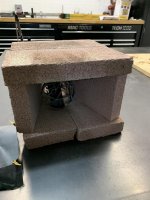
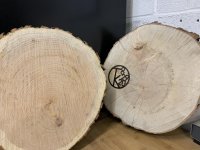
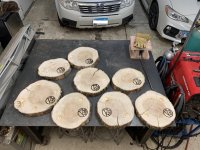
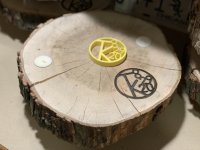
) and pretty happy with the results going onto hardwood centerpieces. Bonus is I got a new HF propane torch and mini makeshift kiln out of the deal :)
attachment.php
 

Attachments

  • IMG_3263.jpg
    IMG_3263.jpg
    55.9 KB · Views: 137
  • IMG_3258.jpg
    IMG_3258.jpg
    90.1 KB · Views: 819
  • IMG_3256.jpg
    IMG_3256.jpg
    95.2 KB · Views: 114
  • IMG_3261.jpg
    IMG_3261.jpg
    149.5 KB · Views: 98
Last edited:
OP
9

90roadster

Well-known member
Joined
Jan 14, 2010
Messages
188
Location
Chicago Burbs
Thanks Guys!

My fiance decided to add little bit more to the design, so I counter bored 1.5" holes for flush tea candles.

Feels go to wrap this project up, total was 14 pieces made. Im ready to get back to more metal working!
attachment.php

attachment.php

attachment.php

attachment.php
 

Attachments

  • IMG_3409.jpg
    IMG_3409.jpg
    155.3 KB · Views: 613
  • IMG_3416.jpg
    IMG_3416.jpg
    116.6 KB · Views: 605
  • IMG_3359.jpg
    IMG_3359.jpg
    149.4 KB · Views: 602
  • IMG_3355.jpg
    IMG_3355.jpg
    117.8 KB · Views: 601
OP
9

90roadster

Well-known member
Joined
Jan 14, 2010
Messages
188
Location
Chicago Burbs
I also added some new tools to the shop over winter break.

Picked up new 3 ton arbor press with some tooling and on a nice heavy duty stand.
attachment.php

attachment.php


Vintage dentist office or possibly watch makers organizer toolbox. Has nifty wooded tray perfect for organizing the 2 and 4 flute endmills
attachment.php


I kept forgetting to turn off my compressor. The solution was to add 220v LED light beacon right above the disconnect. This way when I am done for the day in the shop and turn the main lights off this will stay illuminated red if compressor has power.

Off and On. PS it is brighter than it appears in the second picture.
attachment.php

attachment.php
 

Attachments

  • IMG_3160.jpg
    IMG_3160.jpg
    149.1 KB · Views: 621
  • IMG_3161.jpg
    IMG_3161.jpg
    123.7 KB · Views: 628
  • IMG_3153.jpg
    IMG_3153.jpg
    158 KB · Views: 633
  • IMG_3081.jpg
    IMG_3081.jpg
    141 KB · Views: 628
  • IMG_3080.jpg
    IMG_3080.jpg
    131.4 KB · Views: 633

HotWire

Well-known member
Joined
Mar 21, 2010
Messages
368
Location
Montana
Awesome setup! I’m a little jealous. I’m saving up for a full-size knee mill.


Sent from my iPhone using Garage Journal
 
OP
9

90roadster

Well-known member
Joined
Jan 14, 2010
Messages
188
Location
Chicago Burbs
Made some progress on my Pexto slit shear conversion to a bead roller. Had to extend the upper shaft, mill a T-slot into the upper trunion casting. Here I made some test passes with Baileigh 1/4 round dies.

Next step is to add DC motor to the setup oh and maybe a coat of paint?

attachment.php

attachment.php

attachment.php

attachment.php

attachment.php
 

Attachments

  • IMG_4081.jpg
    IMG_4081.jpg
    105.3 KB · Views: 399
  • IMG_4080 (1).jpg
    IMG_4080 (1).jpg
    87.1 KB · Views: 403
  • IMG_4096.jpg
    IMG_4096.jpg
    120.8 KB · Views: 409
  • IMG_4098.jpg
    IMG_4098.jpg
    72.5 KB · Views: 410
  • IMG_4095.jpg
    IMG_4095.jpg
    131 KB · Views: 413

Craftfab

Well-known member
Joined
Sep 19, 2018
Messages
411
Location
Garage
That is such a cool conversion. Nice work! I apologize if missed somewhere, but what is the size of your shop?
 
OP
9

90roadster

Well-known member
Joined
Jan 14, 2010
Messages
188
Location
Chicago Burbs
That is such a cool conversion. Nice work! I apologize if missed somewhere, but what is the size of your shop?

Appreciate it. Shop is approximately 1100 sqft, 4 bays 3 of which are double deep. Unfortunately it holds 4 cars so my shop space is limited to less than half of the total square footage.
attachment.php

attachment.php

attachment.php
 

Attachments

  • IMG_2706.jpg
    IMG_2706.jpg
    154.1 KB · Views: 344
  • IMG_4103.jpg
    IMG_4103.jpg
    158.4 KB · Views: 347
  • IMG_4106.jpg
    IMG_4106.jpg
    151.4 KB · Views: 342

gorillamotors

New member
Joined
Feb 17, 2020
Messages
1
Location
Florida
Finally got around to upgrading my welding table today. I had a beefy but small 2’ x 4’ table for years but larger garage now allowed for proper table. Went with 4’ x 5’ X 1/2” top with 3x3 uprights and 2x2 frame. Still have to add some hitch/receiver tubes all around for Beverly and Vises , maybe some paint too ...
Love the table. Do you plan on drilling holes in the table? What size? Tapped? Or just no holes?
 
To avoid these ads, REGISTER NOW!
OP
9

90roadster

Well-known member
Joined
Jan 14, 2010
Messages
188
Location
Chicago Burbs
Right before the whole world stopped I was able to pickup this 12x36 Enco lathe I bought at an auctions. I cut it close, just few days before the pickups were suspended until..:headscrat

I'm not too impressed with the old tanker desk stand but very excited about finally having a proper size lathe.

attachment.php

attachment.php

attachment.php

attachment.php
 

Attachments

  • IMG_4692.jpg
    IMG_4692.jpg
    154.7 KB · Views: 272
  • IMG_4690.jpg
    IMG_4690.jpg
    149.8 KB · Views: 272
  • IMG_5035.jpg
    IMG_5035.jpg
    155.9 KB · Views: 191
  • IMG_5034.jpg
    IMG_5034.jpg
    157.9 KB · Views: 192
Last edited:
OP
9

90roadster

Well-known member
Joined
Jan 14, 2010
Messages
188
Location
Chicago Burbs
New tool day over in my shop. Scored a hell of a deal on an Enco 20" variable speed drill press (Now my Enco machine shop is complete). Guy had it listed as 3 phase and was basically giving it away.. well I arrive to load and to my surprise there are only 3 wires! I was stoked. I also picked up 3/4" Jacob Super chuck for it. Looking over at these pictures I remember how sketchy uploading was alone, with only an engine crane, I really need to invest in a small forklift.

attachment.php


attachment.php


attachment.php


attachment.php


attachment.php


attachment.php
 

Attachments

  • IMG_5505.jpg
    IMG_5505.jpg
    88.3 KB · Views: 231
  • 60830742564__DD6FECC8-95B0-45CD-B1C1-C105FBB8F2E1.jpg
    60830742564__DD6FECC8-95B0-45CD-B1C1-C105FBB8F2E1.jpg
    85 KB · Views: 231
  • IMG_5280.jpg
    IMG_5280.jpg
    123.7 KB · Views: 233
  • IMG_5278.jpg
    IMG_5278.jpg
    156 KB · Views: 230
  • 60816431130__6CA0F1DB-5E6E-42FE-84C6-3957B93AFA98.jpg
    60816431130__6CA0F1DB-5E6E-42FE-84C6-3957B93AFA98.jpg
    118.4 KB · Views: 228
  • IMG_5267.jpg
    IMG_5267.jpg
    157.9 KB · Views: 228

zmotorsports

ALLIANCE MEMBER
Joined
Oct 20, 2009
Messages
21,360
Location
Northern Utah
Looks to be a stout drill press.

You'll love the Jacobs 18N chuck, although I don't use mine all that much. When it's needed it flat works and works great.
 
OP
9

90roadster

Well-known member
Joined
Jan 14, 2010
Messages
188
Location
Chicago Burbs
Looks to be a stout drill press.

You'll love the Jacobs 18N chuck, although I don't use mine all that much. When it's needed it flat works and works great.

i love this drill press, oh and the chuck accordingly! This thing will go thru some 1/4" SS with 1/2" dia bit like butter.

Today I got to use many of the tools in my shop to finish up my power bead roller from sheet metal shear conversion. Thinking about adding a sprocket guard possibly but for now works like a charm.
attachment.php

attachment.php

attachment.php


Also re-powered my 16" Apex Disc Sander with 1.5hp Baldor single phase motor, added AB push button and fabbed the channel bracket to mate it all together.
attachment.php

attachment.php

attachment.php
 

Attachments

  • IMG_5362.jpg
    IMG_5362.jpg
    130.2 KB · Views: 198
  • IMG_5540.jpg
    IMG_5540.jpg
    149.5 KB · Views: 199
  • IMG_5539.jpg
    IMG_5539.jpg
    147.5 KB · Views: 199
  • IMG_5544.jpg
    IMG_5544.jpg
    132.3 KB · Views: 199
  • IMG_5545.jpg
    IMG_5545.jpg
    105.1 KB · Views: 199
  • IMG_5452.jpg
    IMG_5452.jpg
    87.1 KB · Views: 199
To avoid these ads, REGISTER NOW!
Top Bottom