To avoid these ads, REGISTER NOW!

New Wolverine Project

valvestud

Member
Joined
Mar 14, 2009
Messages
13
Hi All,

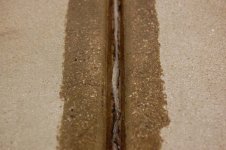
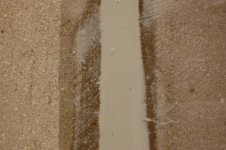
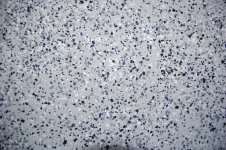
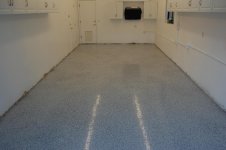
Finally pulled the trigger on an order for my 330 sq. ft. 3rd car garage (shop). Going with the IntegraFlex 1921 for the expansion joints, BondTite 1101, Liquatile 1184 in gray, and EnduraShield 2254 top coat. No flakes or anti-skid for me.

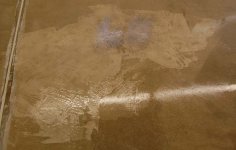
So far I've ground the entire floor with a rented 7" diamond grinder. Also, bought a 4" diamond wheel for my 4-1/2" angle grinder to do the perimeter. The 7" hooked up to my shop vac and was pretty easy, effective, and generated minimal dust. The 4" was not connected to the vac and generated huge amounts of dust. Used a 3M face mask and had no issues.

Next I vacuumed well used Quikrete Bond-Lok Cleaner, De-greaser, Etcher and it worked pretty well. It's much less volatile and dangerous than Muriatic acid. Followed up with a thorough rinse.

I'll post pictures as I progress. If all goes well, I'll tackle my main garage next.

Thanks to all for all the useful data on this site!

Regards,

Joe
 
To avoid these ads, REGISTER NOW!
OP
V

valvestud

Member
Joined
Mar 14, 2009
Messages
13
Hi All,

Time for an update on my project. After the prep, I moved forward with application of the IntegraFlex in the control joints. I stuffed foam backer rod into any areas where cracks went all the way through the slab. I first mixed a small amount of BondTite and applied to the joints. I next pre-mixed each IntegraFlex component and I cannot stress enough that you need to pre-mix, especially the grayish component. It separates during storage and there is a large very viscous chunk of material that settles in the bottom. It's difficult to get this mixed and you really need to hold the container firmly.

Once I mixed the two components together I poured material into the joints right from the container. Next time I'll use a smaller container with a pour spout to better control the application. Once it was mostly set up, I used a razor scraper to clean-up and level to the surrounding slab.

Now for the BondTite; Measuring and mixing went fine, and I started applying, noting the time so that I could better know how long it took to put down. Unfortunately, I mis-understood the instructions and instead of pouring out all of the material at once to inhibit the chemical reaction, I poured, used a squeegee to spread, and back-rolled with the 18” roller in sections. All was well until I got to the last 30-50 sq. ft. I looked into the bucket and the material was smoking! Not knowing what to do, I quickly poured the rest of the material onto the floor where it promptly set-up in varying thickness up to 1/8”, with little or no penetration into the concrete.

By this time it’s the evening and I left Fred a voicemail. He called right back, and we agreed to let the material cure and go from there. So this morning, I sent photos to Fred and he called and agreed I should grind off and start over. So more BondTite is on the way! After seeing how the imperfections in the floor show-up after coating, I’ve also decided to put down a light application of flakes.

OK, so it’s off to Home Depot to once again rent the 7” grinder. Once I receive the BondTite, I’ll need to scuff up and wipe down the part that went down correctly.

All for now, and everyone take care.
 

Attachments

  • DSC_0104LR.jpg
    DSC_0104LR.jpg
    52.1 KB · Views: 137
  • DSC_0107LR.jpg
    DSC_0107LR.jpg
    78.3 KB · Views: 150
  • DSC_0108LR.jpg
    DSC_0108LR.jpg
    78.4 KB · Views: 148
  • DSC_0112LR.jpg
    DSC_0112LR.jpg
    59.1 KB · Views: 167
  • DSC_0114LR.jpg
    DSC_0114LR.jpg
    70.8 KB · Views: 160

eddy

Member
Joined
Jun 23, 2009
Messages
18
Location
Montreal, Canada
Did you have to "V" grind the joints prior to filling them? or was there no need for that in this case?
This is shaping up to be a success.
 
To avoid these ads, REGISTER NOW!
OP
V

valvestud

Member
Joined
Mar 14, 2009
Messages
13
Did you have to "V" grind the joints prior to filling them? or was there no need for that in this case?
This is shaping up to be a success.
No need. These were control joints with radiused edges, not saw cuts.

Joe
 
OP
V

valvestud

Member
Joined
Mar 14, 2009
Messages
13
OK! We have color and flakes. I spent much of yesterday coating the "re-worked" area with the BondTite. Once cured late in the day, I rented a 17" floor polisher and with a green ScotchBrite pad, scuffed up the original application of BondTite. Washed again with Simple Green solution and rinsed well.

This morning I attached a terry towel to a kitchen mop and soaked with Denatured Alcohol. I kept going over the whole floor, changing the towels frequently, until it stopped picking anything up.

Next I applied the LiquaTile. I hand mixed a small container and cut in around the perimeter. I next mixed half of the remaining material and applied to floor. (and yes this time I poured it all out as soon as it was mixed.) I used a larger notched squeegee to spread material and rolled it out. Next time I'll mix up a whole container because measuring the Part A (Color) is very difficult due to the viscosity of the material.

Roll-out was easy and the result was excellent. Next came the flakes; this was pretty easy and I got a pretty even result. I'm waiting another couple of hours and then I'll clean off the loose flakes. Tomorrow morning I'll apply the EnduraShield.

Take Care!
 

Attachments

  • DSC_0013.jpg
    DSC_0013.jpg
    141.4 KB · Views: 115
  • DSC_0012.jpg
    DSC_0012.jpg
    160.3 KB · Views: 149
  • DSC_0005.jpg
    DSC_0005.jpg
    146.7 KB · Views: 145
  • DSC_0014.jpg
    DSC_0014.jpg
    135 KB · Views: 92
  • DSC_0015.jpg
    DSC_0015.jpg
    130.5 KB · Views: 98

rlme36

Well-known member
Joined
Feb 17, 2008
Messages
331
OK! We have color and flakes. I spent much of yesterday coating the "re-worked" area with the BondTite. Once cured late in the day, I rented a 17" floor polisher and with a green ScotchBrite pad, scuffed up the original application of BondTite. Washed again with Simple Green solution and rinsed well.

This morning I attached a terry towel to a kitchen mop and soaked with Denatured Alcohol. I kept going over the whole floor, changing the towels frequently, until it stopped picking anything up.

Next I applied the LiquaTile. I hand mixed a small container and cut in around the perimeter. I next mixed half of the remaining material and applied to floor. (and yes this time I poured it all out as soon as it was mixed.) I used a larger notched squeegee to spread material and rolled it out. Next time I'll mix up a whole container because measuring the Part A (Color) is very difficult due to the viscosity of the material.

Roll-out was easy and the result was excellent. Next came the flakes; this was pretty easy and I got a pretty even result. I'm waiting another couple of hours and then I'll clean off the loose flakes. Tomorrow morning I'll apply the EnduraShield.

Take Care!

I like your color combo on the flakes. Is that a standard mix or did Fred put that one together for you? If he did, can you tell me what it was? As the colors my roundel.

thanks

rob
 
OP
V

valvestud

Member
Joined
Mar 14, 2009
Messages
13
The custom mix is black, dark blue, charcoal, and white. If I did it again, I would have left out the black, but it still looks good.
 
To avoid these ads, REGISTER NOW!
Top Bottom