To avoid these ads, REGISTER NOW!

New workshop project

tintin

Active member
Joined
Apr 8, 2009
Messages
25
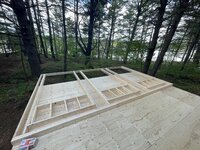
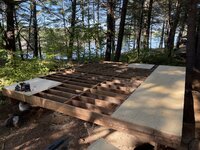
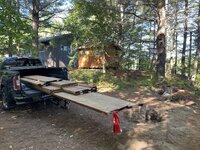
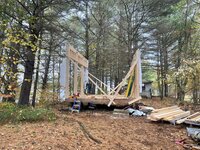
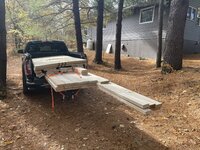
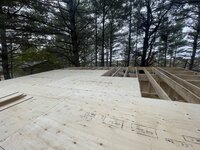
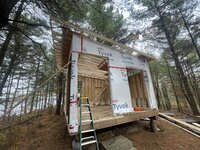
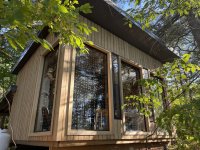
I'm finally building my modest workshop up at the cottage. It will be 16 x 20 with large glass panels facing the lake.

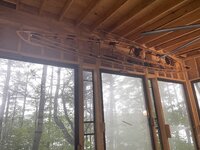
I salvaged some 5' x 9' tempered glass sliding doors that were likely used in a mall to close off a department store or something. They're in aluminum frames designed to go on a track. 3 of them will face the lake making up most of the 20 foot long wall and I'll do something for ventilation in the sections between the windows along with operable windows elsewhere.

Anyhow - I'm thinking about the doors and am leaning towards having a single large entry door, possibly a 48 x 84 steel hinged 'service door'. These seem to be out there in the world.

I want something I can roll a motorcycle through easily enough, but could also transition to a studio / living space in the future.

Any creative ideas out there for a wide door that will be reliable, weather tight and functional enough to be the one main entry to the building?

For the pie-in-the-sky idea, I toyed with framing one of the 5x9 panels and using a pivot hinge on it to make a massive swinging door. But I think this might be a bit far fetched and over the top for this modest structure.

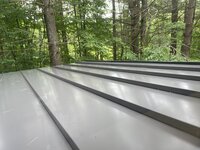
Also for the low slope (1.5:12 pitch) roof, I'm looking at standing seam metal over strapping/Blueskin RF200TM high-temp membrane. I know metal isn't great at this low pitch, but it's been suggested as OK with the membrane and perhaps butyl tape at the panel seams (although I don't know if that applies in standing seam).

The building will be under a lot of tall pine trees and shaded. So the roof needs to be durable and in 25 years from now when I'm pushing 80, I won't care much about it. So it needs to last at least that long ;)
 

Attachments

  • West Elevation.jpeg
    West Elevation.jpeg
    299.7 KB · Views: 329
  • North Elevation.jpeg
    North Elevation.jpeg
    256.9 KB · Views: 295
To avoid these ads, REGISTER NOW!
OP
T

tintin

Active member
Joined
Apr 8, 2009
Messages
25
Took a long time to get the piers put in. First guy kept pushing the date out so I had to scramble.

Footings are all sitting on bedrock. Some at the surface others at most 1-2 feet deep. Pinned to the rock with rebar.

Floor is in, perfectly square and level. Framed the front wall.

Wrapped it up for a week or so but hoping to close it in by the end of October. Or it will stay wrapped up till spring.
 

Attachments

  • IMG_1547.jpeg
    IMG_1547.jpeg
    1.2 MB · Views: 244
  • IMG_1537.jpeg
    IMG_1537.jpeg
    659.3 KB · Views: 220
  • IMG_1539.jpeg
    IMG_1539.jpeg
    1.3 MB · Views: 208
  • IMG_1529.jpeg
    IMG_1529.jpeg
    1.2 MB · Views: 196
  • IMG_1521.jpeg
    IMG_1521.jpeg
    1.6 MB · Views: 192
  • IMG_1505.jpeg
    IMG_1505.jpeg
    1.7 MB · Views: 187
  • IMG_1500.jpeg
    IMG_1500.jpeg
    1.8 MB · Views: 193
  • IMG_1494.jpeg
    IMG_1494.jpeg
    1.5 MB · Views: 196
  • IMG_1485.jpeg
    IMG_1485.jpeg
    1.6 MB · Views: 193
  • IMG_1492.jpeg
    IMG_1492.jpeg
    1.7 MB · Views: 242

Zeke

Well-known member
Joined
Aug 13, 2009
Messages
17,176
Location
Long Beach CA, the sewer by the sea.
Sorry no one commented on your first question. You can get 42" steel doors with frame all day long and they will accommodate a motorcycle. There was a discussion a while back about 4 foot doors and it came down to buying a hospital door.
 
Last edited:
OP
T

tintin

Active member
Joined
Apr 8, 2009
Messages
25
Found a young framer wanting weekend work to help me out. Bonus is he has a set of wall jacks. Bit sketchy lifting that 12' high 20' long top heavy wall, but we made it and the rear 10' wall was a piece of cake. Third wall is framed on the deck just needing sheathing/wrap.

Weather isn't cooperating, but the rafters are on order and I hope to close it in over the next 2-3 weekends. The attached 'carport' will likely wait till spring. The main roof will live with membrane for the winter.
 

Attachments

  • IMG_1623.jpeg
    IMG_1623.jpeg
    1.4 MB · Views: 206
  • IMG_1620.jpeg
    IMG_1620.jpeg
    1.8 MB · Views: 202
  • IMG_1619.jpeg
    IMG_1619.jpeg
    1.3 MB · Views: 193
  • IMG_1616.jpeg
    IMG_1616.jpeg
    1.4 MB · Views: 218
OP
T

tintin

Active member
Joined
Apr 8, 2009
Messages
25
Roof sheathing underway - will hopefully have it dried in this weekend and possibly frame the attached 'carport' covered outdoor workspace but that might wait till spring.

That roof section will attach to a ledger board a few inches below those three transom windows on the rear wall. Just low enough to allow for proper flashing/siding and avoid snow buildup against the storm windows that will be mounted directly to the sheathed wall.

The slots are 18 x 61 inches each so hopefully will provide decent ventilation when paired up with the 14 x 93 inch vertical opening windows at the front between the massive fixed glass panels.
 

Attachments

  • IMG_1668.jpeg
    IMG_1668.jpeg
    1.2 MB · Views: 186
  • IMG_1657.jpeg
    IMG_1657.jpeg
    1.6 MB · Views: 192
  • IMG_1662.jpeg
    IMG_1662.jpeg
    1 MB · Views: 196
  • IMG_1660.jpeg
    IMG_1660.jpeg
    1.8 MB · Views: 197
  • IMG_1653.jpeg
    IMG_1653.jpeg
    1.5 MB · Views: 188
OP
T

tintin

Active member
Joined
Apr 8, 2009
Messages
25
One thing I'm not sure of is what length to make the attached 'carport' roof section (no idea what I should be calling that roof).

The main roof above has a 12 inch overhang on the sides and back (3' at the front). This section I had originally planned to be 20' long, the same as the building itself. So the first and last rafters would be flush with either the framing of the wall (20') or with the surface of the 1/2" plywood sheathing so 20' 1" total length. But - I'm not sure if being flush with the wall is going to cause issues when I put the standing seam metal roof on and then siding - I'm not sure what sort of cladding I'm putting on the building.

Or do I play it 'safe' and make the carport roof say 18' 8" removing 16 inches from the roof so it's still easy for the roof panels and I have 8 inches of space for the siding to wrap around the corner of the building and then interface with the roof/fascia aluminum and flashing?

I want a neat/tidy finish and I'm concerned that having the rafters flush with the side walls of the building may lead to some awkward siding/flashing/roofing situations at that point.
 
OP
T

tintin

Active member
Joined
Apr 8, 2009
Messages
25
Got the shop dried in last weekend. Pretty much secure for the winter. Not great that the Blueskin PE200HT will be exposed like that till spring but it will get a layer of ice and snow on it which will be there pretty much consistently from mid December to early March, protecting it from UV etc. Not too concerned about it.

The carport framing will wait till spring. All the material is safely stored inside the shop for the winter. With luck no critters will find their way in and get trapped. I'm almost tempted to cut an escape hole in the floor but there's openings between the rafters along the front wall that would be easy for a squirrel or racoon to find their way back out of I figure.

I have the storm windows for the two tall skinny openings at the front and three sliders at the rear and will put them on in the spring. They weren't ready till after I boarded up the holes and it's not worth installing them just to have them exposed all winter. About 8 foot high windows at the front and three 18 x 61 inch sliders across the back wall at the top. Hoping for some good air flow on the hot days but I'll also put a large ceiling fan in.

Hard to judge the scale in the photos until you remember the windows are 5 x 9 feet and the entry door is a full 4 x 8. 10' high at the back going to 12' at the front.

IMG_1686.jpegIMG_1687.jpegIMG_1692.jpegIMG_1693.jpegIMG_1696.jpegIMG_1701.jpegIMG_1702.jpegIMG_1709.jpeg
 
OP
T

tintin

Active member
Joined
Apr 8, 2009
Messages
25
I left the windows dirty intentionally, to prevent bird strikes. They'll get properly cleaned and reflective dots added come spring.
 

Uncle murph

Well-known member
Joined
Jan 28, 2021
Messages
1,457
Location
Harford county
Got the shop dried in last weekend. Pretty much secure for the winter. Not great that the Blueskin PE200HT will be exposed like that till spring but it will get a layer of ice and snow on it which will be there pretty much consistently from mid December to early March, protecting it from UV etc. Not too concerned about it.

The carport framing will wait till spring. All the material is safely stored inside the shop for the winter. With luck no critters will find their way in and get trapped. I'm almost tempted to cut an escape hole in the floor but there's openings between the rafters along the front wall that would be easy for a squirrel or racoon to find their way back out of I figure.

I have the storm windows for the two tall skinny openings at the front and three sliders at the rear and will put them on in the spring. They weren't ready till after I boarded up the holes and it's not worth installing them just to have them exposed all winter. About 8 foot high windows at the front and three 18 x 61 inch sliders across the back wall at the top. Hoping for some good air flow on the hot days but I'll also put a large ceiling fan in.

Hard to judge the scale in the photos until you remember the windows are 5 x 9 feet and the entry door is a full 4 x 8. 10' high at the back going to 12' at the front.

IMG_1686.jpegIMG_1687.jpegIMG_1692.jpegIMG_1693.jpegIMG_1696.jpegIMG_1701.jpegIMG_1702.jpegIMG_1709.jpeg
To cool! I love it.
 
OP
T

tintin

Active member
Joined
Apr 8, 2009
Messages
25
Got up one last time to winterize the solar etc. and hauled some more stuff up to the 'shed'.

Should be a nice place to work come spring with a few things finished and a propane heater installed. Planning on a proper direct-vent wall mounted heater for here plumbed to a portable tank or two. If we find it gets used a lot I'll get another 400 pound tank for this building but I expect a 40 pounder will do until I'm too old to haul it for fills.


IMG_1781.jpegIMG_1783.jpegIMG_1782.jpeg
 
OP
T

tintin

Active member
Joined
Apr 8, 2009
Messages
25
"Carport" framing is near complete after one day of work this season. Should wrap it up with sheathing and blueskin next weekend.

Getting about 12 x 20 feet of exterior covered storage from this which will be nice to tuck motorcycles in under etc.

Might close it in a bit between the posts at some point in the future to have a bit more protection from the elements, but for now having that much covered storage on the back of the shop will be great.

I'll have a few loads of gravel or something brought in to level the ground out, but it's level enough to back a boat trailer into or park my truck.

Standing seam roofing is the next priority.
 

Attachments

  • IMG_2428.jpeg
    IMG_2428.jpeg
    1.5 MB · Views: 126
  • IMG_2430.jpeg
    IMG_2430.jpeg
    1.5 MB · Views: 134
OP
T

tintin

Active member
Joined
Apr 8, 2009
Messages
25
Roofing has been contracted and hopefully will be done in the next few weeks. Threw some stairs on and got the permit closed, so now I'm free to do as I please.

Ran an ethernet cable out to it and a long extension cord, so I'm working from the new 'office' now.

100 inch ceiling fan is on the way for when it warms up.
 

Attachments

  • IMG_2453.jpeg
    IMG_2453.jpeg
    1.3 MB · Views: 116
  • IMG_2457.jpeg
    IMG_2457.jpeg
    1.6 MB · Views: 113
  • IMG_2460.jpeg
    IMG_2460.jpeg
    861.8 KB · Views: 125
  • IMG_2502.jpeg
    IMG_2502.jpeg
    855.1 KB · Views: 127
To avoid these ads, REGISTER NOW!
OP
T

tintin

Active member
Joined
Apr 8, 2009
Messages
25
Standing seam roof, soffit and fascia is all done. Should outlast me and my offspring.

Got a good deal on a 100 inch DC motor ceiling fan and squeezed a ping pong table in for my wife who decided we need to start playing.

Next step is flashing the windows and siding. I'm planning on board on batten (reverse board and batten) hemlock, prefinished in clear sealant on all sides.

I'm considering placing the battens directly on the Tyvek and securing with screws from the inside. In most spots the boards are short enough to span structural members running horizontally anyhow, and I can easily toss a brad nail through to identify the center of a batten from the inside and drive 1.5" screws into it from the inside.

This would be an alternative to securing horizontal strapping on the exterior and then the battens to that, then the boards on top of the battens. The building is sheathed with 1/2 plywood, not OSB.

I wouldn't secure the siding with screws from the outside only gripping into the sheathing, but I figure if I do it from the inside it will be a) secure and b) hidden.
 

Attachments

  • IMG_2514.jpeg
    IMG_2514.jpeg
    787.7 KB · Views: 119
  • IMG_2557.jpeg
    IMG_2557.jpeg
    794.9 KB · Views: 108
  • IMG_2737.jpeg
    IMG_2737.jpeg
    1.5 MB · Views: 110
  • IMG_2731.jpeg
    IMG_2731.jpeg
    1.5 MB · Views: 99
  • IMG_2718.jpeg
    IMG_2718.jpeg
    677.8 KB · Views: 110
OP
T

tintin

Active member
Joined
Apr 8, 2009
Messages
25
Oh and importantly final inspection is complete and the permit closed a few weeks back, so no more nosy building inspectors. He didn't care about the lack of landing at the top of the stairs or not having a railing. It's an 'accessory' building, not a sleeping cabin so there are fewer rules.

Not to say 10 years from now when there may be grandkids that this won't evolve into a guest cabin but for inspection purposes and incremental property value assessments, this is a workshop/storage building and it will be my home office/motorcycle tinkering/ping pong palace for hopefully a loooooong time (daughter is 22 and hopefully 10 years away from having kids if she decides to).
 
OP
T

tintin

Active member
Joined
Apr 8, 2009
Messages
25
Compacted crushed limestone going in the carport area (20 x 13) today. I'm using those garage door screens to enclose the carport and will put some sidewalk pavers down to create a workspace for the bikes - oil changes etc.

The wife has taken over the 'studio' - the 320 sq ft was sort of wasted on my home office needs and I have another smaller 9 x 12 bunkie to use for that.

Hung a frame for a Klepper kayak I picked up for free a while back - it's about 17 feet long and looks great suspended 10 feet in the air. It's on pulleys so I can lower it easily. Wife has a couple of hanging chairs in there now and all her easels, supplies, work surfaces etc. Now that it's 'her' space, she's cleaning the five 5x9 windows ;)
 

Attachments

  • IMG_2956.jpeg
    IMG_2956.jpeg
    1.4 MB · Views: 110
  • IMG_2944.jpeg
    IMG_2944.jpeg
    1.5 MB · Views: 115
  • IMG_2909.jpeg
    IMG_2909.jpeg
    662.1 KB · Views: 115
  • IMG_2869.jpeg
    IMG_2869.jpeg
    886.1 KB · Views: 123
OP
T

tintin

Active member
Joined
Apr 8, 2009
Messages
25
Getting the hemlock reverse board and batten up.
 

Attachments

  • IMG_3108.jpeg
    IMG_3108.jpeg
    1.3 MB · Views: 98
  • IMG_3115.jpeg
    IMG_3115.jpeg
    1.4 MB · Views: 94
  • IMG_3117.jpeg
    IMG_3117.jpeg
    797.4 KB · Views: 100
OP
T

tintin

Active member
Joined
Apr 8, 2009
Messages
25
I’ll be removing the stairs and building that area out, flashing it and put the stairs back on. Waiting on some custom profile drip cap for over the windows before I can continue in that direction and around the front of the building.
 
OP
T

tintin

Active member
Joined
Apr 8, 2009
Messages
25
Funny how getting an opening fully wrapped up in siding finishes things off.

All the massive windows are flashing taped with 'G Tape' and the drip cap is on.

It wraps around over both the large side windows and across the entire front of the building. Protects the windows and allows me the break on the taller sections. I couldn't get 13+ foot board and batten material, so the outside corners needed to have **** joints I hadn't originally planned on.

Prepped the pad for a new 420 pound propane tank to supply the Jotul 160 I picked up for this building. It's quickly becoming a finished studio for the wife. I just ordered 320 sq ft of birch flooring for it to match the cottage and bunkie.

The large windows have all been spray foamed finally as well. I installed them 1/2" off the baseplate with plywood spacers so I have a good solid bead of foam around the full perimeter which in many areas also extends up into the cavity of the aluminum window frames.

This DAP No Warp foam is about the best spray foam I've ever used. I don't have the fancy gun for the larger cans but only needed 6 cans or so for the 5 large 5x9 foot windows which I thought was pretty good coverage.

I left the one small area over one side window for final location of the horizontal direct vent for the propane heater. Once I have that finalized I'll put some boards in to frame the vent and avoid any odd placement of the edge of the vent over a gap between the boards.IMG_3152.jpegIMG_3151.jpegIMG_3148.jpegIMG_3153.jpegIMG_3149.jpeg
 

duneslider

Well-known member
Joined
Jan 20, 2013
Messages
2,243
Location
Riverton, Utah
I love this build! Great looking building! Love the siding you are putting on it too, it looks fantastic. I would love something like that in my backyard, not to mention in a location like you have.

Curious, but what do you do to winterize solar? I am assuming this is in an area that gets a lot of snow and maybe the snow can damage the panels? I just haven't heard of people winterizing solar.
 
OP
T

tintin

Active member
Joined
Apr 8, 2009
Messages
25
I love this build! Great looking building! Love the siding you are putting on it too, it looks fantastic. I would love something like that in my backyard, not to mention in a location like you have.

Curious, but what do you do to winterize solar? I am assuming this is in an area that gets a lot of snow and maybe the snow can damage the panels? I just haven't heard of people winterizing solar.
The panels get completely encased in snow and ice on the roof. I’ve never done anything for them.

I make sure the batteries are fully charged and then disconnect them from both the charge controller and inverter to isolate them. They freeze up and last the winter with no issues.

They remain like that from November to April. The batteries are wearing out and in the next year or two I’ll replace the bank but in the meantime it just means I run my little Honda 2200 generator a couple hours if I get 2-3 really cloudy days in a row or use extra power for the saws etc.
 
OP
T

tintin

Active member
Joined
Apr 8, 2009
Messages
25
Wrapped things up a few weeks back. Turning it into a proper space to hang out in. Installed 3/4" solid birch hardwood to match what I put in the main cabin a few years back.

Had the propane tank dropped in and found a 2nd hand Jotul 160 fireplace for it.

Bolted the door closed (working on a proper latch/lock setup) and covered the windows for the winter. Will open it for business in April and get the 'carport' area screened in and put some pavers down to work on the bikes.

IMG_3159.jpegIMG_3216.jpegIMG_3306.jpegIMG_3462.jpegIMG_3080.jpeg
 
OP
T

tintin

Active member
Joined
Apr 8, 2009
Messages
25
Early fall is about the best time to work outside on projects like this so I wrapped up the siding and just need to finish trimming the large windows.

Time for new motorcycles too. Gave the old bobber project to a friend, sold my '75 BMW and the DRZ and picked up a thoroughly modern Tuareg.

2E54A103-D8FF-4D4A-9AFA-F8FAC25CA6AE_1_105_c.jpeg7E0581BA-D4B5-46A2-B7C7-C2C6A055F129_1_105_c.jpegE1BF4F63-572B-4D47-993D-9461171F1AE9_1_105_c.jpeg50F8C363-C174-439C-A696-98F6C86F1A1D_1_105_c.jpeg
 
OP
T

tintin

Active member
Joined
Apr 8, 2009
Messages
25
Finished trimming the windows, picked up a free Coke fridge for some shelving in the toolshed and wrapped it up for the winter a few weeks back.

Now I'm just keeping an eye on things over the winter with my trail camera. Pretty good setup - a Reolink camera on an LTE SIM card. No monthly subscriptions etc - just a data add-on plan for $10 monthly from my mobile provider.

The tracks are from a fox that seems to be hanging about in the area.
 

Attachments

  • IMG_5058.jpeg
    IMG_5058.jpeg
    1.1 MB · Views: 32
  • IMG_5154.jpeg
    IMG_5154.jpeg
    753.1 KB · Views: 35
  • IMG_E8CA48367920-1.jpeg
    IMG_E8CA48367920-1.jpeg
    834 KB · Views: 40

Smilodon

Well-known member
Joined
Oct 27, 2009
Messages
1,168
Location
Titusville, FL
Neat build. Are you eventually going to replace the stairs with a ramp so you can ride a bike in? I guess you could ride some of your bikes up the stairs, but not sure about the bobber(s)...🏠🏍️
 
OP
T

tintin

Active member
Joined
Apr 8, 2009
Messages
25
Neat build. Are you eventually going to replace the stairs with a ramp so you can ride a bike in? I guess you could ride some of your bikes up the stairs, but not sure about the bobber(s)...🏠🏍️
The 'workshop' was handed over to the wife to use as a studio.

The large 4 x 8 door was intended for motorcycles to pass through easily while still being a regular door, and the height of the floor is just about exactly the same as the bed of my truck to load / unload bikes, but alas motorcycles will not be gracing the 'studio' anytime soon.

So in exchange, fall 2024 I sold off a couple of my old motorcycles and bought a 2024 Tuareg 660 which requires no work :). The carport on the side of the garage has a couple tons of gravel to level the ground and I have large garage-door bug screen panels I plan to put up. I may put boards up as well to enclose the carport a bit and some large patio stones down to make it my 'workshop'.

I gave my bobber project to a friend in the US - hauled it down there last summer to the Mid-Ohio event in July and left it behind and the two old Hondas live in my other smaller outbuilding which is my home office while up there.

So no more old junky motorcycle projects for me - I'm turning 56 and am going to spend all my time riding now and my other time building things at the cottage like maybe a sauna this year :)
 
To avoid these ads, REGISTER NOW!
Top Bottom