To avoid these ads, REGISTER NOW!

Next Bicycle Resto-Mod (Early 80s Bianchi)

SlappyWhite

Well-known member
Joined
Oct 3, 2012
Messages
1,819
Location
Upper Canada
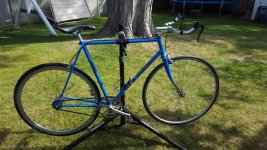
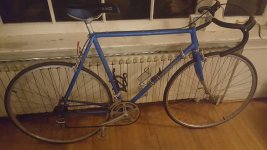
Vintage Japanese made early 80s Bianchi. This one is being turned into a fixie (fixed gear), will not be donating this on once complete (it is a project for me this time...).

The plan is for a Celeste Green (or close to it) paint job (sort of a seafoam green). De-anodize and polish most of the aluminium parts I am keeping. Adjust the chainline (to a track line). Add some track bars....

I am going to try something different for paint this time. Bianchi Celeste Green is a bit of a moving target over the years and none of the usual spray bomb suspects make anything like it. Looking for paint I came across what is basically graffiti paint (brands like Molotow and Ironlak--hundreds and hundreds of colours!), I can get some colours that are close enough for me. I have been test spraying some items and so far I am very impressed (application and durability), we will see how this one turns out (worse case I have to strip the frame and paint it again...). Nitro-Alkyd, acetone base as far as I can tell.

Here is the before picture...
 

Attachments

  • 20170806_010028 -- Resize.jpg
    20170806_010028 -- Resize.jpg
    96 KB · Views: 220
To avoid these ads, REGISTER NOW!

bonneyman

Well-known member
Joined
Apr 22, 2010
Messages
8,843
Location
Desert SW
I rebuilt a Bianchi for my brother many years ago, and it had this light neon green fork and green decals. Just happened to find some bar tape and a water bottle to complement those green accents. It had a nice gruppo, not top of the line Shimano but not cheapie, either.

Looking forward to how yours comes out. :thumbup:
 

ducksface

Banned
Joined
Oct 25, 2012
Messages
2,477
I might be a shade and a half off, but try
Krylon celery.

I'm looking a better spray bomb.
I'll look forward to your review.
 

4xdog

Well-known member
Joined
Aug 18, 2012
Messages
5,623
Location
Santa Fe, NM
We'll be watching to see how this turns out.

It's not Celeste, but I've always been a fan of USDA Forest Service Green on their vehicles.
i-k9SqDDp.jpg


There was a replica of a vintage Italian bike shop set up by a UK vintage bike parts dealer at the Goodwood Revival last year, as part of the celebration of the Fiat Cinquecento.

There were some TRULY droolworthy Bianchis scatterred around, like this one. Amazing...
i-Zk7MSzq.jpg


i-KcrfnhK.jpg


i-gfPKCrs.jpg


i-s3JGVnQ.jpg
 
OP
S

SlappyWhite

Well-known member
Joined
Oct 3, 2012
Messages
1,819
Location
Upper Canada
I will post some more pics later but here is a quick update.

The mechanical mock-up to make sure I work through all the "bugs" prior to painting.

I reused the original cranks by removing the smaller sprocket, this gives me a bit of a chain line problem. My large sprocket will be a 52. Normally fixies come with a 40+ something front sprocket, I like the more track looking larger sprocket. I make up the ratio on the rear (larger 19 vs the common 16t)...

The original chain line was around 44mm (centre of frame to middle to the two front two sprockets). The rear wheel uses a track hub that requires a 40.5 mm track chain line, this is measured from the centre of the frame to the actual front single sprocket. All in all I needed to move the drive cranks 5 to 6mm inward.

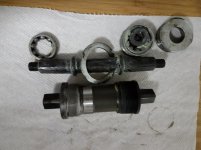
I fixed this by switching to a narrower bottom bracket. My front chain line is about 41 mm now, close enough. If you don't do this (within some reason) the chain will just keep coming off. New (sealed) vs old in one of the pics.

The rear drop outs are 126 mm wide (typical six speed rear hub). The new track wheel is 120 mm wide (hub). I debated if I should cold set the frame (bend it to be narrower and then realign the drop outs), just jam it in there, or space out the hub. I picked up two 3 mm spacers that I put between the bearing cone and the lock nut, one on each side. Seemed line the easiest path. One on each side keeps the rim centred and keeps the track chain line.

Reused the original chain, just shortened it. This means I had to use a narrow rear sprocket, not a full track one (requires a wider chain). Does not impact the chain line....

Reusing the original 700c front wheel.

Front bars are just the old drop bars flipped and chopped to make bullhorns, I don't like the feel on the mock up so I am getting new real bullhorn bars. Needed new brake levers (bar end) as well.

I will have actual brakes because I am not crazy....

I also hate this new seat (it was on sale).... Old seat was CCM, can't have that on a Bianchi... So I may look for another one.

SPD pedals out of my spare parts...I am an SPD man...

Next is total disassembly and paint etc...
 

Attachments

  • mechanical-resize.jpg
    mechanical-resize.jpg
    151.8 KB · Views: 102
  • New BB.jpg
    New BB.jpg
    104.5 KB · Views: 49
Last edited:
OP
S

SlappyWhite

Well-known member
Joined
Oct 3, 2012
Messages
1,819
Location
Upper Canada
Some more disassembly. The stem was seized in the fork tube (aluminum and steel bonded for the win...). Tried a bunch of things, leverage, penetrating oils, etc. Finally laid the frame flat on the floor, turned the fork 90° to also be flat on the floor. Stood on the fork crown and legs. Hit the stem (which was pointing up) twice, as hard as I could, (as opposed to twice as hard as I was capable of...) with a 5 lbs hammer, it is free now....

Next, the headset bearings had become indexed over the years (small indents on the races/cups that the ball bearings drop into creating notches when steering). One of the races was pretty rusty as well so they needed to come out. To do this I made a new tool last weekend (new to me, did not invent anything). Now I could have just bought one like this but....

https://www.parktool.com/product/head-cup-remover-rt-1

I started with some left over 1" 4130 tube I had laying around. Cut the four slots (creating fingers) in it with my die grinder and a cut-off wheel. Drilled some holes at the end of each slot to prevent further splitting. Bent the "fingers" out. Drilled a hole to hang it on my peg board (very important feature the store bought one does not have!). Painted it with some of the brand and type of paint I will be using (as a test piece) on the weekend. For the paint, quick sand to remove mill scale, wipe down with lacquer thinner, sprayed away on bare metal. Seems to stick very well and to be very durable! A few coats of the blue (to match most of my other bicycle tools....) followed by two of the gloss clear. Could be shinier but more than good enough for a bike frame.

To use the tool. you slide it through the races/cups in the head tube until the fingers pop out at the top of the race, then you hit it with a hammer to pound out the race/cup.

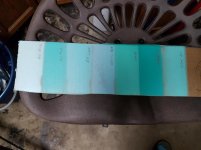
Finally here are some of the different colours I am testing to match the Celeste. I plan to take this to the local Bianchi dealer to get a look in the same light. Right now the third one (labelled Riv Light in my sloppy writing) is my first choice. Sadly I have another Bianchi (full blown Reparto Corse at that) but I can not use it to compare, it is not Celeste....
 

Attachments

  • New Tool.jpg
    New Tool.jpg
    58.8 KB · Views: 47
  • Remove Races.jpg
    Remove Races.jpg
    98.3 KB · Views: 56
  • Colours.jpg
    Colours.jpg
    113.1 KB · Views: 57
  • Old Stem.jpg
    Old Stem.jpg
    152.6 KB · Views: 49
  • Before.jpg
    Before.jpg
    48.6 KB · Views: 51
Last edited:

bonneyman

Well-known member
Joined
Apr 22, 2010
Messages
8,843
Location
Desert SW
I just visited a local bike shop that was closing after 20 years in business. They let me dig through their bins of freewheel and cassette removal tools. Being that they were "used" I got em for about $4 each. Sweet!
No headset cup remover, though. Wish I would've had more $$$ - they had some nice old stuff in there!
 
OP
S

SlappyWhite

Well-known member
Joined
Oct 3, 2012
Messages
1,819
Location
Upper Canada
I have been sidetracked a bit since my last post. The weather is getting colder so I figured I better get some paint on the frame....

I trimmed off the dérailleur hanger, and all the brazeons I will not be using.

I used paint stripper to strip the frame down. It had lots of surface rust so I spent a lot of quality time with the wire wheel to get it all cleaned up before priming. I used a brake calliper hone to clean up the rust inside the seat tube.

The seat clamp was bent in a little and was binging with the post. I used a small peice of 4130 tube and a body hammer to straighten it out. (The tube with the paint on it).

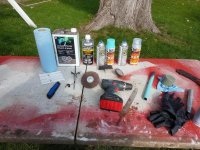
I used Duplicolor etching primer and then the Molotow paint followed by the Molotow clear. One can gave me three good coats for both products. I let the primer dry >30min, hit it with the colour (three coats) and then with the three coats of clear (once the colour was dry enough, applied the clear like it was just another coat of colour).

I used a spare chunk or tube as a paint reaction test piece (seen on the table). Basically I try each coat on it before the frame to make sure I do not get any odd reactions...

I will let it harden for a week or two before applying decals and assembly.

Bianchi Celeste is a moving target... not sure I am 100% happy with the end colour...

I have to finish this one up, I just picked up a 1968 Schwinn Speedster as the next bicycle project... Full resto on that one is coming.
 

Attachments

  • Primed.jpg
    Primed.jpg
    155.8 KB · Views: 72
  • Stuff.jpg
    Stuff.jpg
    150.4 KB · Views: 79
  • Frame.jpg
    Frame.jpg
    156.4 KB · Views: 107
Last edited:
To avoid these ads, REGISTER NOW!

Movin/on

Well-known member
Joined
May 9, 2014
Messages
247
Location
Brookings, Oregon
Nice project and execution of the bike.
Not intending as a Hijack but I'm not familiar with bike values I just ride.
I've got a mid-60's Urago track bike and have no idea of the value.
Any ballpark figure? It's been sitting for over 40 years.

Movin/on
 

Attachments

  • Urago Track Bike.jpg
    Urago Track Bike.jpg
    74.4 KB · Views: 62
Last edited:

wasfast

Well-known member
Joined
Apr 10, 2014
Messages
874
Location
San Diego CA
Not a lot of value. Has low end parts and not a desirable frame. It's also on the large side which might be alright depending on the buyer. I'd guess $200 max. Classic Rendezvous and Ebay might be of some help.
 
OP
S

SlappyWhite

Well-known member
Joined
Oct 3, 2012
Messages
1,819
Location
Upper Canada
Movin/on

Bike value really does go by the age old adage "it is worth what someone is willing to pay for it... "

I am a little more optimistic than wasfast. The bike looks to be in really nice condition. It is a real track frame (rear fork-dropouts). Urago is a bit obscure in NA as it is a defunct French manufacturer, I am no expert but I think they were of better quality. In the picture it looks like it has cottered cranks so either it is older than you believe or a lower end model. Maybe 400 up, but it really depends on the local market, being a fixed gear also the local hipsters... and the below...

Is it in full running shape (+), are the rims aluminum (+) or steel (-), any decals stating the tubing material (+ for good) or (- for gas pipe), tubular or clincher tires (tubular are the ones that get sewn up and glued to the rims (-), clinchers are the ones with the regular tire and tubes most people know (+)), 700c (+) or 27" (-) rims, how much does it weigh (lighter the better), what brand are the rims, hubs, etc. (+ or -). From the above we can figure out if it was originally cheapo or higher end. The large size may be a put off for manny buyers.

For the tire type tubular would likely mean higher end but they are a PITA so a negative value for anything but a wall hanger IMO.

FYI, being French, most parts will be French Thread (actually metric) and not ISO. Pedals are likely 14mm not 9/16. Headset/stem will be slightly different, bottom bracket will be different. Cotters and cranks will be different. Replacement parts can be a little harder to find than ISO parts. So be extra careful if you service it.

I have a 60s Jeunet in the inventory (another defunct French brand) that I mechanically restored a few years ago and this coming spring I will be repainting the frame... It was a really low end model though...still a great ride.
 
Last edited:
OP
S

SlappyWhite

Well-known member
Joined
Oct 3, 2012
Messages
1,819
Location
Upper Canada
Quick update, the project has been a little delayed but is now back on track...
 

Attachments

  • Bianchi Fixe 2.jpg
    Bianchi Fixe 2.jpg
    157.8 KB · Views: 52
OP
S

SlappyWhite

Well-known member
Joined
Oct 3, 2012
Messages
1,819
Location
Upper Canada
Funny story, I serviced the bearings in the front hub last night. As I was reassembling the hub I thought to myself..."I should be counting the ball bearings during assembly, I normally do"..."naw, I don't need to, I have done so many of these"...

Guess what, after all was said and done I had one left over found during clean-up, take it apart again... PSA, always count the ball bearings during assembly... it did run surprising smooth with only 9 of 10 on one side.
 
OP
S

SlappyWhite

Well-known member
Joined
Oct 3, 2012
Messages
1,819
Location
Upper Canada
Here it is all said and done....

Small recap, 80s 12 speed cromoly Bianchi (from the Japanese frame and parts era). Completely refinished and converted to a fixed gear.

The frame and fork were stripped, rust repaired and then painted with "Graffiti Paint" The frame with etching primer first, then Belton Molotow spray paint (Riviera Light) and gloss clear. The fork with Ironlak paint on bare metal topped with the Molotow clear. The bike was a test of these paints for me, so far they are better than any other typical rattle can paint I have ever used, hands down!

The paint is impressively durable. The very few chips on the frame during assembly (couple chips when pressing in the headset) failed right down to bare metal (etching primer gave up before the paint)...

Final weight came in at 23 lbs 9oz (~10.5 kg), steel is real.
 

Attachments

  • Done.jpg
    Done.jpg
    150.6 KB · Views: 47
Last edited:
To avoid these ads, REGISTER NOW!
Top Bottom