
You are using an out of date browser. It may not display this or other websites correctly.
You should upgrade or use an alternative browser.
You should upgrade or use an alternative browser.
NJ: new project
- Thread starter ersatzs2
- Start date
heavychevy454ss
Active member
- Joined
- Apr 30, 2006
- Messages
- 38
Looks like it'll be a nice one
Flipper_1938
Well-known member
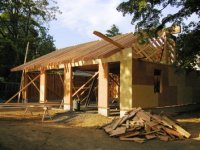
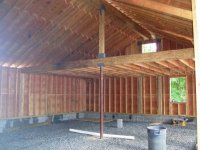
What's the story with the monster beam? ....or is that just an optical illusion?
Monster beam is typlically needed on an open ceiling roof, at least mine was. I had to go for a 2"x14"x24' beam on mine and that was 18' shorter!!! Then you tie on 2"x10" rafters etc to get the loads right. Basically an architect will tell you what's needed. Very cool looking at that engineered lumber though!
BTW, that garage is going to be awesome!
BTW, that garage is going to be awesome!
aben8057
Member
Looks great and what weather we a having. Make sure you post your progress.
Flipper_1938 said:What's the story with the monster beam? ....or is that just an optical illusion?
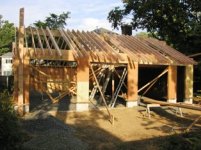
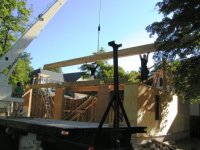
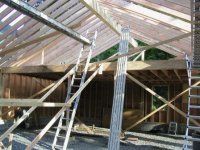
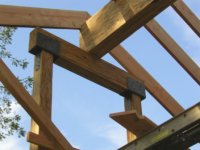
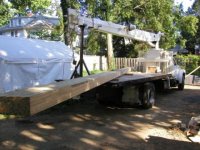
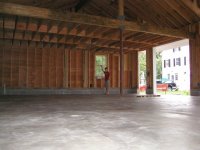
As JMur said: it's how the roof is engineered in order to build without trusses. Ordinarily trusses or rafters plus crossties would form a rigid structure that makes a vertical load on the supporting walls. If you want an open ceiling, though, the rafters have to basically hang from the ridge, which then needs to be big enough to carry their weight all the way across. There is still a column in the middle to help bear some of that weight. But here is detail of the micro-lam lumber supporting one end of the ridge (the opening is for a window) and another shot of the ridge on the back of the truck prior to lifting.
Yeah this weather is great isn't it!
Attachments
Last edited:

Quiksilver
Well-known member
 Must see more pictures, this is the type of construction I want to use when I get to build my garage. What is the overall size? How does the open ceiling compare in price to building with standard style trusses? Roof pitch? Height in loft? overall height? Sorry for all the questions, you have just peaked my interest. Thank You, Chad.
Quiksilver said:
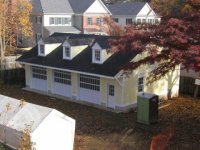
Size is 42x30' I would guess the open roof costs ~30% more than prefab trusses. They still needed that crane in to set the main ridge although it just took 30 min. on a Sat AM.
If I was really thinking I would've spec'ed steel instead of the micro lam because it would have made a great track for a hoist,allowing engines or lawnmowers or whatever to be hauled up into the loft.
Not sure on roof pitch, overall height is 20', with about 18' to the ridge inside. I wanted enough room to get an F250 6' up on the lift. The loft headroom is only about 6.5' at the ridge which makes it a storeage area, not really a room.
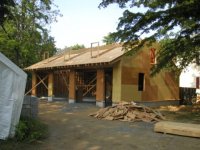
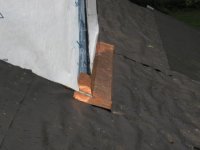
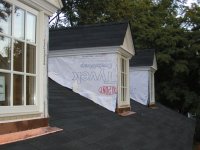
Here it is today: roofers came and put up tarpaper and flashing but then the rains came back...
One interesting detail: I wanted the garage door tracks to follow flat against the roof so they could be open with a car on the lift. And the loft ceiling is lower than the top of the far right door. So the solution is a pocket in the floor of the loft that allows that garage door to slide up along the bottom of the roof.
Attachments


IntrstlarOvrdrve
ALLIANCE MEMBER
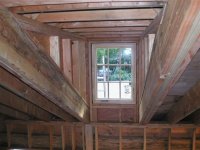
I really like the way the open ceiling looks. I wish our garage had an upstairs, just a loft
Updates:
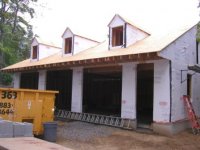
Roof on, a gang of guys arrived one morning and did it in ~3 hours.
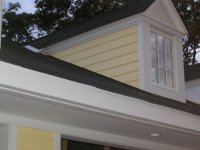
Trim complete. We decided to use Koma synthetic trim instead of wood, and hardi-plank siding, hoping to avoid paint for the whole exterior. I got a shock this week when the bill for the trim came in at $6K over forecast. There goes the lift and half the cabinets until... next year? I hope.
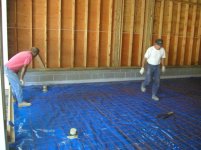
Blue vapor barrier (thank you BMWpower), four floor pots in place, floor poured yesterday. Concrete guys returned this AM to cut two grooves end to end. It is pretty level, some bumps here and there. My dream is to be able to scale the karts/cars without needing to shim the scales level.
Roof on, a gang of guys arrived one morning and did it in ~3 hours.
Trim complete. We decided to use Koma synthetic trim instead of wood, and hardi-plank siding, hoping to avoid paint for the whole exterior. I got a shock this week when the bill for the trim came in at $6K over forecast. There goes the lift and half the cabinets until... next year? I hope.
Blue vapor barrier (thank you BMWpower), four floor pots in place, floor poured yesterday. Concrete guys returned this AM to cut two grooves end to end. It is pretty level, some bumps here and there. My dream is to be able to scale the karts/cars without needing to shim the scales level.
Attachments
-
 Garage grooving floor Sat AM.jpg62.8 KB · Views: 708
 -
 Garage exterior apron after pour.jpg73.6 KB · Views: 617
 -
 Garage day after pour.jpg59.4 KB · Views: 712
 -
 Garage concrete crew in action.jpg74.1 KB · Views: 777
 -
 Interior before floor is poured compressed.JPG35.9 KB · Views: 745
 -
 Garage vapor barrier and re bar.jpg67.9 KB · Views: 905
 -
 Garage redi-mix in place.jpg67.9 KB · Views: 621
Inetmonkey
Well-known member
Looks fantastic! I can't wait to see the finished product!
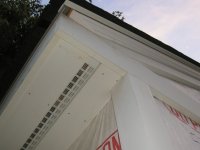
The louvered vents under the eaves are a nice detail. Much better looking than the usual drilled holes or grated vents.
The louvered vents under the eaves are a nice detail. Much better looking than the usual drilled holes or grated vents.
PAToyota
Well-known member
ersatzs2 said:Updates:
I got a shock this week when the bill for the trim came in at $6K over forecast. There goes the lift and half the cabinets until... next year? I hope.
Ouch!

What happened there? Prices across the board have gone up this year. Lately we've been seeing things come back down a bit with the lower fuel costs. But why the spike on the synthetic trim and did you look at changing to another mfg for the trim?
Der Bugmeister
Well-known member
- Joined
- Dec 29, 2005
- Messages
- 445
That's definitely a lot of 'over budget', but it sure does look sharp. Nice build!
ersatzs2,
I just took delivery of my VB6 this week. Thanks for the pics of it in place. I bought the tape for the joints, but didn't know until the prduct arrived, and I started reading their instructions on the side of the roll, that they recommend using a 2 sided butyl tape to seal down the edges of the barrier. Did you use something to seal the edges? Trying to decide if I should go back and order the stuff.
I just took delivery of my VB6 this week. Thanks for the pics of it in place. I bought the tape for the joints, but didn't know until the prduct arrived, and I started reading their instructions on the side of the roll, that they recommend using a 2 sided butyl tape to seal down the edges of the barrier. Did you use something to seal the edges? Trying to decide if I should go back and order the stuff.
DynoDave said:ersatzs2,
...they recommend using a 2 sided butyl tape to seal down the edges of the barrier. Did you use something to seal the edges?
I didn't order the tape bc I didn't read bmwpowers comments closely enough until too late. Also I saw somewhere that the really hot setup would be to wrap the barrier up the edges of the foundation, and sandwich it between foam edging and the outer wall. I didn't tape the edges either, just laid it along the sidees. I did go back with scrap pieces and patched around the floor pots and places where the wire had punctured, but I just laid it on top of the holes, no tape.
Contractor just used a dull pencil on the forecast. We are ahead on other areas, eg framing, so the net impact on the project is somewhat mitigated. However we decided to splurge on some custom aluminum garage doors so the budget is in the red zone...PAToyota said:Ouch!
What happened there? Prices across the board have gone up this year. Lately we've been seeing things come back down a bit with the lower fuel costs. But why the spike on the synthetic trim and did you look at changing to another mfg for the trim?
Last edited:
Quiksilver
Well-known member
Looks incredible!!! Cant wait to see more pics/ progress, as can you, I'm sure.
red vette mike
Well-known member
Looks great. I used HardiPlank on some carriage style doors that I fabricated. The manufacturers info said that the material must be painted. You mentioned not painting some of the exterior so I putting in my 2cents here. I had the trim on my house coated in vinyl some years ago. It cost a lot ($6000 I think) but has been great as regards not having to paint. My garage addition (31x54) does not have the vinly yet but I hope to add it someday. I had to buy a 32' ladder to get to the top of the gables. I don't like being up that high. Your doing great on your build.
ersatzs2 said:I didn't order the tape bc I didn't read bmwpowers comments closely enough until too late. Also I saw somewhere that the really hot setup would be to wrap the barrier up the edges of the foundation, and sandwich it between foam edging and the outer wall. I didn't tape the edges either, just laid it along the sidees. I did go back with scrap pieces and patched around the floor pots and places where the wire had punctured, but I just laid it on top of the holes, no tape.
Well, I didn't order it either. I must have missed it on their website the first time through. Some of their instructions seem focused on true "problem" areas (building sites) for moisture. I don't have any issues in my current garage, and I'm quite sure it does not have the level of protection that the VB6 will offer. So I'm not too worried about it. How did it hold up to being walked on? Any additional tears to go back and fix?
And thanks again to BMWPower for pointing out this product to us.
DynoDave said:Well, I didn't order it either. I must have missed it on their website the first time through. Some of their instructions seem focused on true "problem" areas (building sites) for moisture. I don't have any issues in my current garage, and I'm quite sure it does not have the level of protection that the VB6 will offer. So I'm not too worried about it. How did it hold up to being walked on? Any additional tears to go back and fix?
And thanks again to BMWPower for pointing out this product to us.
No problem, glad to help. Yea, the new website is a little different. The old site had the tape on the same page as the barrier, IIRC. Again, sorry for the confusion.
DynoDave said:How did it hold up to being walked on? Any additional tears to go back and fix?
The stuff is tough, the concrete guys noticed the difference right away. I can't believe gravel would puncture it even with lots of foot traffic, especially over compacted gravel. However when they put down that wire grid, they connected each roll by twisting the wire ends together. Where these pointed down, they ripped through when walked on. I placed 1' squares under the sharp wire ends. I wasn't there for the pour so I don't know whether they stayed in place or not. That's where tape would've been handy.
Like you I'm not in an area that should have a lot of water problems so I'm not concerned about the few holes or the imperfect edges.
Ditto. I applaud these guys who have 'finished' their projects but still hang out here!DynoDave said:And thanks again to BMWPower for pointing out this product to us.
Last edited:
Thanks. Actually, I mis-spoke: yes the hardi-plank does get painted, but it is prefinished at the factory. What I meant was we won't have any painting on the site. In fact, we picked a stock color from the catalog which was close to the house, but by mistake they delivered unpainted. To atone for the error, they are having it painted offsite, but this time the exact color of the house. So that looks to have a happy ending.red vette mike said:Looks great. I used HardiPlank on some carriage style doors that I fabricated. The manufacturers info said that the material must be painted. You mentioned not painting some of the exterior so I putting in my 2cents here.
the Koma plastic trim however, doesn't need paint.


C_F
ALLIANCE MEMBER
That looks really great, congratulations!
I've got garage envy again now. 
I've got garage envy again now.
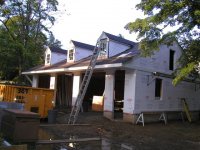
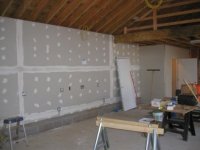
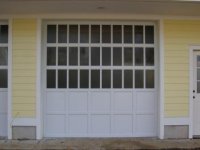
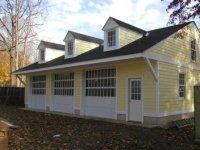
Update, doors installed, getting close the the end...
Garage door installation began yesterday. I was pretty worried about how these would turn out. I must've drawn 30 different design iterations on graph paper before coming up with this configuration. They are all aluminum, and the manufacturer is used to doing mostly commercial projects. If I had BMWpowers energy, I would've managed some of the details differently, but I'm pretty pleased with the outcome. They completely blew my budget so lift and cabinets are going to have to wait. In other news, the back wall is insulated and sheetrocked. I'm 5' from the property line and I know without asking what my neighbor will think of my doing any carb tuning on the karts on a Sat AM...
Also I prepped the bathroom and pump room floors for Expoxy, but they still aren't dry this am so I'm going to wait. I really want to get it down prior to installing toilet and sink.
Attachments
-
 Garage doors installed bathroom floor finish prep.JPG14.5 KB · Views: 708
 -
 Garage doors installed interior rear wall sheetrocked.JPG18.9 KB · Views: 743
 -
 Garage doors installed interior bathroom.JPG22 KB · Views: 813
 -
 Garage doors installed interior detail.JPG17.6 KB · Views: 772
 -
 Garage doors installed door detail.JPG17.2 KB · Views: 809
 -
 Garage Exterior doors installed.JPG33.1 KB · Views: 986
 -
 Garage doors installed aerial view.JPG34.8 KB · Views: 1,162


Sweet doors and garage. Is that glass in the doors or plexi?
Shame you have the wait on the cabinets. Waiting *****.
Believe it or not, as long as you've got the doors closed on the garage when you do the carb tuning, not much sound will come out of the garage. Unless of course you gun the motor...
Shame you have the wait on the cabinets. Waiting *****.
Believe it or not, as long as you've got the doors closed on the garage when you do the carb tuning, not much sound will come out of the garage. Unless of course you gun the motor...
bmwpower said:Sweet doors and garage. Is that glass in the doors or plexi?
Glass, single pane. insulated glass was a huge price increase and not acceptable. I just came in from working on the bathroom floor, however, and around noon when the sun came around it really warmed up in there.
cdrewferd
Well-known member
Looks amazing. Great job on the doors.
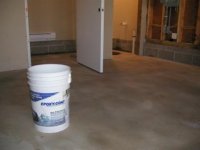
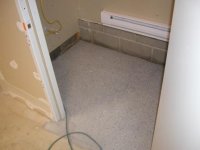
Epoxy-Coat on the floor
Photos of the bathroom floor. I'm doing it (the floor) myself after learning it would cost ~$6K for a pro installation vs ~$1200 to do it myself. I wanted to get the bathroom done before the plumber sets the fixtures so scrambled to finish it Friday and Saturday. It took hours to dry it Sat with a heat gun after the acid wash on Friday. I overdid it with the flakes, and didn't get the finish on very evenly. I have a feeling the stuff handles better in bigger quantities, ie when I used the 3/8" nap roller, it soaked up what seemed like half my mix. Anyhow, the point of doing this small section was to do a trial run.
http://www.garagejournal.com/forum/showthread.php?t=5788
Steve392 did a very detailed and accurate (by my exp) post on the whole Epoxy-Coat process.
Attachments

Last edited:
Down Under Bloke
Well-known member
Re: Epoxy-Coat on the floor
NEW FLASH: You might be a perfectionist, it looks good to me and yep that’s why you do a trail area. Many would have fronted up the $6k and looked at the final result; you can claim the floor as your own!!
I was going to quip about a crappy job in the crapper but the joke stank.

ersatzs2 said:I overdid it with the flakes, and didn't get the finish on very evenly. ..... Anyhow, the point of doing this small section was to do a trial run..
NEW FLASH: You might be a perfectionist, it looks good to me and yep that’s why you do a trail area. Many would have fronted up the $6k and looked at the final result; you can claim the floor as your own!!
I was going to quip about a crappy job in the crapper but the joke stank.
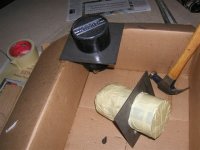
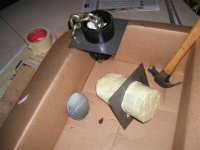
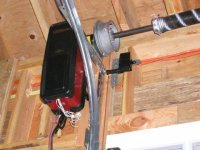
Is that the new LiftMaster residential Jack-shaft opener? I've been waiting for someone to try them to see if they are worth it...my installer said he wanted to either test out on his own or someone else's before he sold me one.
Thanks
Thanks