

Nohr-S Excellent Results
I wanted to share my Nohr-S garage experience. I would like to thank Scotty for answering a ton of questions and guiding me through the process. And the many users in this forum for all of their post.
I decided to go with Nohr-S mainly because they had a primer and great reviews here on the forum. I trolled this forum for over two months looking at pictures, tips and pointers from other users. Once the job was about to begin I felt like I was completely ready to proceed.
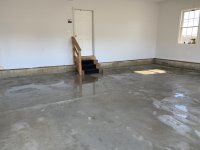
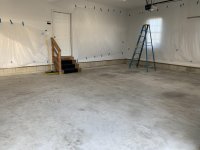
Since the prep work is the most important part of the job. I pressure washed the floor twice and degreased the floor three times. And gave the floor a week to dry out. Then I had a contractor come in and grind the floor for me. Which I feel gave me much better and more consistent results than acid etching.
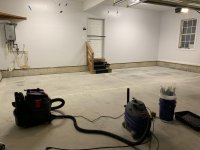
I then applied the Legacy quick set crack and joint filler and filled the expansion joints. Filling the expansion joints came out perfect other than grinding them down, I wasn’t completely satisfied with the grind I did The quick set does exactly what it is advertised to do and you must work fast once the two parts are mixed together.
My garage is 600 sq ft and I had a concern that we would not have enough product or might run short with the 575-625 sq ft kit. But the kit was more than enough to cover our needs.
Before you install read the directions multiple times. The dry times, tips, and overall directions. These instructions and times are down to a science and accurate. Do not doubt them or rush the job. One thing I remember Scotty saying in a thread. (Welcome to the world of coatings). Wind, temperature and humidity all play a part, So I took that into account.
We laid the primer and the pot life from the directions was approximately 45 minutes to get it in the floor which was more than enough once it was mixed. You should definitely have a helper or two to cut in or roll on. So you’re not rushed.
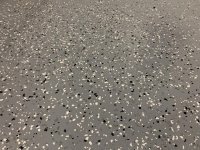
Once the primer dried we prepared for the first coat and mixed the colored pigment exactly like the directions said and laid the product down. We also had the chips placed equally into four gallon freezer bags one for each section we worked. The first coat went down perfect no bubbles no roller marks. We worked in approximately 4’x4’ sections flaking as we went. I was using a 18” roller and about halfway through at 300 sq ft I changed the roller which I feel that kept roller marks out.
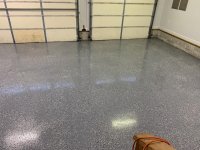
After the first coat was down we let it dry and applied two more coats of clear and the floor turned out perfect. On the final coat I mixed 6.5 tbs per gallon of fine anti skid. Which was the perfect amount for grip on the floor.
I am completely happy with the product and outcome of the job and would definitely use this product again.
I wanted to share my Nohr-S garage experience. I would like to thank Scotty for answering a ton of questions and guiding me through the process. And the many users in this forum for all of their post.
I decided to go with Nohr-S mainly because they had a primer and great reviews here on the forum. I trolled this forum for over two months looking at pictures, tips and pointers from other users. Once the job was about to begin I felt like I was completely ready to proceed.
Since the prep work is the most important part of the job. I pressure washed the floor twice and degreased the floor three times. And gave the floor a week to dry out. Then I had a contractor come in and grind the floor for me. Which I feel gave me much better and more consistent results than acid etching.
I then applied the Legacy quick set crack and joint filler and filled the expansion joints. Filling the expansion joints came out perfect other than grinding them down, I wasn’t completely satisfied with the grind I did The quick set does exactly what it is advertised to do and you must work fast once the two parts are mixed together.
My garage is 600 sq ft and I had a concern that we would not have enough product or might run short with the 575-625 sq ft kit. But the kit was more than enough to cover our needs.
Before you install read the directions multiple times. The dry times, tips, and overall directions. These instructions and times are down to a science and accurate. Do not doubt them or rush the job. One thing I remember Scotty saying in a thread. (Welcome to the world of coatings). Wind, temperature and humidity all play a part, So I took that into account.
We laid the primer and the pot life from the directions was approximately 45 minutes to get it in the floor which was more than enough once it was mixed. You should definitely have a helper or two to cut in or roll on. So you’re not rushed.
Once the primer dried we prepared for the first coat and mixed the colored pigment exactly like the directions said and laid the product down. We also had the chips placed equally into four gallon freezer bags one for each section we worked. The first coat went down perfect no bubbles no roller marks. We worked in approximately 4’x4’ sections flaking as we went. I was using a 18” roller and about halfway through at 300 sq ft I changed the roller which I feel that kept roller marks out.
After the first coat was down we let it dry and applied two more coats of clear and the floor turned out perfect. On the final coat I mixed 6.5 tbs per gallon of fine anti skid. Which was the perfect amount for grip on the floor.
I am completely happy with the product and outcome of the job and would definitely use this product again.
Attachments
-
 655CAF78-848B-4417-A2C5-FDF3F225D4DB.jpg89.9 KB · Views: 118
 -
 D03EC0AC-7191-4047-9EB1-CBCC889A8D8C.jpg102.2 KB · Views: 114
 -
 80850718-F726-4AE9-995D-13EC33C8E25B.jpg127.2 KB · Views: 112
 -
 9F3E0B46-9579-4836-AADC-A4FDA13D4581.jpg138.5 KB · Views: 115
 -
 61A118E3-0F92-4692-9F0E-5B832BB48FDC.jpg111.7 KB · Views: 121
 -
 B6A48234-831E-44EE-A9E7-8FEF57A9319B.jpg148.1 KB · Views: 149
 -
 5B84DCE5-B3E9-48CC-8B15-B868B4E4F5E1.jpg166.7 KB · Views: 133
Last edited: