To avoid these ads, REGISTER NOW!

Norsk Woodworks

fredlangva

Active member
Joined
Sep 10, 2011
Messages
34
Location
Jacksonville, FL
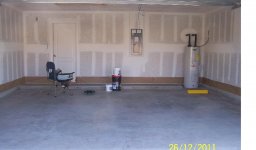
My wife and I closed on our new house in late December. It has been a few years since I had a garage I was able to use as a woodshop. I thought I would try to finish this one since we had new construction and a blank slate.

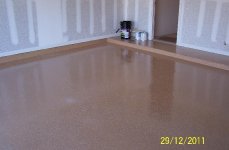
We currently only have one car to deal with, so I can set up a permanent shop in the other half. One of the problems with my past shops has been dust control and organization. So for this shop, I'll start off trying to get the storage in order and some dust control system in place before I use the shop too heavily.
 
To avoid these ads, REGISTER NOW!
OP
F

fredlangva

Active member
Joined
Sep 10, 2011
Messages
34
Location
Jacksonville, FL
Here's a photo of the garage before I put the epoxy floor down.
 

Attachments

  • ready for epoxy.jpg
    ready for epoxy.jpg
    141.5 KB · Views: 50
Last edited:
OP
F

fredlangva

Active member
Joined
Sep 10, 2011
Messages
34
Location
Jacksonville, FL
I watched the construction of the house pretty closely since my dad was a foreman at a construction company many years ago and I had built quite a number of homes with him.

The concrete guys hadn't used any additives nor was there a brush coat on the floor so prep was very straight forward:

1) Scrapped off putty bumps and any excess paint on floor.
2) Blew out debris
3) Used the phosphoric acid included with the kit to 1 gal of water.
4) Applied the mixture using a garden sprayer. Scrubbed with deck brush.
5) Washed floor down with high pressure hose attachment.
6) Re-applied mixture on parts of floor that looked like the etch didn't work fully.
7) Rewashed entire floor
8) Let floor dry for 3 days.

Once I went back and checked it, the floor had a bit of a rough texture to it, so I figured I had enough bite for the epoxy.
 
To avoid these ads, REGISTER NOW!
OP
F

fredlangva

Active member
Joined
Sep 10, 2011
Messages
34
Location
Jacksonville, FL
Thanks to all the great folks here at Garage Journal, laying it down was pretty easy also if time consuming.

I bought 4 sets of 1 Qt and 2.5 Qt mixing buckets from Lowe's.

1) I mixed the solid part for 3 minutes
2) Divided parts A and B into the 8 buckets evenly.
3) Mix 1 part A bucket into a part B bucket and mix for 3 minutes.
4) Divided the garage into 4 sections and got to work on the first one.
5) Temps were in the low 60s so cure time was a bit longer. I spread out a line near the trim boards and brushed the epoxy out. I also did this for the step part.
6) Spread out the epoxy in a line parallel to the wall about 10" away
7) Smooth out the epoxy using the squee-gee. (I had to tape this to a pole since the one supplied did not have a screw attachment.
8) Roll out going right angle from the line I put down
9) wait 10 minutes and roll out again going the same direction as the line I laid out at first
10) repeat 3 more times.


I threw the chips and silica on after the floor was finished since the temperature was low enough to slow the cure.
 
OP
F

fredlangva

Active member
Joined
Sep 10, 2011
Messages
34
Location
Jacksonville, FL
The only thing I wished I did a bit better was throwing the chips on a few sections of the floor. I got a couple places thicker than I really wanted.

Attached are the end result pictures
 

Attachments

  • left floor.JPG
    left floor.JPG
    65.5 KB · Views: 40
  • right floor.JPG
    right floor.JPG
    57.3 KB · Views: 34
  • chips detail.JPG
    chips detail.JPG
    18.3 KB · Views: 37

Jack Olsen

Super Moderator
Staff member
Joined
Mar 22, 2009
Messages
6,678
Location
Los Angeles
Looks like a nice place to start. And one car in a two-car solves a lot of problems before you've even started.

Congratulations.
 
To avoid these ads, REGISTER NOW!
Top Bottom