To avoid these ads, REGISTER NOW!

Northern Garage build

scuba0459

Well-known member
Joined
Mar 27, 2010
Messages
114
Location
The Fundy shore off Nova Scotia
Hi,

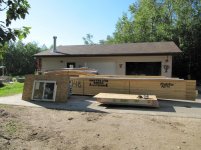
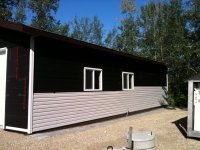
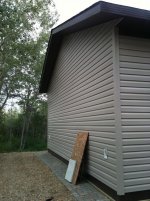
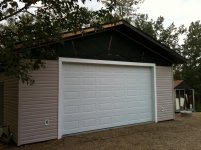
I am in the process of building my dream garage. Actually it will be both a garage and I since I work from home I am going to move my office, currently in a bedroom, to the garage as well.

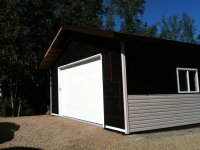
-The Garage is 26' x 42' with a 9 x 16' door. The ceiling is 10' hight
- The floors will be heated with 1000' of tubing.
- Heat will be supplied by a domestic water heater.
- We will do most of the work ourselves.


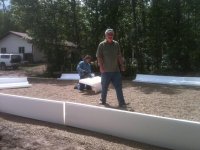
In an effort to make the building a cheap to heat as possible I went with a Legalett shallow frost protected foundation. It's a type of ICF construction that is common in Northern Europe. The building will actually rest on undisturbed clay, covered with 6" of clean gravel. On top of the gravel is 6" of EPS.

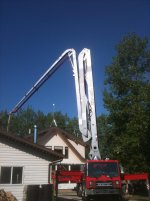
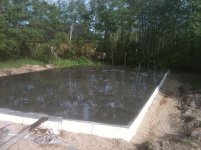
The actual site prep began on June 4th and we poured the concrete a week later using a concrete pump. Since the floor is insulated and heated we did not add air to the mix. My plan was to cover the floor with VA tile but I am now thinking about epoxy.

A neighbor welded up a great steel plate so that we could protect the foam on the door edge.

more to follow.

Albert
 

Attachments

  • IMG_0117.jpg
    IMG_0117.jpg
    145.5 KB · Views: 369
  • IMG_0147.jpg
    IMG_0147.jpg
    147 KB · Views: 400
  • IMG_0153.jpg
    IMG_0153.jpg
    140.2 KB · Views: 342
  • IMG_0165.jpg
    IMG_0165.jpg
    146 KB · Views: 394
  • IMG_0160.jpg
    IMG_0160.jpg
    140.5 KB · Views: 385
To avoid these ads, REGISTER NOW!
OP
S

scuba0459

Well-known member
Joined
Mar 27, 2010
Messages
114
Location
The Fundy shore off Nova Scotia
Northern Garage build - part 2

On June 25th the garage package arrived. I had a local lumber yard and truss company put together a garage package that included the trusses, windows, doors, facia, soffit and siding. Northland Home Hardware delivered the complete package to the site that morning.

A few hours later, my neighbor, Peter, and I started laying out the walls. The next day, Saturday, Ian, a good friend of mine arrived to help with the rest of the walls. He actually took a week off to give me a hand and he is also helping me with the rest of the project.

Saturday afternoon my brother in law arrived with his son and his sons friend. They had driven in from the Lower Mainland of BC to spend a week of their vacation time to lend a hand.

By the end of Sunday the 6 of us had 3 of the walls up. My wife managed keeping everybody fed and happy.

Things are going well.
 

Attachments

  • IMG_0372.jpg
    IMG_0372.jpg
    141 KB · Views: 251
  • IMG_0199.jpg
    IMG_0199.jpg
    139.1 KB · Views: 234
  • IMG_3889.jpg
    IMG_3889.jpg
    148.7 KB · Views: 246
OP
S

scuba0459

Well-known member
Joined
Mar 27, 2010
Messages
114
Location
The Fundy shore off Nova Scotia
Northern Garage build - part 3

Attached are some picture of where we were at by the end of the first week. Peter, my neighbor, has built a couple of garages over the years and he was real clear abut keeping things square. We really worked on this and by the time got to the roof sheathing it was obvious he had done a great job of keeping us square. There is not a single sheet of OSB that had to be cut at an angle. The shingles meet at the ridge with the same distance from the top row to the ridge cap.

On Sunday morning the crew from BC went home and I installed the windows and the man door. The 9 x 16' overhead door will be installed by a contractor.
 

Attachments

  • IMG_0223.jpg
    IMG_0223.jpg
    142.2 KB · Views: 365
  • IMG_0224.jpg
    IMG_0224.jpg
    142.6 KB · Views: 350

ckk

Member
Joined
May 6, 2010
Messages
8
Looks great. Definately coming along!
Gotta ask, where exactly is North Central Alberta? You close to Edmonton, or a little farther north?

26x42. That'll be awesome! You shouldn't run out of space too easily!
 
OP
S

scuba0459

Well-known member
Joined
Mar 27, 2010
Messages
114
Location
The Fundy shore off Nova Scotia
I live in Strathcona county. We have 3 acres so that lets us build a good size garage. I did have to get the county to give me an exception as they have rules about how many square feet of auxiliary buildings you can have. I already have a 26 x36' garage.

Thanks...

Albert
 
Last edited:

28HopUp

Well-known member
Joined
Mar 16, 2010
Messages
295
Location
Lowcountry SC
That looks great! It's nice to have friends and family who are willing to give their time to help you out. Please keep the pictures coming...
 
OP
S

scuba0459

Well-known member
Joined
Mar 27, 2010
Messages
114
Location
The Fundy shore off Nova Scotia
I need to figure out how to post full size pictures but while I figure that out an update is in order. We finished putting the building up and then finished the landscaping. Yesterday the building inspector approved the exterior membrane and at 5pm I started installing the siding. So attached is where we are at as of 7 pm yesterday.

Last Thursday a friend of ours called to say that he was in town. I convinced him to stay the weekend and with his help we managed to get the tar paper installed along with the trip for the siding.

On Tuesday the inspector came and looked at the building, passed the membrane inspection and told me that he building was looking good and would last for a long time,

So far so good.
 

Attachments

  • IMG_0311.jpg
    IMG_0311.jpg
    147.1 KB · Views: 155
  • IMG_0312.jpg
    IMG_0312.jpg
    141.6 KB · Views: 167
Last edited:
OP
S

scuba0459

Well-known member
Joined
Mar 27, 2010
Messages
114
Location
The Fundy shore off Nova Scotia
This weekend I managed to get most of the siding up. My gorgeous bride ( of 7 years) gave me a hand but most of it I did myself. It turned out really good but I do have to figure out how one side of the garage door wall ended up at a different height than the other side. I hope I don't have to tear down all the siding on one side to correct it.
 

Attachments

  • IMG_0326.jpg
    IMG_0326.jpg
    145 KB · Views: 122
  • IMG_0327.jpg
    IMG_0327.jpg
    151.4 KB · Views: 117
  • IMG_0328.jpg
    IMG_0328.jpg
    152.1 KB · Views: 122
  • IMG_0329.jpg
    IMG_0329.jpg
    142.5 KB · Views: 145

Boyd Who

Well-known member
Joined
Oct 15, 2007
Messages
1,080
Location
Manitoba
Looks good! My biggest fear when doing my siding was having the door end come out uneven when I got to the top of the door. I was lucky and everything lined up. At least they're short pieces so if you do have to move one side it won't be too hard. How much are they out?
 

egads74

Well-known member
Joined
Sep 1, 2008
Messages
87
would you mind elaborating a bit on the slab bolsters and wire? It appears you did 6" mess and placed a bolster every 2' in direction... I assume there is a bolster row along each wall. What is the height of the bolsters? I guess you were able to walk all over it without to much of a crush down? Whose bolsters did you use? no rebar? thanks in advance... Nice garage...
 

csp

Well-known member
Joined
Mar 23, 2010
Messages
5,719
Location
Franktown, CO
So the ICF's under the entire slab make it unnecessary for footers below the frost line?

My basement/foundation was formed with ICF's and they are totally worth the extra expense.
 
OP
S

scuba0459

Well-known member
Joined
Mar 27, 2010
Messages
114
Location
The Fundy shore off Nova Scotia
The bolsters are called chairs, some were 3" and some were 6" so that the rebar wire was spaced 3" and 6" from the foam along the sides and 6" in the center. I had extra mesh so I installed a row along the center of the foundation so that the Wheelbarrows full of concrete could travel easily. We ended up hiring a pumper truck to do the pour.

Once we put up all the mesh and wired it together you could walk on it easily. It was also a great way to tie down the 1,000 feet of PEX for the radiant heating.

The foundation was designed by Legalett and a local engineer. It is a shallow frost protected foundation and is quite common in Northern Europe and is gaining in popularity here in Canada. The building inspector thought it was neat and had no issue with what we were doing. The design eliminates the need for a frost wall and footings.

I went with it because I was quoted $17,000.00 for conventional ICF foundation and figured that this would be less. It also eliminated one concrete pour. So I learned about the Legalett foundation and made a deal with the local installer that he would reduce his bill if my wife and I would be the laborers for the job. I had also discussed becoming a certified installer but I don't think that I would want to make a living placing foundations.

The building slab sits on 4" of clean washed 3/4" rock that we placed over the clay. We had to do a soil test to make sure the building wouldn't sink and we exceeded the design requirements by about 1,000 percent. The foundation installer got the engineer to specify 3/4" rock but he could have and should have specified larger gravel as this stuff was real hard to keep level while laying down the edge elements. We used the removed top soil for another project and it's kind of funny but we ended up buying another 20 yards of clay when we made the driveway.

I hunted around to see if I had any extra chairs to see if their was a brand name but I can't seem to find any extra ones. They were supplied with the rest of the Legalett foundation package.

Thanks for looking at my build.

Albert
 
OP
S

scuba0459

Well-known member
Joined
Mar 27, 2010
Messages
114
Location
The Fundy shore off Nova Scotia
Looks good! My biggest fear when doing my siding was having the door end come out uneven when I got to the top of the door. I was lucky and everything lined up. At least they're short pieces so if you do have to move one side it won't be too hard. How much are they out?
I have not gone up to measure but I think I am out about 1". I did not realize that something was wrong until I noticed that the electrical outlets on either side of the door did not line up the same with the groves in the siding.

I will probably take down one side this weekend and fix it. I had thought about just finishing the gable end with cedar shakes but seeing the electrical outlets every time I look at the garage will drive me nuts. I want this garage to look better than a contractor build one.

I have been watching your build with interest so it is great to see you are watching mine. Where in Rural Manitoba are you?

Albert
 

Boyd Who

Well-known member
Joined
Oct 15, 2007
Messages
1,080
Location
Manitoba
Ah, yes. An inch out would bug me too. Mine ended up within 1/16" from side to side and I can live with that. I've got one minor screw-up on the back side of the garage but I'm probably the only one who will ever notice it. I have no plans to fix it. :)
I'm in Neepawa. You have to pass by our house when you drive through town on Hwy 16.
 

JC23

Well-known member
Joined
Dec 31, 2009
Messages
11,718
Location
Northcoast
Cool build and documentation. Thanks!

I would like to know more about your 'membrane inspection.' Never heard of that before. Just what are they looking for?
 
To avoid these ads, REGISTER NOW!
OP
S

scuba0459

Well-known member
Joined
Mar 27, 2010
Messages
114
Location
The Fundy shore off Nova Scotia
The inspection is called "exterior membrane" and the inspector was looking at how I flashed around the windows and doors and how I applied the building paper. I needed to get this done before we could apply the siding. When he arrived he also checked my framing and attic venting.

He told me to add a few more nails to the framing in the corners, install more wall studs where the top plate spices were and was otherwise happy.

We have now installed most of the siding and can begin the wiring. Once the rough in wiring passes then their is insulation inspection and then the final electrical and building inspections.
 

Boyd Who

Well-known member
Joined
Oct 15, 2007
Messages
1,080
Location
Manitoba
Wow, lots of inspections out there! I only needed two...one when we poured the pad to ensure it was in the right place, then a framing inspection. My electrical may or may not get inspected, I'll know in a week or two.
 
OP
S

scuba0459

Well-known member
Joined
Mar 27, 2010
Messages
114
Location
The Fundy shore off Nova Scotia
Al,

Some counties are easier than others. Before we got our building permit we had tp get a development permit.

I think that permits will end up in the top 10 costs for the building. My wife thinks we spent close to $1,000 just on permits. I guess it helps pay for the paved roads in the county.
 

02hawk

Active member
Joined
Oct 9, 2006
Messages
27
Location
Edmonton Canada
Hi Scuba...nice build....been watching your progress with interest. I live in Edmonton and completed my house with a 48 x 26 attached garage 2 years ago. In Edmonton I could not meet code with a water tank to heat he floor...I had to install a boiler with a glycol system....(because of this I decided to heat the basement and bathroom floors as the cost was minor)...you are lucky to be in Strathcona county ....by the way....I am out of room...lol
 
OP
S

scuba0459

Well-known member
Joined
Mar 27, 2010
Messages
114
Location
The Fundy shore off Nova Scotia
O2Hawk,

I found out the same thing. I needed to buy a boiler to heat the floor. I also needed to have a professional design the heating system. I figured that would add about $7,000.00 or more to the project cost.

Originally I wanted water in the garage and too have a washroom. We live on a couple of acres and have a well. We have a reverse osmosis unit for drinking water and treat the well water for iron and iron bacteria. We also have a water softener. The water is to hard and full of minerals for washing cars or windows and the front of our house is all glass. (see picture)

So my plan was to install a small cistern, something like those 250 gallon totes, and then buy water for the garage. I had it all figured out.I looked at composting toilets, etc.

Heat was going to be from a demand hot water heater and the system was one spec'd by Radiantec.

At a home show I spoke with several vendors about sizing the gas line, radiant heat, etc and it was then that I learned that I needed to buy a boiler and all the valving, etc. I also learned that I needed to hire a radiant floor designer to design the system. I estimated my $7,000.00 heating budget would now triple.

So one day I called a local plumber to find out if he could help me. He suggested what we ended up doing. He also verified with the plumbing inspector that it would work. It would involve installing a 700 gallon cistern, a 700 gallon septic tank, connecting the septic tank to my existing septic field and then all the stuff I would have had to buy and install anyway.

What I understand is that we could install plumbing in the garage, use a domestic hot water heater and the use the heater as a heat source for the floor. The heater's primary purpose is to supply domestic hot water.

The inspector did have some other requirements on how the system is controlled, etc. He did not require a mixing valve to cool the water going into the floor. You could actually say that my plumber and the plumbing inspector designed the system we installed.

So that is how we managed to get this to happen.

The final cost of the system, including back hoe's gravel, sand, tanks, pumps, heaters, etc. was about $17,000.00.

I think it was worth it, we will find out shortly once the Alberta winter kicks in.

(I already have a 26 x 36' garage so hopefully this one doesn't get too small too fast)

Albert
 

Attachments

  • DSCF0068.jpg
    DSCF0068.jpg
    151 KB · Views: 149
OP
S

scuba0459

Well-known member
Joined
Mar 27, 2010
Messages
114
Location
The Fundy shore off Nova Scotia
The development permit and building permit were a pain. Originally I wanted to build a steel quonset but that wasn't going to happen. After I changed to a conventional building and proved that the engineer was ok with it, things got easier.

I met a guy who lives near by and he built a 30x50 steel building after he told the county where to go.

Got the siding fixed and up today.

Albert
 
OP
S

scuba0459

Well-known member
Joined
Mar 27, 2010
Messages
114
Location
The Fundy shore off Nova Scotia
This weekend was a long weekend and my wife and I managed to get a fair amount of work accomplished. The siding if finished, the interior wall studs are all up and we did some work on the landscaping that had to be dealt with as a result of building the garage.

I did end up removing and replacing the siding on one side of the garage door so that I could level it out. Tearing down the siding was easy so I am real gad that I fixed this.
 

Attachments

  • IMG_0331.jpg
    IMG_0331.jpg
    151 KB · Views: 68
  • IMG_0336.jpg
    IMG_0336.jpg
    142.6 KB · Views: 100
Last edited:
OP
S

scuba0459

Well-known member
Joined
Mar 27, 2010
Messages
114
Location
The Fundy shore off Nova Scotia
I ended up redoing the siding on one side of the door and it is now perfect. I have framed the interior walls where the office and bathroom will be and have most of the wiring done.

Earlier this week the Liftmaster 3800 garage door opener was installed. What a cool unit.

I will post some more pictures after the weekend.
 

Hit-By-Thunder

Well-known member
Joined
May 11, 2008
Messages
181
Location
Fort Saskatchewan
hey Albert, found your build thread as you found mine. Oh I hear ya on the permits. My original 24X36 was approved finally only to be shut down by a "Stamped engineered drawing and a letter of compliance" cause it was over 592 square feet.

anyhow really nice garage/office you have going on there. Yes, the liftmaster is cool hey?

Rob/HBT
 
OP
S

scuba0459

Well-known member
Joined
Mar 27, 2010
Messages
114
Location
The Fundy shore off Nova Scotia
Today they are blowing the insulation into the attic. If the weather warms up a bit they will do the walls tomorrow. Last Tuesday I passed the rough in electrical inspection. I will post more and some pictures later this week. I see that I promised some pictures in October but I really have not done much except the electrical in the past 5 weeks.
 
OP
S

scuba0459

Well-known member
Joined
Mar 27, 2010
Messages
114
Location
The Fundy shore off Nova Scotia
Atticmasters installed the Cellulose insulation in the Attic on Thursday afternoon. They blew in R50 and supplied the attic hatch as well. it took them about three hours and I estimate that the installation cost me about $300.00 more than if I had done this myself. I think that that was $300.00 well spent.

The walls are scheduled for this Wednesday so over the weekend I have been putting in the compressed air lines. I ran PEX tubing all around the perimeter of the garage.

The walls will also be blown in Cellulose. The installers will apply a mesh to the walls and blow in a Cellulose product that is slightly denser via holes that they will cut in the mesh. The walls are slightly more expensive to do than the ceiling as it takes three guys to blow it in and they need to install the mesh. At the same time they will fill all the small spaces around the windows, doors and where the wall studs are very close with foam. The walls will be R21.

Last weekend I thought it would be great to get the infloor heating running. so a friend and I filled the water heater and cranked the heater up as high as possible. We turned on the pump and the floor began to fill with water. We watched the water come back up the translucent lines and head back to the heater. After a few moments the water must have turned to slush and the pump quit sending warm water to the floor. It was -20C (-4 F) outside. So much for that. We now had an unheated building with copper and PEX pipes filled with water.

First we used a patio heater to provide us with some warmth and to try to prevent any damage to the copper lines. The heater went thru a tank of propane every 8 hours or so. I then rented a propane construction heater and we used that to keep the piping from freezing and got back to work on drywalling the ceiling so the insulation could be blown in.

My buddy went to one of his rental properties and came back with a Trane fan coil unit. It was an old one, likely from the 50's or early 60's and we hooked that up to the hot water heater instead. Those heaters really do a great job of converting the hot water into warm air. The water flowed into the heater at 72C (160F) and came back at about 32C (90F) We aimed it at the utility closet and blew the warm air into the closet. That night I temporarily insulated the walls of the closet and we draped some plastic over the front of the utility closet in an effort to keep some of the heat in.

We continued to put up the ceiling but as we got closer to finishing the ceiling I became concerned about if the construction heater was putting putting out carbon monoxide or not and the amount of vapor that it was emitting. All the siding nails that stick thru the sheating were covered with ice. The vapor barrier on the ceiling was also covered with frost. So we finished the job using the halogen work light as our only source of heat.

Yesterday morning I tried the slab again and one loop had thawed out. I temporarily hooked up the floor heat again and turned down the water heater. This morning the water was flowing into the floor at 60C (140 F) and coming back thru one loop at 22C (72 F). The temperature is now reading a comfortable 7C (45F) on the liftmaster 3800 opener's display but most of the garage is likely warmer than that. The outside temperature is -6C (20 F). Three of the four 250' loops are still frozen but I imagine that they will thaw out either today or a day or so after the wall insulation is installed.

i guess the lesson here is to be patient and that radiant floor pumps have no pressure so they really can't push slush. I think if I had temporarily used a more positive pump it may have worked. I doubt the pump would have ran for long as the water is very hot and the pump would likely have overheated. I also don't have such a pump. When we first started we were running the return water down the drain so I suspect that the pressure pump in the cistern was effectively doing the same job and it couldn't keep the water flowing.

But it is sure nice to now have a garage that is not freezing cold.

Today I will finish the compressed air lines and maybe hang some drywall in the interior walls.
 
OP
S

scuba0459

Well-known member
Joined
Mar 27, 2010
Messages
114
Location
The Fundy shore off Nova Scotia
Today we finished painting the walls. On Saturday we had the ceiling textured. Tomorrow we are going to start on the floor. Next weekend we will add a red stripe to the walls. We picked red tool box color. I don't actually own a red tool box but I like the color.
 

Attachments

  • IMG_0829.jpg
    IMG_0829.jpg
    149.7 KB · Views: 52
  • IMG_0831.jpg
    IMG_0831.jpg
    182.9 KB · Views: 47
Last edited:

Flipr3mix

New member
Joined
Dec 23, 2011
Messages
2
Nice garage. So how much the garage kit costs you? and the concrete?. Im thinking of building the same size in Gunn, AB
 
To avoid these ads, REGISTER NOW!
Top Bottom