To avoid these ads, REGISTER NOW!

Odd couple's shop projects

rmack898

Well-known member
Joined
Jan 23, 2007
Messages
3,153
Location
Honu Grove NE Florida
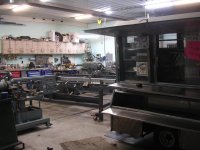
A lot of stuff gets done in my shop, it just doesn’t get done very fast.
It’s my shop but my son sometimes thinks it’s his shop and we are constantly battling
over “My” space. My project list is long and I tend to start too many things without finishing
something before I start another. My son on the other hand gets tunnel vision on a project
and can’t do anything else until his project is done.

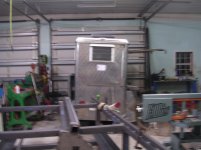
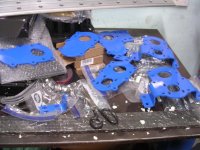
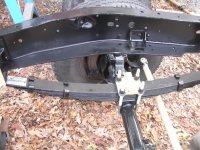
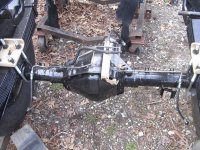
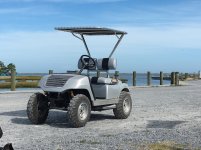
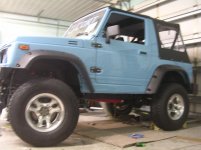
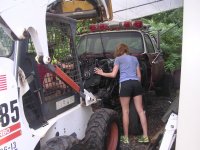
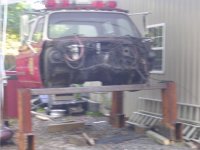
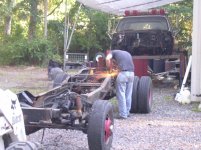
My last major project was a diesel powered golf cart that took me almost 14 months
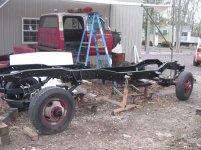
to finish. My son’s last project was a frame off resto-mod on a ’87 Samurai that took him
18 months to finish. We both have new projects started along with side work we both do for
a completely different clientele. I’ll use this thread to document our shared projects in a common space. We are almost like the “Odd Couple”, I’m just not sure who is Felix and who is Oscar.

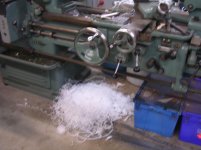
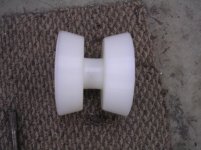
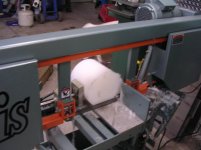
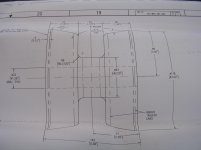
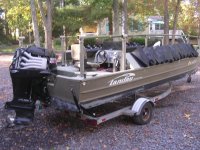
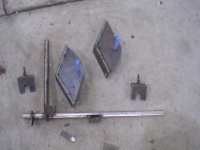
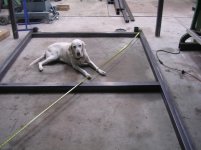
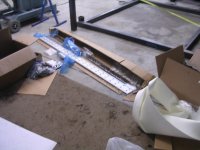
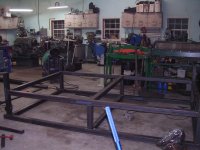
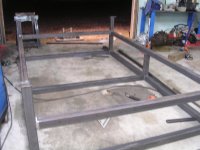
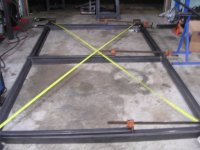
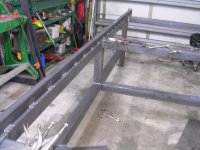
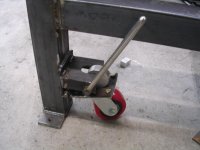
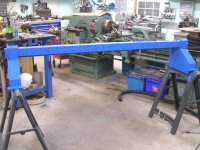
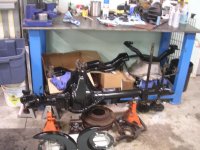
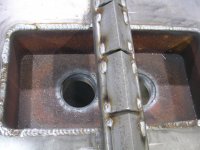
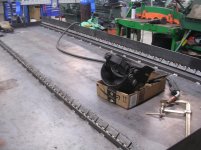
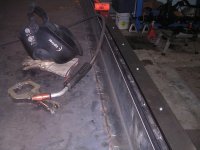
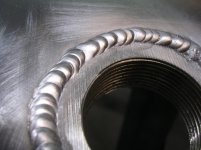
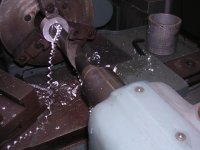
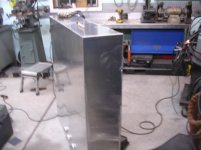
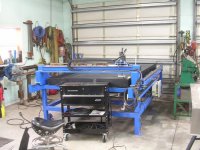
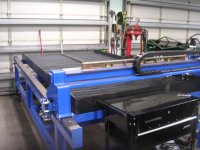
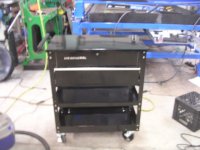
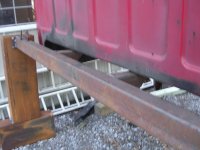
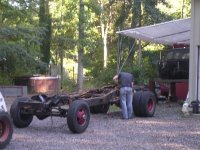
Before I get into our new projects, here’s some pics of our last projects.
 

Attachments

  • IMG_1350.jpg
    IMG_1350.jpg
    144 KB · Views: 349
  • DSCN4740.jpg
    DSCN4740.jpg
    148.6 KB · Views: 315
To avoid these ads, REGISTER NOW!
OP
R

rmack898

Well-known member
Joined
Jan 23, 2007
Messages
3,153
Location
Honu Grove NE Florida
OK, so my new to the top of the list project is a 5'X10" plasma table. Ive gotten as far as ordering the gantry from PPLLC, the controls from CandCNC, and picking up a trailer load of steel today. Somewhere in this big pile of steel tubes and flat bar is a really cool tool that will expand the capacity of the work that comes out of the shop. I just need to wait for the brown truck and start cutting and glueing all the parts together.

I'm not sure how long this will take but I am optimistically thinking I might get it done before the first of the year. It all depends on how much of my time gets consumed by Felix or Oscar or who ever my son is with his current project.
 

Attachments

  • DSCN4967.jpg
    DSCN4967.jpg
    147.7 KB · Views: 131
  • DSCN4968.jpg
    DSCN4968.jpg
    146.8 KB · Views: 121
OP
R

rmack898

Well-known member
Joined
Jan 23, 2007
Messages
3,153
Location
Honu Grove NE Florida
My son's new project is going to become his new daily driver. He wanted a 1 ton square body, crew cab truck with a Cummins engine and a flat bed, a solid work truck with no bells and whistles.

After a year of searching for a good truck to start from, he bought a 1986 fire truck off of CL that has always been garage kept and had just over 20K original miles. He found it just outside of NYC and he drove it home. It had a really cool custom body, a 12KW generator, and light towers on it. It had a 454 gas motor and an auto trans.

He sold the body, generator, engine and trans and basically got the truck for free. Thats him standing in one of the pull out shelves in the truck body.
 

Attachments

  • 019.jpg
    019.jpg
    139.5 KB · Views: 282
  • 018.jpg
    018.jpg
    151.1 KB · Views: 299
  • 021.jpg
    021.jpg
    144.3 KB · Views: 293
  • 020.jpg
    020.jpg
    151.4 KB · Views: 285
  • 016.jpg
    016.jpg
    151.1 KB · Views: 451
  • 014.jpg
    014.jpg
    155 KB · Views: 294
  • 017.jpg
    017.jpg
    155.7 KB · Views: 355
OP
R

rmack898

Well-known member
Joined
Jan 23, 2007
Messages
3,153
Location
Honu Grove NE Florida
With the body, engine and trans gone, the first thing we did was cut the truck in half. It had a really long wheel base so he wanted to shorten it up a little. We took 18" out of the center of the frame and bobbed 20" off the back behind the axle.

The frame was welded back together and we added a fish plate that was welded on one side and bolted as well.
 

Attachments

  • DSCN4832.jpg
    DSCN4832.jpg
    140.6 KB · Views: 429
  • DSCN4829.jpg
    DSCN4829.jpg
    133.3 KB · Views: 420
  • DSCN4823.jpg
    DSCN4823.jpg
    150.5 KB · Views: 457
  • DSCN4821.jpg
    DSCN4821.jpg
    133.2 KB · Views: 379
  • IMG_1754.jpg
    IMG_1754.jpg
    143.7 KB · Views: 411

willymakeit

Well-known member
Joined
Apr 27, 2009
Messages
1,242
Location
Springfield Mo.
What engine and transmission in the golf cart. I have Cushman minute miser with cab ect that I'd like to convert to deisel.
Thanks in advanced
 
OP
R

rmack898

Well-known member
Joined
Jan 23, 2007
Messages
3,153
Location
Honu Grove NE Florida
It was a Yamaha G16 and I put a 3 cylinder Yanmar in it with the stock Yamaha ******.
 

Attachments

  • tight fit2.jpg
    tight fit2.jpg
    145 KB · Views: 254
  • 3cyl Yanmar.jpg
    3cyl Yanmar.jpg
    142.3 KB · Views: 240
OP
R

rmack898

Well-known member
Joined
Jan 23, 2007
Messages
3,153
Location
Honu Grove NE Florida
With the truck frame all glued back together, it was time for it to vacate the shop because I'm not going to live with a project truck in the middle of the floor for however long it takes to build.

Once outside, the front clip was removed and it was determined that the front x member would need to be replaced in order for the Cummins engine to fit. The core support also needed some major modification in order to fit the intercooler along with the stock radiator.

A new cross member and motor mounts were fabricated and installed. Trevor bought a 12-valve Cummins with 150K on the clock. He got a new bell housing and married a NP4500 to the engine. He and his girlfriend test fit the engine in the truck and had to move the rear transmission mount to accommodate the new gear box. With the engine in the truck he also discovered that another forward X-member would need to be modified to clear the front crank pulley.

The engine came back out and he started unbolting the body from the frame along with removing all the electrical and plumbing connections.
 

Attachments

  • DSCN4884.jpg
    DSCN4884.jpg
    143.7 KB · Views: 700
  • DSCN4881.jpg
    DSCN4881.jpg
    136.1 KB · Views: 449
  • DSCN4973.jpg
    DSCN4973.jpg
    143.2 KB · Views: 381
  • DSCN4816.jpg
    DSCN4816.jpg
    144.7 KB · Views: 416
OP
R

rmack898

Well-known member
Joined
Jan 23, 2007
Messages
3,153
Location
Honu Grove NE Florida
Once the body was unbolted, we used a floor jack, timbers, and concrete blocks to get it up in the air high enough to roll the chassis out from under it. I had some big steel tube scraps left over from a job so I cut it up and made stands for the body to replace the blocks and timber.
we bolted the body to the stands and it will be safe until we need it again.

The frame cam back in the shop and the forward X-member was modified to clear the crank pulley. Back outside again, the axles and all suspension components were removed and we put the frame on our red neck rotisserie (2 engine stands).

The plan was to blast the frame and get it coated with epoxy primer before the weather got too cold. I borrowed a diesel compressor and tried to blast it with one of those cheap import pressure pot blasters. Total failure. I called a friend and he will blast it next week for $300. Since warm weather will not be back till next spring, we'll take the frame from the blaster to another friends paint booth to shoot the primer.

This weekend I think Trevor will be tearing the axles apart and cleaning them in preparation to put new gears in them. I think he's still on the fence about what ratio he's putting in because he can't make up his mind on what wheels and tires he going to run. I think it will be cool with Alcoa's and 22.5s.

That brings the truck project to current date.
 

Attachments

  • DSCN4969.jpg
    DSCN4969.jpg
    150.4 KB · Views: 262
  • DSCN4959.jpg
    DSCN4959.jpg
    156.3 KB · Views: 289
  • DSCN4956.jpg
    DSCN4956.jpg
    153 KB · Views: 283
  • DSCN4925.jpg
    DSCN4925.jpg
    144.4 KB · Views: 273
  • DSCN4917.jpg
    DSCN4917.jpg
    132.5 KB · Views: 279
  • DSCN4916.jpg
    DSCN4916.jpg
    149.1 KB · Views: 283
  • DSCN4915.jpg
    DSCN4915.jpg
    149.8 KB · Views: 297
OP
R

rmack898

Well-known member
Joined
Jan 23, 2007
Messages
3,153
Location
Honu Grove NE Florida
As far as my plasma table build is concerned, I just got tracking #s for my gantry kit and it will be here next Wednesday. I will most likely spend the weekend cutting up that big pile of steel tube that I picked up yesterday.
If I don't get dragged into to much of Trevor's truck project, I might even start welding stuff together.
 
OP
R

rmack898

Well-known member
Joined
Jan 23, 2007
Messages
3,153
Location
Honu Grove NE Florida
BH38,
We talked to many folks about spicing the frame and everyone has different ideas on how to do it.

Someone showed me a tech instruction from Isusu on their recommended procedure for chassis length changes. Isusu recommends a straight cut with full penetration welds and bolted fish plates that get welded on one side only so that's what we did.
 

Bighead38

Well-known member
Joined
Nov 11, 2012
Messages
5,612
Location
Rockland County NY
BH38,
We talked to many folks about spicing the frame and everyone has different ideas on how to do it.

Someone showed me a tech instruction from Isusu on their recommended procedure for chassis length changes. Isusu recommends a straight cut with full penetration welds and bolted fish plates that get welded on one side only so that's what we did.

:beer: 
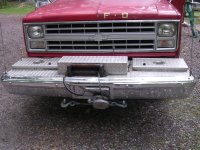
sounds good. I don’t know what the best way is so I was curious what made you choose that method. Seems like you found a good guide for how to do it.

How far down in jersey are you? Down by Atlantic City? Do you know what town that truck came from?
 

Stuart in MN

Well-known member
Joined
Sep 8, 2005
Messages
23,069
Location
Minneapolis
That's going to be a beast of a truck. :) If it were mine I'd go for a regular Chevy truck bed instead of a flatbed, but that's just me.
 

CGT80

Well-known member
Joined
Aug 29, 2014
Messages
863
Location
IE, SoCal, USA
That seems like the hard way to get a square body. Luckily, my dad gave me the one I have, which I have ridden around in since I was 4 years old. It is a 79 C20 camper special and is a year older than I am. I have done many upgrades and it now has a sbc 406 with an aluminum top end and roller valve train. It was in rough shape when I got it, but the body was straight and we only get surface rust here. My 88 K5 was already lifted and had 35" tires when I bought it so there wasn't much to do. At that time, I had an 85 K5 that was beat up but stock, with an engine torn apart. The 88 was the fast track to what I really wanted. That is great that your son has the ambition to do all that.......we know where he gets it.

My dad bought parts to build the plasma table, but hadn't gotten around to putting it together and getting the THC and other components. He didn't even have a plasma cutter yet and I had a miller 375 extreme and did some fabrication jobs. I decided I wanted to use the table, so I took the lead and had my dad help me with assembling parts of it.

Here is a video, as I was trying to troubleshoot the CandCNC MP3500 DTHC and get the settings right for the Hypertherm 65.


You can see the torch dive into the work at the end. It was hard to record and watch it cut at the same time. I don't like taking video, but have a college degree in still photography.

It is harder to build your own table, but you will learn a great deal. After doing it myself, and still working out the bugs, a prebuilt and proven table would feel like cheating.

I'll upload a photo of a holder I made for the index pins that go to my tab and slot fab block table. In the last couple weeks, I have made about 50 similar items for customers and it is great to see some of the capabilities of a plasma table.

View media item 76164
View media item 76165
Thanks for sharing all your projects.
 
Last edited:
OP
R

rmack898

Well-known member
Joined
Jan 23, 2007
Messages
3,153
Location
Honu Grove NE Florida
Todays project was an anchor roller. I got a print and a 12" long piece of UHMW 7" in diameter. After many distractions during the course of the day I had a roller that was called out in the print and a pile of plastic swarf on the floor.

Tomorrows projects are not plasma table related. I have to fix a space rocket and a duck boat. Stay tuned for that.
 

Attachments

  • DSCN4977.jpg
    DSCN4977.jpg
    137.2 KB · Views: 170
  • DSCN4976.jpg
    DSCN4976.jpg
    141 KB · Views: 169
  • DSCN4975.jpg
    DSCN4975.jpg
    135.2 KB · Views: 167
  • DSCN4974.jpg
    DSCN4974.jpg
    131.2 KB · Views: 151

RM209

Well-known member
Joined
Apr 17, 2009
Messages
892
Location
MD
rmack: That looks like a great project your son has started!
I lived in Cape May for several years; summers are beautiful.

RM209
 
To avoid these ads, REGISTER NOW!

jw3

Well-known member
Joined
Oct 26, 2014
Messages
109
Do you try to reclaim your plastic shavings for reuse???


Sent from my iPhone using Tapatalk
 
OP
R

rmack898

Well-known member
Joined
Jan 23, 2007
Messages
3,153
Location
Honu Grove NE Florida
rmack: That looks like a great project your son has started!
I lived in Cape May for several years; summers are beautiful.

RM209
Spring, fall, and winter are great, summer *****, I can't leave my house. I can't wait to move out of NJ.

Do you try to reclaim your plastic shavings for reuse???
Sent from my iPhone using Tapatalk

The plastic swarf went in the recycling bin with everything else.

The duck boat came in not running. It wanted to start but would not. I opened the drain on the vapor separator and got straight water, the entire fuel system was filled with water. I drained the fuel rail, and all the fuel lines, nothing but water. I took direct suction off the fuel tank and got almost 3 gallons of water out before I started getting fuel. I pulled another 2 gallons out before I got clean fuel.
I changed all the filters and primed the system and started it up. It ran on 2 cylinders for a while and then the 3rd cylinder kicked in. After about 4 minutes I could hear the 4th cylinder start to kick in. I let it run for about 20 minutes and it ran like a top.
In a past life I owned a boat and motor dealership. I still take care of a few long time customers. This particular guy does not take care of his boat at all and I'm not sure why I still service his boat, I guess he is just a nice guy and I can't say no.

I got some work done on the space ship but I ran out of time and got tired so I didn't finish it, maybe tomorrow.

Trevor came home for the weekend and we got his chassis loaded on the trailer ready to go to blasting next Friday. He started tearing down the front axle .
 

Attachments

  • DSCN4979.jpg
    DSCN4979.jpg
    150.3 KB · Views: 247
  • DSCN4983.jpg
    DSCN4983.jpg
    131 KB · Views: 244
OP
R

rmack898

Well-known member
Joined
Jan 23, 2007
Messages
3,153
Location
Honu Grove NE Florida
I still didn't finish the space ship....you'll have to wait for that.

I did get to move forward on the plasma table but first had to make a modification to a new tool in the shop.
I bought a an Ellis 1800 band saw to replace my 5X6 Jet for this project but is a stationary tool and I need to move it to be able to cut the 24' sticks of tube for the plasma table. So I made a little deviation and made a wheel kit for the Ellis.

Once I was able to move the saw, I made a big copy of the the materials list for the plasma table and started cutting tube. I have about 4.5 hours into cutting all the tube for the table base. I plan on starting to weld it all up tomorrow.
 

Attachments

  • DSCN4998.jpg
    DSCN4998.jpg
    139.1 KB · Views: 139
  • DSCN4997.jpg
    DSCN4997.jpg
    131.1 KB · Views: 162
  • DSCN4993.jpg
    DSCN4993.jpg
    137.6 KB · Views: 176
  • DSCN4992.jpg
    DSCN4992.jpg
    136.6 KB · Views: 147
  • DSCN4991.jpg
    DSCN4991.jpg
    135.9 KB · Views: 153
  • DSCN4990.jpg
    DSCN4990.jpg
    136.8 KB · Views: 148
OP
R

rmack898

Well-known member
Joined
Jan 23, 2007
Messages
3,153
Location
Honu Grove NE Florida
I had more cutting to do for the plasma table. I cut 158 individual parts and I still have a bunch more to go.

I drilled and tapped the feet for the legs and got them welded up and started to lay out the upper frame for the table. Damn this thing is big, wirer the hell am I going to put it once I have it built.

The brown truck showed up today with the gantry kit and it was 3 boxes of parts.
It seems as I shorted myself about 8' of square tube so I have to make another 3 hour round trip to the steel supplier. I might do that Saturday morning but until then I still have plenty of work to do.

My dog Chewy can actually read a tape measure and helped me get the frame square.
 

Attachments

  • DSCN5000.jpg
    DSCN5000.jpg
    135.1 KB · Views: 134
  • DSCN5002.jpg
    DSCN5002.jpg
    139.3 KB · Views: 110
OP
R

rmack898

Well-known member
Joined
Jan 23, 2007
Messages
3,153
Location
Honu Grove NE Florida
Between the last two n nights, I got the table base squared up, tacked, and I finished welding it tonight. Tomorrow I will pull it out of the shop and flip it over so I can start laying out the rails and welding the gantry together.

5X10 is a pretty big weldment and I was working alone so after I had it all tacked together and I took diagonal measurements and saw that it was dead nots square I was pretty pleased. After it was all welded up solid it was till dead nuts square.

I got a confirmation email from CandCNC and it will be 2-3 weeks before the electronics package shows up so I have plenty of time to get the rest of the table done and painted before then.

This thing is fricken huge and takes up what open floor space I had, I'm going to have to re-shuffle the the shop to make room for it.........AGAIN
 

Attachments

  • DSCN5009.jpg
    DSCN5009.jpg
    147.1 KB · Views: 121
  • DSCN5008.jpg
    DSCN5008.jpg
    152.8 KB · Views: 128
  • DSCN5005.jpg
    DSCN5005.jpg
    143.4 KB · Views: 99
  • DSCN5003.jpg
    DSCN5003.jpg
    140.3 KB · Views: 100
OP
R

rmack898

Well-known member
Joined
Jan 23, 2007
Messages
3,153
Location
Honu Grove NE Florida
Well the pics might not show it but I did get a **** ton of work done today. Since Trevor is home for the weekend, I had him help me turn the table right side up and let me weld up the bottom side of all the joints i couldn't get when it was upside down.

Next up was getting the 1-1/2" tube that support the rails welded in. They have to be parallel so I had to make up a few fixtures to help getting them aligned before tacked them in place and then stick welding each side. The top rail of the table is 30" tall and I can't tell you how many times I "jumped the fence" today to get the rails all stitch welded in place without distorting anything. I'm fricking tired.

Tomorrow I will lay out the holes in the cold rolled top rail and drill and tap them.

Monday I make a run back to the steel supply to pick up some custom angle I had them bend for me and start on the water table part.
 

Attachments

  • DSCN5012.jpg
    DSCN5012.jpg
    144.5 KB · Views: 104
  • DSCN5013.jpg
    DSCN5013.jpg
    146 KB · Views: 107
Last edited:
OP
R

rmack898

Well-known member
Joined
Jan 23, 2007
Messages
3,153
Location
Honu Grove NE Florida
Since this table is so damn big, I would like to be able to move it when needed to make room to get other things into the shop.

I wanted to have some kind of retractable wheels and not have to use some kind of leveling screw in the legs to jack the table off the wheels.

After spending a whole bunch of time thinking about ideas that were just way too expensive (air bags, hydraulics, etc.) I came up with a mechanical solution. One of my requirements is that I want to extend/retract the wheels with no tools.

What I came up with is a hinged caster plate that is actuated by an over center cam. The mechanism only needs to lift the table about a half inch. I bought the heaviest duty door hinge that Lowes had and I just couldn't make it work right. I decided that I would build the whole thing even the hinges with stuff from my scrap pile. So stated by making plated to bolt the caster to, then it was off to the scrap pile to see what I had to make the next part from. The materials I had on hand are what actually drove the design one part at a time.

I was easier to make 4 of each part so I didn't have to repeat all the set ups after I made the prototype. I had the better part of Sunday and half of today and started to get a little bit worried about spending so much time making parts for something I wasn't sure would work.

I got the first one welded up and then clamped it to the table leg and was pleasantly surprised that it worked as well as I had thought it would. I have to make one change on the handle location but I should get them all finished tomorrow and will post pics of them on the table. One quarter turn of the handle raises the table let 3/4"
 

Attachments

  • DSCN5014.jpg
    DSCN5014.jpg
    142.4 KB · Views: 184
  • DSCN5015.jpg
    DSCN5015.jpg
    142.6 KB · Views: 222
  • DSCN5016.jpg
    DSCN5016.jpg
    143.1 KB · Views: 184
  • DSCN5017.jpg
    DSCN5017.jpg
    142.4 KB · Views: 172

WoodsTruck

Well-known member
Joined
Jan 12, 2013
Messages
1,020
Very nice wheel set up.

Could you make a metal strap narrower than the cam wheel and weld it between the caster bolts so that the wheel picks up when the wheel is raised? I was picturing something like a square corners U-bolt but out of strap. It would have to allow full travel of the cam though. Or maybe just an inverted "J or L" to capture the cam as it appears the cam support is boxed in.

Reason for this would be to sweep up **** around the table legs and not have the casters in the way. Should make it easier to roll when the wheels go back down.
 
OP
R

rmack898

Well-known member
Joined
Jan 23, 2007
Messages
3,153
Location
Honu Grove NE Florida
Reason for this would be to sweep up **** around the table legs and not have the casters in the way. Should make it easier to roll when the wheels go back down.

If wheels up off the become an issue, I might just add a spring.

I got all the wheels welded up and installed. In the down position they lift the table legs about 3/4" off the floor and the table is easy for me to roll around by myself.

Next up was to start putting the gantry together. I had to drill and tap 48 holes in the 3x3 tube and I used a drill/tap combo and did the entire thing in about 15 minutes. Once I had all the pieces for the gantry squared and clamped together, it got tacked and stitch welded.

With the gantry done, I started mounting the 3x1/2" cold rolled rails. I pre drilled all the holes in the rails and then clamped the rail in place. I used a piece of 5/16" drill rod in the chuck of the mag drill to get centered on the hole. Once centered I put the drill/tap combo in the mag drill and worked my way down the rail.

I got one rail done and had to call it quits to bring paying job into the shop. I used the lift wheels to move the table and make room for the hot dog cart that came in with a broken frame.
 

Attachments

  • DSCN5027.jpg
    DSCN5027.jpg
    142.6 KB · Views: 167
  • DSCN5023.jpg
    DSCN5023.jpg
    145.5 KB · Views: 159
  • DSCN5025.jpg
    DSCN5025.jpg
    137.7 KB · Views: 169
  • DSCN5030.jpg
    DSCN5030.jpg
    136.8 KB · Views: 159
  • DSCN5021.jpg
    DSCN5021.jpg
    134.5 KB · Views: 186
  • DSCN5035.jpg
    DSCN5035.jpg
    147.1 KB · Views: 179
  • DSCN5034.jpg
    DSCN5034.jpg
    143 KB · Views: 212
OP
R

rmack898

Well-known member
Joined
Jan 23, 2007
Messages
3,153
Location
Honu Grove NE Florida
I got a call to come look at this job, its a hotdog cart that has a broken frame is severely rusted out. I really didn't want to get involved in this and quoted a price that would make anyone runaway from me. There are not many folks around here that will work on a hot dog cart and I got the job at my price.

So the plasma table got pushed aside enough for me to bring the hot dog cart in the shop. Th frame basically rusted out from underneath the cart so I will have to jack it up, cut out all the rotten steel and build a new frame to set the cart on. I really didn't want to get involved in a project like this but it will pay for a good portion of the plasma table, so I guess it's game on for the hot dog cart.
 

Attachments

  • DSCN5039.jpg
    DSCN5039.jpg
    147.7 KB · Views: 221
  • DSCN5038.jpg
    DSCN5038.jpg
    136.7 KB · Views: 217
  • DSCN5037.jpg
    DSCN5037.jpg
    137.1 KB · Views: 234
  • DSCN5036.jpg
    DSCN5036.jpg
    137.4 KB · Views: 225

bonneyman

Well-known member
Joined
Apr 22, 2010
Messages
8,784
Location
Desert SW
.....In a past life I owned a boat and motor dealership. I still take care of a few long time customers. This particular guy does not take care of his boat at all and I'm not sure why I still service his boat, I guess he is just a nice guy and I can't say no......

Yeah, I'm the same way with some of my old AC customers. Just can't let all my years of keeping them going get flushed down the tube when the the next guy to come along will just let it go to pot.

Having a work ethic is hard work!:lol:
 
OP
R

rmack898

Well-known member
Joined
Jan 23, 2007
Messages
3,153
Location
Honu Grove NE Florida
I got the hod dog cart finished and out of the shop, moved the plasma table back to where I can work on it and got back to work.

The biggest complaint I've seen from others that have built this table is that the sides of the water table are too low and it splashes everywhere. The plans call for 3" sides with 2" of water. I got some 12"x1/8" flat bar and bent in to 6"x6" angle to make the frame. Then I laid a 5'x10' sheet of 1/8" steel in the frame and welded it up. I tacked it in place and then stitched 2" welds around the perimeter and back stepped until I had it fully welded. I got a little warpage in the bottom sheet but not as much as I thought I would have.

I needed a little break from welding so I got the gantry painted and started to assemble the gear reduction drive. The brown truck showed up with the electronics package from CandCNC. I'm at the point now where I need to get the major part of the table planted before I can continue with assembly. I hate to paint.
 

Attachments

  • DSCN5053.jpg
    DSCN5053.jpg
    141.7 KB · Views: 108
  • DSCN5052.jpg
    DSCN5052.jpg
    134.5 KB · Views: 109
  • DSCN5050.jpg
    DSCN5050.jpg
    136.7 KB · Views: 118
  • DSCN5059.jpg
    DSCN5059.jpg
    140.3 KB · Views: 125
  • DSCN5058.jpg
    DSCN5058.jpg
    140.2 KB · Views: 131
  • DSCN5056.jpg
    DSCN5056.jpg
    137.8 KB · Views: 121
OP
R

rmack898

Well-known member
Joined
Jan 23, 2007
Messages
3,153
Location
Honu Grove NE Florida
Trevor's fire truck build is moving forward also. The frame has been blasted and primed with SPI epoxy primer. Trevor tore down the front axle, took it to bare metal and has it primed also. The brown truck brings boxes of parts for the truck build every day.

I think he will get the front axle all back together this weekend and then start on the real axle. I'm pretty sure he has new springs ordered and it should be back to a rolling chassis soon (I hope).
 

Attachments

  • DSCN5060.jpg
    DSCN5060.jpg
    143 KB · Views: 143
OP
R

rmack898

Well-known member
Joined
Jan 23, 2007
Messages
3,153
Location
Honu Grove NE Florida
Between the day job, some side jobs in the shop, and fighting the flu, progress has been rather slow.

I got the water table all welded up. The drawings called for 3" angle to make the frame and then a full 5'x10' sheet of 1/8" welded into the frame. Most every complaint I have read about this design is that the 3" sides are too shallow and allow excess splashing. I took 12"x1/8" flat stock and bent it up to make 6"x6" angle and used that for the frame. I ran 2" welds spaced 12" apart and back stepped while jumping from side to side but still had a bit of warpage.

When I went to weld in the center support for the slats I had a few gaps that were almost 2". I grabbed some big washers and tacked them to the table sheet and used a few bull pins to pull it all back together.

I finished welding in all 125 pieces of angle for the slat retainers tonight. tomorrow I'll get some young neighbor help to lift the water table off the frame and start prepping it for paint.
 

Attachments

  • DSCN5067.jpg
    DSCN5067.jpg
    143.7 KB · Views: 126
  • DSCN5066.jpg
    DSCN5066.jpg
    137.2 KB · Views: 122
  • DSCN5064.jpg
    DSCN5064.jpg
    134.8 KB · Views: 115
  • DSCN5063.jpg
    DSCN5063.jpg
    133.2 KB · Views: 103
  • DSCN5062.jpg
    DSCN5062.jpg
    138.8 KB · Views: 101
  • DSCN5056.jpg
    DSCN5056.jpg
    137.8 KB · Views: 104
  • DSCN5054.jpg
    DSCN5054.jpg
    145 KB · Views: 107
OP
R

rmack898

Well-known member
Joined
Jan 23, 2007
Messages
3,153
Location
Honu Grove NE Florida
Well between working crazy overtime at the day job, preparing for the holidays, and fighting the seasonal flu, progress has been painstakingly slow.

I managed to get the water table off the frame and get the frame painted. Then I got the gantry installed on the frame.

I had originally planned on using two 55-gallon plastic drums for a water bladder and then I realized that once I welded the water table to the frame, if there was ever a problem with the drums I would have to cut them out as there is not enough room to get them out in one piece.

So on to plan B. I decided to make an aluminum tank for a water bladder. A 4'x4'x10" tank should hold all the water I need for the table. I started out with making bungs for the fill and drain lines. I had a 2-1/2" piece of aluminum round stock and sliced of three pieces 3/4" thick. Then I chucked them up in the lathe and drilled them with an 1-3/8" drill. I then bored them to 1.5" and tapped them with a 1-1/4" pipe tap. I would have preferred to go with 1-1/2" fittings but I have a bunch of 1-1/4" ball valves so I went with 1-1/4"NPT.

Once I had the bungs made, I drilled the bottom sheet of the tank and welded them in. Then I tacked the sides of the tank to the bottom. I them made 4 baffles and welded them into the tank. The tank is all tack welded together from the inside. All I have left to do is slot the top so the I can plug weld it to the baffles and then weld up all the outside seams. With any luck I'll get the tank finished up tomorrow.
 

Attachments

  • DSCN5085.jpg
    DSCN5085.jpg
    143.2 KB · Views: 120
  • DSCN5083.jpg
    DSCN5083.jpg
    135 KB · Views: 118
  • DSCN5082.jpg
    DSCN5082.jpg
    136.9 KB · Views: 108
  • DSCN5081.jpg
    DSCN5081.jpg
    143.9 KB · Views: 101
  • DSCN5077.jpg
    DSCN5077.jpg
    138.9 KB · Views: 111
  • DSCN5075.jpg
    DSCN5075.jpg
    137.7 KB · Views: 105
  • DSCN5073.jpg
    DSCN5073.jpg
    137.3 KB · Views: 109
OP
R

rmack898

Well-known member
Joined
Jan 23, 2007
Messages
3,153
Location
Honu Grove NE Florida
So today wasn't as productive as I had planned. I drilled the tank top in 16 places and then plug welded the top to the baffles. That left me with just about 35' of lineal TIG welding the seams.

Just I would get in the groove, the phone would ring or someone would stop by for a visit. I got the tank about half welded and called it quits for the day.

I for a week of vacation tomorrow so no progress for the next week.
 

Attachments

  • DSCN5090.jpg
    DSCN5090.jpg
    141.1 KB · Views: 90
  • DSCN5089.jpg
    DSCN5089.jpg
    151.7 KB · Views: 85
  • DSCN5088.jpg
    DSCN5088.jpg
    133 KB · Views: 84
  • DSCN5087.jpg
    DSCN5087.jpg
    141.8 KB · Views: 79
OP
R

rmack898

Well-known member
Joined
Jan 23, 2007
Messages
3,153
Location
Honu Grove NE Florida
Like I said in the first post of this thread, "we do a lot of cool things in the shop, we just don't do them fast".

It's been almost 3 months since my last update but we did manage to get a little bit of work done in that time.

I'm not sure where to begin. As of today, the plasma table is almost done. I finished installing the RS485 upgrade board on the Hypertherm plasma. The only thing left to do is install the ground cable and the digital current sensor. I could actually be cutting metal tomorrow but I want to run a few files without the torch on to dial in a few things before I try and cut metal for real. I know i've got a bunch of learning to do but I will do it slowly.

I really wasn't sure of what to do about the plasma computer and I toyed with a few different options before I went forward.

I bought a Harbor Freight tool cart. I drilled a bunch of holes in it and then started cutting it up. I mounted the computer monitor on the lid. Then I cut the front to the cart off and made a drawer for the keyboard and mouse to reside on. I put a hinge on the front piece of the cart that I cut off so that the cart can go back together closed in its original configuration.

Lift the lid, open the front, pull out the drawer and I have a self contained computer station to run the plasma table from.

Sorry for the blurry pics.
 

Attachments

  • DSCN5135.jpg
    DSCN5135.jpg
    151.7 KB · Views: 115
  • DSCN5130.jpg
    DSCN5130.jpg
    147.1 KB · Views: 113
  • DSCN5129.jpg
    DSCN5129.jpg
    144.2 KB · Views: 118
  • DSCN5113.jpg
    DSCN5113.jpg
    146.5 KB · Views: 116
  • DSCN5101.jpg
    DSCN5101.jpg
    147.8 KB · Views: 123
  • DSCN5098.jpg
    DSCN5098.jpg
    138 KB · Views: 119
OP
R

rmack898

Well-known member
Joined
Jan 23, 2007
Messages
3,153
Location
Honu Grove NE Florida
I don't want to neglect the fire truck build as that is progressing slowly as is the norm for our projects.

The frame was blasted and primed with SPI epoxy primer. Front and real axels were torn down and rebuilt with new bearings and seals. It turned out the the axels had 3.73:1 gears so we didn't have to make a gear change.

A disc brake conversion was done on the real axel and all new SS brake lines were bent and installed on custom made hangers.

The chassis in back in roller status and the the cab is getting ready to be moved inside to begin preparation for paint. There are a few holes in the roof that need to get welded up and then it is off to paint before our friend Jeff the painter moves to Tennessee.

Little by little we are moving forward.
 

Attachments

  • DSCN5131.jpg
    DSCN5131.jpg
    167.1 KB · Views: 136
  • DSCN5132.jpg
    DSCN5132.jpg
    158.7 KB · Views: 130
  • DSCN5133.jpg
    DSCN5133.jpg
    170.4 KB · Views: 134
  • DSCN5134.jpg
    DSCN5134.jpg
    159.5 KB · Views: 144
OP
R

rmack898

Well-known member
Joined
Jan 23, 2007
Messages
3,153
Location
Honu Grove NE Florida
Why the lift on a flatbed work truck?

Trevor is 25 years old and its his build for a daily driver. I was 25 years old almost 30 years ago and I remember my youth so I try not to distract him when he's on a roll.

What would have happened if my Dad told me I was nuts for putting a 471 Detroit in a '59 power wagon. I don't even want to think about it.
 
To avoid these ads, REGISTER NOW!
Top Bottom